Godox LF308 Series User manual

INSTRUCTION MANUAL
LED
LED Flash Light
Made in China
:2
:0755-29609320(8062):0755-25723423:godox@godox.com
godox.com
Add: Building 2, Yaochuan Industrial Zone, Tangwei Community, Fuhai Street, Bao’an District,
Shenzhen, China Tel: +86-755-29609320(8062) Fax: +86-755-25723423
GODOX Photo Equipment Co., Ltd.
705-LF3080-01
QCPASS

一、前言
感谢您购买神牛产品!
LF308系列闪光灯在传统LED灯的基础上增加了闪光功能, 既可作为LED灯使用, 又可作为闪
光灯使用。非常适用于微距拍摄、婚庆拍摄、采访布光、静物拍摄以及视频拍摄等。两种
型号可选: LF308D白光版(色温5600K)、LF308Bi双色温版(3300~5600K), 亮度高, 轻巧
便携, 无线分组调光, 操作便捷。
主要特点:
● 一灯两用, 既可作为LED灯使用, 又可作为闪光灯使用
● 308颗高亮度灯珠, 锂电池或DC供电
● 蓝牙或2.4G无线6组32频道分组控制
● 无线调节各组亮度或色温(双色温版)
● 快速调节补光角度
● 大液晶屏, 参数自动保存
● 适用于各品牌摄像机和相机
类型
白光版(色温5600K)
双色温版(色温3300K~5600K)
型号
LF308D
LF308Bi
请勿将闪光灯放置在高温、高湿的地方。
此机有温度保护功能, 当温度过高时进入保护状态, 当温度降低后恢复正常。
请勿用湿手接触产品, 亦不可将产品浸入水中或暴露于雨中。
使用电池的注意事项:
● 切勿将电池投入火中或加热升温。
● 当电量用尽时, 电池容易漏液。所以为了避免产品受损, 请在长期
不使用本产品或电量用尽时取出电池。
● 如果受损电池中的液体接触到皮肤或衣服, 请立即用大量清水冲洗。
警 告
- 02 -- 01 -

三、部件
09
07
08
03
06
粒灯珠01. 308
色温片02.
同步插孔03. 3.5mm
开关04. ON/OFF
电源插座05. DC
色温调节06.
旋钮+造型灯按钮
亮度/功率07.
调节旋钮+试闪按钮
按钮08. GR/CH
切换按钮09. LED/FLASH
10. 锂电池插槽
屏 黑底白字11. LCD ( )
电池取出按键12.
四、电源管理
1. 供电方式
LF308系列LED闪光灯有2种供电方式:
● 锂电池供电
选择SONY 锂电池NP-F970,放置于锂电池
插槽内。
注:
● 使用锂电池供电时, LCD显示当前剩余电量。当电量符号闪烁时, 表示锂电池电量极
低。为了防止LED灯自动强行熄灭, 请及时对锂电池充电后再使用。
● 当使用直流电源, 电量显示满格。
● 必须使用神牛标配的适配器, 否则测试出来的指数不一致。
● 插入DC插头时自动切断锂电池。
2. 安装锂电
(1) 关闭电源开关。
(2) 将锂电池带插孔端对准闪光灯锂电池
插槽正负极触点, 并推进卡紧。
(3) 打开电源开关即可。
(4) 使用完毕, 请关闭电源开关。
(5) 取出电池:按电池取出按键再往右推
就可拿出电池。
● 直流电源供电
6.5~12V 4A适配器,与DC电源插座连接。
05
13
14
15
16
17
01 02
C
电量
频道
亮度
色温
LCD液晶显示屏
组别
散热孔13.
转轴固定旋钮14. A
15. B转轴固定旋钮
16. 热靴固定旋钮
热靴连接座17.
支架安装孔18. 1/4”
手柄19.
微型底座20.
CCT
04
10
11
12
14
1920
- 04 -- 03 -

五、使用LED闪光灯
1. 机顶使用
● 转动闪光灯的热靴固定旋钮至最高点,
将闪光灯热靴水平插入相机或摄像机热
靴。
● 扭紧热靴固定旋钮。
2. 手持使用
● 转动闪光灯的热靴固定旋钮至最高点, 将
手柄固定在1/4”支架安装孔上。
● 扭紧热靴固定旋钮。
3. 平放使用
● 转动闪光灯的热靴固定旋钮至最高点,
将闪光灯热靴水平插入微型底座。
● 扭紧热靴固定旋钮。
4. 灯架使用
● 转动闪光灯的热靴固定旋钮至最高点, 将
灯架固定在1/4”支架安装孔上。
● 扭紧热靴固定旋钮。
注:如您的摄像机没有热靴座, 可以购买市面上的摄像机连接支架, 通过闪光灯上的
1/4”支架安装孔来固定。
六、操作说明
1、闪光灯设置
1.1. 开/关机
● 插入锂电池或者DC电源。
● 按ON/OFF开关, 闪光灯打开。
● LCD显示主机当前信息。
1.2. 模式选择:LED常亮模式/LED闪光模式
● 按LED/FLASH按钮切换模式:
显示屏上显示为LED即LED常亮模式, 显示 即为闪光模式。
1.3. 亮度调节
● LED常亮模式时, 旋转主机上的 调节旋钮可对亮度进行调整。
亮度范围0%-100%。
1.4. 色温调节
● LED常亮模式或闪光模式时, 旋转主机上的 旋钮可对色温进行调整。
常亮模式 闪光模式
CCT
色温显示范围:
白光版LF308D
5600K
双色温版LF308Bi
3300K~5600K
注:白光版无法调节色温,LCD显示5600K。
- 06 -- 05 -

2、闪光模式
2.1. 使用闪光模式时, 可以用X系统无线引闪闪光, 无线引闪需选购神牛X系列触发器, 如X1、
X2、Xpro系列、XT32等,此类带发射功能的产品可远程调节LF308系列产品功率,
控制造型灯的开关及触发闪光灯引闪。(触发器的操作请看对应触发器说明书)。
2.2 同步孔触发
LF308系列产品带PC同步插孔, 同步插孔规格为3.5mm。
此处可插入同步线或者触发器(如RT、DM等)触发插头对
闪光灯进行同步引闪。
2.3 造型灯
按 按钮可以开关造型灯, 或用触发器控制。
造型灯亮度跟随LED常亮模式。如需调节亮度请切换
到LED常亮模式,调好亮度再切换到闪光模式。
3. LED灯模式
3.1 此模式下可使用2.4G无线遥控器无线调节其色温和亮度。
3.2 LED灯色温调节模式选择P模式时, 色温在4200K时亮度达到最大;
选择普通模式调节色温时, 在相同亮度等级下所有的色温亮度基本一样。
4. 无线远程控制 (遥控器另购)
4.1 2.4G无线遥控
本产品具备无线遥控功能, 使用2.4G无线技术, 无视角限制, 距离远, 可
同时分别控制6组LED灯。32组通道频率, 100个无线ID,抗干扰强。使
用前请把LED主机和遥控器RC-A6的频道与组别调至一致。
遥控器频道/组别调整
● 在常态时, 按CH/GR按钮, 此时组别闪烁, 按 "-" "+" 按钮可选择组别(A~F,0-9);
● 在常态时, 按CH/GR按钮2次, 此时频道闪烁, 按 "-" "+" 按钮可选择频道(1~32)。
遥控器ID调整
● 在常态时, 双击CH/GR按钮, 按 "-" "+" 按钮可选择ID号(ID号为OFF,01-99)。
遥控器亮度参数调节
● 在常态时, 按 "-" "+" 按钮可对亮度调整。
遥控器色温参数调节
● 在常态时, 按SET按钮, 此时色温值闪烁, 按 "-" "+" 按钮可对色温调整。
遥控器复位
● 同时按住"-" "+" 按钮即可复位。
1.5. 主机频道/组别调整
● 在常态时,按CH/GR按钮,此时组别闪烁,旋转调节旋钮可选择组别(A~F)。
● 在常态时,长按CH/GR按钮,此时频道闪烁,旋转调节旋钮可选择频道(1~32)。
自定义功能符号
F1
F2
F3
F4
自定义功能设置:在开机状态下,长按LED/FLASH按钮,进入自定义功能。
功能
无线ID
输出功率显示模式
蓝牙ID号
LED灯色温调节模式
设置符号
OF
01~99
1/P
P.P
GDB6-XXXX
01
02
设置和说明
关闭ID
可选择01~99任意一个数字
显示功率方式为分数形式
显示功率方式为小数形式
蓝牙连接时选择要连接的
ID号连接
P模式(调节色温时,亮度也跟着改变,
当色温在4200K的时候亮度达到最大)
普通模式(调节色温时,在相同亮度
等级下,所有的色温亮度基本一样)
使用范围限制
无
闪光模式
无
双色温灯
CCT
- 08 -- 07 -
2.4 试闪
按 按钮, LED灯将闪光或用触发器引闪。

4.2 蓝牙无线控制
本产品还具备手机APP蓝牙无线控制功能, 可同时分别控制多台LED灯。32组通道频率,
抗干扰强。
· 连接蓝牙: 在开机状态下, 长按LED/FLASH按钮, 进入自定义功能。旋转 旋钮
到F3, LED灯会显示蓝牙ID号。打开APP“GodoxPhoto”,点击蓝牙选择LED灯对应的
蓝牙号, 输入密码(原始密码“000000”), 蓝牙连接成功。
当同时用多台带蓝牙模块的LED灯组合使用时, APP可以同时控制多台LED灯。与手机蓝
牙连接成功的机作为主机, 其他机为从机, 主机将手机APP数据广播出去, 从机接收到与
其通道和组别匹配的数据以实现调控。
· LED控制和闪光控制:具体操作请看手机APP“GodoxPhoto” : 设置---帮助。
蓝牙主页
E965
E965
EA59
其他设备
清除设备
12: 00
注:主机在开机状态下才可以接收无线信号。
七、标配物品
包含物品
LED闪光灯
适配器
手柄
微型底座
柔光片
黄色滤色片
蓝色滤色片
序号
1
2
3
4
5
6
7
LF308D (5600K)
1个
1个
1个
1个
1个
1个
1个
LF308Bi (3300K~5600K)
1个
1个
1个
1个
1个
无
无
LED闪光灯 适配器
主页
设置 蓝牙
相机 闪光灯 LED
12:0 0
其他操作说明
· 按遥控器的ON/OFF按键, 只可打开或者关闭所有组别的LED灯的当前状态, 无法对LED灯
开机或关机。LED灯在接收遥控器的“OFF”指令后, 灯光消失, LCD屏变暗且只显示
“OF”。
· 长按遥控器“SET”按钮2秒, 可关闭或者打开当前组别的LED灯。
遥控器使用提示:
(1)使用白光版时, 请把遥控器的色温值固定在5600K。
(2)长时间不使用, 请取出电池。
5. 滤色片更换
· 用手轻轻捏住色温片向右拉出。
· 将新色温片直接插入, 向左推移, 色温片更换完毕。
手柄
微型底座
- 10 -- 09 -
E965

LED闪光灯
锂电池供电
DC电源供电
频道
组别
功率
色温
100%光照度(LUX)
调光范围
闪光功率调控
闪光触发控制方式
灯珠数量
工作环境温度
产品尺寸
净重
白光版LF308D
7.4V锂电池(NP-F970接口)(需另购)
6.5~12V 4A
32个
6组(A、B、C、D、E、F)
最大18W
5600K±300K
LUX≤1300 (1 米)
0%~100%
OF, 7.0-10 (1/8-1/1)
同步线插孔, 试闪按钮, 2.4G无线, 蓝牙
308个
-10~50度
180mm*185mm*40mm (不包含手柄尺寸)
400g
双色温版LF308Bi
3300K~5600K ±300K
LUX≤1200 (1 米)
308个(5600K: 154个; 3300K: 154个)
设计和规格如有变更, 恕不另行通知。
八、产品参数 Foreword:
Thank you for purchasing this Godox Product!
LED Flash Light LF308 series add flash functions based on the traditional LED light.
LF308 series can be served as a flash, as well as an LED light. It’s excellent for
macrophotography, product shooting, photojournalistic and video recording, etc. The
lightweight and portable light provides high brightness and accurate color temperature.
Two models are available: LF308D Daylight Version Version (5600K) and LF308Bi Bicolor
Version (3300K).
Features:
● Can both serve as a flash and an LED light
● 308-LED-bulbs panel is lithium-ion or DC powered
● Bluetooth or 2.4G wireless grouping system (6 groups & 16 channels)
● Wirelessly adjust brightness or color temperature(bicolor version)
● Include an adapter, a remote control, a portable handle and a mini stand
● Quickly change panel angle
● Large-sized LCD panel & settings auto saved
● Fits almost any cameras and camcorders
Type
Daylight Version (Color Temperature 5600K)
Bicolor Version (Color Temperature 3300K~5600K)
Model
LF308D
LF308Bi
- 12 -- 11 -

Parts
Battery Level
Indicator
Channel Group
Light
Brightness
Color
Temperature
LCD Panel
Do not place in high temperature or high humidity conditions.
If this product overheats, it will cease operation and resume working after cooling
down. This is due to the built-in overtemperature protection.
Do not handle with wet hands, immerse in water, or expose to rain.
Observe precautions when handling batteries:
● Do not mix new and used batteries or batteries of different types.
● Do not put batteries into a fire or apply direct heat to it.
● Batteries are prone to leakage when fully discharged. To avoid damage to the
product, be sure to remove batteries out when the product will not be used for a
long time or when batteries run out of charge.
● Should liquid from batteries come into contact with skin or clothing, rinse
immediately with fresh water.
Warning:
Body
01. 308 LED Beads
02. Color Filters
03. 3.5mm Sync Cord Jack
04. Power Switch
05. DC Power Jack
06. Color Temperature
Select Dial + Modeling Lamp Button
07. Light Brightness/
Power Select Dial + Test Button
08. GR/CH Button
09. LED/Flash Button
C
10. Lithium Battery Compartment
11. LCD Panel (White in Black)
12. Battery Release Button
13. Heat Dissipation Hole
14. Angle Adjusting Knob A
15. Angle Adjusting Knob B
16. Locking Ring
17. Camera Hotshoe
Connection
18. 1/4″ Bracket
Mounting Hole
19. Handle
20. Mini Stand
CCT
09
07
08
03
0605
13
14
15
16
17
01 02
04
10
11
12
14
1920
- 14 -- 13 -

Power Management
1. Power Supply
Two power supply modes are available:
● Using lithium battery:
Choose SONY NP-F970model lithium
battery (separately sold) and install
them correctly.
Note:
● When using lithium battery, the Battery Level Indicator is displayed on the LCD
panel. When the indicator blinks, the lithium battery power is low. Please recharge it
immediately before usage in order to avoid forceful auto off.
● When using DC power supply, the Battery Level Indicator will be displayed as full.
● Must use the included Godox adapter, otherwise, the tested index may not be in
accordance with instruction manual.
● The lithium battery will be disconnected when inserting DC power source.
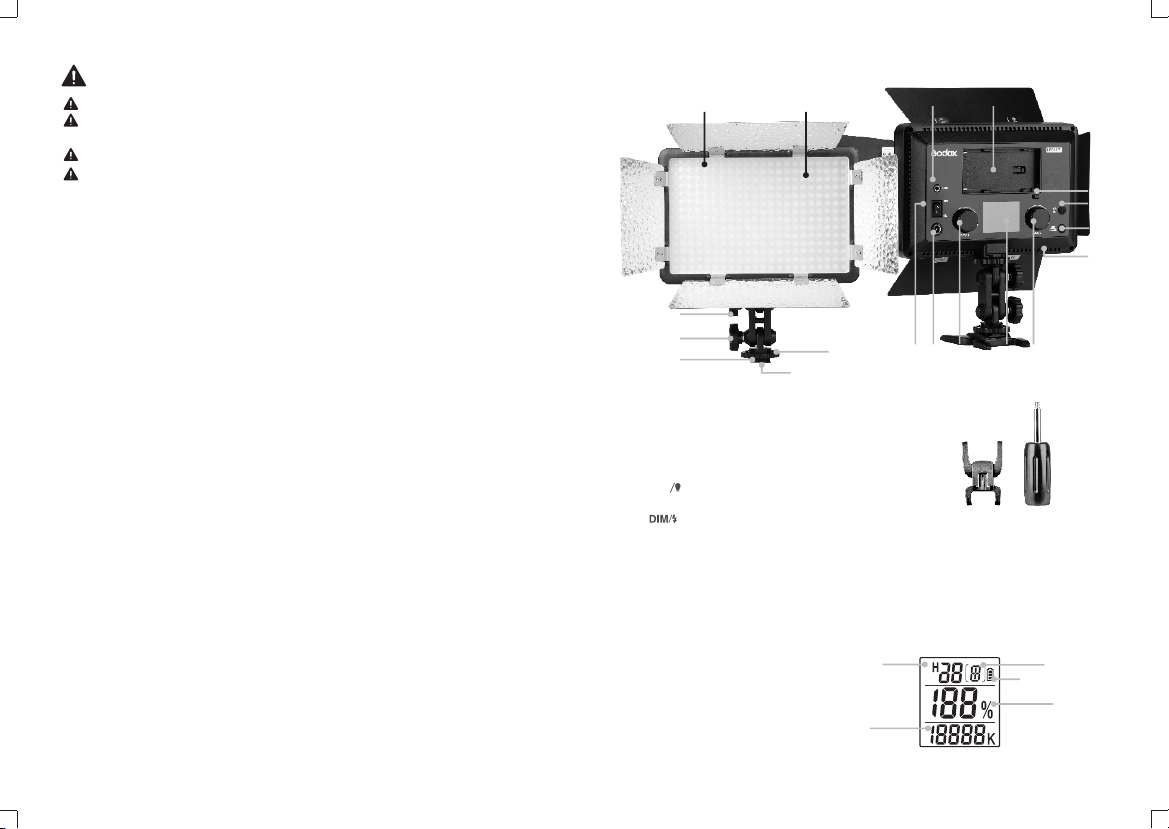
2. Installing Lithium Battery
(1) Turn the Power Switch off.
(2) Target the socket of the lithium battery
towards the “+””-” contacts of the Battery
Compartment. Push the battery in until it
locks.
(3) Power the light on.
(4) After using the light, please power it off.
(5) Press the Battery Release Button and
push rightwards to take the battery out.
● Using DC power jack:
This light can be powered by DC power
supply. Use a 6.5~12V 4A adapter
(purchased separately) to connect the
light with the DC power supply.
Using the LED Flash Light
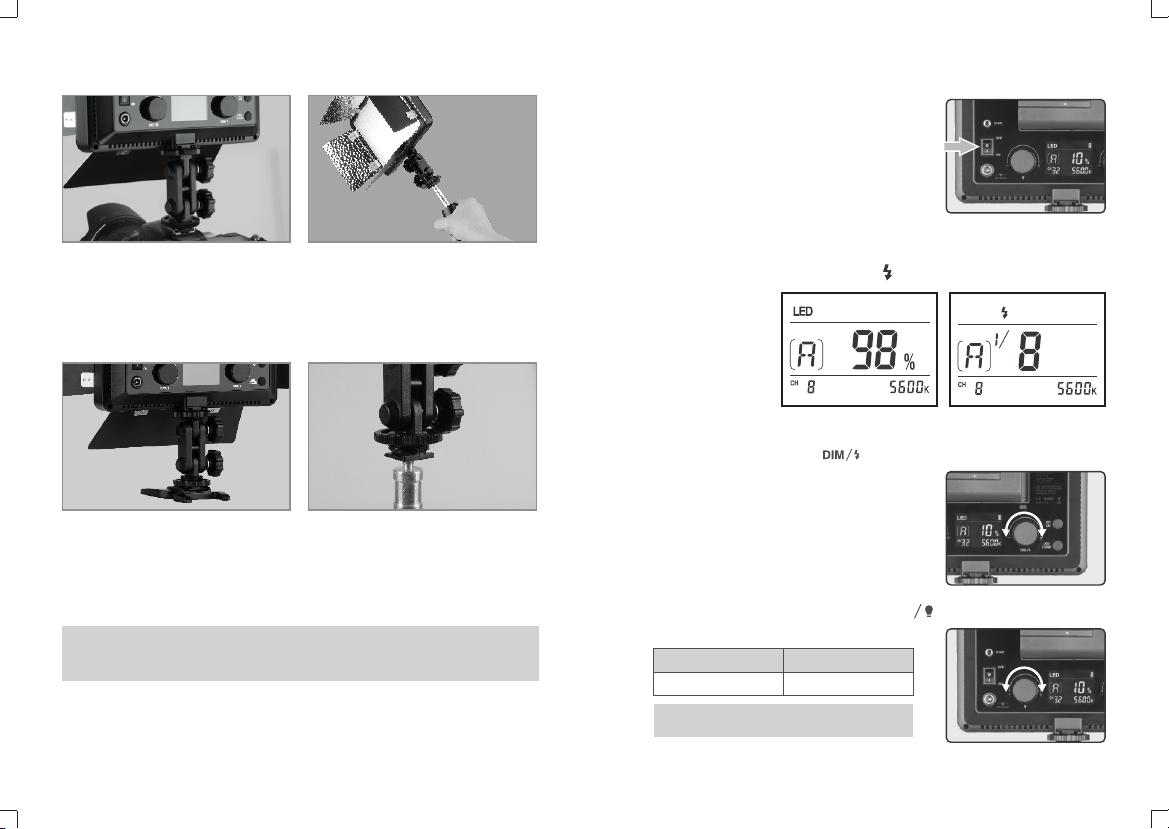
1. On the Camera
● Screw the Locking Ring to the highest
point and insert the Camera Hotshoe
Connection horizontally into the
hotshoe of a camera or a camcorder.
● Tighten the Locking Ring.
Note: If your camcorder has no hotshoe connection, you are advised to purchase a
connecting bracket for camcorder. The video light has a 1/4″ Bracket Mounting
Hole as your camcorder does. Therefore, you can easily connect both the light
and the camcorder to the bracket.
2.By the Handle
● Screw the Locking Ring to the highest
point and insert the Camera Hotshoe
Connection horizontally into the
hotshoe of a camera or a camcorder.
● Tighten the Locking Ring.
3.On the Mini Stand
● Screw the Locking Ring to the highest
point and insert the Camera Hotshoe
Connection horizontally into the
hotshoe of the mini stand.
● Tighten the Locking Ring.
4.On the Light Stand
● Screw the Locking Ring to the highest
point and install the light stand onto the
1/4”Bracket Mounting Hole.
● Tighten the Locking Ring.
- 16 -- 15 -

2. Flash Mode
2.1 In flash mode, X system wireless triggering can be achieved. It is recommended to
separately purchase Godox X series flash trigger, e.g. X1, X2, XPro series, XT32, etc.
The products with transmitting functions can remote control LF series' power, modeling
lamp' s ON/OFF and triggering. Please refer to relevant instruction manuals of flash
triggers for more details.
2.2 Sync Triggering
The sync cord jack of LF308 is a Φ3.5mm plug. Insert a
trigger(e.g. RT and DM flash trigger) plug here and the
flash will be fired synchronously with the camera shutter.
2.3 Modeling Lamp
In flash mode, press the button can switch on or off the modeling lamp. Or use a
flash trigger to control it. The modeling lamp's light brightness will change with brightness
value in LED mode. If light brightness adjustment is needed,
please switch to LED mode and back to the flash mode after
adjustment finished.
1.4 Color Temperature Adjustment
● In LED mode or flash mode, turn the button
to adjust color temperature.
Color temperature range:
CCT
Operation
1. Flash Setting
1.1 Before Usage
● Insert the lithium battery or connect the light with
the DC power supply.
● Switch the power on, the video light giving out light.
● LCD panel shows the information.
1.2 Mode Selection:
LED Mode/Flash Mode
● Press LED/FLASH Button to switch
different mode: the light will be
served as LED if LED is displayed
while being served as flash if is
displayed.
1.3 Light Brightness Adjustment
● In LED mode, turn the button to adjust the
light brightness from 0% to 100%.
Daylight Version
LF308D
5600K
Bicolor Version
LF308Bi
3300K~5600K
NOTE: Color temperature of LED 308D (Daylight Version) is invariable. The LCD
panel only shows 5600K.
Custom
Function Signs
F1
F2
F3
F4
Function
Wireless ID
Power output
display mode
Bluetooth ID
Color temperature
adjusting mode
of LED light
Setting Signs
OF
01~99
1/P
P.P
GDB6-XXXX
01
02
Settings & Description
Wireless ID is off
Choose any figure from 01 to 99
Display power in the form of fractions
Display power in the form of fraction decimal
Choose the ID to be connected
P mode(light brightness changes with the
color temperature and reach to the max.
value in 4200K)
General mode(when adjusting color
temperature, the light brightness in the same
level nearly keep the same value in all color
temperature)
Restrictions
No
Flash mode
No
Bicolor light
Custom Function Settings: when turning on the flash, long press the LED/FlASL button
and enter custom function settings.
LED MODE FLASH MODE
- 18 -- 17 -
1.5 Adjusting Channel/Group of the LED Flash Light
● Press the CH/GR button and the group icon blinks. Turn the select dial to choose a
group (A to F).
● Press the CH/GR button twice and the channel icon blinks. Turn the select dial to
choose a channel (1 to 32).

Adjusting Channel/Group with the Remote Control
● Press the CH/GR button and the group icon blinks. Press the“-”“+”button to choose a
group (A to F, 0 to 9).
● Press the CH/GR button twice and the channel icon blinks. Press the“-”“+”button to
choose a channel (1 to 32).
Adjusting ID with the Remote Control
● Double click the CH/GR button and press the“-”“+”button to choose ID from OFF or 0
to 99.
Adjusting Light Brightness with the Remote Control
● Press the“-””+“button to adjust the light brightness.
Adjusting Color Temperature with the Remote Control
● Press the SET button of the remote control and the color temperature icon blinks.
Press the“-”“+”button to adjust the color temperature.
Remote control reset: press down "-" and "+" button simultaneously to reset.
Other Operation Tips:
● Pressing the ON/OFF button on the remote control can only turn on/off all the
LED groups instead of powering it on or off. When received the “OFF” command
from the remote control, LED Flash Light stop lighting up and LCD panel gets
dark with “OF” displayed.
● Pressing the “SET” button on the remote control for 2 seconds can only turn
on/off the current LED group.
Tips of Using Remote Control:
(1) When using the Daylight Version LF308D, please set the color temperature of
the remote control as 5600K constantly.
(2) Please remove the battery if the light will not be used for an extended period
of time.
3. LED Mode
3.1 In this mode, 2.4G wireless remote control can be applied to wirelessly adjust the
light’s color temperature and light brightness.
3.2 When choosing P mode in color temperature adjusting mode of LED light, the light
brightness reaches to the max. value in 4200K. When choosing general mode, the
light brightness in the same level nearly keep the same value in all color temperature.
4. Wireless Remote Control
4.1 2.4G Wireless Remote Control
With 2.4G wireless system, this product has remote grouping and
control function. Up to 6 groups of LED light can be controlled. 32
channels are available with strong anti-interference capability.
Please set the channels and groups of LED Flash Light to the
same as those of RC-A6 remote control before usage.
• Bluetooth connection: when turn the LED light on, long press the LED/FLASH
button and enter C.Fn custom functions. Turn the button to F3, Bluetooth ID will be
displayed on the LCD panel. Open the GodoxPhoto APP and click Bluetooth to
choose the corresponding Bluetooth ID. Enter the password (original password is
000000) and the Bluetooth is successfully connected.
When using in combination with multiple LED lights with Bluetooth, APP can be
applied to control those LED lights simultaneously. Use one light as mast unit and
others as slave units. The mast unit will transmit the parameters to slave unit and the
slave units will receive the data which belongs to their own channels and groups.
• LED control and flash control: please refer to Settings---Help in“GodoxPhoto”APP
to see more detail.
4.2 Bluetooth Wireless Remote Control
This LED light can also be wirelessly controlled by smartphone APP through
Bluetooth. 32 channels are available with strong anti-interference capability.
蓝牙主页
E965
E965
EA59
其他设备
清除设备
12: 00
主页
设置 蓝牙
相机 闪光灯 LED
12:0 0
- 20 -- 19 -
E965
CCT
2.4 Test
Press button, and the LED light will fire a flash
or using a flash trigger to control it.
Note: Remote control purchased separately

What's in the Box of LF308?
Included Item
LED Flash Light
Adapter
Handle
Mini Stand
Diffusion Filter
Yellow Filter
Blue Filter
NO.
1
2
3
4
5
6
7
LF308D (5600K)
1 PC
1 PC
1 PC
1 PC
1 PC
1 PC
1 PC
LF308Bi (3300K~5600K)
1 PC
1 PC
1 PC
1 PC
1 PC
NO
NO
* Product design and specifications are subject to change without notice.
Technical Data:
LED Flash Light
Lithium Battery
DC Power Supply
Channel
Group
Power
Color Temperature
100% Light Brightness
(LUX)
Light Brightness Range
Power Output Control
Triggering Method
LED Beads Quantity
Operation Temperature
Dimension
Net Weight
BT Frequency Range
Max. Transmitting Power
Daylight Version LF308D
7.4V Lithium Battery(SONY NP-F970 model lithium battery)
(sold separately)
6.5~12V 4A
32
6 groups(A, B, C, D, E, F)
Max. 18W
5600K±300K
LUX≤1300 (1 m)
0%~100%
OF, 7.0-10(1/8-1/1)
Sync cord, test button, 2.4G wireless, Bluetooth
308
-10~40 °C
180mm*185mm*40mm(not with the Handle)
400g
2402.0-2480.0MHz
5dbm
Bicolor Version LF308Bi
3300K~5600K ±300K
LUX≤1200 (1 m)
308 (5600K:154; 3300K:154)
LED Flash Light
Handle
Mini Stand
Adapter
5. Replacing A Color Filter
● Pinch the edge of the color filter and pull it out.
● Insert a new color filter in and push it to the left.
Then the color filter is securely in position.
- 21 - - 22 -
FCC Statement
This device complies with part 15 of the FCC Rules. Operation is subject to the following two conditions: (1)
This device may not cause harmful interference, and (2) this device must accept any interference received,
including interference that may cause undesired operation.
Any Changes or modifications not expressly approved by the party responsible for compliance could void
the user's authority to operate the equipment.
Note: This equipment has been tested and found to comply with the limits for a Class B digital device,
pursuant to part 15 of the FCC Rules. These limits are designed to provide reasonable protection against
harmful interference in a residential installation. This equipment generates uses and can radiate radio
frequency energy and, if not installed and used in accordance with the instructions, may cause harmful
interference to radio communications. However, there is no guarantee that interference will not occur in a
particular installation. If this equipment does cause harmful interference to radio or television reception,
which can be determined by turning the equipment off and on, the user is encouraged to try to correct the
interference by one or more of the following measures:
- Reorient or relocate the receiving antenna.
- Increase the separation between the equipment and receiver.
- Connect the equipment into an outlet on a circuit different from that to which the receiver is connected.
- Consult the dealer or an experienced radio/TV technician for help.
The device has been evaluated to meet general RF exposure requirement.
The device can be used in portable exposure condition without restriction.

- 24 -- 23 -
()
12
3
12
0755-29609320-8062
()
()

Warranty
Dear customers, as this warranty card is an important certificate to apply for our
maintenance service, please fill in the following form in coordination with the seller
and safekeep it. Thank you!
Note: This form shall be sealed by the seller.
Applicable Products
The document applies to the products listed on the Product Maintenance lnformation (see below for
further information). Other products or accessories (e.g. promotional items,giveaways and additional
accessories attached,etc.) are notincluded in this warranty scope.
Product
Information
Model Product Code Number
Name Contact Number
Address
Customer
Information
Seller
Information
Note:
Name
Contact Number
Address
Date of Sale
If maintenance service is needed, you can directly contact the product distributor or authorized service institutions. You can
also contact the Godox after-sale service call and we will offer you service. When applying for maintenance service, you
should provide valid wananty card. If you cannot provide valid warranty card, we may offer you maintenance service once
confirmed that the product or accessory is involved in the maintenance scope, but that shall not be considered as our
obligation.
The guarantee and service offered by this document are not applicable in the following cases: . The product or accessory
has expired its warranty period; . Breakage or damage caused by inappropriate usage, maintenance or preservation, such
as improper packing, improper usage, improper plugging in/out external equipment, falling off or squeezing by external
force, contacting or exposing to the improper temperature, solvent, acid, base, flooding and damp environments, etc; .
Breakage or damage caused by non-authorized institution or staff in the process of installation, maintenance, alternation,
addition and detachment; . The original identifying information of product or accessory is modified, alternated, or
removed; . No valid warranty card; . Breakage or damage caused by using illegally authorized, nonstandard or non-public
released software; . Breakage or damage caused by force majeure or accident; . Breakage or damage that could not be
attributed to the product itself. Once met these situations above, you should seek solutions from the related responsible
parties and Godox assumes no responsibility. The damage caused by parts, accessories and software that beyond the
warranty period or scope is not included in our maintenance scope. The normal discoloration, abrasion and consumption are
not the breakage within the maintenance scope.
How to Get the Maintenance Service
Inapplicable Cases
Warranty Period
The warranty period of products and accessories isimplemented according to the relevant Product Maintenancelnformation.
The warranty period is calculated from the day(purchase date) when the product is bought for the first time,And the purchase
date is considered as the date registered onthe warranty card when buying the product.
Godox After-sale Service Call 0755-29609320-8062
Maintenance and Service Support Information
The warranty period and service types of products are implemented according to
the following Product Maintenance Information:
Product Type
Parts
Other Items
Name
Circuit Board
Battery
Electrical parts e.g.battery charger,
power cord, sync cable, etc.
Flash tube, modeling lamp, lamp body,
lamp cover, lockingdevice, package, etc.
Maintenance
Period(month)
12
3
12
No
Warranty Service Type
Customer sends the
product to designated site
Without warranty
Customer sends the
product to designated site
Customer sends the
product to designated site
This manual suits for next models
2
Table of contents
Other Godox Camera Flash manuals

Godox
Godox TT585C User manual

Godox
Godox Gemini GS series User manual

Godox
Godox Thinklite TT350O User manual

Godox
Godox TT685II-N User manual

Godox
Godox thinklite TTL TT350 User manual

Godox
Godox Thinklite TT350O User manual

Godox
Godox V860IIIO User manual

Godox
Godox V860 III User manual

Godox
Godox AD300Pro User manual

Godox
Godox A1 User manual