manuals.online logo
Brands
  1. Home
  2. •
  3. Brands
  4. •
  5. Godrej
  6. •
  7. Washer
  8. •
  9. Godrej WTEON ADR 65 5.0 FDTNS User manual

Godrej WTEON ADR 65 5.0 FDTNS User manual

WTEON ADR 65 5.0 FDTNS
WTEON 650 AD 5.0
*The image is for representation purpose only.
(with digital display)
WTEON ADR 65 5.0 FDTNS
WTEON 650 AD 5.0
6.5 kg
6. 9 wash programs
The Godrej washing machine provides you the freedom to select from 9 wash
programs. This includes the REGULAR, DELICATE, HEAVY, QUICK WASH,
WASH, RINSE, SPIN, WASH + RINSE, RINSE + SPIN.
7. Digital Display
The Godrej washing machine comes with a 2-Digit LED digital display with
remaining time indicator. It also indicates the error codes if machine encounters
any error.
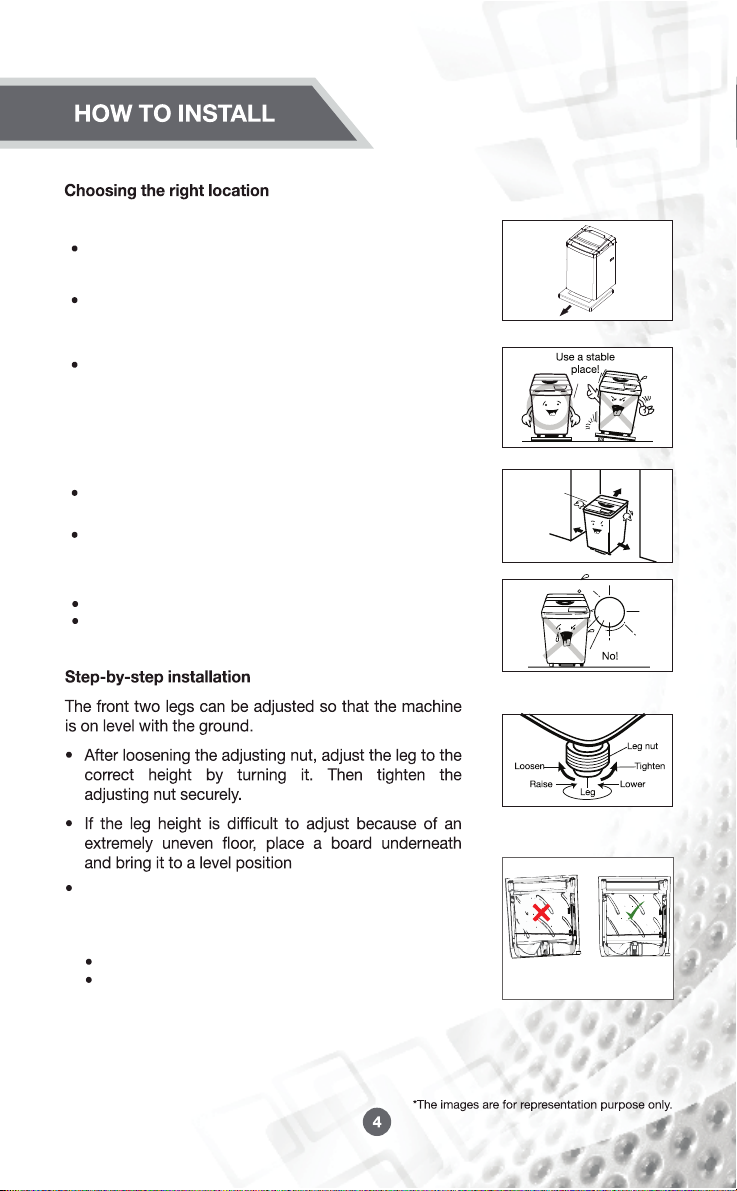
Install your Godrej EON Washing Machine on a flat
and firm surface.
Max tilt angle on the supporting face : 1°.
Installing machine on an unstable
location can create noise as machine may vibrate.
This can be dangerous since vibrations may
cause the machine to move.
Keep a distance of at least 10cm between the sides
and rear of your machine to the nearest wall.
Do not place your machine in an area with high
humidity or direct exposure to sunlight or rain.
This can
Result in insulation damage
Cause deformation or discolouration of the plastic
parts
To check whether your machine is in level open the lid
of machine, pour water into the tub up to the level just
above pulsator and check if the water level matches
with steel drum holes along the periphery.
Trolley is not recommended.
If a trolley is used it should be a metallic
trolley with four adjustable legs and
with proper locking to avoid movement
during function of machine.
Removal of packaging materials
Please ensure all packaging / bottom cushion to be
removed from the machine before starting machine.
CAUTION: Operating the machine with the
packaging may cause movement/unbalanced
condition and can damage the machine parts.
MACHINE NOT LEVEL MACHINE LEVEL
Allow 10 cm
Connecting the Electrical plug of your washer to Wall Socket
lConnect the 3-pin power cord to a properly grounded Standard
Indian 3-pin outlet. Never plug it into an ungrounded outlet.
lIf the external socket does not have grounding terminal,
then a separate grounding is needed.
l Live and neutral terminals in Socket should not be reverse.
lBurying copper plate:
Connect the Ground Wire to a Ground Copper Plate and bury
it more than 75cm in the ground.
A Gas pipe, Telephone wire, lightening rod, Neutral, Extension cords
without ground terminals, plastic, etc.
lUsing Grounding Wire:
Connect the Ground Wire to the socket provided exclusively
for Grounding.
lUsing a short-circuit breaker:
If Grounding methods described above are not possible,
a separate circuit breaker should be employed and
installed by a qualified electrician.
SEPARATE GROUNDING METHODS (ANY ONE TO BE FOLLOWED)
Never connect ground to:
Note: All electrical wirings or modifications should be done by a qualified electrician only.
E
NL
*The image is for representation purpose only.
Child Lock: Child lock can be activated by pressing WATER
LEVEL AND PROGRAM buttons simultaneously for 2
seconds. Once Child Lock is activated, machine will indicate
CL on display periodically. During Child lock, all the control
panel buttons are inactive. Child Lock will be deactivated
automatically after completion of wash cycle or by pressing
power button on control panel. Child lock can be deactivated
by same manner i.e. pressing WATER LEVEL AND
PROGRAM buttons again for 2 seconds.
Program Button: Used to
select wash cycles as per
requirement. By default
REGULAR cycle is selected.
Cycle button: Used to select
individual cycles like Wash/
Rinse/Spin only or Combinations.
2-Digit LED Display: To indicate
remaining time.
Power Button: Used to switch ON or
switch OFF the machine.
(min.) (min.) (min.) (min.)
TOTAL
TIME
Regular
Program
Delicate
Program
Heavy
Program
Quick Wash
Program
11-12
min
11-12
min
11-12
min
11-12
min
11-12
min
11-12
min
11-12
min
0 min
8 min
7 min
11 min
8 min
54 min
45 min
61 min
29 min
• Turn POWER ON Button
(Regular Program gets
selected automatically)
• Press Start/Pause button
to start the machine
• Water level and wash time
is automatically selected
by the machine, if not
selected manually
• Regular program is set
from factory as default
Program
• Turn POWER ON Button
(Regular Program gets
selected automatically)
• Press Program button to
select Delicate Program
• Water level and wash time
is automatically selected
by the machine, if not
selected manually
• Press Water level button to
change the water level if
desired
• Press Start/Pause button
to start the machine
• Turn POWER ON Button
(Regular Program gets
selected automatically)
• Press Program button to
select Heavy Program
• Water level and wash time
is automatically selected
by the machine, if not
selected manually
• Press Water level button to
change the water level if
desired
• Press Start/Pause button
to start the machine
~4 min
water in +
~10 min
(wash) +
~8min
(inbuilt
soak)
~4 min
water in +
~14 min
(wash) +
~8min
(inbuilt
soak)
~4 min
water in+
~5 min
(wash)
Note: Timings may change due to reasons like
water inlet pressure variation.
~4 min
water in +
~5 min
(wash) +
~3 min
(inbuilt
soak)
Energy label declaration program: Delicate. By default water will be ‘High’ for energy program. User can change the
water level. At any other water level, energy rating will be not considered.
Wash Only
Rinse Only
Wash + Rinse
Spin Only
Rinse + Spin
• Press the Power ON button
• Press Cycle button to select Wash option
• Press Start/Pause button to start Wash
only
• Press the Power ON button
• Press Cycle button till Rinse LED glows
• Press Start/Pause button to start Rinse
only
• Press the Power ON button
• Press Cycle button till Wash & Rinse
LEDs glow together
• Press Start/Pause button to start Wash +
Rinse
• Press the Power ON button
• Press Cycle button till Spin LED glows
• Press Start/Pause button to start Spin
only
• Press the Power ON button
• Press Cycle button till Rinse & Spin
LEDs glow together
• Press Start/Pause button to start Rinse +
Spin
Wash operation and timing will
be as per the Program selected
(Eg. 22 min for Regular)
Rinse operation and timing will
be as per the Program selected
Wash & Rinse operation and
timing will be as per the
Program selected
Spin operation and timing will
be as per the Program selected
Rinse & Spin operation and
timing will be as per the
Program selected
3.1 - 6.5 kg.
When using the Regular Cycle:
Note: To select other Programs, Refer Washing Operations.
Auto calibration for auto load sensing:
Due to aging, the mechanical friction changes on motor belt tension and other
mechanical parts. Hence it is required to calibrate the machine for auto load
sensing. Calibration can be done by pressing CYCLE+START/PAUSE+POWER
button together for 2 sec. and machine will perform the calibration automatically.
The auto calibration should be started with empty tub i.e. without water and
clothes inside the tub.
•Select the HEAVY program with LOW water level selection. Add the detergent in
detergent compartment and press the Start/Pause button to allow the water and
detergent to mix for about one minute. After one minute passed, turn the power switch
OFF to stop the machine.
•Place the blanket into the basket. Press it in all way to down by hand, ensuring that it is
fully immersed in water.
•Restart the machine switching ON power button.
•After restarting, press PROGRAM key to select HEAVY Program.
•Water level will be selected as per cloth load. To manually change water level, Select the
water level as per requirement and press Start.

This manual suits for next models

1

Other Godrej Washer manuals

Godrej GWS 700PS User manual

Godrej

Godrej GWS 700PS User manual

Godrej WSEDGE PRO 85 5.0 PB3 M User manual

Godrej

Godrej WSEDGE PRO 85 5.0 PB3 M User manual

Godrej WT EON 650 PF User manual

Godrej

Godrej WT EON 650 PF User manual

Godrej WF EON 700 PASE User manual

Godrej

Godrej WF EON 700 PASE User manual

Godrej GWF 580PX User manual

Godrej

Godrej GWF 580PX User manual

Godrej EON Series User manual

Godrej

Godrej EON Series User manual

Popular Washer manuals by other brands

Beko WMB 91445 HLC user manual

Beko

Beko WMB 91445 HLC user manual

Whirlpool LA9800XM Use & care guide

Whirlpool

Whirlpool LA9800XM Use & care guide

NEW POL NWT1912 user manual

NEW POL

NEW POL NWT1912 user manual

Bosch WGG25400ES User manual and installation instructions

Bosch

Bosch WGG25400ES User manual and installation instructions

AEG PRINCESS S operating instructions

AEG

AEG PRINCESS S operating instructions

LG WD-N1213D6 owner's manual

LG

LG WD-N1213D6 owner's manual

LG WM2496*M Series Training manual

LG

LG WM2496*M Series Training manual

Maytag MVWX5SPAW installation instructions

Maytag

Maytag MVWX5SPAW installation instructions

Fagor F-2814 instruction manual

Fagor

Fagor F-2814 instruction manual

LG T1993EFHSKL owner's manual

LG

LG T1993EFHSKL owner's manual

Bosch Maxx 5 Operating and installation instruction

Bosch

Bosch Maxx 5 Operating and installation instruction

Bosch WGB25400GR User manual and installation instructions

Bosch

Bosch WGB25400GR User manual and installation instructions

LG FH069FD2FS owner's manual

LG

LG FH069FD2FS owner's manual

LG WD14800RD Service manual

LG

LG WD14800RD Service manual

Imesa TANDEM O11 Series Instructions for installation, use and maintenance

Imesa

Imesa TANDEM O11 Series Instructions for installation, use and maintenance

Electrolux EW610F instruction manual

Electrolux

Electrolux EW610F instruction manual

Hotpoint AQXGF 149 PM Instruction booklet

Hotpoint

Hotpoint AQXGF 149 PM Instruction booklet

AEG L6FBG942R user manual

AEG

AEG L6FBG942R user manual

manuals.online logo
manuals.online logoBrands
  • About & Mission
  • Contact us
  • Privacy Policy
  • Terms and Conditions

Copyright 2025 Manuals.Online. All Rights Reserved.