Good Way APS-1000 Manual

APS-1000
Ionizing Air Purier
Operating and
Maintenance
Instructions
Read before operating.

APS-1000 0221
2
CONTENTS:
IMPORTANT SAFETY INSTRUCTIONS.................................................................................................3
PRODUCT OVERVIEW AND DIAGRAM ..............................................................................................4
PUSH BUTTON DISPLAY PANEL ..........................................................................................................5
PACKAGE INCLUDES ............................................................................................................................5
PRODUCT POSITION AND LOCATION REQUIREMENTS ................................................................6
FILTER INSTALLATION...........................................................................................................................6
PRODUCT FUNCTIONALITY ................................................................................................................6
PRODUCT FEATURES............................................................................................................................7
FILTER CHARACTERISTICS ...................................................................................................................7
OPERATING INSTRUCTIONS ........................................................................................................... 7-9
PM VALUE EQUIVALENCY TABLE........................................................................................................9
GENERAL MAINTENANCE AND STORAGE ...............................................................................10-14
TROUBLESHOOTING..........................................................................................................................15
PERFORMANCE SPECIFICATIONS....................................................................................................16
NOTES...................................................................................................................................................17
Thank you for purchasing Goodway's APS-1000 Air Purifying System. We appreciate
your business and look forward to serving you in the future. As with all Goodway
products, you can be assured that the nest quality components and workmanship
have gone into this machine.
Please take a few minutes to read the following Operating and Maintenance
Instructions. Please pay particular attention to the safety instructions and exercise
caution when using this machine.
GOODWAY®TECHNOLOGIES CORPORATION
HVAC & FACILITY MAINTENANCE SOLUTIONS
For Sales Call: 1-800-333-7467
For Service Call: 1-800-370-2855

APS-1000 0221 3
WARNING: Read and understand all instructions. Failure to follow all instructions
listed below may result in electric shock, re and/or serious personal injury.
IMPORTANT SAFETY INSTRUCTIONS
READ ALL INSTRUCTIONS BEFORE USING THIS PRODUCT.
When operating in Automatic mode, if the moisture level in the room is extremely
high, condensation might form on the air quality sensor and cause the indicator
light on the display panel to show a poor air quality, even if the air quality in the
room is actually excellent. In this case, it is suggested that you manually select your
desired fan speed.
WARNING: Don’t Use With Wet Hands!
WARNING: Never touch the electrical outlet or plug of the power cord with
wet hands.
1. Do not block the intake or exhaust of this unit while it is running.
2. Do not use the unit if it does not operate properly or has been damaged.
Do not try to service the unit yourself - call Goodway for assistance. Service
must be performed only by qualied repair personnel. Service performed by
unqualied personnel could result in a risk of injury and voids the warranty.
3. Do not allow the unit to freeze or leave in freezing temperatures.
4. Use only Goodway approved accessories and replacement parts.
5. Keep machine clean and dry to maximize performance and longevity.
6. Follow maintenance procedures outlined in this manual.
WARNING
WARNING: Remove the lters from their plastic wrapping before turning the
machine on. See instructions on page 6 for more details.

APS-1000 0221
4
Remote Control
(APS-REMOTE)
Rear Cover Front Cover
HEPA Composite Filter
(APF-H13)
HEPA Composite Filter
(APF-H13)
Pre-Filter
(APF-PF)
Pre-Filter
(APF-PF)
Main Body
PRODUCT OVERVIEW AND DIAGRAM
This new generation of Ionizing Air Purier has been specially developed by our
company’s research team, and it utilizes the most advanced technology from
throughout the world. It relies on multiple-lter technology to provide you with
healthy, clean air.
* Note APS-CSTR (Replacement Wheel Set) not shown

APS-1000 0221 5
Child Lock
Mode Selection
Filter Warning Light
Timer Power
Fan Speed
PUSH BUTTON DISPLAY PANEL
The upper display screen includes push-buttons for power and other function
controls, as well as information displays for consumption status and
operating status.
Upper Display Screen
Lower Display Screen
PACKAGE INCLUDES
Machine Body 1
Pre-lter 2
HEPA Composite Filter 2
Product User Manual 1
Remote Control 1

APS-1000 0221
6
PRODUCT POSITION AND LOCATION REQUIREMENTS
Maintain distance of 8" (20cm) between back of machine
and wall
Maintain distance of 12"
(30cm) between back of
machine and wall
Maintain distance
of 12" (30cm)
between back of
machine and wall
FILTER INSTALLATION
1. Removing the lters from their plastic wrapping
a. Remove front and rear covers
b. Remove lters
c. Remove lters from plastic wrapping
Note: Prior to use, please ensure that all plastic wrapping has been removed
from the lters
2. Installing the lters and the front and rear covers
a. Install the HEPA composite lter
Note: The side with pull tabs should face outward
b. Install the pre-lter (the inward-facing and outward-facing sides are different)
Note: The side with buckles should face outward
c. Install the front and rear covers
Note: Prior to use, please be sure to re-attach the front and rear covers
While it is running, a distance of 8" (20cm) should be maintained between the back
of the air purier and the wall, and a distance of 12" (30cm) should be maintained
between each side of the air purier and any wall.
PRODUCT FUNCTIONALITY
• Puries the air by eliminating smog, dust particles, formaldehyde, and other
gaseous pollutants.
• Produces large quantities of anions to improve air quality and optimize living
environments.
• Disinfects and puries large volumes of air in homes, ofces, restaurants, bars,
and entertainment venues.

APS-1000 0221 7
PRODUCT FEATURES
• 4-color LED display for indication of current air quality.
• Dual-lter design for double the clean air output.
• Internal high-precision particulate sensor for real-time detection of air quality.
• Wi-Fi control, manual control, automatic nighttime sleep mode control, infrared
remote control.
• Four purication modes: manual, automatic, maximum speed, and nighttime.
FILTER CHARACTERISTICS
1. Pre-lter: lters out larger particulate matter, including human hair, pet dander,
cotton bers, and more.
2. HEPA composite lter: lters out smog, dust, pollen, allergens, and pollutants
as well as tiny particulates (PM2.5) larger than 0.3 microns; lters out harmful
gases such as benzene, formaldehyde, odors, and more.
Automatic Operating Mode
Power Button
OPERATING INSTRUCTIONS
1. Connecting to a Power Source: When using this product for the rst time,
remove all components from their packaging and undo the tie around the
power cable, then insert the plug into an electrical socket to provide power to
the machine. Once connected, the Power button on the product’s display panel
will turn red.
Lightly pressing the Power button will sound a bell tone to indicate that the air
purier is turning on, and the Power button will turn green when the start-up
process has completed. The machine will enter its Automatic mode by default.
The ‘AUTO’ (Automatic mode) icon on the front display panel will light
up green.

APS-1000 0221
8
2. Mode Selection: Once the machine has powered on, one of the following four
operating modes can be selected by pressing the ‘MODE’ button: Automatic,
Sleep, Maximum Speed Smoke Removal, and Manual. When the ‘AUTO’ light
is on, the anionization process is active, and the fan speed will change based
on feedback received from the sensor (when Automatic mode is activated, the
‘AUTO’ icon will light up, and when it is deactivated, the icon brightness will
reduce by half). When the Smoke Removal icon is lit, the machine’s Maximum
Speed mode has been activated. When the Sleep icon is lit, Sleep mode has
been activated, and the brightness of all display lights will be reduced by
half. Under Sleep mode, the air purier will only operate at its Sleep mode fan
speed, and will no longer be controlled by feedback from sensors.
When Timer mode is activated, the machine will run for a specied period of
time and then enter into its idle state.
3. Manual Mode: When the machine is powered on, pressing the Fan Speed
button will change the speed of the electric motor, thereby adjusting the
machine’s operating speed. After an adjustment is made by the user, the
electric motor will no longer receive controls from the machine’s sensors, and
will continue to operate at its current setting.v
Fan Speed display, with a
total of 5 different speeds

APS-1000 0221 9
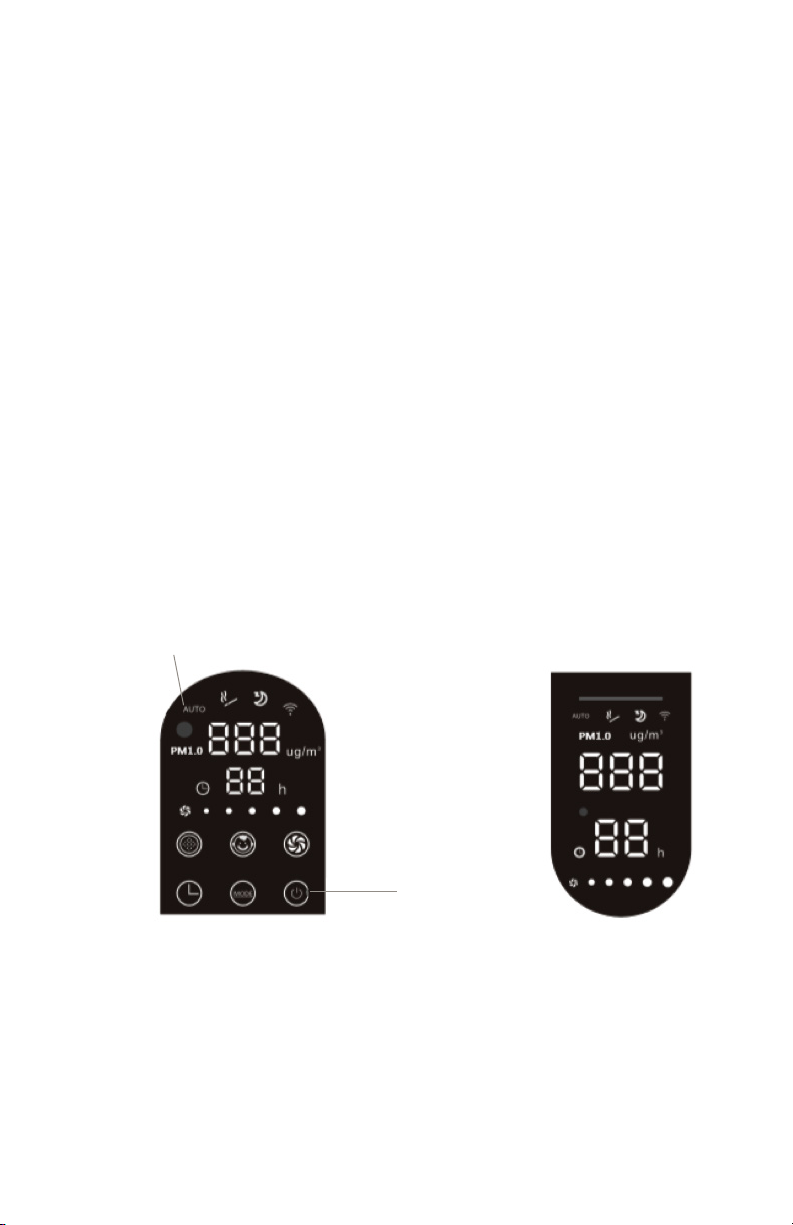
4. Child Lock: When the machine is powered on, pressing the Child Lock button
will lock the functionality of all of the push buttons. The machine will no longer
be able to receive controls from any button, but will continue to operate under
its current settings. Pressing the Child Lock button again and holding for 5
seconds will deactivate the Child Lock (when Child Lock mode is activated, the
Child Lock icon will light up, and when it is deactivated, the icon brightness will
reduce by half).
5. Timer Mode: Pressing this button when the machine is powered on will allow
you to program a xed operating time. After the button is pressed, each
additional press will add 1 hour to the operating time up to a period of 12
hours, after which an additional press will exit the Timer setup (when Timer
mode is activated, the Timer icon will light up, and when it is deactivated, the
icon brightness will reduce by half).
6. Wi-Fi: While the machine is powered off, pressing the ‘MODE’ button and
holding for 5 seconds will cause the Wi-Fi icon to blink rapidly. While the icon is
blinking, enter the smartphone app and pair with the machine. Refer to the Wi-
Fi Instructions Sheet for information on how to operate the smartphone app.
After the machine and app have been paired successfully, the icon will stay
continuously lit. If the machine’s Wi-Fi signal ever becomes disconnected, the
Wi-Fi icon light will turn off. When the machine is rst powered on it will begin
searching for a Wi-Fi signal, and during this time the Wi-Fi icon light will blink
slowly; once the connection is made, the icon will stay continuously lit. The
machine will remember any previous Wi-Fi connections, and can be powered
on, powered off, or controlled for any other function via Wi-Fi while in its
Idle state.
PM VALUE EQUIVALENCY TABLE
PM1.0 Density
ug/m3
5-35 35-75 76-150 151-500
Air Quality (Green) Good (Blue) Normal (Orange) Poor (Red) Dirty
Fan Speed Silent Medium High Maximum
Speed
Fan Speed
Light Indicator

APS-1000 0221
10
Filter Replacement Reminders
This air purier will provide reminders for lter replacement at xed intervals. When
the machine reaches 300 hours of operation, the red indicator light will blink as a
reminder that the pre-lter needs to be cleaned. When the machine reaches 3,000
hours of operation, the red indicator light will stay continuously lit as a reminder
that the HEPA composite lter needs to be replaced. While the indicator light is on,
the Filter button’s reset function is in effect, and pressing the Filter button will reset
the time and begin the operating period for the cleaned pre-lter or new HEPA
composite lter.
Filter Operating Normally Interval Reached
Pre-lter No Indicator Red light blinks as a
reminder that lter needs
to be cleaned
HEPA Composite Filter No Indicator Red light stays
continuously lit as a
reminder that lter needs
to be replaced
Air Quality
Indicator Light
GENERAL MAINTENANCE AND STORAGE
1. Pre-lter: The cleaning frequency for the pre-lter should be determined
based on the fan speed, level of contamination in the air, and accumulated
operating time, but should typically be once every two to three months. Please
clean the lter according to these guidelines to keep the air purier running at
its full effectiveness.
2. HEPA Composite Filter: Made from HEPA, adsorptive material, catalytic
material, and lter material, this multi-functional composite lter can effectively
purify the air by removing oating particulates, viruses, and bacteria, and by
eliminating odors and harmful gases.

APS-1000 0221 11
Handhold Location
3. CleaningthePre-lter:
a. Power off the machine by disconnecting the plug from the electrical outlet.
b. From the handhold location, pull out on each of the front and rear covers,
and then pull upwards to completely remove them from the machine.
c. Lightly, push down on the two tabs located at the top of the lter and then
carefully pull the lter out and up, minimizing the dust and dirt falling back
off of the lter.
Push down on the tabs to release the lter
d. To clean the lter, a vacuum cleaner or brush can be used to remove dust
and lint; if the lter is extremely dirty, it can also be carefully cleaned using
water, to be reinstalled only after it has completely dried (in order to prevent
damage, do not bend the lter during the cleaning process).
Using a vacuum cleaner to remove dust Cleaning with water
at the faucet

APS-1000 0221
12
e. For reinstallation, insert the tabs at the bottom of the lter into the
corresponding grooves in the body of the machine (be mindful of the
orientation of the lter, as the two push tabs on the top of the lter should be
pointing outwards), then simply push the top of the lter into place.
f. To reinstall all lter components at once, insert the tabs of the HEPA
composite lter, the pre-ilter, and nally the front cover into the
corresponding grooves in the main body of the machine, and then push the
top of the front cover so that it locks into place with the main body.
4. Smart Reminders for Filter Replacement:
a. Power off the machine by disconnecting the plug from the electrical outlet.
b. Follow the same method detailed in the “Cleaning the Pre-lter” section to
open the rear cover and remove the pre-lter.
c. Following the lter replacement reminders on the display panel, remove the
dirty HEPA composite lter from the machine and insert the new lter in its
place, then reinstall all lter components into the main body.
The two tabs at the
bottom of the lter must
be inserted into the
grooves in the body of
the machine
HEPA Composite Filter Pre-lter Front Cover

APS-1000 0221 13
d. Plug the power cord back into the electrical outlet and power on the
machine; when the red indicator light turns on, press and hold the Filter
button for 5 seconds to reset the lter replacement timer. When operating
under normal conditions, pressing the Filter button will display the
accumulated run time for the current lter, in units of hours. Because only
three digits can be displayed, the screen will rst display the thousands digit,
then switch to display the hundreds, tens, and singles digits, so please be
sure to watch the screen until you have seen all four digits displayed (see the
image below for an example of how ‘2,802 hours’ would be displayed on
the screen).
Filter
The screen rst displays the
thousands digit
The screen then switches
to display the hundreds
through singles digits
e. Finally, disconnect from the power source and install the rear cover onto the
main body of the machine.
After removing the protective cover, use a cotton
swab to lightly wipe the sensor lens
Use a vacuum cleaner or
hairdryer to clean the air
quality sensor cover

APS-1000 0221
14
5. Cleaning the Machine:
Cleaning the surface of the main body: Use a dry cloth to wipe clean dirt and
dust; never wash with water.
Cleaning the air outlet:
1. Disconnect from the power source by unplugging the power cord from the
electrical outlet.
2. Place your hand on the edge of the air outlet screen marked with a ▲
symbol, and pull upwards to lift it off the machine.
3. If the air outlet screen is removed while the machine is running, the machine
will cease operation until the screen is replaced; when replaced, operation
will continue under the same settings.
▲
6. Maintaining and Cleaning the Anion Generator:
If the machine begins making a squeaking noise, the anion generator requires
cleaning. First remove the air outlet screen, and use a cotton swab to clean the
anion emitter by inserting it into the top of the iron mesh and moving from left
to right to clean off dust. The anion generator must be cleaned at
regular intervals.

APS-1000 0221 15
TROUBLESHOOTING
Common Issue or
Problem
Inspection/Resolution Procedure
Machine will not power
on (red power indicator
light is not on)
1. Is the power cord plug inserted correctly into the electrical
outlet?
Plug in the power cord.
2. Are the left and right side air inlet covers secured?
Fully close the left and right side air inlet covers.
Machine will not power
on (power indicator
light is on) No response
to push-button controls
Is the air outlet screen on the top of the machine installed
correctly?
Ensure that the orientation of the air outlet screen is correct.
Properly install the air outlet screen.
There are pollutants
in the air, but the air
quality indicator light
remains “green”
Hastheairpurierbeenplacedinalocationwhereitwould
bedifculttotakeinthepollutedair(dust)?
Adjust the machine’s position or location.
Even after running for
long periods of time,
the air quality indicator
light remains “red”
Is the particulate sensor dirty?
Clean the particulate sensor.
The machine is
making a “popping” or
“banging” noise while
running
Is there excess dust collected on the anion generator?
Clean off the anion generator.
The air coming out
of the air outlet has a
strange odor
1.Aretheltersdirty?
Clean the lters.
2.Hasitbeenalongtimesincethelterswerereplaced?
Replace with new lters.
The machine is not
automatically entering
sleep mode at night
IstheairpurieroperatingunderManualmode?
Press the “Mode” button on the control panel and make sure
that the air purier is operating under Automatic mode.
The air purier has
been running for a long
time, but the air quality
in the room does not
seem to be improving
1.Hastheplasticwrappingbeenremovedfromtheairlters?
Remove all plastic wrapping from the air lters before using
the air purier for the rst time.
2.Havetheltersbeeninstalledinthewrongorder?
Follow the instructions detailed in the user manual for the
correct lter installation order.
The lter warning light
is blinking
This indicates that the pre-lter has reached its cleaning interval
as programmed within the machine settings; after cleaning the
lter, press and hold the Filter button to complete a time reset.
The lter warning light
is continuously lit
This indicates that the HEPA composite lter has reached
the end of its useful life as programmed within the machine
settings; after replacing the lter, press and hold the Filter
button to complete a time reset.

APS-1000 0221
16
PERFORMANCE SPECIFICATIONS
Particulate CADR 470ft³/m
(800m³/hr)
Particulate CCM Level P4
EnergyEfciencyofParticulateCleaning > 10
Gaseous Pollutant CADR 175ft³/m
(300m³/hr)
Pollutant CCM Level F4
EnergyEfciencyofGaseousPollutant
Cleaning
≥ 3
Operating Noise ≤ 66dB(A)
Suitable Usage Area 600 ~ 1000ft²
(56 ~ 96m²)
Operating Method Intelligent purication
Generated Anion Density 610,000/in³
10,000,000/cm³
Voltage Rating AC 115V/60Hz
AC 220V/50Hz
Power Rating 85W
Idle Power Consumption ≤ 2W
Power Cord Length 6.5ft (2m)
ProductDimensions(LxWxH) 15.8x15.8x26.3in
(40x40x66.9cm)
Net Weight 14.0kg (31lb)

APS-1000 0221 17
NOTES

GOODWAY®TECHNOLOGIES CORPORATION
420 West Avenue, Stamford, CT 06902 USA
Tel: 203-359-4708 · Toll-Free Tel: 800-243-7932
Fax: 203-359-9601 · Toll-Free Fax: 800-359-9625
Email: goodway@goodway.com
Visit: www.goodway.com
P/N: MNL-APS-1000
©Copyright 2021 Goodway Technologies Corp., Stamford, CT USA
Effective date February 16, 2021
Goodway is a Trademark of Crossford International.
Goodway reserves the right to improve products; contact the factory for the latest conguration and uses.
Provides innovative maintenance solutions for a wide variety
of industries including commercial HVAC, food and beverage
processing, power generation and manufacturing.
HVAC & FACILITY MAINTENANCE SOLUTIONS
For Sales Call: 1-800-333-7467
For Service Call: 1-800-370-2855
Table of contents