smartmi 2 User manual
Smartmi Air Purifier 2 User Manual 01
14
27
40
53
66
79
92
Manuale utente Purificatore d'aria Smartmi 2
Manuel d'utilisation de Purificateur d'air Smartmi 2
Smartmi Luftreiniger 2 Benutzerhandbuch
Manual de Usuario de Purificador de aire Smartmi 2
Manual de Utilizador do Purificador de Ar Smartmi 2
Oczyszczacz powietrza Smartmi 2 Instrukcja obsługi
Руководство пользователя Умного очистителя
воздуха Smartmi Air Purifier 2

1
WARNING
When the power cord is damaged, it must be replaced with a genuine power
cord purchased from the manufacturer or after-sales service department.
This appliance can be used by children aged from 8 years and above and
persons with reduced physical, sensory or mental capabilities or lack of
experience and knowledge if they have been given supervision or instruction
concerning use of the appliance in a safe way and understand the hazards
involved.
Children shall not play with the appliance. Cleaning and user maintenance shall
not be made by children without supervision.
Make sure the purifier is turned off and unplugged before performing the
maintenance. Fix the grille with screw after cleaning fan blades and air duct.
This appliance contains a UV-C emitter.
Do NOT replace the UV-C emitter.
Unintended use of the appliance or damage to the housing may result in the
escape of dangerous UV-C radiation. UV-C radiation may, even in little doses,
cause harm to the eyes and skin.
Appliances that are obviously damaged must not be operated.

2
Turn off and unplug the purifier before moving it.
The purifier cannot turn on when the fan grille
and the filter compartment cover are not
installed properly.
Maintain a distance of at least 20 cm between
the air inlets and walls or other objects.
The purifier must be placed on firm and flat floor.
Prior to cleaning or other maintenance, the
appliance must be disconnected from the supply
mains.
Frequently remove dust, hair, and other particles
from the outer mesh screen of the filter, so as to
reduce the chance of bacteria growth.
Remove dust, hair, and particles from the
purifier's air inlets to prevent a reduction of air
intake.
Cover the air outlet to prevent dust, hair, and
other particles from falling in when the purifier is
left unused for a long time.
To avoid fire, electric shocks, or other damage, use
the power cord and electrical outlet as instructed
below:
Do not excessively pull, twist or bend the power
cord, as this may expose or break the cord's
core.
The power cord must be plugged into a suitable
electrical outlet.
Use the power cord that is provided with the
purifier, do not use any third party power cords.
purifier.
In unstable locations where the purifier can
easily fall over.
In environments that are extremely hot, humid,
or damp, such as bathrooms.
If the product falls down due to external forces
and is damaged, or the product is damaged due
to other causes, please ensure that the product
appearance is complete/components are reset
(for example, the top grille needs to be reset if it
falls off) before use; Otherwise, please contact
the after-sales or dealers for replacement.
Always unplug the purifier before carrying out
maintenance to or moving the air purifier.
Immediately stop using the purifier when it
makes unusual sounds, gives off bad odors,
overheats, or its fan rotates irregularly.
Do not stick your fingers or foreign objects into
the protective parts, movable parts, air inlets, or
air outlets.
Keep objects such as hairs or fabrics away from
the purifier to avoid blocking the air inlets or air
outlets.
Do not sit on, lean on or tilt the purifier.
When using in conjunction with gas-fueled
appliances (such as gas stoves, gas heaters),
please ventilate sufficiently to avoid carbon
monoxide poisoning.
Do not pour liquids, nor throw powders or other
small substances into the purifier's air outlet.
Do not use the purifier in the following
circumstances, as they may result in electric
shocks, fire, or other damage:
Near open flames, such as candles, incense
burners, stoves, fireplaces, cigarettes,
firecrackers, lighters, multipurpose torches,
candle lighters, or fire pans.
Near appliances that generate high
temperatures, such as electric heaters, fan
heaters, electric foot warmers, electric stoves, or
electric irons.
Make sure no inflammable objects get into the
Precautions

3
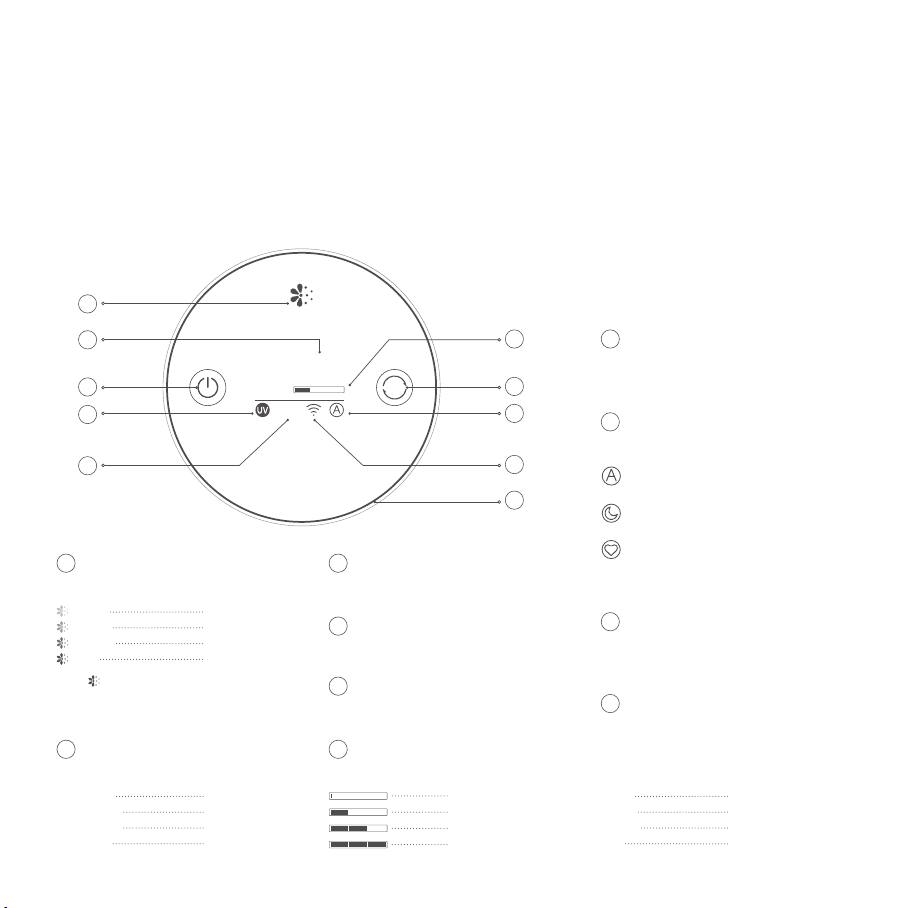
Product Overview
Read this manual carefully before use, and retain it for future reference.
Note: Illustrations of the product, accessories, and user interface in this user manual are for reference purposes only. The actual product and functions may vary
due to product enhancements.
OLED Display
Screen
Grille Fixing Screw
Grille
Power Port
Display On/ Off Button
Laser Particle Sensor
Power Button
TVOC Sensor
Temperature and
Humidity Sensor
Filter Compartment
Cover
Mode Switch Button
Front view Rear view
Package Contents: Air purifier, filter, power cord, user manual
4
Screen Display
Air quality indicator
J
Wi-Fi Indicator
I
Mode Switch Button
G
46-
119
UWPD
QN3/6
A
B
C
D
E
J
I
H
G
F
Green
Yellow
Orange
Red
Excellent
Good
Moderate
Unhealthy
Mode
H
Automatic: Automatically switch modes
according to the indoor air quality.
Sleep: Ultra-low noise for a comfortable
sleeping environment.
Favorite: Set and save the coverage area in
the app to adjust the purifying
Indicating comprehensive air quality based
on indoor PM2.5 and TVOC value
TVOC status indicatorPM2.5 Indicator
Temperature
Pollen Alert Indicator
A
B
Power Button
C
UV status indicator
D
E
F
Green
Yellow
Orange
Red
Excellent
Good
Moderate
Unhealthy
Excellent
Good
Moderate
Unhealthy
1-20 μg/m3
21-35 μg/m3
36-55 μg/m3
>55 μg/m3
Excellent
Good
Moderate
Unhealthy
Note: indicates the level of PM 2.5-10
(covering common pollen sizes)
Other manuals for 2
4
Table of contents
Languages:
Other smartmi Air Cleaner manuals


