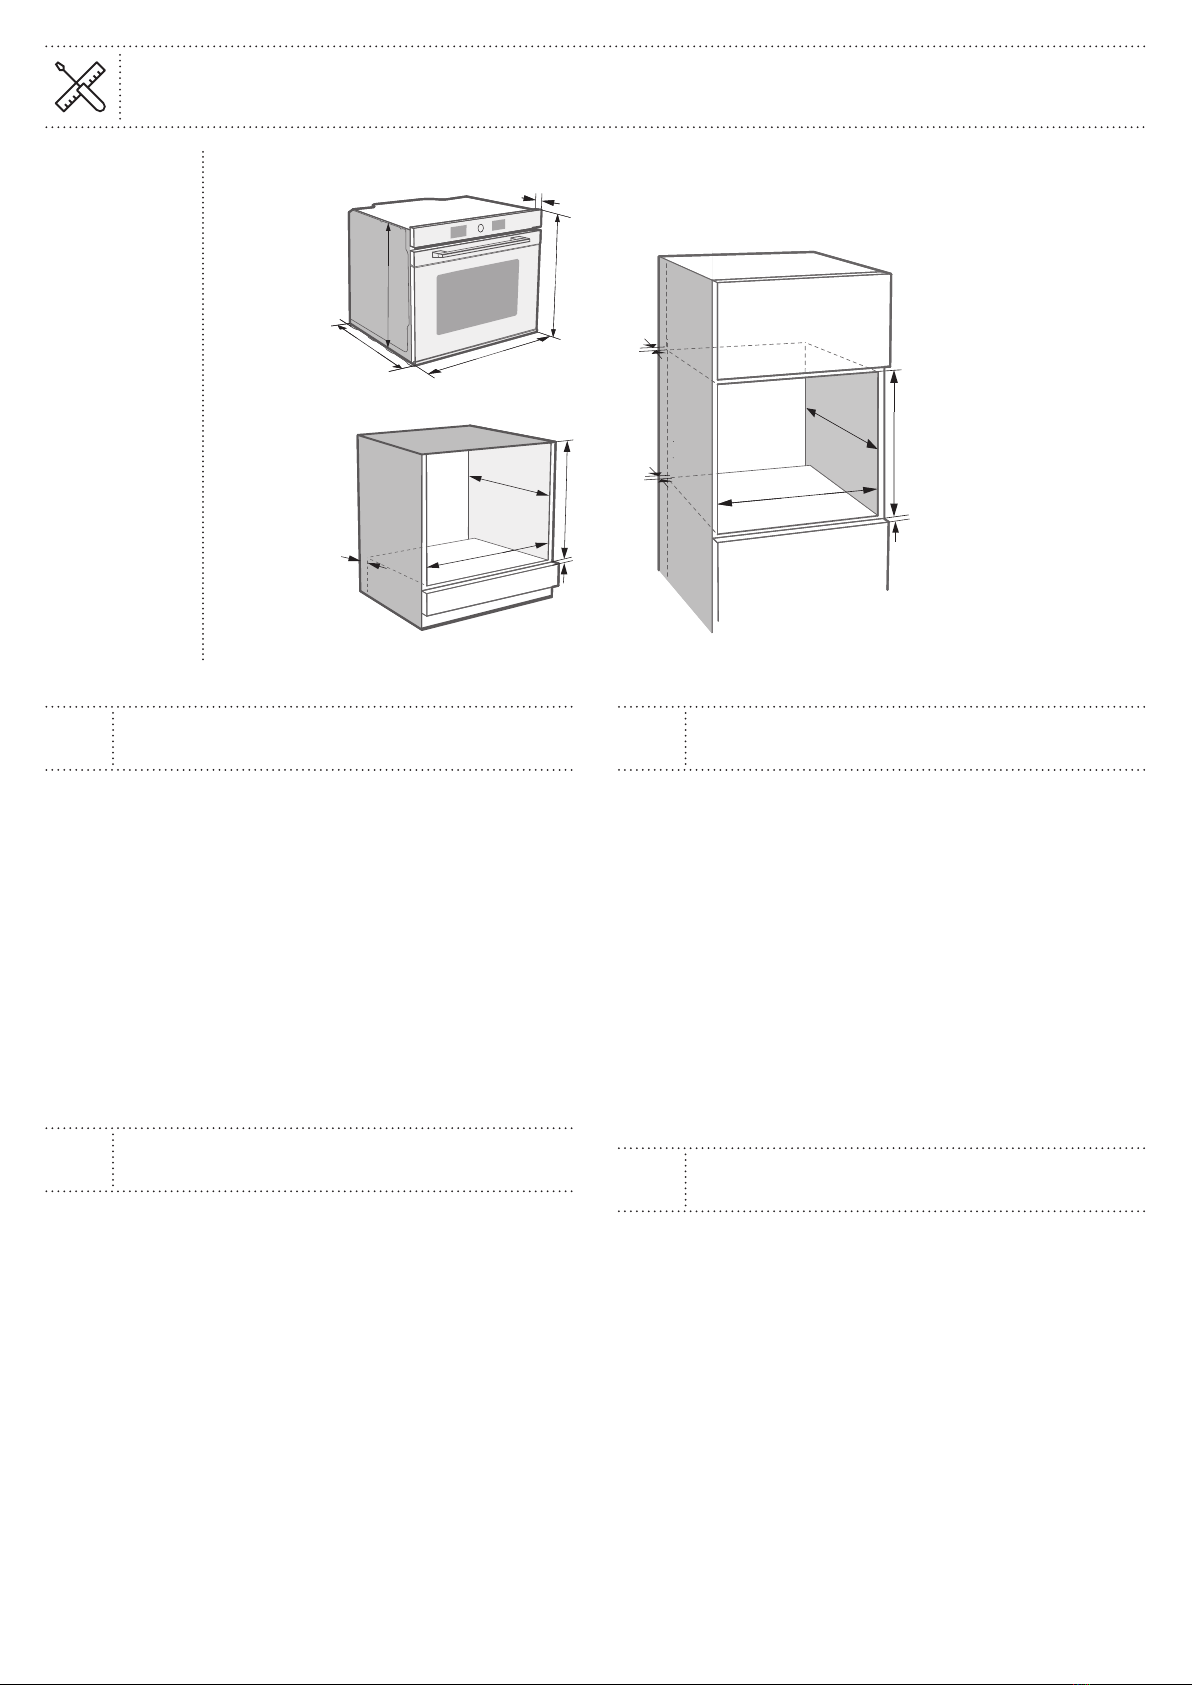
GoodHome Bamia GHPY71 User manual

V10419
3663602434405
GHPY71
bamia

FR Préparation 03
PL Przygotowanie 03
RO Pregătire 03
Preparation 03
Installation 04
FR Installation 04
PL Montaż 04
RO Instalare 04
Use 13
FR Utilisation 22
PL Użytkowanie 31
RO Utilizare 41
Care and
Maintenance 52
FR Entretien et maintenance 55
PL Czyszczenie i konserwacja 58
RO Îngrijire și întreținere 62
EN Contents
PL Zawartość FR Contenu
RO Cuprins

x 2
EN IMPORTANT - Please read
carefully the separate
safety guide before use.
FR IMPORTANT: veuillez lire
attentivement le guide de
sécurité avant utilisation.
PL WAŻNE — przed użyciem
należy się uważnie zapoznać
z dołączonymi oddzielnie
informacjami dotyczącymi
bezpieczeństwa.
RO IMPORTANT - Citiți cu
atenție ghidul separat
privind siguranța înainte de
utilizarea produsului.
[01] x 1 [05] x 1 [06] x 1
[03] x 1
[04] x 1
[
09
]
x 2
[
08
]
x 2
[
07
]
x 2
[02] x 2

EN Installation
• This appliance must be installed correctly by a
qualified person, strictly following the manufacturer’s
instructions.
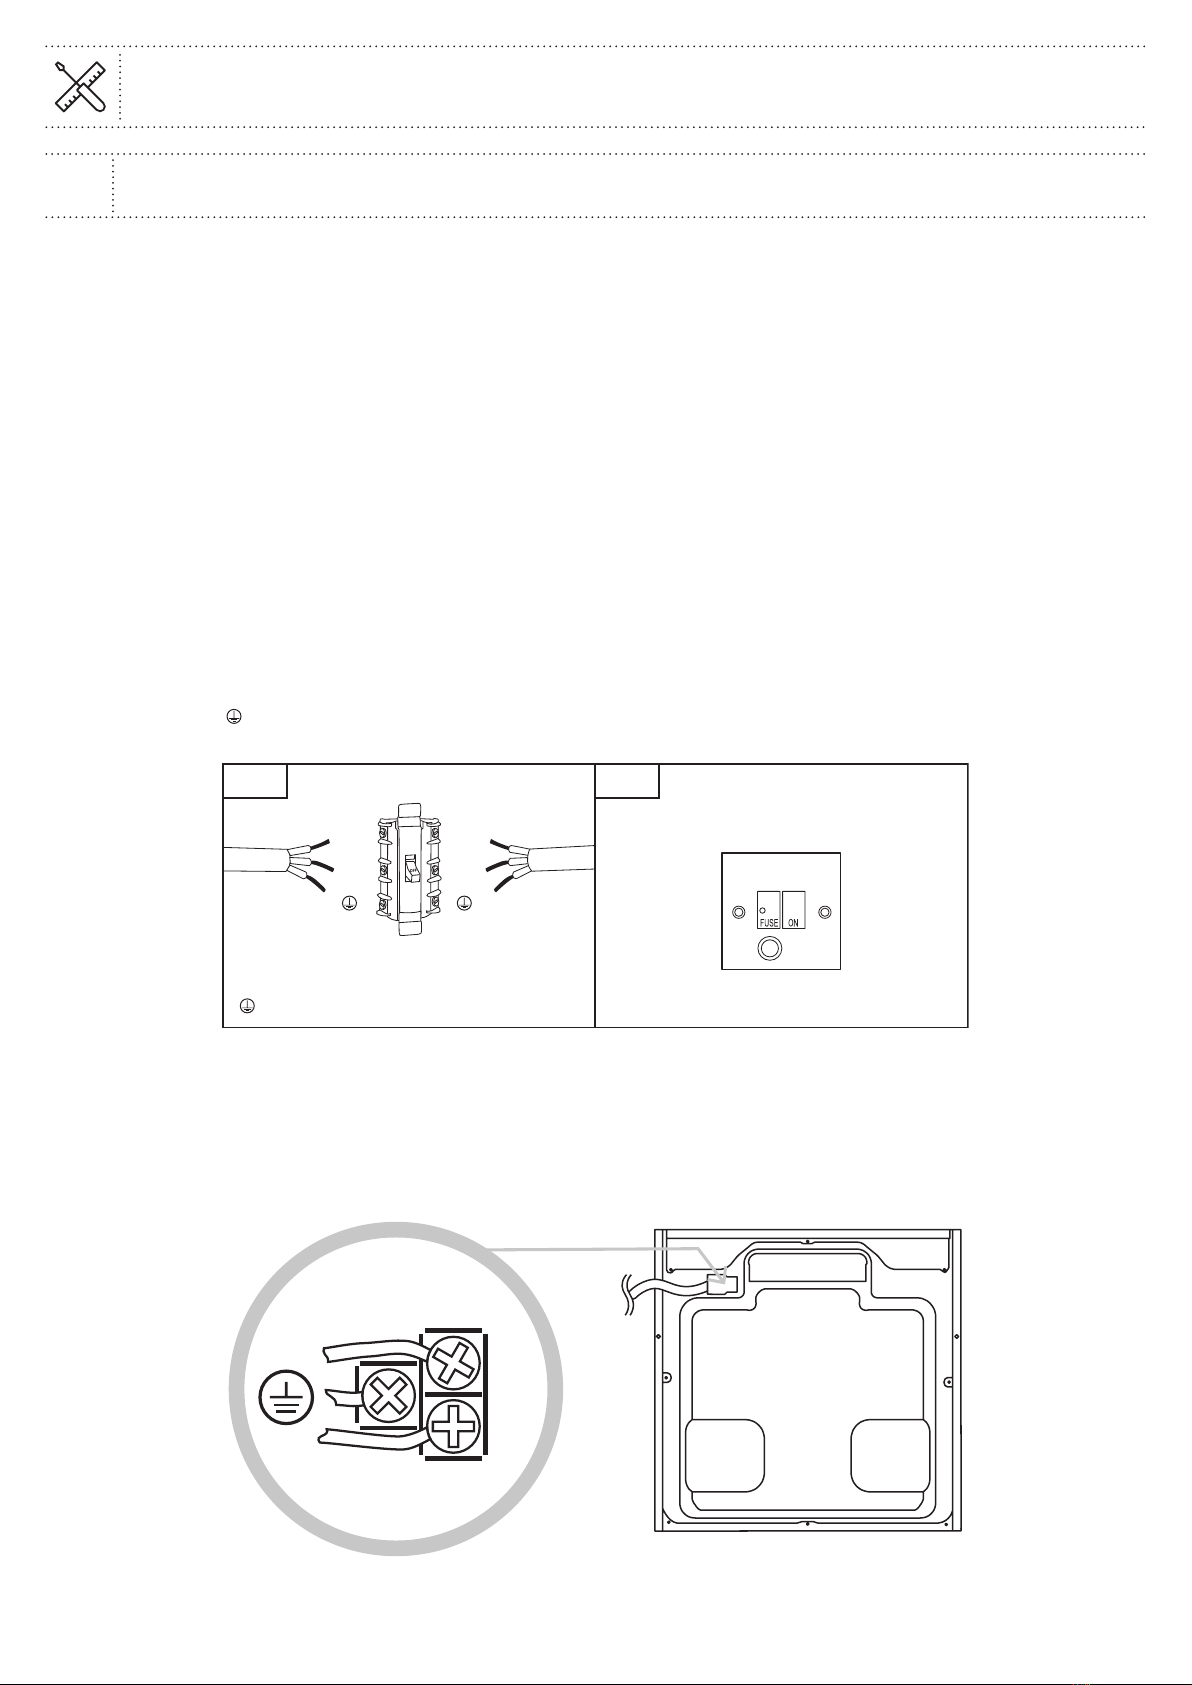
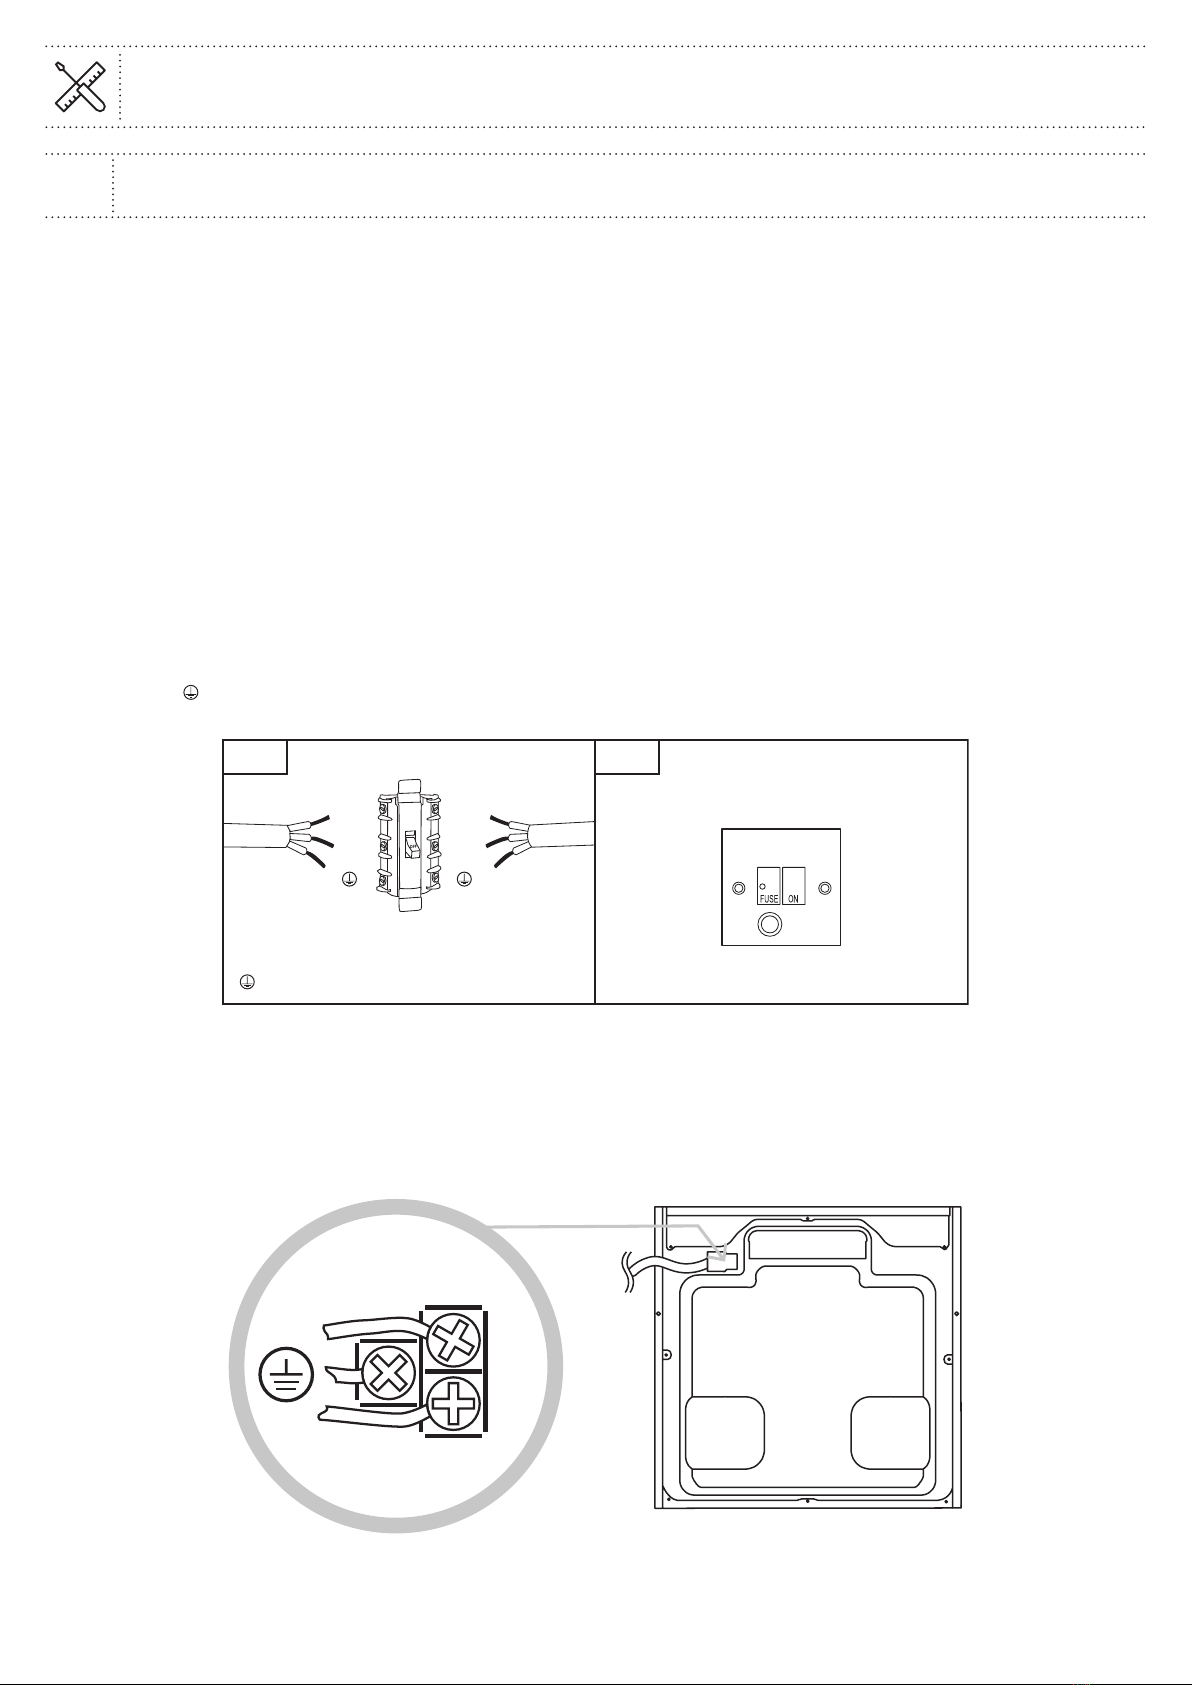
• Warning: Danger of electric shock! The power supply
must be cut off before the appliance is installed
completely.
• Only a qualified person in compliance with the
instructions provided can install the appliance. The
manufacturer declines all responsibility for improper
installation, which may harm persons and animals and
cause damage.
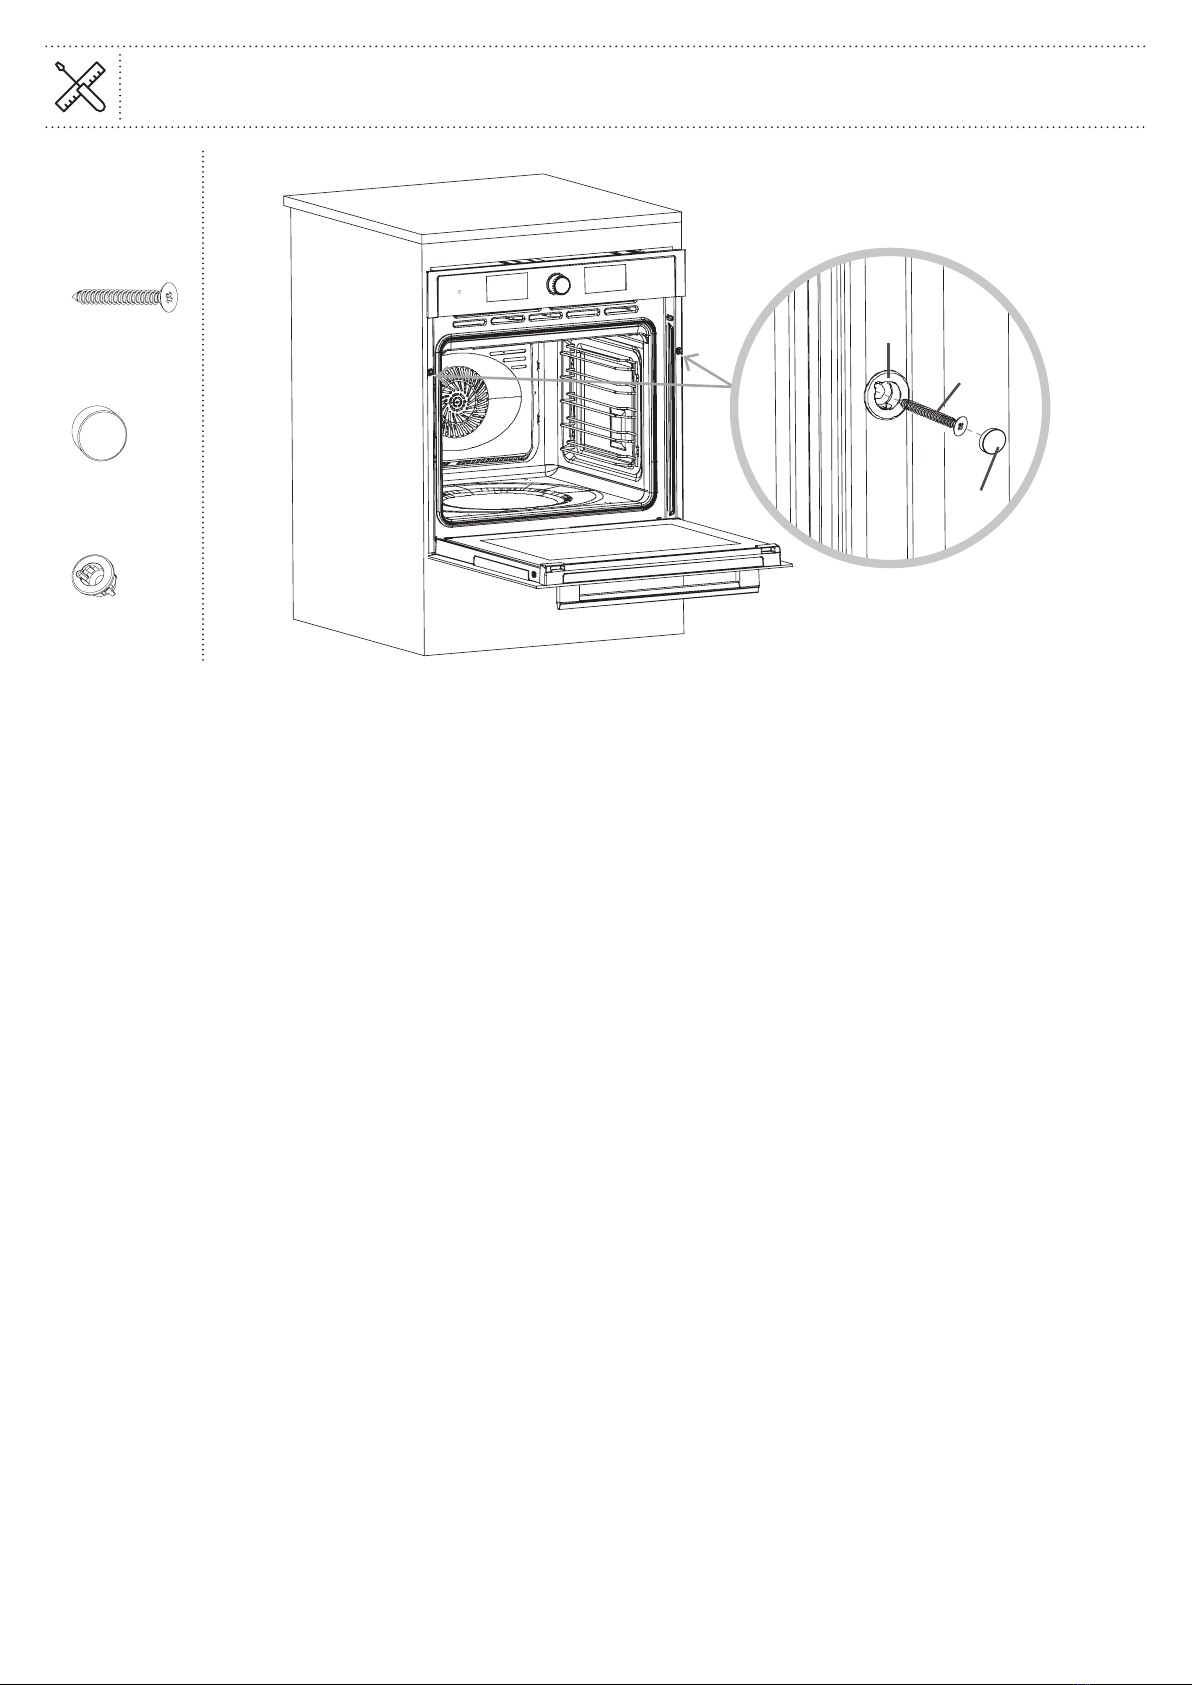
• Check the package and make sure you have all of the
parts listed.
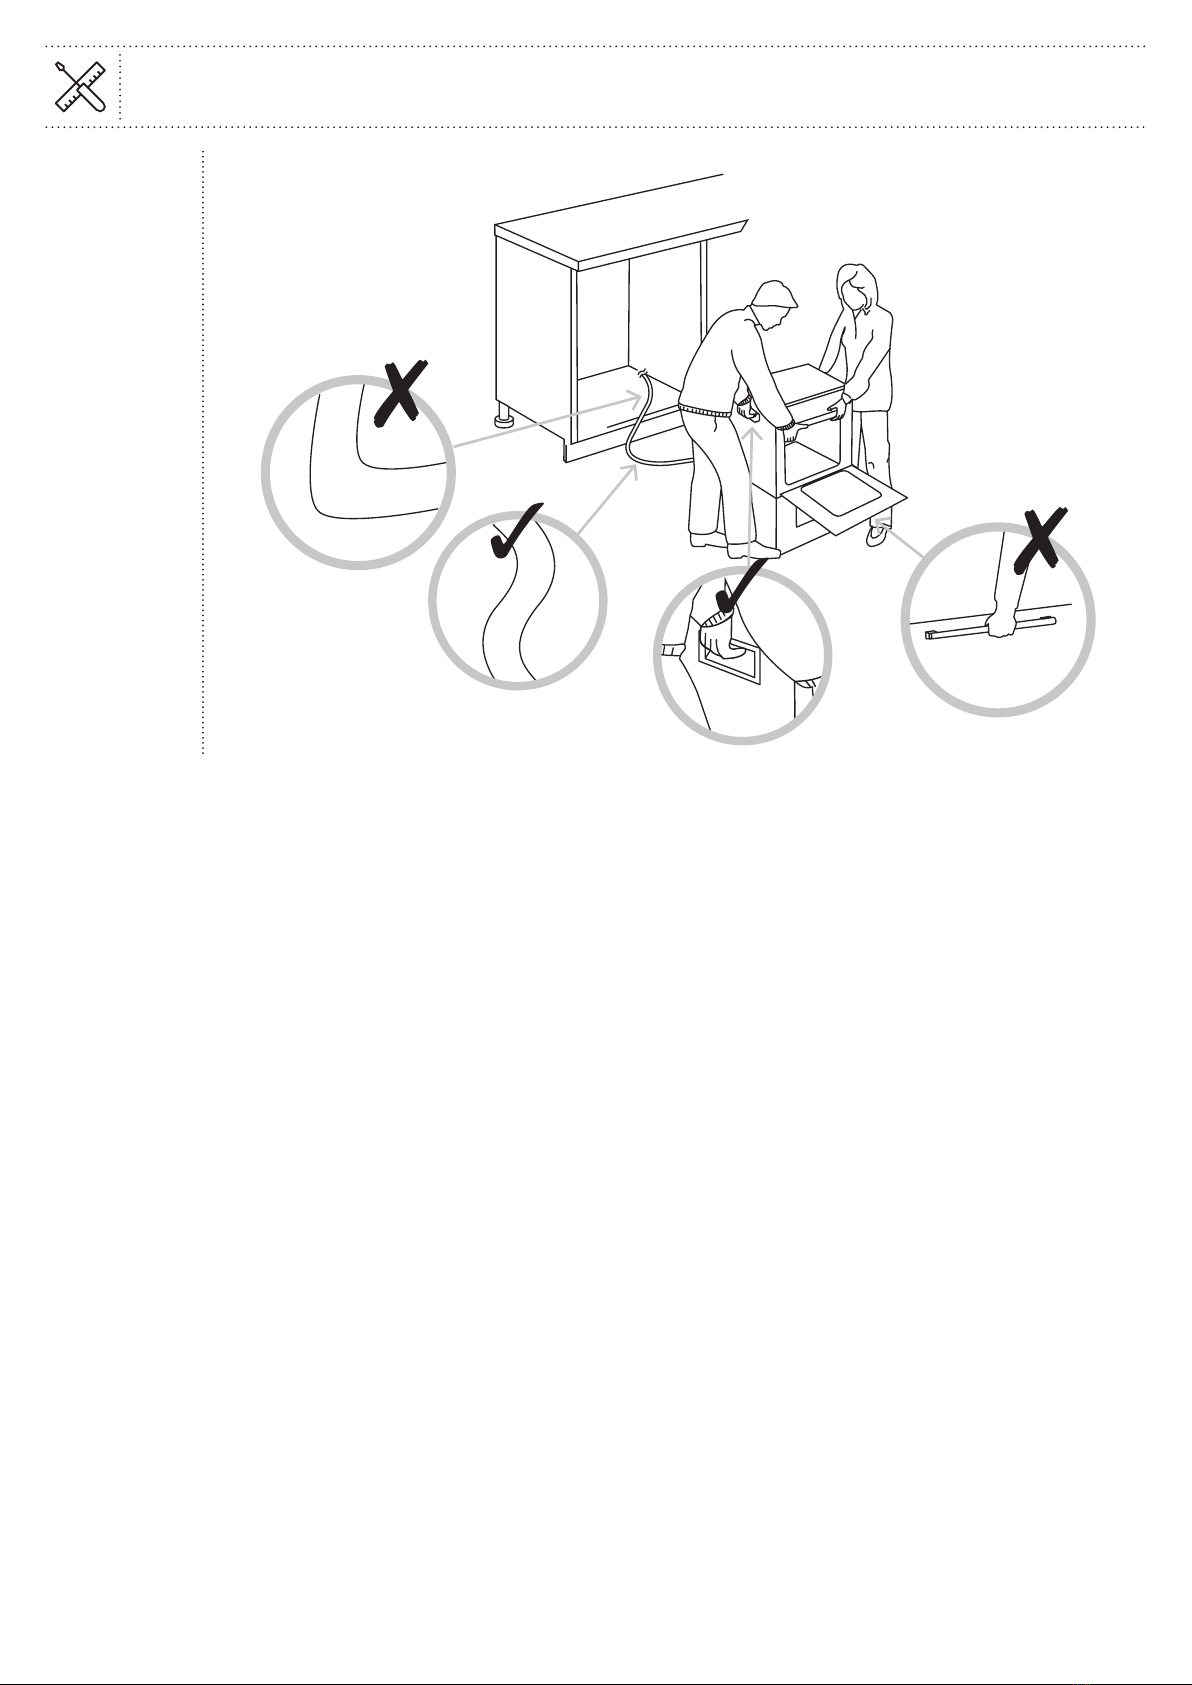
• Decide on the appropriate location for the appliance.
• This appliance contains glass. Please take care
when fitting or handling to prevent personal injury or
damage to the appliance.
• The specifications plate is available on this appliance.
This plate displays all the necessary identification
information for ordering replacement parts.
• If you sell the appliance, give it away, or leave it behind
when you move house, make sure you also pass on this
manual so that the new owner can become familiar
with the appliance and its safety warnings.
FR Installation
• Cet appareil doit être correctement installé par une
personne qualifiée, en suivant rigoureusement les
instructions du fabricant.
• Avertissement: Risque de choc électrique!
L’alimentation électrique doit être coupée avant que
l’appareil ne soit installé complètement.
• Seule une personne qualifiée, conformément
aux instructions fournies, peut installer l’appareil.
Le fabricant décline toute responsabilité en cas
d’installation incorrecte susceptible de blesser des
personnes et des animaux et de provoquer des
dommages.
• Vérifier l’emballage et s’assurer qu’il contient toutes
les pièces énumérées.
• Choisir un emplacement approprié pour l’appareil.
• Cet appareil contient du verre. Rester prudent lors
du montage ou de la manipulation pour éviter toute
blessure ou tout dommage de l’appareil.
• La plaque signalétique est disponible sur cet
appareil. Cette plaque affiche toutes les informations
d’identification nécessaires pour commander des
pièces de rechange.
• Si vous vendez l’appareil, si vous le donnez, ou
si vous le laissez lors de votre déménagement,
assurez-vous de transmettre ce manuel de façon à
ce que le nouveau propriétaire puisse se familiariser
avec l’appareil et les avertissements de sécurité.
PL Montaż
• WAŻNE — przed użyciem należy się uważnie zapoznać
z dołączonymi oddzielnie informacjami dotyczącymi
bezpieczeństwa.
• To urządzenie musi zostać prawidłowo zamontowane
przez wykwalifikowaną osobę, ściśle przestrzegającą
instrukcji producenta.
• Ostrzeżenie: Niebezpieczeństwo porażenia prądem
elektrycznym! Zasilanie musi być odcięte do momentu
zakończenia montażu urządzenia.
• Urządzenie może zamontować wyłącznie
wykwalifikowana osoba, postępując zgodnie z
dostarczoną instrukcją. Producent nie ponosi żadnej
odpowiedzialności za nieprawidłowy montaż, który
może spowodować obrażenia u ludzi i zwierząt lub
uszkodzenia mienia.
• Sprawdzić zawartość opakowania i upewnić się, że
zawiera części wymienione w specyfikacji.
• Wybrać odpowiednie miejsce ustawienia urządzenia.
• Urządzenie zawiera elementy szklane. Podczas
montażu lub obsługi zachować ostrożność, aby
uniknąć obrażeń ciała i uszkodzeń urządzenia.
• Na urządzeniu jest umieszczona tabliczka
znamionowa. Tabliczka zawiera wszystkie dane
identyfikacyjne niezbędne do zamówienia części
zamiennych.
• W przypadku sprzedaży urządzenia lub przeprowadzki
należy oddać tabliczkę lub pozostawić ją na swoim
miejscu. Należy również przekazać niniejszą instrukcję
obsługi nowemu właścicielowi, aby umożliwić mu
zaznajomienie się z urządzeniem i ostrzeżeniami
dotyczącymi bezpieczeństwa.
RO Instalare
• IMPORTANT - Citiți cu atenție ghidul separat privind
siguranța înainte de utilizarea produsului.
• Acest aparat trebuie instalat corespunzător de o
persoană calificată, urmând cu strictețe instrucțiunile
producătorului.
• Avertisment: Pericol de electrocutare! Alimentarea
cu energie trebuie întreruptă înainte de montarea
completă a aparatului.
• Numai o persoană calificată, în conformitate cu
instrucțiunile furnizate, poate instala aparatul.
Producătorul nu își asumă nicio responsabilitate
pentru instalarea necorespunzătoare, care poate
provoca rănirea persoanelor și a animalelor și poate
cauza prejudicii.
• Verificați ambalajul și asigurați-vă că aveți toate
piesele specificate.
• Decideți amplasarea corespunzătoare pentru aparat.
• Acest aparat conține sticlă. Aveți grijă la montare sau
manipulare, pentru a preveni vătămările corporale sau
deteriorarea aparatului.
• Plăcuța cu specificații este disponibilă pe aparat. Pe
plăcuță sunt afișate toate informațiile de identificare
necesare pentru comandarea pieselor de schimb.
• Dacă vindeți, donați sau lăsați în urmă aparatul când
vă mutați în altă casă, predați și acest manual noului
proprietar, pentru ca acesta să se familiarizeze cu
aparatul și cu avertismentele de siguranță.
04
EN Installation FR Installation
PL Montaż RO Instalare

01
05
EN Installation FR Installation
PL Montaż RO Instalare
EN Installation of Built-in Ovens
• For correct installation, this appliance can be fitted
under the work surface in a built under housing unit or
in a tall oven housing unit.
• Caution! The panels of the adjacent cabinets must
be made of heat-resistant material. In particular,
the adhesive that bonds the plastic laminate to the
furniture must be able to withstand temperatures
of not less than 120°C to avoid delamination. The
appliance must be housed in heat-resistant cabinets.
• Be sure to observe the minimum installation height
of the kitchen unit. Pay attention to the minimum
dimensions of the openings.
• Remove the back of the kitchen unit to ensure
an adequate current of air circulates around the
appliance.
FR Installation de fours intégrables
• Afin d’être bien installé, cet appareil peut être monté
sous le plan de travail dans un logement pour four ou
dans un logement intégré au mobilier de cuisine.
• Attention! Les panneaux des éléments de cuisine
adjacents doivent être conçus à partir de matériaux
résistants à la chaleur. La colle permettant de fixer le
plastique stratifié aux meubles doit pouvoir résister
à une température minimale de 120°C afin d’éviter
le décollement. L’appareil doit être installé dans des
éléments résistants à la chaleur.
• Penser à respecter la hauteur minimale d’installation
de l’unité de cuisine. Faire attention aux dimensions
minimales des ouvertures.
• Retirer le fond de l’élément de cuisine pour garantir
qu’un courant d’air circule autour du four.
PL Montaż piekarników do zabudowy
• Opisywane urządzenie można zamontować pod
blatem w zabudowie kuchennej lub w wysokiej
obudowie do piekarnika.
• Przestroga! Płyty sąsiednich szafek muszą być
wykonane z materiału odpornego na wysokie
temperatury. Aby uniknąć delaminacji, klej mocujący
laminat z tworzywa sztucznego do mebla musi być
odporny temperaturę co najmniej 120°C. Urządzenie
musi być umieszczone w szafce odpornej na wysokie
temperatury.
• Należy zwrócić uwagę na minimalną wysokość
montażu szafki kuchennej. Zwrócić uwagę na
minimalne rozmiary otworów.
• Należy zdjąć tylną płytę szafki kuchennej, aby
zapewnić odpowiedni przepływ powietrza wokół
piekarnika.
RO Instalarea cuptoarelor
încorporate
• În vederea instalării corecte, acest aparat poate
fi montat sub suprafața de lucru, într-o carcasă
construită sau într-un dulap înalt de cuptor.
• Atenție! Panourile dulapurilor adiacente trebuie să
fie fabricate din materiale termorezistente. În mod
special, adezivul care fixează plasticul laminat de
mobilier trebuie să suporte temperaturi de cel puțin
120°C pentru a evita desprinderea părții laminate.
Aparatul trebuie încastrat în dulapuri rezistente la
temperaturi înalte.
• Asigurați-vă că respectați înălțimea minimă de
instalare a dulapului de bucătărie. Acordați atenție
dimensiunilor minime ale deschiderilor.
• Îndepărtați partea posterioară a dulapului de bucătărie
pentru a asigura o circulație adecvată a aerului în jurul
aparatului.
595 mm
35 mm
35 mm
550 mm
560-568 mm
Ø100 mm
546 mm
596mm
20 mm
550 mm
5
8
5-5
9
5 mm
mm675
35 mm
5 mm
5 mm
560-568 mm
585-595 mm

02
06
EN Installation FR Installation
PL Montaż RO Instalare
EN
The diagram above shows the air circulation requirements including a slot that should be cut into the plinth if fitted.
It is essential when installing your oven there is adequate air circulation around the appliance to ensure the
correct operation of the appliance. Inadequate air circulation will greatly impair the performance of the
appliance and can affect adjacent cabinets due to the rise in temperature. The panels of the kitchen unit that
are next to the oven must be made of a heat resistant material. Ensure that the glues of units that are made of
veneered wood can withstand temperatures of at least 120°C. Remove the back of the kitchen unit to ensure
an adequate current of air circulates around the oven.
FR Le schéma ci-dessus présente les exigences en matière de circulation de l’air; une fente doit notamment être
découpée dans la plinthe, si les éléments en sont équipés.
Lors de l’installation de votre four, il est essentiel de prévoir une circulation d’air suffisante autour de l’appareil
afin d’en assurer le bon fonctionnement. Une circulation d’air insuffisante altère considérablement les
performances de l’appareil et peut affecter les éléments de cuisine adjacents en raison de l’augmentation
de la température. Les panneaux des éléments de cuisine situés à côté du four doivent être conçus à partir
d’un matériau résistant à la chaleur. Veiller à ce que les colles d’unités faites en bois contreplaqué puissent
supporter des températures d’au moins 120°C. Retirer le fond de l’élément de cuisine pour garantir qu’un
courant d’air circule autour du four.
PL Powyższy rysunek przedstawia wymaganą cyrkulację powietrza, w tym wymagane wycięcie w cokole.
Przy instalacji piekarnika istotne jest zapewnienie prawidłowej cyrkulacji powietrza wokół urządzenia, co
jest warunkiem jego prawidłowej pracy. Niedostateczna cyrkulacja powietrza znacznie utrudnia prawidłowe
działanie urządzenia i może mieć wpływ na sąsiednie szafki z powodu wzrostu temperatury. Płyty szafek
kuchennych sąsiadujących z piekarnikiem muszą być wykonane z materiału odpornego na wysokie
temperatury. Klej stosowany szafkach wykonanych z forniru musi wytrzymywać temperaturę co najmniej
120°C. Należy zdjąć tylną płytę szafki kuchennej, aby zapewnić odpowiedni przepływ powietrza wokół
piekarnika.
RO Diagrama de mai sus indică cerințele privind circularea aerului, inclusiv o fantă care trebuie tăiată în plintă,
dacă este montată.
Existența circulației adecvate a aerului în jurul aparatului este esențială la montare, pentru a asigura
funcționarea corectă a aparatului. Circulația defectuoasă a aerului va dăuna în mare măsură performanței
aparatului și poate afecta dulapurile adiacente, din cauza temperaturilor înalte. Panourile mobilei de bucătărie
de lângă cuptor trebuie să fie fabricate dintr-un material rezistent la temperaturi înalte. Asigurați-vă că
adezivul dulapurilor fabricate din furnir poate rezista la temperaturi de cel puțin 120°C. Îndepărtați partea din
spate a dulapului pentru a asigura circularea unui curent corespunzător de aer în jurul cuptorului.
595 mm
35 mm
10 mm
35 mm

03
07
EN Installation FR Installation
PL Montaż RO Instalare
EN
Important: Do not lift the appliance by the door handle to avoid potential damage to the glass and hinges.
Caution! If the supply cord is damaged, it must be replaced by the manufacturer, its service agent or similarly
qualified persons in order to avoid a hazard.
FR Important: ne pas soulever le four par la poignée de la porte afin d’éviter des dommages potentiels au niveau
du verre et des charnières.
Attention! Si le cordon d’alimentation est endommagé, il doit être remplacé par le fabricant, son prestataire
de service ou une personne qualifiée afin d’éviter tout accident.
PL Ważne: Nie należy podnosić urządzenia, trzymając za uchwyt drzwi, aby uniknąć uszkodzenia szkła oraz zawiasów.
Przestroga! Jeśli dojdzie do uszkodzenia przewodu zasilania, powinien on zostać wymieniony przez
producenta, przedstawiciela serwisowego lub inną osobę o podobnych kwalifikacjach, aby uniknąć zagrożeń.
RO Important: Nu ridicați aparatul ținându-l de mânerul ușii, pentru a evita orice potențiale deteriorări ale sticlei
și balamalelor.
Atenție! În cazul în care cablul de alimentare este deteriorat, acesta trebuie înlocuit de producător, agentul de
service sau persoane cu un nivel de calificare similar pentru evita o situație periculoasă.

04
08
EN Installation FR Installation
PL Montaż RO Instalare
[07]
[08]
[09]
EN
Once the oven has been lifted into place inside the appliance housing, locate the two holes in the casing of the
oven and fix it into place using [07], [08] and [09].
Caution: Do not over tighten the screws [07] to avoid damage to the oven or appliance housing - use a
screwdriver only!
FR Une fois que le four est placé à l’intérieur du meuble de l’appareil, repérer les deux trous dans l’enveloppe du
four et les fixer à l’aide de [07], [08] et [09].
Avertissement: ne pas trop serrer les vis [07] pour éviter d’endommager le meuble de l’appareil ou le four.
Utiliser uniquement un tournevis!
PL Po umieszczeniu piekarnika we właściwym miejscu wewnątrz obudowy urządzenia należy zlokalizować dwa
otwory w obudowie piekarnika i zamocować go za pomocą elementów [07], [08] i [09].
Przestroga: Nie dokręcać zbyt mocno śrub [07], aby uniknąć uszkodzenia piekarnika lub obudowy urządzenia
— należy używać wyłącznie wkrętaka!
RO După așezarea cuptorului în interiorul carcasei, identificați cele două găuri din carcasa cuptorului și fixați-l în
poziție, utilizând [07], [08] și [09].
Atenție: Nu strângeți excesiv șuruburile [07], pentru a evita deteriorarea cuptorului sau a carcasei - utilizați
doar șurubelnița!
[07] x 2
[08] x 2
[
09
]
x 2

09
EN Installation FR Installation
PL Montaż RO Instalare
EN Electrical Installation
All installation must be carried out by a competent person or qualified electrician. Before connecting the mains supply
ensure that the mains voltage corresponds to the voltage on the rating plate.
Direct Connection
The appliance must be connected directly to the mains using an omnipolar circuit breaker with a minimum opening of
3 mm between the contacts.
The installer must ensure that the correct electrical connection has been made and that it complies with the wiring
diagram.
The cable must not be bent or compressed.
Regularly check the power cord for damage. If the supply cord becomes damaged, it must be replaced by the
manufacturer, its service agent or similarly qualified persons in order to avoid a hazard.
WARNING: This is a Class I appliance and MUST be earthed.
The appliance is supplied with a 3-core mains cable and must be connected to the electricity supply via a double pole
switch having a 3 mm minimum contact gap on each connector.
The Residual Current Device (RCD) must be rated at 16 Amps.
The wires in the mains lead are coloured in accordance with the following code:
Brown = L - Live
Blue = N - Neutral
Green and Yellow = - Earth
EUR UK
N
L
N
L
N
L
DOUBLE POLE SWITCHED
FUSED SPUR OUTLET
USE A16AMP FUSE
(Blue)
(Brown)
(Green/Yellow)
To avoid the risks that are always present when you use an electrical appliance it is important that this appliance is
installed correctly and that you read the safety instructions carefully to avoid misuse and hazards. Please keep this
instruction booklet for future reference and pass it on to any future owners. After unpacking the appliance please
check that it is not damaged. If in doubt, do not use the appliance but contact Customer Services - see end of Care &
Maintenance section for details.
L
N

10
EN Installation FR Installation
PL Montaż RO Instalare
FR Installation électrique
Toute l’installation doit être effectuée par une personne compétente ou un électricien qualifié. Avant de raccorder le
câble d’alimentation, s’assurer que la tension de secteur correspond à la tension indiquée sur la plaque signalétique.
Raccordement direct
L’appareil doit être raccordé directement au secteur à l’aide d’un disjoncteur omnipolaire avec une ouverture minimale
de 3mm entre les contacts.
L’installateur doit s’assurer que le bon raccordement électrique a été effectué et qu’il respecte le schéma de câblage.
Le câble ne doit pas être plié ou comprimé.
Vérifier régulièrement que le cordon d’alimentation n’est pas endommagé. Si le cordon d’alimentation est endommagé,
il doit être remplacé par le fabricant, son prestataire de service ou une personne qualifiée afin d’éviter tout accident.
AVERTISSEMENT: il s’agit d’un appareil de ClasseI. Il DOIT être raccordé à la terre.
L’appareil est livré avec un câble secteur à 3conducteurs principaux. Il doit être relié à l’alimentation électrique via un
interrupteur bipolaire présentant un écart minimal de 3mm entre chaque raccord.
Le dispositif à courant résiduel (RCD) doit être de 16ampères.
les fils du cordon d’alimentation secteur présentent le code couleur suivant:
Marron=L-Phase
Bleu=N-Neutre
Vert et jaune= -Terre
EUR UK
N
L
N
L
N
L
BOÎTIER DE DÉRIVATION AVEC
FUSIBLES ET INTERRUPTEUR BIPOLAIRE
UTILISER UN FUSIBLE DE 16 A
(bleu)
(marron)
(vert/jaune)
Afin d’éviter les risques, toujours présents lors de l’utilisation d’un appareil électrique, il est important que cet appareil
soit correctement installé et de lire les instructions de sécurité soigneusement en vue d’empêcher tout danger ou
mauvaise utilisation. Veiller à conserver ce manuel d’instructions pour référence et à le transmettre à tout futur
propriétaire. Après avoir déballé l’appareil, vérifier qu’il n’est pas endommagé. En cas de doute, ne pas utiliser l’appareil,
contacter le service client (voir la fin de la section Entretien pour plus de détails).
L
N

11
EN Installation FR Installation
PL Montaż RO Instalare
PL Instalacja elektryczna
Montaż musi zostać wykonany przez osobę kompetentną lub wykwalifikowanego elektryka. Przed podłączeniem
zasilania upewnić się, czy napięcie zasilania odpowiada napięciu na tabliczce znamionowej.
Podłączenie bezpośrednie
Urządzenie należy podłączyć bezpośrednio do sieci zasilającej, korzystając z wyłącznika wielobiegunowego o
minimalnym odstępie między stykami wynoszącym 3mm.
Monter powinien upewnić się, czy zostało wykonane odpowiednie połączenie elektryczne oraz czy jest ono zgodne ze
schematem połączeń.
Przewód nie może być zagięty ani przygnieciony.
Należy regularnie sprawdzać przewód zasilania pod kątem uszkodzeń. Jeśli dojdzie do uszkodzenia przewodu zasilania,
powinien on zostać wymieniony przez producenta, przedstawiciela serwisowego lub inną osobę o podobnych
kwalifikacjach, aby uniknąć zagrożeń.
OSTRZEŻENIE: Jest to urządzenie klasy I i MUSI być uziemione.
Urządzenie jest wyposażone w 3-żyłowy przewód zasilania sieciowego, który należy podłączyć do sieci zasilającej za
pośrednictwem przełącznika dwubiegunowego z odstępem między stykami każdego bieguna wynoszącym co najmniej
3mm.
Wyłącznik różnicowoprądowy (RCD) musi mieć wartość znamionową 16A.
Żyły w przewodzie zasilania są oznaczone następującymi kolorami:
Brązowy = L – napięcie
Niebieski = N – neutralny
Zielono-żółty = – uziemienie
EUR UK
N
L
N
L
N
L
(niebieski)
Aby ograniczyć do minimum ryzyko związane z użytkowaniem urządzenia elektrycznego, niezwykle ważne jest, aby
produkt został prawidłowo zamontowany oraz aby użytkownik dokładnie zapoznał się z instrukcjami dotyczącymi
bezpieczeństwa i unikał nieprawidłowej obsługi oraz związanych z tym zagrożeń. Należy zachować instrukcję obsługi w
celu wykorzystania w przyszłości i przekazania jej kolejnym właścicielom. Po rozpakowaniu urządzenia upewnić się, że
nie jest ono uszkodzone. W przypadku wątpliwości nie używać urządzenia i skontaktować się z działem obsługi klienta.
Więcej szczegółowych informacji znajduje się na końcu części Czyszczenie i konserwacja.
L
N

12
EN Installation FR Installation
PL Montaż RO Instalare
RO Instalarea electrică
Toate operațiunile de instalare trebuie să fie realizate de o persoană competentă sau un electrician calificat. Înainte
de conectarea la rețeaua electrică, asigurați-vă că tensiunea rețelei corespunde cu tensiunea de pe plăcuța de
identificare.
Conexiune directă
Aparatul trebuie conectat direct la rețea cu ajutorul unui disjunctor omnipolar cu o deschidere minimă între contacte
de 3 mm.
Instalatorul trebuie să se asigure că a realizat corect legăturile electrice și că a respectat schema electrică.
Cablul nu trebuie să fie îndoit sau comprimat.
Verificați periodic cablul de alimentare, pentru a depista deteriorările. În cazul în care cablul de alimentare este
deteriorat, acesta trebuie înlocuit de producător, agentul de service autorizat sau persoane cu un nivel de calificare
similar, pentru a evita situațiile periculoase.
AVERTISMENT: Acesta este un aparat Clasa I și TREBUIE împământat.
Aparatul este prevăzut cu un cablu de alimentare cu 3 fire și trebuie conectat la rețeaua electrică printr-un întrerupător
bipolar, cu distanța pe fiecare conector de minim 3 mm.
Dispozitivul de protecție la curent rezidual (RCD) trebuie să aibă 16 Amperi.
Firele din cablul de alimentare sunt colorate conform codificării de mai jos:
Maro = L - Fază
Albastru = N - Nul
Verde și galben = - Împământare
EUR UK
N
L
N
L
N
L
(Albastru)
(Maro)
(Verde / galben)
Pentru a evita riscurile aferente utilizării unui echipament electric, este important ca acest aparat să fie instalat corect
și să citiți cu atenție instrucțiunile de siguranță, ca să evitați utilizarea greșită și pericolele. Păstrați această broșură cu
instrucțiuni pentru consultare ulterioară și predați-o proprietarilor viitori. După despachetarea aparatului, verificați
să nu fie deteriorat. Dacă aveți îndoieli, nu folosiți aparatul, ci contactați Serviciul clienți - a se vedea sfârșitul secțiunii
Îngrijire și întreținere, pentru detalii.
L
N

13
EN Use FR Utilisation
PL Użytkowanie RO Utilizare
EN Before you start
WARNING: Read the instructions before using the appliance.
Switch on the appliance at the switched fused connection unit. The appliance will beep once and is ready for use.
EN Oven Description
1
2
3
4
5
6
7
8
9
5
10
4
3
6
1Control panel
2 Mains cable (at rear, not shown)
3Carrying handles (x 2)
4 Fixing holes (x 2)
5 Side rails (x 2)
6 Oven lamp (x 2)
7Fan
8Door
9Door handle
10 Shelf level markings
Note: This diagram may be slightly different from the layout of the appliance.
Shelf levels are numbered from the bottom up and levels 4 and 5 are used mainly for grilling and
browning of food. Refer to the cooking guides provided throughout this manual to determine the
appropriate shelf levels for your dishes.
EN Oven Control Panel
1 2 3 4
5 6
12
11
10
19:45
Thursday, 2 1 June
8
7
9
5 6

14
EN Use FR Utilisation
PL Użytkowanie RO Utilizare
1Master On/Off Key 7 Pyrolytic Function Key
2 Left Touch Screen 8 Presets Mode Key
3 360° Control Knob (Push to eject or hide) 9 Master Settings Key
4 Right Touch Screen 10 Oven Light Key
5Cooking Mode Key 11 Child Lock Key
6 Defrost Mode Key 12 Time and Date Display
EN Turning the oven on and off
1. Touch the Master On/Off Key once to turn on the oven, and once more to turn it off. The oven
will beep once to confirm in each case.
2. After ten minutes of inactivity, the oven will automatically turn itself off.
3. Once the oven has started up, both touch screens will be displayed as above.
EN Using the touch screens
Setting up the oven for first use
From the main menu of the Left Touch Screen, touch the Master Settings Key .
NOTE: It is normal for the Right Touch Screen to dim during various functions such as when Settings
are altered.
1 Exit Master Settings Key
2Clock Key
3Date Key
4Language Key
5 Display Brightness Key
6Master Volume Key
7 Factory Reset Key
6
2 5
7
1
Setting the time
1. Touch the Clock Key and the hour and minute digits appear on the Right Touch Screen.
2. Rotate the 360° Control Knob to select the hours from 0-23.
3. Touch the minute display and rotate the 360° Control Knob to select the minutes from 0-59.
4. Touch the Tick twice to store the time.
Setting the date
1. Touch the Date Key and the date, month and year appear on the Right Touch Screen.
2. Swipe up or down in each column to choose the correct date.
3. Touch the Tick twice to store the date.
Setting the language
1. Touch the Language Key and the country options appear on the Right Touch Screen.
2. Swipe up or down to choose the correct language.
3. Touch the Tick twice to store the language.
43

15
EN Use FR Utilisation
PL Użytkowanie RO Utilizare
Setting the display brightness
1. Touch the Display Brightness Key and the control appears on the Right Touch Screen.
2. Rotate the 360° Control Knob to select the brightness from 0-9. Default brightness is 8.
3. Touch the Tick twice to store the brightness.
Setting the alert volume
1. Touch the Master Volume Key and the control appears on the Right Touch Screen.
2. Rotate the 360° Control Knob to select the volume from 0-3. Default volume is 3.
3. Touch the Tick twice to store the volume.
Reset to factory default options
1. Touch the Factory Reset Key and the reset message appears on the Right Touch Screen.
2. Touch the Tick or Cross to reset or cancel and return to the Settings menu.
EN Using your oven
Before first use
• Remove all stickers, surface protection foils and packing materials.
• Remove all accessories and the side racks from the cavity.
• Clean the appliance cavity and all accessories as described in Care and maintenance.
• Turn the oven on, choose Standard mode and set the temperature to 250°C. Close the door and
cook for one hour to burn off any remaining manufacturing residues. (See the section “Choosing a
Cooking Mode” below.)
IMPORTANT: Keep the kitchen well ventilated during this first use to help disperse the odours
produced. Keep kitchen doors closed and ensure children and pets are not present.
Cooking Modes
The increments in all modes:
Temperature set Increment
under 100°C 1°C
over 100°C 5°C
MENU PAGE 1
Icon Mode Temperature
Range (default) Description
Standard 30-250°C
(180°C)
Traditional static heat from upper and lower heating elements ensures
that the foods remain moist when cooked for longer periods of time.
Ideal for slow baked cakes and soufflés.
Convection 50-250°C
(160°C)
A heating element around the convection fan provides an additional
source of heat for convection style cooking. In convection mode the fan
automatically comes on to improve air circulation within the oven and
creates an even heat for cooking. This mode is suitable for cakes, pastry
and to roast meat when you want it well cooked on the outside and
tender in the middle. No pre-heating is required when using this mode.
ECO 140-240°C
(140°C)
For energy-saving cooking. The temperature range of the thermostat is
wider and drops to a lower temperature to save energy. The oven heats
up to a higher temperature, then stops and switches back on at lower
temperatures. The average temperature remains the same. Increment is
20°C in this mode.

16
EN Use FR Utilisation
PL Użytkowanie RO Utilizare
Fanned 50-250°C
(160°C)
Combination of the fan and both heating elements provides more even
heat penetration, saving up to 30-40% of energy. Dishes are lightly
browned on the outside and still moist on the inside. Ideal for grilling or
roasting large pieces of meat at a higher temperature.
Grill 150-250°C
(180°C)
Only the upper heating element is working.
Best results are achieved by using the top shelf for smaller foods and a
lower shelf for larger foods. Ideal for rapid cooking and browning.
Grill & Fan 50-250°C
(180°C)
The inner heating element and the upper heating element are both
working together with the fan.
Best results are achieved by using the top shelf for smaller foods and
a lower shelf for larger foods. The fan lessens the strong heat from the
upper heating element creating more even browning and heat distribution,
without drying out foods. Ideal for rapid cooking and browning.
Double grill 150-250°C
(180°C)
The inner heating element and the upper heating element are both
working. Ideal for grilling flat items and for browning foods.
Bottom 30-220°C
(170°C)
Only the lower heating element is working. Ideal for pies or pastries
where a crispy base is desired. Also suitable for slow cooking of stews
and casseroles.
MENU PAGE 2
Swipe left to access.
Slow cook 80-120°C
(100°C)
The upper and lower heating elements are both working at a lower heat
level. Ideal for slow cooking tender and juicy meats.
Preserve 60-100°C
(75°C)
Use this mode to keep food hot for short periods.
Warm plate 30-70°C
(50°C)
Use this mode to warm ceramic plates and dishes before serving.
Dry 50-150°C
(110°C)
Ideal for drying small pieces of fruit, vegetables or herbs.
Pizza 50-250°C
(180°C)
Ideal for pizza and dishes which need a lot of heat from underneath. The
lower element and circular convection element are both used.
Practical cooking advice
• This appliance offers a wide range of alternatives which allow you to cook any type of food in the
best possible way. With time you will learn to make the best use of this versatile appliance and the
following directions are a guideline which may be varied to suit your personal needs.
• Read the information on the food packaging for guidance on recommended cooking times and
temperatures. Once familiar with the performance of the appliance, the temperatures and times
may be varied to adapt them to your personal tastes.
• Check that frozen food is completely thawed before cooking, unless instructed otherwise.
STANDARD
Food Temperature setting (ºC) Recommended shelf
position from the bottom Cooking time in minutes
Small cakes 175-185 416-19
Sponge cake 180-185 220-25
Pizza 205-210 318-23
Apple yeast cake 185-195 425-50

17
EN Use FR Utilisation
PL Użytkowanie RO Utilizare
CONVECTION
Small cakes (single layer) 165-170 216-19
Sponge cake 160-165 220-25
Pizza 170-175 218-23
Apple yeast cake
(single layer) 170-175 225-50
Small cakes
(double layer) 165-170 2 (deep tray)
4 (shallow tray) 20-23
Apple yeast cake
(double layer) 170-175 2 (deep tray)
4 (shallow tray) 65-75
GRILL
Toast 240 34-5
Beef steak 240 215+
GRILL & FAN
Food Temperature setting (ºC) Recommended shelf
position from the bottom Cooking time in minutes
Chicken 210 255-65
Goose 210 275-88
Roasted joint of pork 210 1135-150
DOUBLE GRILL
Toast 240 46-8
Choosing a Cooking Mode
• From the Main Menu, choose the Cooking Mode Key to enter the Heating Menu.
• The Cooking Mode options are now shown on the Left Touch Screen, and are across two pages.
Swipe left or right to access both pages.
• Touch the icon of the required Cooking Mode from the table above and the two displays will now
show the individual controls available in that mode.
TURN AND TOUCH
Quick Tip: From the Main Menu, just turn the 360° Control Knob clockwise or anti-clockwise and you
will gain instant access to the Standard Cooking Mode at its default temperature of 180°C. Touch the
Start Cooking Key and the oven will start instantly.

18
EN Use FR Utilisation
PL Użytkowanie RO Utilizare
Cooking Mode Controls
Left Touch Screen Right Touch Screen
Boost Control (if applicable) Temperature Dial Timer Dial
Timer
ºC
ºC
19
11 10
284
1 Exit Key 6 Temperature Dial
2Current Cooking Mode 7Current time
3 Boost Key (if applicable) 8 Timer Dial
9 Child Lock Key
4 Main Menu Key 10 Stop Cooking Key
5 Oven Light Key (orange when on) 11 Start Cooking Key
Adjusting the temperature
• Eject the 360° Control Knob (if necessary) and rotate it to set the desired temperature on the
Right Touch Screen.
Adjusting the timer (optional)
• If required, touch the Timer Dial and rotate the 360° Control Knob to set the timer from 1 minute to
4 hours.
• When the selected time has elapsed, the oven will continue to beep for one minute or until the
“Timer complete” tick is touched on the screen. NOTE: This will switch off the oven. Touch the
Stop Cooking Key twice to return to the Main Menu.
Setting the Boost
• Touch the Boost Key to activate this function and the oven will heat up faster to the selected
temperature by switching on all elements for a short period until the operating temperature is
reached. The oven will then switch off those elements not used in the selected Cooking Mode.
Note: This function is not available in every Cooking Mode.
Start cooking
Touch the Start Cooking Key to commence cooking. The Right Touch Screen will change to the
following display, and the Timer will start its countdown, if this was selected.
The Oven Light Key will turn orange when the oven is illuminated. If you wish to alter the
temperature after cooking has started, just touch the Temperature Dial and adjust as required. After
three seconds the new temperature is set automatically.
Note: If you do not commence cooking at this point, the oven will revert to the Main Menu after five
minutes.
07:15
Cooking timeTemperature
18 0:01
Current 180
ºC
ºC
34
567
8
910
3 5 6 7
1 2 3 4

19
EN Use FR Utilisation
PL Użytkowanie RO Utilizare
1 Oven Light Key (orange when on) 6 Internal oven temperature (does not show
when selected temperature has been reached)
2Current time 7 Pause Cooking Key
The large Pause icon will show in the centre
of the display and both screens will be locked;
touch the icon again to resume cooking.
3Timer
When set: Shows remaining time
When not set: Shows current cooking time
8 Selected cooking temperature
4 Child Lock Key 9 Selected Cooking Mode
5Stop Cooking Key 10 Cooking in progress
Stop cooking
Touch the Stop Cooking Key at any time to turn the oven off and cancel the timer.
Using Defrost
To defrost manually
1. From the Main Menu, choose the Defrost Key to enter the Defrost Menu. There is one option
shown on the Left Touch Screen and the Timer options are shown on the Right Touch Screen.
07:15
Timer
2. Touch the Start Key to instantly commence defrosting, and touch the Stop Key to finish. The
Defrosting Time is displayed on the right screen.
3. During defrosting you can touch the Pause Key to temporarily stop and touch the large Pause
icon to recommence again.
To defrost using the Timer:
1. From the Main Menu, choose the Defrost Key to enter the Defrost Menu. There is one option
shown on the Left Touch Screen and the Timer options are shown on the Right Touch Screen.
2. Touch the Timer icon on the Right Touch Screen and rotate the 360° Master Control Knob to set
the required defrosting time.
3. Touch the Start Key to commence defrosting and the Timer will start its countdown. Touch the
Stop Key to finish early.
4. During defrosting you can touch the Pause Key to temporarily stop and touch the large Pause
icon to recommence again.
Presets
You can create and save up to twelve user presets for your favourite settings which can be used at
any time. Each preset can include the Cooking or Defrosting Mode, temperature and cooking time.
Note: If the Cooking Mode Key is chosen, select the required Cooking Mode from the two screens in
the usual way.

20
EN Use FR Utilisation
PL Użytkowanie RO Utilizare
Creating a Preset
1. From the Main Menu touch the Presets Key .
2. Touch the “Save a preset” Key .
Save a preset
3. On the Left Touch Screen select the Cooking Mode Key or Defrost Mode Key .
Note: If the Cooking Mode Key is chosen, select the required Cooking Mode from the two screens in
the usual way.
4. On the Right Touch Screen select the Temperature and Time required, for example: Standard
Mode, 180°C, 01:30.
07:15
Temperature
18 1:30
Timer
ºC
5. Touch the “Save a preset” Key to store this to memory.
6. The Preset number created will be displayed on the screen; touch the Tick to exit and the
Preset is shown in the Left Touch Screen.
Using a Preset
-
hr
hr
hr
-
-
1
30
40
00
min
min
min
220
180
Save a preset
1. All Presets are stored across four menu pages.
2. Swipe the screen from right to left to access these pages and locate your required Preset.
Other manuals for Bamia GHPY71
1
This manual suits for next models
1
Table of contents
Languages:
Other GoodHome Oven manuals