goodnature A18 User manual

1
A18 Grey Squirrel Trap
Quick Start Guide
goodnaturetraps.co.uk

1
Your Trap – A18 Grey Squirrel
Striker
Black Tabs
Trap Body
Tree Mount
Screws
Shroud Cap
Shroud Entrance
Digital Strike
Counter
Lure Basket
Trigger
Lure Cradle
Gas Canister
The Back Plate
The Back Plate provides a surface that makes it diicult
for non-target species to get purchase beneath the trap,
preventing them from entering. Grey Squirrels are still
able to easily get into the trap.

2
Doing things dierently is in our nature
We started Goodnature for good reason: to see
endangered wildlife in New Zealand and around the
world flourish again. This means getting on top of a
bunch of pests. We also want to go about it kindly,
without using nasty toxins. That’s why we develop
humane traps that automatically reset and are easy
and safe to use in living spaces through to wild places.
Not only have we created a world-first, we started a
revolution. Big thanks for joining us.
Your constant control system
Congratulations! You’re now the owner of the world’s
most advanced pest control technology. Goodnature’s
automatic resetting trapping system gives you
constant control against pest reinvasion. Powered using
compressed CO2gas, Goodnature technology combines
design engineering principles and animal behavioural
science with the highest manufacturing standards to
deliver a trap that will kill 18 times per gas canister. Our
lures are developed to maximise freshness to remain
highly attractive to pests. As our lures are toxin-free
there is no risk of secondary poisoning to wildlife, pets,
livestock and working animals. Our Trigger and Strike
mechanism gives the Goodnature A18 its certified
A-Class humane status. This Quick Start Guide has
been developed to help you get the best results from
your trap. Your success is everyone’s success so if you
have any questions or need any tips, we’re here to help -
goodnaturetraps.co.uk
Trap safely
We’ve designed our traps to target specific pests only.
To avoid injuring or killing protected wildlife or any
other animal that’s good for nature, it’s important you
follow the installation instructions to set up your trap
correctly.
This guide shows you how to make sure each trap
is set up to be both eective and safe. For more
trap safety advice, tips to maximise success and
support biodiversity in your own backyard, visit
goodnaturetraps.co.uk
Our A18 trap is approved for trapping grey squirrels
in the UK. If you’d like to trap rats, mice or stoats,
check out our A24 Trap. All use of traps is subject to
legislation set out in the Spring Traps Approval Order
for each country.
We’re here to help
Drop us an email or pick up the phone - we’d love to
help you get rid of your grey squirrel problem.
Sni sni
Targeted long life lure
attracts grey squirrels
into the trap.
Kapow!
Grey squirrels
move the trigger
to get to the lure,
firing the trap.
Auto-reset
The trap clears and
resets immediately
after an A-Class
humane kill.
Sni sni...
The long life lure
continues to attract
grey squirrels for
constant control.
Scavenged
Dierent species
scavenge the dead
carcasses from
below the trap.
How it works

3
Installing your trap
Attach the Trap Body to the Tree Mount
Tilt the Trap Body backwards slightly and lower it onto
the top locking tab of the Trap Mount. As you press
downwards the Trap Body will be guided in toward the
Trap Mount and lock in with a click.
Power up your Trap
Remove the black cap from the gas canister. Be careful
to keep the screw thread clean and free of debris. Screw
the canister firmly into the trap. Hand tighten only.
4.3.
Separate the Tree Mount from the Trap Body
Using your forefinger and thumb, press the Black Tabs
inwards and ease the orange Trap Mount along and o
the Trap Body.
Attach the Tree Mount & Back Plate
Align the holes in the Back Plate with the Tree Mount
holes. Screw into a straight tree or post, 1.5m (5 ft)
above the ground. Do not overtighten the screws.
2.1.
Attach the Digital Strike Counter
Slightly wet the inside of the rubber strap for lubrication
and rotate the Counter anti-clockwise as you ease it up
the canister. The Counter display must face directly
away from the tree.
Zero the Digital Strike Counter
Zero the Counter by pressing the button and holding it
down until the display shows ‘00’. The Counter goes to
sleep a few seconds after the button is released.
5. 6.

4
Refresh Lure once a fortnight
To keep the Lure fresh and attractive to grey squirrels,
it’s important to refresh it at least once every fortnight.
Simply, remove any remaining dried lure and add in a
fresh new grape sized dollop. The fresher the lure, the
more attractive your trap will be.
Replace the Gas every 6 months
You must change the gas canister every 6 months
regardless of how many kills you’ve counted. This
ensures your trap is pressurised and always ready
to strike.
11. 12.
Test fire your Trap
To test fire the trap, reach a pen or twig down through
the top of the trap and push the Trigger gently to the
side. The Striker will fire with a bang and then retract.
WARNING: Always keep your hands clear of trap
entrances and always treat the trap as live.
Pre-feed the tree
Place a small amount of Lure and wipe it beneath the
trap as ‘pre-feed’. This enhances your trapping success
as more lure helps attract the squirrels to your trap.
7. 8.
Checking the Digital Strike Counter
To check the tally on the Counter, quickly press and
release the button. The display will show the number
killed. Pressing and holding the button down zeroes
the Counter.
10.
Add Lure & replace the Shroud Cap
Scoop a grape sized dollop of Lure into the Lure Basket.
Screw the Lure Basket into the top of the trap, then
screw on the Shroud Cap.
9.

5
Moving your trap
Unscrew Gas CanisterRemove Digital Strike Counter
2.1.
Test fire Detach Trap
4.3.
How to move traps safely
Rather than move your traps, it’s better to add to your
trap network and increase your pest free area.
To move the trap, first remove the Counter and unscrew
the Gas Canister. You may hear any remaining gas in the
canister escaping. This may cause the canister to freeze
rapidly, so it’s a good idea to unscrew the Gas Canister
using a cloth to protect your hands.
WARNING Remove final charge from the trap
Although the Gas Canister has been removed, the
Trap may still be live with one charge remaining in its
chamber. Safely test fire your trap by removing the
Shroud Cap and the Lure Basket, and using a pen/twig
reach down through the top of the trap and push the
Trigger to one side. If there is still gas in the trap, the
orange Striker will be triggered, if nothing happens, all
gas has been flushed out and the trap is safe to move.
Always treat the trap as live until you have de-gassed
and test fired it. If the trap doesn’t fire when triggered,
the trap has successfully been de-gassed.
With the trap de-gassed, your trap is now safe to detach
from the Trap Mount. Using your thumb and forefinger,
squeeze the Black Tabs and with upward pressure pull
the trap up and o the Trap Mount.
Always keep fingers clear of trap entrances.

6
Declaration & warnings
• USE ONLY Goodnature CO2Canisters. Use of other
canisters will void warranty
• NEVER use a petroleum-based lubricant in your trap
• ALWAYS store CO2Canisters below 49°C
• NEVER leave CO2Canisters in a vehicle on a hot day
• ALWAYS dispose of used CO2Canisters responsibly
• NEVER crush CO2Canisters or put in a fire
• NEVER allow children to play with or around traps
• NEVER submerse your trap
• NEVER use a damaged trap
• NEVER modify your trap
• ALWAYS act responsibly
• USE ONLY as recommended in this quick start guide
• ALWAYS wear appropriate safety gear when setting and
firing a trap
• DO NOT install the CO2Canister until the trap is
correctly mounted
• ALWAYS remove the CO2Canister and test-fire to
remove final charge before removing the trap from its
mounted position
• ALWAYS treat your trap as LIVE
Warnings
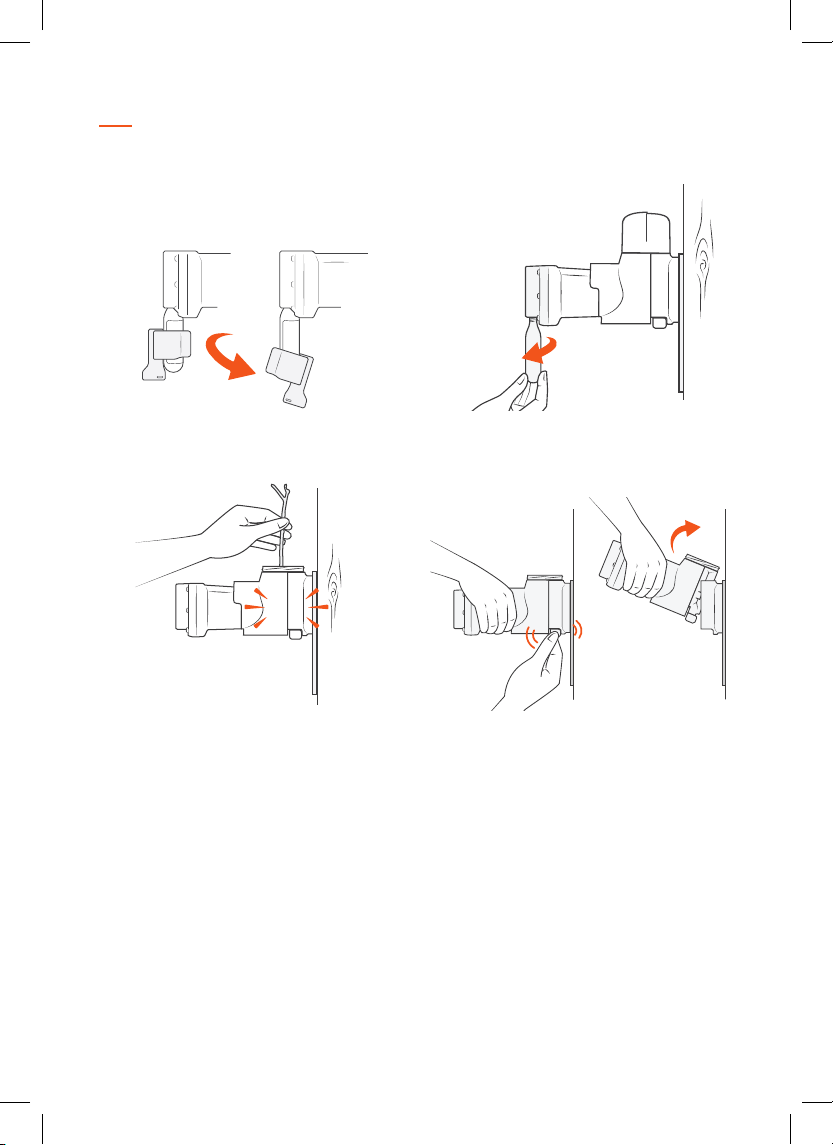
• ONLY test fire your trap as directed: see section: Moving
Your Trap
• ALWAYS remove the CO2Canister and test-fire to
remove final charge before moving the trap
• ALWAYS test-fire to remove final charge from the trap
after removing the CO2Canister and before removing it
from the trap mount: see section: Moving Your Trap
• ONLY set traps at the height recommended in this guide
and be considerate of others when choosing the traps
location
• NEVER put hands or objects in the entrance of
the trap
• NEVER fire and re-fire the trap in quick succession
• Contains gas under pressure; may explode if heated
• Protect from sunlight. Store in a well-ventilated place
• UN2037 / EN16509
• Carbon Dioxide CO2, CAS: 124-38-9, 16g
EC and UK Declaration of Conformity of
machinery (original)
This declaration relates exclusively to the machinery in the
state in which it was placed on the market, and excludes
components which are added and/or operations carried out
subsequently by the final user.
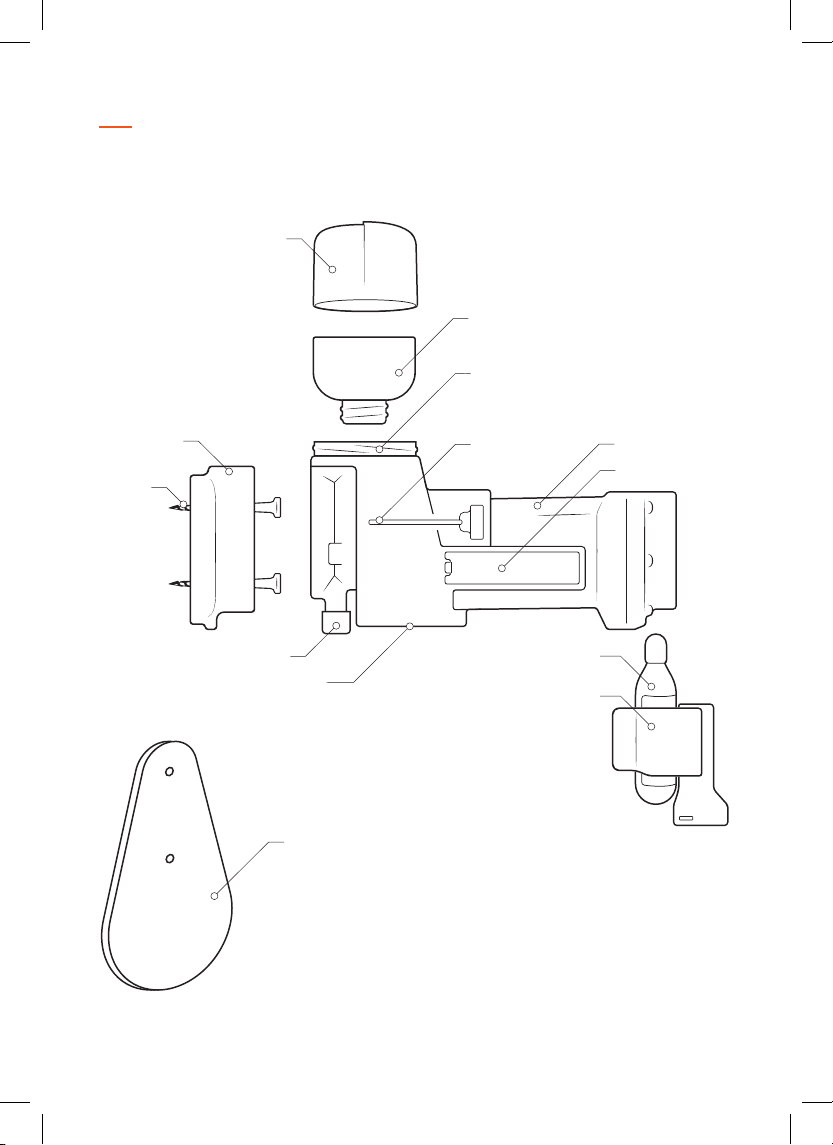
Product: Rat Trap / Rat and Mouse Trap, A24; including trap
mount kit and blocker accessories.
Manufacturer: Goodnature Limited, 8 Horner Street,
Newtown, Wellington 6021, NEW ZEALAND
Technical File Authorised Representative:
Gallagher Europe BV
Bornholmstraat 62A, 9723 AZ Groningen, Netherlands
This product fulfils all relevant provisions of the Machinery
Directive 2006/42/EC and the UK Statutory Instrument 2008
No. 1597 Supply of Machinery (Safety) Regulations 2008.
Signed for an on behalf of: Goodnature Limited, Wellington
Place and date of Issue:
Goodnature Limited, 8 Horner Street, Newtown, Wellington
6021, NEW ZEALAND, 10th January - 2020
Name, Function, Signature:
Craig R. Bond, Director
NOT FOR HUMAN CONSUMPTION
Lure contains nuts, milk & soya products.

7
Please recycle after use. This material has been printed using vegetable
oil-based/mineral oil-free inks. Printed on uncoated woodfree paper produced
from eucalyptus fibres and sourced from sustainable forests.
33-087_REV-05
goodnaturetraps.co.uk
Table of contents
Other goodnature Lawn And Garden Equipment manuals
Popular Lawn And Garden Equipment manuals by other brands

DynaTrap
DynaTrap DT600TUN owner's manual

Toro
Toro TR-34D Operator's manual

PowerG
PowerG N0E-10ET-10.8 Translation of the original instructions

HSS Hire
HSS Hire Power Scythe Operating & safety guide

Kingxxel Tools Co
Kingxxel Tools Co M1E-LD-115 Operator's manual

GD Import
GD Import 087308 quick start guide