Gorilla 01-3013 User manual

-FOR RESIDENTIAL USE ONLY-
-FOR CHILDREN AGES 3-11-
ASSEMBLY MANUAL
All Rights Reserved
Latest Revision: March 1, 2013
Toy Chest
(01-3013)

Warranty and Safety Guidelines……………………………………….......…….....Pages 1-5
General Information, Tool List and Kit Contents…………………………..................Page 6
Hardware and Lumber Checklist...……....………………………………………....Pages 7-8
Attach Front and Rear to Sides..……….....…………………………..………...…...... Step 1
Attach Bottom……………………………..…………………………..……................... Step 2
Attach Ropes to Lid………………………....………...........……….…………...…...... Step 3
Drainage Holes........................................................................................................ Step 4
PLEASE READ OWNER’S MANUAL CAREFULLY
BEFORE STARTING ASSEMBLY!
TABLE OF CONTENTS
Page 2

Page 3
Limited Manufacturers Warranty
The “seller” warrants its play sets to be free from defects in workmanship and materials, under
normal use and conditions at its original installation, for one year.
Cosmetic defects or natural defects of wood (e.g., warping, seasonal checking or cracking,
knots, or knot holes, etc.) that do not affect the structural integrity of the product are not covered
by this warranty. Defects that develop because the product is exposed to extreme climate
conditions, excessive water exposure, lumber that has been damaged by wood boring bees,
or defects that develop as a result of faulty or improper installation of the product, are not
covered by this warranty. Fading or discoloration or molding of any wood part or surface rust on
hardware are not considered defects in material as long as they do not affect the functionality or
structural integrity of the part or component.
It is the owner’s responsibility to properly maintain the product. Imperfections or defects that
develop because of a failure to properly maintain the play set are not covered by this warranty.
The “seller” will repair or, at its discretion, replace any part within the stated warranty period
that is defective in workmanship or materials. This decision is subject to verication of the
defect, which, at the “seller’s” discretion, may be accomplished by submitting photographs or by
delivery of the defective part to the “seller”. Any warranty claim must include proof of purchase,
including the date of purchase. In addition, within the rst 30 days from the date of purchase,
the “seller” will replace any parts discovered to be missing from or damaged in the original
packaging.
This warranty is valid only if the product is used for the purpose for which it was designed and
installed at a residential, single-family dwelling. This warranty is void if the product is used
in a commercial or institutional setting. This warranty does not cover (a) products that have
been damaged by acts of God, negligence, misuse, or accident, or that have been modied or
repaired by unauthorized persons; (b) the cost of labor; or (c) the cost of shipping the product,
any part, or any replacement product or part.
The “seller” DISCLAIMS ALL OTHER REPRESENTATIONS AND WARRANTIES OF ANY
KIND, EXPRESS, IMPLIED, STATUTORY, OR OTHERWISE, INCLUDING THE IMPLIED
WARRANTIES OF MERCHANTABILITY AND FITNESS FOR A PARTICULAR PURPOSE.
PLAYNATION WILL NOT BE LIABLE FOR ANY INCIDENTAL OR CONSEQUENTIAL
DAMAGES. This warranty is valid only in the United States of America, is nontransferable
and does not extend to the owners of the product subsequent to the original purchaser. Some
states do not allow limitations on implied warranties or exclusion of incidental or consequential
damages, so these restrictions may not be applicable to you. This warranty gives you specic
legal rights. You may also have other rights which vary from state to state.

Page 4
Important Safety Guidelines
This product is intended for residential use only and not intended for use in any public
setting. A safety surface such as mulch or recycled tire should be used under the
product to prevent injury from falls.
As with any home project, good judgment and respect for power tools will greatly reduce
the risk of injury. We recommend you follow all tool manufacturers’ safety guidelines.
Always wear eye protection and safety gloves to prevent injury. While the toy chest is
being constructed, please keep children away until the project is complete. Bolts and
screw heads should be checked regularly for tightness.
The “seller” shall not be liable for incidental, indirect or consequential damages or
injuries that result from the building and/or playing on this product. Adult supervision is
recommended anytime a play set is being used.
WEIGHT LIMIT
• 50 LBS. Total weight of objects inside toy chest.
The weight limit shown above must not be exceeded. Failure to adhere to these and
other safety guidelines could result in damage to the product and injury to the users.
Safety and Maintenance Tips:
NOTE: Your children’s safety is our #1 concern. Observing the
following statements and warnings reduces the likelihood of serious
or fatal injury. Please review these safety rules regularly with your
children.
• On-site adult supervision is required.
• Do not add any additional hardware to the toy chest.
• Teach children not to place objects on top of toy chest lid.
• Teach children not to sit on top of toy chest lid.
• Teach children not to play, stand or hide inside toy chest.
• Teach children not to stand on top of or jump from top of toy chest.
• Teach children to remove toy chest lid completely before retrieving toys from inside.
• Teach children not to use the equipment in a manner other than intended.
• Parents should have children dress appropriately. Loose clothing such as scarves and
ponchos should not be worn. Always take off, tie up or tuck in cords and drawstrings on
children’s clothing. These things can get caught on playground equipment and strangle
a child.
• Verify that the ends of the rope handles are tied on both ends and the rope cannot
wrap around an adult hand.
• Teach children not to attach items to the toy chest that are not specically designed for
use with the equipment, such as, but not limited to, jump ropes, clothesline, pet leashes,
cables and chain as they may cause a strangulation hazard.
• Children must NOT use this product until it has been completely assembled and
inspected by an adult.

17"
40"
19 1
2"
Page 5
Safety and Maintenance Tips for Your New Play Set: (continued)
This product should be inspected on a regular basis. If any of the following conditions
are noted, they should be removed, corrected, or repaired immediately to prevent
injuries.
• Hardware that is loose, worn or that has protrusions or projections.
• Splinters, large cracks, and decayed wood components.
• Deterioration and corrosion on structural components.
• Missing or damaged equipment components.
• Check all screws frequently during the usage season and tighten as required.
(But not so tight that you crack the wood)
• Check all coverings for bolts and sharp edges twice monthly during usage season to
be certain they are in place. Replace when necessary. It is especially important to do
this at the beginning of each new season.
• Inspect wood parts monthly. The grain of the wood sometimes will lift in the dry season
causing splinters to appear. Light sanding may be necessary to maintain a safe playing
environment. If you are treating your toy chest with stain regularly, it will help prevent
severe checking/splitting and other weather damage.
• Once or twice a year, depending on your climate conditions, you must apply some type
of protection (sealant) to the wood of your unit. Prior to the application of sealant, lightly
sand any “rough” spots on your set. Please note this is a requirement of your warranty.
• Disposal Instructions: When the toy chest is no longer desired, it should be
disassembled and disposed of in such away that no unreasonable hazards will exist at
the time it is discarded.

Page 6
General Info to Review Before Installation
• Identify all of the parts for your toy chest. Empty each box and lay out pieces so you
can see each part. Your instruction book will have detailed drawings that will make it
easy for you to recognize individual parts. Keep all hardware separate from wooden
pieces.
• After everything is laid out, check carefully to ensure all parts are present. Make sure
there are no broken boards.
• Find an area to sort your hardware. It is best to open the hardware on a solid surface
so that you do not lose any pieces in the grass. This will save time and familiarize you
with all the different pieces in the hardware bag.
• Important note: Wood has some natural defects such as knots, surface cracks, etc…
We reject parts that are structurally defective. We use a high quality lumber in our
structures; however, you should inspect each part for splinters or rough spots and sand
them smooth to prevent injury.
• After familiarizing yourself with all of the components, read all instructions thoroughly.
Reading instructions after you have studied the parts will help you understand more
clearly the installation process, and help to eliminate unnecessary mistakes.
• Pay close attention to the diameter and length of each bolt and screw.
• After you complete installation, make sure every bolt, screw, and nut is tight, and every
board is secure. Wood will expand and contract with the seasons.
• Check all screw connections seasonally.
• Place the toy chest on level ground, not less than 6ft from any structure or obstruction
such as a fence, garage, house, overhanging branches, laundry lines, or electrical
wires.
REQUIRED TOOL LIST:
___ Interchangeable tip screwdriver or power screwdriver
___ #2 square bit
KIT CONTENTS:
___ (Qty ) Description
___ (2) Front/Rear Panels (same)
___ (1) Bottom Panel
___ (1) Top Panel
___ (2) Side Panels (same)
___ (2) Rope (1/2”diameter x 22” long)
___ (1) Hardware Bag

#2 SQUARE
DRIVE BIT
QTY: 1
11-0030 - TOY CHEST HARDWARE
6/22/2012
REV: B J.H.
#8 X 1-1/2"
WOOD SCREW
QTY: 30
7
8
9
1
4
3
2
5
6
USE THE RULER TO THE RIGHT TO MEASURE YOUR BOLTS AND SCREWS. PICTURE VIEWS
SHOWN ABOVE ARE 1:1 SCALE AND CAN BE USED TO MATCH BOLT AND SCREW SIZES.

DESCRIPTIONPICTURE QTY.
2
1
FRONT/REAR
15-1/2" LONG
1-1/2" THICK X
PANEL
17" WIDE X 40"
2-11/16" THICK
X 22" LONG
1
1
WIDE X 37-
1/16" LONG
BAG
X 14-1/16"
PANEL
(NOT SHOWN)
40" LONG
18-3/4" HIGH X
1-1/2" THICK X
18-3/4" HIGH X
1/2" DIAMETER
LONG
2
2
1-1/2" THICK X
SIDE PANEL
BOTTOM
TOP PANEL
(LID)
ROPE
HARDWARE
(NOT SHOWN)

STEP 1: ATTACH FRONT AND REAR TO SIDES
1: LOCATE THE 18-3/4" H X 40" WIDE FRONT AND REAR PANELS AND TWO 18-3/4" H X 15-1/2" SIDE PANELS.
NOTE THE FRONT AND REAR PANELS ARE THE SAME.
2: PLACE ALL THE PANELS SO THAT THE STEPPED AREA IS FACING UP.
3: THE PERIMETER FRAME OF THE FRONT PANEL WILL OVERLAP PERIMETER FRAME OF THE SIDE PANELS. THE
TOP OF THE FRONT PANEL WILL BE FLUSH TO THE TOP OF THE SIDE PANELS.
4: ATTACH THE FRONT PANEL TO THE SIDE PANELS WITH #8 X 1-1/2" WOOD SCREWS.
5: REPEAT THIS PROCESS TO ATTACH THE REAR PANEL.
SIDE PANEL TOPS FLUSH
OF SIDE PANELFLUSH
REAR PANEL
PERIMETER FRAMEOF FRONT PANEL
PERIMETER FRAME
STEPPED AREA FACES UP
ON ALL FOUR PANELS.
#8 X 1-1/2"
WOOD SCREWS
FRONT PANEL
DETAIL OF OVERLAP
SIDE PANEL
SCREW
14" X 37" TOY CHEST
BOTTOM
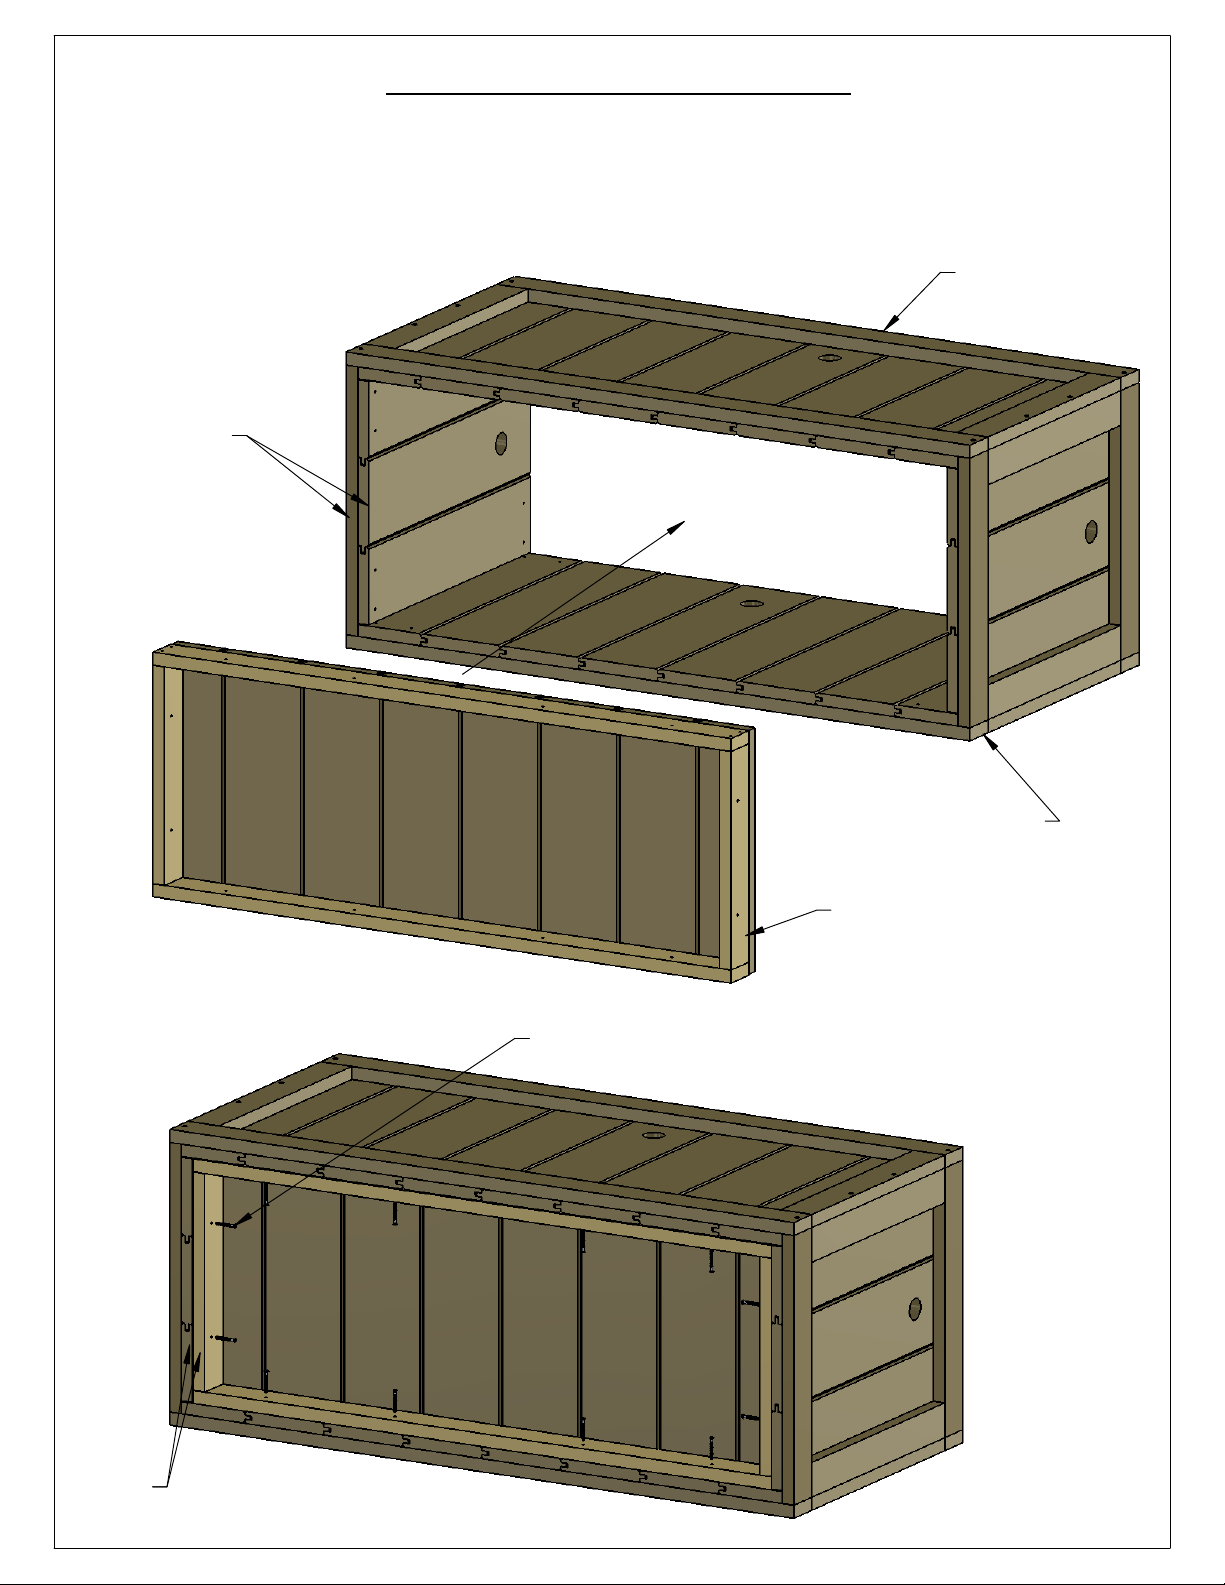
STEP 2: ATTACH BOTTOM
1: ROLL THE TOY CHEST ASSEMBLY ONTO THE BACK SIDE WITH THE STEPPED AREA FACING AWAY FROM
YOU.
2: PLACE THE 14" X 37"BOTTOM INSIDE THE TOY CHEST ASSEMBLY. THE PERIMETER FRAME OF THE BOTTOM
SHOULD BE FLUSH TO THE BOTTOM OF THE FRONT/REAR AND SIDES
3: ATTACH THE BOTTOM TO THE FRONT/REAR AND SIDE PANELS WITH #8 X 1-1/2" WOOD SCREWS.
FACES AWAY.
STEPPED AREA
THESE BOARDS
ARE FLUSH ON
THE BOTTOM
TOY CHEST ASSEMBLY
#8 X 1-1/2" WOOD SCREW
FLUSH


