Graham Field GENDRON 450 Standard User manual

GD-450-525-INS-LAB-RevA21
Read this manual before operating your wheelchair.
Save this manual for future use.
The most current version of this manual can be found online at www.grahameld.com.
450 Standard / 450 Recliner
525 Standard / 525 Recliner
Bariatric Manual Wheelchair
User Manual

GD-450-525-INS-LAB-RevA21 • Regency 450 / 525 User Manual 2
CONTENTS
1 INTRODUCTION..........................................................................................................................................................................................3
2 IMPORTANT SAFETY PRECAUTIONS......................................................................................................................................................4
WARNINGS ...................................................................................................................................................................................................... 4
3 GETTING STARTED — SETUP AND GENERAL OPERATION GUIDELINES..........................................................................................6
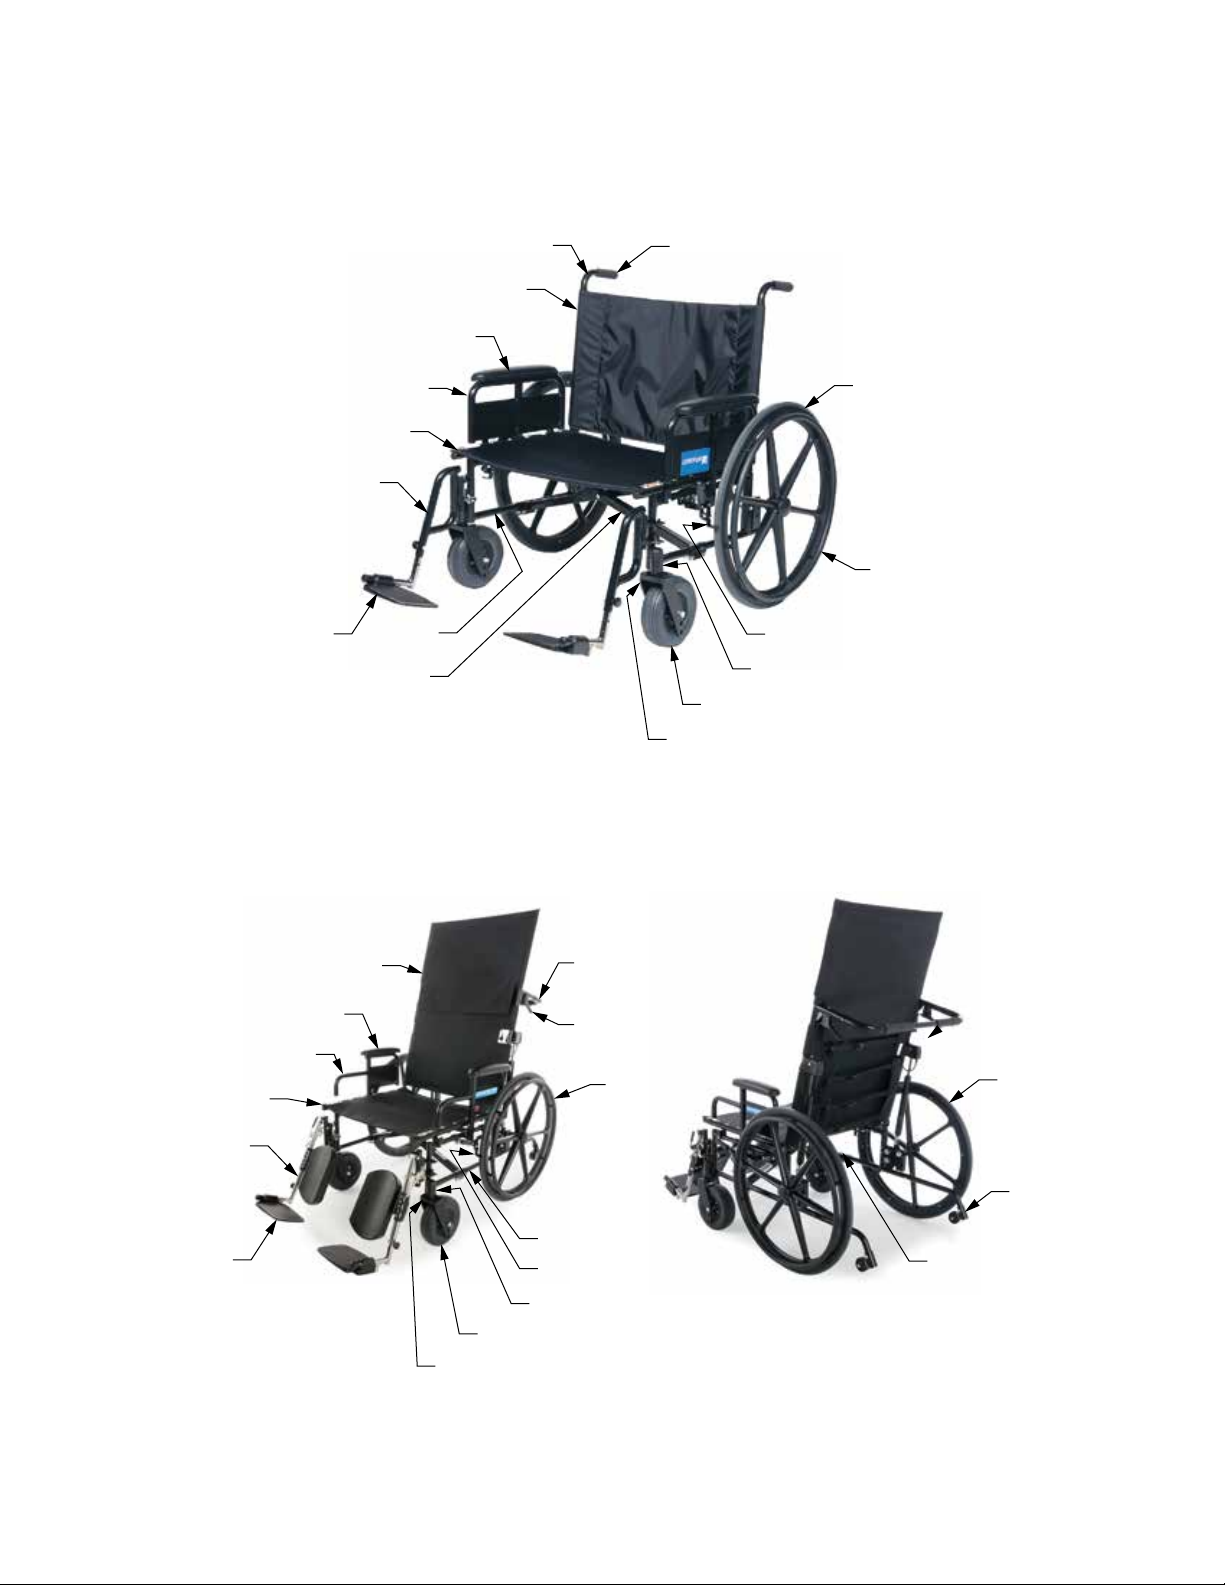
REGENCY 450 / 525 COMPONENT IDENTIFICATION .................................................................................................................................. 6
OPERATING THE WHEEL LOCKS ................................................................................................................................................................. 7
UNFOLDING AND FOLDING THE WHEELCHAIR ......................................................................................................................................... 7
UNFOLDING THE WHEELCHAIR ........................................................................................................................................................... 7
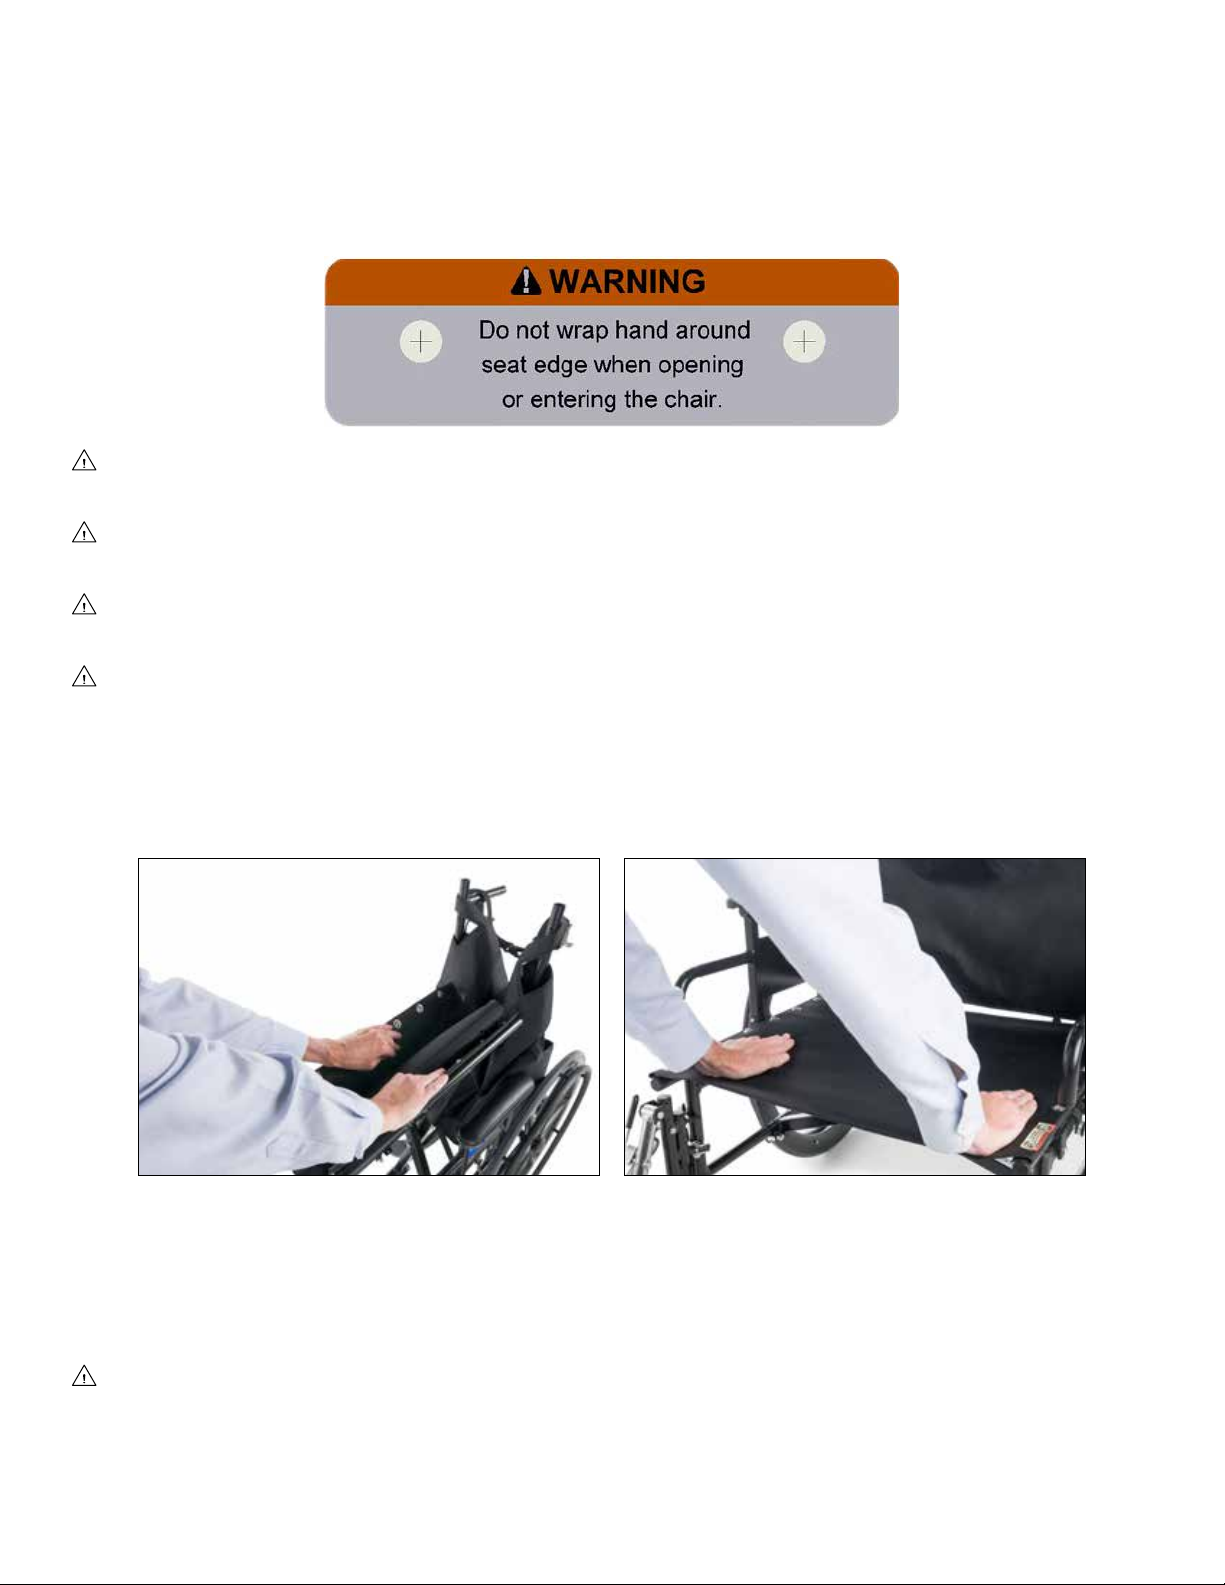
OPENING THE WHEELCHAIR (ALL MODELS).............................................................................................................................. 7
INSTALLING THE HEADREST AND PUSHBAR (RECLINING MODELS ONLY)........................................................................... 8
FOLDING THE WHEELCHAIR FOR TRANSPORTATION OR STORAGE............................................................................................. 9
REMOVING THE HEADREST AND PUSHBAR (RECLINING MODELS ONLY) ............................................................................ 9
CLOSING THE WHEELCHAIR (ALL MODELS).............................................................................................................................. 9
4 HANDLING TIPS .......................................................................................................................................................................................10
BALANCE ...................................................................................................................................................................................................... 10
TRANSFER .................................................................................................................................................................................................... 10
REACHING / BENDING ................................................................................................................................................................................. 11
REACHING / BENDING FORWARD OR SIDEWARD ........................................................................................................................... 11
REACHING / BENDING BACKWARD ................................................................................................................................................... 11
RAMPS AND INCLINES ................................................................................................................................................................................ 12
ASCENT.................................................................................................................................................................................................. 12
DESCENT ............................................................................................................................................................................................... 12
CURBS ........................................................................................................................................................................................................... 12
CURBS — WITH ATTENDANT .............................................................................................................................................................. 13
GOING UP (METHOD 1)................................................................................................................................................................. 13
GOING UP (METHOD 2)................................................................................................................................................................. 13
GOING DOWN ................................................................................................................................................................................ 13
STAIRS AND ESCALATORS......................................................................................................................................................................... 13
WEIGHT TRAINING ....................................................................................................................................................................................... 13
5 ADJUSTMENTS ........................................................................................................................................................................................14
REAR WHEELS & CASTERS........................................................................................................................................................................ 14
ARMS ............................................................................................................................................................................................................. 14
REMOVE ARM........................................................................................................................................................................................ 14
INSTALL ARM ........................................................................................................................................................................................ 14
SWINGAWAY FOOTREST / ELEVATING LEGREST.................................................................................................................................... 15
SWING FOOTREST / LEGREST AWAY FOR TRANSFER ................................................................................................................... 15
RETURN FOOTREST / LEGREST TO OPERATION POSITION .......................................................................................................... 15
SWINGAWAY FOOTREST, ELEVATING LEGREST: ADJUST FOOTPLATE EXTENSION LENGTH ................................................. 15
ELEVATING LEGREST: RAISE LEGREST ........................................................................................................................................... 16
ELEVATING LEGREST: ADJUST CALF PAD POSITION ..................................................................................................................... 16
CROSSBRACES............................................................................................................................................................................................ 16
TIGHTEN CROSSBRACES.................................................................................................................................................................... 16
RECLINER (525 RECLINING MODEL ONLY)............................................................................................................................................... 17
ADJUSTING THE BACK ANGLE (525 RECLINING MODEL ONLY).................................................................................................... 17
WHEEL LOCKS ............................................................................................................................................................................................. 17
ADJUST WHEEL LOCKS ...................................................................................................................................................................... 17
6
TRANSPORTING THE GENDRON REGENCY 450 / 525.............................................................................................................................18
TRANSPORTING THE WHEELCHAIR.......................................................................................................................................................... 18
7 MAINTENANCE.........................................................................................................................................................................................19
SERVICE MANUAL........................................................................................................................................................................................ 19
DO-IT-YOURSELF MAINTENANCE .............................................................................................................................................................. 19
LIST OF TOOLS ..................................................................................................................................................................................... 20
GENERAL CARE.................................................................................................................................................................................... 20
CHECK TIRE WEAR .............................................................................................................................................................................. 20
CHECK HANDRIMS ............................................................................................................................................................................... 20
CHECK WHEEL LOCK ENGAGEMENT................................................................................................................................................ 20
CHECK ANTI-TIPPERS (STANDARD ONLY ON RECLINING MODELS) ............................................................................................ 20
CHECK HANDGRIPS............................................................................................................................................................................. 20
CHECK CROSSBRACES....................................................................................................................................................................... 20
CHECK UPHOLSTERY .......................................................................................................................................................................... 21
CHECK REAR WHEEL ADJUSTMENT................................................................................................................................................. 21
CHECK ARMS ........................................................................................................................................................................................ 21
CHECK BACKPOSTS / PUSH HANDLES............................................................................................................................................. 21
CHECK FOOTRESTS & ELEVATING LEGRESTS ............................................................................................................................... 21
CLEANING YOUR REGENCY 450 / 525 ............................................................................................................................................... 21
CHECK CASTERS ................................................................................................................................................................................. 22
CHECK WHEEL BEARINGS.................................................................................................................................................................. 22
8 TROUBLESHOOTING...............................................................................................................................................................................23
9 SPECIFICATIONS .....................................................................................................................................................................................24
10 LIMITED WARRANTY...............................................................................................................................................................................25
11 INDEX ........................................................................................................................................................................................................27

GD-450-525-INS-LAB-RevA21 • Regency 450 / 525 User Manual 3
1 INTRODUCTION
Important safety, operating, and maintenance instructions that warrant your attention are
included in this user manual. Read this entire manual carefully before operating your new
wheelchair, keep it handy for future reference, and refer to it as often as necessary to help
maintain good performance standards.
Consult your healthcare professional and GF Health Products, Inc. ("Graham-Field") authorized
distributor for assistance in developing and learning safe and effective techniques for performing
your daily activities according to your individual physical abilities and needs, and to make certain
that your wheelchair is properly prescribed and adjusted for your use.
The safety precautions in this manual are general warnings intended to be used only as
basic guidelines. You may nd it necessary to develop your own methods for safely solving
frequently encountered challenges. Again, consult your professional medical advisors for their
recommendations about safety methods, and never hesitate to ask for their assistance.
Your wheelchair should receive frequent, regularly scheduled maintenance, including an
inspection of the mechanical parts, to ensure proper operation. Some suggested inspection
procedures, troubleshooting procedures, and adjustment procedures are included in this manual.
When it comes to service and repair, remember that your Graham-Field authorized distributor
knows your wheelchair best.
Thank you for choosing a Gendron product. We at Graham-Field wish to assure you of our
continuing commitment to provide innovation and quality in our products. The Regency 450 / 525
is a manual folding wheelchair suitable for frequent users who require a portable wheelchair, tted
to their anatomy, without the need of customization or alteration to the center of gravity. The
Regency 450 / 525 is intended for indoor and / or outdoor use.
The Regency 450 / 525 Recliner comes with a removable full support headrest which includes an
additional neck support that adjusts easily to t every need. A pushbar is standard. The Recliner
mechanism is intended to be operated by an attendant. Anti-tippers are standard on Recliners.
The Regency 450 has a maximum weight capacity of 450 lb (204 kg).
The Regency 525 has a maximum weight capacity of 525 lb (238 kg).
The person performing adjustments on the Regency 450 / 525 has the responsibility of making
certain that the user can safely operate the wheelchair with the adjustments selected. This
person must evaluate the user's ability, weight, physical condition, the environment in which the
wheelchair will be used, and the terrain over which the wheelchair will travel.
Please note the following special statements, used throughout this manual, and their signicance:
WARNING: Indicates a potential hazard situation or unsafe practice that, if not avoided,
could result in death or serious personal injury.
CAUTION: Indicates a potential hazard situation or unsafe practice that, if not avoided,
could result in minor or moderate personal injury.
sNOTICE: Indicates a potential hazard situation or unsafe practice that, if not avoided, could
result in product or property damage.
Info: Provides application recommendations or other useful information to ensure that you get
the most from your product.

GD-450-525-INS-LAB-RevA21 • Regency 450 / 525 User Manual 4
2 IMPORTANT SAFETY PRECAUTIONS
IMPORTANT SAFETY PRECAUTIONS: ALWAYS FOLLOW THESE SAFETY PRECAUTIONS
WHEN USING YOUR WHEELCHAIR. FAILURE TO DO SO COULD RESULT IN PERSONAL
INJURY TO YOU OR OTHERS OR DAMAGE TO YOUR WHEELCHAIR.
Safety requires the constant attention of the wheelchair user and the attendant. It is extremely
important to learn and always use safe methods of performing basic daily activities. Always
consult your healthcare professional to determine those methods most suitable for your
individual abilities.
Protect yourself and your wheelchair by having your Regency 450 / 525 serviced regularly.
Whenever any part of your Regency 450 / 525 is not functioning properly, contact your
Graham-Field authorized distributor immediately, as a hazardous situation could result, causing
personal injury or damage to your wheelchair. ONLY EXCELLENT CONDITION IS ACCEPTABLE
WHERE SAFETY IS CONCERNED. Periodic inspection, adjustment, and replacement of worn parts
will provide many years of superb performance.
WARNINGS
WARNING:
Regency 450 maximum weight capacity is 450 lb (204 kg), EVENLY DISTRIBUTED.
Regency 525 maximum weight capacity is 525 lb (238 kg), EVENLY DISTRIBUTED.
WARNING: Do not operate this wheelchair on streets or roadways.
WARNING: Do not operate this wheelchair on hilly or rough terrain, sand, wet or icy
surfaces, or surfaces with impaired traction. Ensure that pathway is clear of all obstacles.
WARNING: Do not turn wheelchair while going downhill, as wheelchair could tip over.
WARNING: Do not attempt any incline or decline greater than six degrees (10% grade, or
one foot of rise or fall per ten feet of ramp length).
WARNING: This wheelchair does not offer seating or occupant restraint equivalent to
the seat provided in a motor vehicle! To increase your safety while traveling in a motor
vehicle, always transfer to the vehicle seat and use the restraint provided by the vehicle
manufacturer.
WARNING: Do not tie down or attach anything to the wheels. This could cause tipping and
possibly result in injury or damage to the wheelchair.
WARNING: The footplates' lowest point should clear the ground by at least 2 1/2inches, to
permit proper clearance of potential obstruction.
WARNING: Doing a "wheelie" (tilting the wheelchair backward until it reaches its balance
point) is dangerous and could result in personal injury to the user.
WARNING: Do not stand or step on the footplates while transferring to or from your
wheelchair. This could cause the wheelchair to tip or may cause personal injury or damage
to your wheelchair.
WARNING: Do not wrap hand around seat edge when opening or entering the chair.

GD-450-525-INS-LAB-RevA21 • Regency 450 / 525 User Manual 5
WARNING: When folding or unfolding the wheelchair, do not place your ngers or hands
under the seat rail or between the seat rail and side panel.
WARNING: Do not lift the wheelchair by the arms, footrests or legrests, or any other
detachable parts.
WARNING: Always engage wheel locks before transferring, using a wheelchair lift, or using
an elevator.
WARNING: Ensure wheelchair is on a stable, level surface and engage wheel locks before
and during transfer.
WARNING: Do not lean over the top of the wheelchair back. This could cause the
wheelchair to tip over.
WARNING: To reduce the risk of tipping before leaning or reaching forward, sit back in the
seat and rotate casters fully toward front of wheelchair.
WARNING: Unauthorized modication or the use of non-Gendron replacement parts could
change the structure of the wheelchair, void the warranty, and create a hazardous condition
resulting in serious personal injury.
WARNING: Do not lean on this wheelchair or use it as a walker—these are practices which
could result in loss of balance and personal injury.
WARNING: Do not use your wheelchair on escalators.
WARNING: Wheel locks are not brakes. Do not use the wheel locks to slow down your
wheelchair, or while the wheelchair is moving. Wheel locks are only intended to keep the
wheelchair in place when it is at a complete stop.
WARNING: Cancer and Reproductive Harm - www.p65warnings.ca.gov.
WARNING: GF Health Products, Inc. specically disclaims responsibility for any personal
injury or property damage which may occur during any use which does not comply with
federal, state, or local laws or ordinances.

GD-450-525-INS-LAB-RevA21 • Regency 450 / 525 User Manual 6
3 GETTING STARTED — SETUP AND GENERAL OPERATION GUIDELINES
REGENCY 450 / 525 COMPONENT IDENTIFICATION
Familiarize yourself with main components, identied in Regency 450 / 525 illustrations below.
footplate
Regency 450 / 525 Bariatric Wheelchair, Standard Model
armpad
back upholstery
backpost / push handle
arm
footrest
seat upholstery
rear wheel
handgrip
caster wheel
wheel lock
caster housing
frame
crossbrace
caster fork
handrim
footplate
Regency 450 / 525 Bariatric Wheelchair, Recliner Model
armpad
back upholstery
arm
elevating legrest
(footrest not shown)
seat upholstery
anti-tipper
rear wheel
crossbrace
frame
caster wheel
caster housing
wheel lock
caster fork
recliner
release lever
recliner push bar
handrim

GD-450-525-INS-LAB-RevA21 • Regency 450 / 525 User Manual 7
OPERATING THE WHEEL LOCKS
The Regency 450 / 525 has two wheel locks — one on each rear wheel. To engage the wheel locks,
push the levers forward until they lock into place. To disengage, pull back on the levers until the
wheels roll freely.
UNFOLDING AND FOLDING THE WHEELCHAIR
WARNING: Read warning label, shown above, located on seat rails: Do not wrap hand
around seat edge when opening or entering the chair.
WARNING: When folding or unfolding the wheelchair, do not place your ngers or hands
under the seat rail or between the seat rail and side panel.
WARNING: Do not sit on or transfer into the wheelchair unless it is fully open and the seat
rails are fully seated.
WARNING: Do not lift the wheelchair by the arms, footrests or legrests, or any other
detachable parts.
UNFOLDING THE WHEELCHAIR
Opening the Wheelchair (All Models)
1. Engage wheel locks on both sides.
2. Use both hands to push down with even pressure on seat tubes and seat upholstery on insides
of wheelchair, as shown at above left, until the seat rails are fully seated, as shown at above
right. Do not place any fingers or parts of your hand under the seat rails.
3. Attach footrests or legrests to wheelchair.
4. Reinstall seat cushion, if so equipped.
WARNING: Ensure seat, arms, and footrests or legrests are locked in place before
occupying or operating wheelchair.

GD-450-525-INS-LAB-RevA21 • Regency 450 / 525 User Manual 8
Installing the Headrest and Pushbar (Reclining Models Only)
After the wheelchair has been fully unfolded and opened:
1. Install headrest as shown at above left: slide headrest down onto headrest support assembly as
shown.
WARNING: Ensure headrest is fully seated and securely installed before use.
2 Install headrest cover, shown at above right.
3. Install push bar as shown at above right: push bar into pusher handles until spring buttons
lock into place.
WARNING: Ensure both spring buttons are fully extended through the push bar before use.
WARNING: DO NOT use reclining wheelchair without both headrest and push bar installed.
4.
To adjust the back angle, grasp both pusher handles securely and pull up on both release levers
simultaneously. Gently lower or raise the back to the desired height, and release the levers.

GD-450-525-INS-LAB-RevA21 • Regency 450 / 525 User Manual 9
FOLDING THE WHEELCHAIR FOR TRANSPORTATION OR STORAGE
Removing the Headrest and Pushbar (Reclining Models Only)
1. Press both pushbar spring buttons and pull pushbar out away from receivers.
2 Remove headrest cover, shown at above left.
3. Remove headrest as shown at above right: slide headrest up and off headrest support assembly
as shown.
Closing the Wheelchair (All Models)
1. Detach footrests or legrests from wheelchair.
2. Remove seat cushion, if applicable.
3. Grab the seat upholstery at center front and rear with both hands, pull sharply, and lift up as
shown above.
4. If necessary, fold the excess seat upholstery over the arm.
5. To fold wheelchair completely, tip it sideways so wheel won’t drag and press sides together.

GD-450-525-INS-LAB-RevA21 • Regency 450 / 525 User Manual 10
4 HANDLING TIPS
The Gendron Regency 450 / 525 has been designed and engineered to perform as a stable
and well balanced unit when used for its intended purpose. However, it is possible to tip the
Regency 450 / 525 over if it is used improperly or if you move beyond the center of gravity.
You may want to consider the use of a positioning belt, available from your distributor or
www.grahameld.com, to maintain proper weight distribution. We urge you to learn the
characteristics of your wheelchair. It is most important to learn safe methods to perform the daily
activities basic to your lifestyle. Consult your medical professionals for assistance in developing
the skills and proper techniques to perform all activities safely.
BALANCE
Proper balance is the key to maintaining the stability of your wheelchair. Reaching, bending, and
transferring to or from a wheelchair will change your weight distribution and center of gravity.
When performing such activities, do so as instructed in the following paragraphs to avoid tipping
the wheelchair.
TRANSFER
WARNING: Always ensure the wheelchair is on a stable, level surface before transfer.
WARNING: Always engage wheel locks before transfer.
WARNING: Do not step on the footplates; this could cause the wheelchair to tip. Fold them
up, and either detach them, or swing them aside.
WARNING: There is a critical moment when there is little or no seat platform beneath you.
Take every precaution to reduce this unsupported distance before you attempt transfer.
Patient Lift Transfer Transfer Board Transfer
Transferring into or out of a wheelchair is a very difcult maneuver; always exercise extreme
care even when transferring with the aid of an attendant, a patient lift (shown at above left), or
a transfer board (shown at above right). Consult your medical professionals for assistance in
developing your individual transfer technique. Engage both wheel locks and ensure the wheelchair
is stabilized and will not move or slide during the transfer. Take extra precautions to prevent
tipping. Use good body mechanics to prevent personal injury.

GD-450-525-INS-LAB-RevA21 • Regency 450 / 525 User Manual 11
REACHING / BENDING
WARNING: Always turn the casters frontward to provide stability while reaching. If in
doubt, ask for assistance or use a device that will extend your reach without requiring you
to shift your weight.
Although it is not recommended, you may nd it occasionally necessary to lean or reach from your
wheelchair. Consult with your healthcare professional for assistance in developing your personal
safe reaching or moving techniques suited to your ability and restrictions.
REACHING / BENDING FORWARD OR SIDEWARD
WARNING: Do not attempt to reach objects if you are required to move forward in the seat.
Do not attempt to retrieve objects from the oor if you must reach down between your
knees. Do not shift your weight in the direction that you are reaching and/or bending; this
could cause the wheelchair to tip.
Reach Forward Reach Sideward
1. Maneuver the wheelchair as close as possible to the object you wish to reach.
2. Rotate both casters fully forward: Go forward, and then back the wheelchair toward the object
to swing the casters fully forward.
3. Engage both wheel locks.
4. Ensure the casters are rotated fully forward before reaching. If not, repeat step 2.
REACHING / BENDING BACKWARD
WARNING: Do not engage the wheel locks while reaching or bending backward. Should
your weight suddenly shift accidentally, it is better to roll in that direction than to tip over.
WARNING: Do not lean over the back upholstery; this could cause the wheelchair to tip.
1. Maneuver the wheelchair as close as possible to the object; the rear wheels will limit how close
you can get.
2. Rotate both casters fully forward: Go forward, and then back the wheelchair toward the object
to swing the casters fully forward.
3. Reach only as far as your arm will extend without changing your sitting position. If in doubt,
reposition the wheelchair or ask for assistance.

GD-450-525-INS-LAB-RevA21 • Regency 450 / 525 User Manual 12
RAMPS AND INCLINES
WARNING: During descent, the footplates' lowest point should be no closer to the ground
than 2 1/2 inches to permit proper clearance.
WARNING: Do not attempt any incline or decline of more than 6 degrees (10% grade, or one
foot of rise or fall per ten feet of ramp length).
WARNING: Do not use wheel locks to slow your descent. Attempting to use wheel locks
is likely to result in accidental locking that could cause the wheelchair to stop abruptly,
suddenly pitch forward, or tip sideways.
WARNING: Avoid changing direction while descending a ramp or incline, as this could
cause instability.
Most people are capable of negotiating short inclines without assistance, depending upon upper
body strength, endurance, and the degree of incline. Know your own strength and endurance
capabilities and limitations before attempting to negotiate an incline or decline. Practice with an
attendant or healthcare professional rst before attempting any inclines, declines curbs or ramps.
Always inspect the ramp for hazards such as holes, slippery or uneven surfaces, etc. before
starting up or down. If you can not see the entire ramp, ask someone to inspect it for you.
ASCENT
Lean the upper part of your body slightly forward,
as shown above, as you ascend the incline. If it
becomes necessary to stop on the incline, avoid any
abrupt or sudden forward movement as you resume
climbing; this could cause tipping.
DESCENT
Always face forward when going down a ramp,
but do not lean forward; this could cause tipping.
Lean slightly backward to increase stability. It is
critical to keep the wheelchair under control at all
times. Descent should be made slowly and safely
by grasping the handrims; however, use care, as
friction heat will be generated. We recommend the
use of gloves to reduce the effects of friction heat,
but going slower is a better alternative.
CURBS
Curbs should only be negotiated with the assistance
of an attendant. When you encounter curbs, nd a way around, or use the ramps now available
in most locations. If there is no ramp available, avoid the curb by using the disabled-designated
elevators now required in most locations.
Ascent
Descent

GD-450-525-INS-LAB-RevA21 • Regency 450 / 525 User Manual 13
CURBS — WITH ATTENDANT
Going up (Method 1) Going Up (Method 2) (Going Down)
WARNING: When approaching a curb, ensure the hand grips are securely fastened and do
not turn or slip off.
Curbs should only be negotiated with the assistance of an attendant. The following are
suggestions only for curb negotiation. It is important for you to develop your own safe technique
that is best suited for your abilities with the aid of your healthcare professionals.
Going Up (Method 1)
When approaching a curb, ensure the hand grips are securely fastened and do not turn or slip off.
Tilt the wheelchair backward to its balance point and move forward until the front casters pass
over the top of the curb. Lower the front casters slowly onto the curb while lifting the wheelchair
by the push handles, and push forward until the rear wheels roll up and over the curb. Ensure the
wheelchair has completely cleared the curb and can not roll backwards.
Going Up (Method 2)
Ensure the hand grips are securely fastened and do not turn or slip off. Turn the wheelchair
around and back up until the rear wheels are against the curb. Tilt the wheelchair back to its
balance point and lift up by the push handles while pulling the wheelchair up and over the curb.
DO NOT let the front casters down until the wheelchair is back far enough to clear the curb.
Going Down
Ensure the hand grips are securely fastened and do not turn or slip off. While standing behind
the wheelchair, turn the wheelchair around and carefully back down the step. Hold the handgrips
tightly and pull the wheelchair to where the rear wheels reach the curb edge, then slowly roll
the rear wheels down onto the lower level. After the wheels are safely on the lower level, tilt the
wheelchair back to its balance position and turn it face forward. Lower the front casters carefully
by placing one foot on the tipping lever and gradually decreasing the force of exertion.
STAIRS AND ESCALATORS
WARNING: Never attempt to negotiate stairs or escalators in your Regency 450 / 525.
Stairs and escalators are dangerous obstacles. If you encounter steps and there is no ramp
available, avoid the steps by utilizing the disabled designated elevators now required in most
locations.
WEIGHT TRAINING
WARNING: This wheelchair is not designed or tested as a seat for weight training.

GD-450-525-INS-LAB-RevA21 • Regency 450 / 525 User Manual 14
5 ADJUSTMENTS
The Regency 450 / 525 offers several adjustments to make it easier and more comfortable to
drive. The MAINTENANCE section offers preventive maintenance suggestions for keeping your
wheelchair in excellent condition; ensure that all components are in excellent condition before
adjusting. The following are recommended methods; after a few adjustments, you may develop
your own. Always consult your Graham-Field authorized distributor for assistance.
The person performing adjustments on the Regency 450 / 525 has the responsibility of making
certain that the user can safely operate the wheelchair with the adjustments selected. This
person must evaluate the user's ability, weight, physical condition, the environment in which the
wheelchair will be used, and the terrain over which the wheelchair will travel.
All adjustments and their page locations are referenced in the index at the end of this manual.
Specic tools needed to perform each adjustment are identied in adjustment directions. A
complete list of tools needed to perform all adjustments in this section follows:
7/16" wrench
1/2" wrench
REAR WHEELS & CASTERS
We recommend that you do not replace or adjust rear wheel or caster components yourself, since
special tools and training are required. Please contact your Graham-Field authorized distributor
when your rear wheels or casters need adjustment.
ARMS
Removable Full-Length Arm Removable Desk-Length Arm
Arm height and position are factory set; do not modify this. All arms are removable.
REMOVE ARM
Grasp the armpad by middle, depress the spring button at the front arm socket, and pull up on the
arm to remove it from the socket.
INSTALL ARM
Grasp the armpad by middle, depress the spring button at the front arm socket, and push down on
the arm to install it in the socket.
WARNING: Ensure both arms are securely locked into sockets before occupying or
operating wheelchair.

GD-450-525-INS-LAB-RevA21 • Regency 450 / 525 User Manual 15
SWINGAWAY FOOTREST / ELEVATING LEGREST
Swingaway Footrest Elevating Legrest
WARNING: Avoid potential pinch points while swinging the Footrest or Elevating Legrest in
or out.
WARNING: The footplates' lowest point should be no closer to the ground than 2 1/2inches,
to permit proper clearance.
WARNING: Do not stand on the footplates; this could cause the wheelchair to tip.
SWING FOOTREST / LEGREST AWAY FOR TRANSFER
1. Push swingaway release lever, at top of Footrest / Legrest, rearward; Footrest / Legrest will
swing outward.
2. Fold footplate upward and out of the way.
3. If wheelchair has Elevating Legrest, rotate calf pads upward 90° for transfer ease.
RETURN FOOTREST / LEGREST TO OPERATION POSITION
1. Rotate footplate downward, parallel with oor.
2. Swing Footrest / Legrest inward and lock it in place.
3. If wheelchair has Elevating Legrest, rotate calf pads downward 90° to occupy wheelchair.
WARNING: Ensure Footrest / Legrest extensions are locked in place, with footplates
rotated downward, before occupying or operating wheelchair.
SWINGAWAY FOOTREST, ELEVATING LEGREST: ADJUST FOOTPLATE EXTENSION LENGTH
Tools required: 7/16" wrench
1. Use
7/16" wrench to remove through-bolt that holds footplate extension in position in
Footrest / Legrest hanger.
2. Reposition footplate extension in desired position inside hanger.
3. Reinstall through-bolt in appropriate adjustment hole for desired footplate extension length.
Use 7/16" wrench to tighten through-bolt.
4. Follow steps 1-3 to adjust other side's footplate extension length. Ensure both through-bolts are
securely tightened and minimum ground clearance is 2 1/2inches.
WARNING: Ensure footplate extensions are securely installed inside footrest or legrest
before occupying or operating wheelchair.

GD-450-525-INS-LAB-RevA21 • Regency 450 / 525 User Manual 16
ELEVATING LEGREST: RAISE LEGREST
Elevating Legrest
WARNING: Avoid potential pinch points while adjusting Elevating Legrest angle.
To raise the Elevating Legrest (adjust the legrest rotation angle):
1. Grasp the legrest near the footplate while holding the Legrest Height release lever (shown
above).
2. Rotate the footplate up or down to the desired height.
3. Release the lever.
WARNING: Ensure Legrest is locked in place before occupying or operating wheelchair.
ELEVATING LEGREST: ADJUST CALF PAD POSITION
Calf pad position can be adjusted to ve different points for ideal comfort:
1. Rotate the calf pad upward 45°; the calf pad will then be free to move between positions.
2. Slide calf pad to the preferred slot in the Calf Pad Height Adjustment Bracket (shown above).
3. Rotate calf pad back down to lock the positioning lug into the slot. In addition, calf pads can be
rotated upwards 90° for ease or entering and exiting the chair.
WARNING: Ensure Legrest calf pads are locked in place before occupying or operating
wheelchair.
CROSSBRACES
TIGHTEN CROSSBRACES
Tools required: 1/2" wrench
Check the crossbraces to ensure that the bolt and nut securing both crossbraces in the center of
the wheelchair are secure (crossbraces should be loose enough to fold easily, yet snug enough to
take up excess play). Use a 1/2" wrench to tighten or loosen.

GD-450-525-INS-LAB-RevA21 • Regency 450 / 525 User Manual 17
RECLINER (525 RECLINING MODEL ONLY)
ADJUSTING THE BACK ANGLE (525 RECLINING MODEL ONLY)
1. See picture above: to adjust the back angle, grasp both ends of push bar securely and
simultaneously pull up on both release levers (use your hands to squeeze the end of push
handles and release levers together).
2. Gently lower or raise the back to the desired height.
3. Release the levers.
3. When folding the wheelchair, disconnect the push bar from the right pusher handle, then
depress the spring button on the left pusher handle and rotate the push bar downward 90°.
The spring button should extend through the storage hole on the push bar.
WHEEL LOCKS
ADJUST WHEEL LOCKS
Tools required: 7/16" wrench
As a result of tire wear, wheel locks may need adjustment to
prevent the rear wheels from turning when the wheel locks are
engaged.
To adjust wheel locks:
1. Use a 7/16" wrench to loosen the two locknuts (shown at right)
until the lock slides on the frame.
2. Place the wheel lock in the locked position and slide it into
contact with the tire.
3. Place the wheel lock in the unlocked position and slide it 3/8"
closer to the tire.
4. Use a 7/16" wrench to tighten the two clamp bolts and engage the lock to check the t. The
lock should indent the tire at least 3/8". Tighten clamp bolts securely to eliminate wheel lock
movement on frame.
WARNING: Ensure wheel locks are adjusted so that they lock in place appropriately before
occupying or operating wheelchair.
Wheel Lock

GD-450-525-INS-LAB-RevA21 • Regency 450 / 525 User Manual 18
6
TRANSPORTING THE GENDRON REGENCY 450 / 525
WARNING: This wheelchair does not offer seating or occupant restraint equivalent to
the seat provided in a motor vehicle! To increase your safety while traveling in a motor
vehicle, always transfer to the vehicle seat and use the restraint provided by the vehicle
manufacturer.
Follow the instructions in FOLDING THE WHEELCHAIR FOR TRANSPORTATION OR STORAGE,
page 9.
TRANSPORTING THE WHEELCHAIR
When transporting the wheelchair in a motor vehicle, do not place the wheelchair where it will
interfere with the safe operation of the vehicle or endanger the driver or passengers. The front
seat IS NOT a good location to store a wheelchair during transport — it can be dislodged and
become a serious hazard to the driver. Always take precautions to avoid personal injury when
loading or lifting a wheelchair into or out of a vehicle.
Lifting Wheelchair into Rear Seat or Trunk
Rear Seat: Move the front seat as far forward as possible. Fold the wheelchair as described on
previous page and face it toward the open car door. Tilt the wheelchair backwards as shown above
and roll it forward on the rear wheels. Push the wheelchair forward so the casters enter the car.
Tilt the wheelchair away from the back of the front seat, then lower the casters to the oorboard.
Slowly lift-roll the chair into the car.
WARNING: Ensure the wheelchair is stable and will not shift while the car is in motion.
WARNING: Ensure the wheelchair does not block the driver’s eld of vision.
Trunk: Fold the wheelchair as described on previous page and set the wheel locks. Grasp the front
of the frame and rear of the wheels and lift the wheelchair carefully, using good body mechanics to
avoid injury, and place it in the trunk.
WARNING: DO NOT put any articles on top of the wheelchair.
Close the trunk lid slowly.
Follow the instructions in UNFOLDING AND FOLDING THE WHEELCHAIR, pages 7 and 8, to
reassemble the wheelchair.

GD-450-525-INS-LAB-RevA21 • Regency 450 / 525 User Manual 19
7 MAINTENANCE
Protect your Gendron Regency 450 / 525 by having it serviced regularly. Proper care and
maintenance are essential to keep your wheelchair in safe working condition. Periodic
inspection, adjustment, and replacement of worn parts will provide many years of superb
performance. When you believe that a component or part of your Regency 450 / 525 is not
functioning properly, contact your Graham-Field authorized distributor immediately, as a
potentially hazardous condition could result. Only excellent condition is acceptable where
safety is concerned.
SERVICE MANUAL
There is no service manual for the Regency 450 / 525. Please contact your Graham-Field authorized
distributor with service questions not answered by this manual.
Info: We recommend that you have a Graham-Field authorized distributor perform a six month
maintenance check, as the distributor may nd and correct a problem which might otherwise go
undetected and eventually cause more serious problems and/or personal injury.
DO-IT-YOURSELF MAINTENANCE
You can do many of the scheduled maintenance tasks yourself, if you have mechanical ability
and a few basic tools. Refer to the maintenance schedule on the next page for the recommended
regularity of each procedure. If any maintenance procedure is not clear to you, ask your
Graham-Field authorized distributor for assistance.
sNOTICE: Improper maintenance can cause operating problem and may affect your
warranty.
WARNING:
Unauthorized modication or the use of non-Gendron replacement parts
could change the structure of the wheelchair, void the warranty, and create a hazardous
condition resulting in serious personal injury.
MAINTENANCE SCHEDULE
Procedure Perform at least every
Week Month 3 Months 6 Months
Check tire wear ✔
Check handrims ✔
Check wheel lock engagement ✔
Check anti-tippers ✔
Wipe off frame with soft cloth ✔
Check Crossbraces ✔
Check handgrips ✔
Check upholstery ✔
Check rear wheel adjustment ✔
Check arms ✔
Check backposts / push handles ✔
Check footrests / elevating legrests ✔
Clean frame ✔
Check caster stem rotation (distributor) ✔
GF distributor maintenance check ✔
Check rear wheel bearings (distributor) ✔
Check caster bearings (distributor) ✔

GD-450-525-INS-LAB-RevA21 • Regency 450 / 525 User Manual 20
LIST OF TOOLS
The tools and cleaning supplies listed will assist in the following procedures.
30 weight oil (available at most auto parts stores)
Phillips screwdriver
soft cloth
mild soap and water solution
GENERAL CARE
Always evaluate the overall operation of your wheelchair. It should function with ease and should
travel straight without excessive drag or pull to one side.
Remember, your Graham-Field authorized distributor knows your wheelchair best when it comes
to service and repairs. Contact your authorized distributor with any questions or concerns
regarding the safe operation and maintenance of your wheelchair. Regular maintenance is essential
for your safety and continued operation of your wheelchair.
CHECK TIRE WEAR
Examine tires at least once a week for surface wear and cracks and replace them as needed.
Replace solid rubber tires when they become loose on the rims or cracks appear.
CHECK HANDRIMS
Check handrims at least once a week. Inspect each handrim for rough or sharp edges and, if any
are found, replace handrims immediately. Ensure that all hardware is properly aligned and secure.
CHECK WHEEL LOCK ENGAGEMENT
Check wheel lock engagement at least once a week. See Adjust wheel locks in the ADJUSTMENTS
section to adjust wheel lock engagement. If a wheel lock is worn or damaged, replace it
immediately. Inspect the hardware for looseness or signs of wear.
Ensure the locking mechanism operates smoothly. The locking assembly should be tight enough
so that the wheel can not rotate or the lock slip. Check that the locking shoe does not press
against the tire when in the unlocked position. Excessive force should not be required to either
engage or release wheel locks. Oil the wheel lock pivot points with one or two drops of 30 weight
oil. Remove excess oil and dirt.
CHECK ANTI-TIPPERS (STANDARD ONLY ON RECLINING MODELS)
Check the anti-tippers at least once a week. Ensure anti-tippers are securely fastened and properly
positioned.
CHECK HANDGRIPS
Check handgrips at least once a week. Ensure they are not ripped; ensure they are tight and
securely fastened.
CHECK CROSSBRACES
The locknut on the pivot bolt should be snug, but not overly tight. If the pivot bolt becomes worn,
replace both it and the locknut.
This manual suits for next models
3
Table of contents
Other Graham Field Wheelchair manuals

Graham Field
Graham Field LUMEX Versamode Drop Arm User manual

Graham Field
Graham Field LUMEX 89101 User manual

Graham Field
Graham Field Everest Jennings 2055LS Parts list manual

Graham Field
Graham Field Everest Jennings PURETILT PT3000-18 Installation and user guide

Graham Field
Graham Field LUMEX FR566G Series User manual

Graham Field
Graham Field 5226 Parts list manual

Graham Field
Graham Field Everest & Jennings EJ87X-1 User manual

Graham Field
Graham Field GENDRON 6700 User manual

Graham Field
Graham Field TENDERFLO AQTF-2035 User manual

Graham Field
Graham Field Lumex TENDERFLO WATER CUSHION User manual