Grand GMD-M8 User manual

MANUAL
用户手册
GMD- M8
八段上(下、侧)送型松紧带装置
MODEL & DEVICES
G R A N D M I C R O C O M P U T E R C O N T R O L E L A S T I C S E R I E S


1、Function and control panel instruction
产品简介与面板操作说明
(1-2)
2、Installation guide
安装说明
(3)
3、0 kg Calibration
归零 校正
(4)
4、Adjustment for tape sliding over the roller
松紧 带左 右偏 差调 整
(5)
5、Operation guide
操作 使用 说明
(6-15)
6、Send machine fault diagnosis
送带 机故 障诊 断
(16-17)
7、M8 Series tension type computerized metering device schematic
微电脑控制松紧带装置示意图
(18)
8、Needle counting , foot switches Assembly drawings
针数计数器、脚踏开关组件图
9、Stand module and parts list
支撑架组件图
11、Pats list for vibrating tape module
电动抖带装置组件图
13、Component feed device assembly map
送料装置组件图
14、Component feed device assemb a list of
送料装置清单
(19)
(20)
(22)
(24)
(25-26)
C o n t e n t s
目 录
12、Control box accessory and assembly
控制 箱组 件图
(23)
10、Foot switch
脚靠开关
(21)
15、GMD-M8 Assembly diagram
八段下、侧送松紧 带 机 安 装 示 意 图
(27)

B、Control panel instruction
操作面 板说明
1) Small size, easy installation and opetation,Auto control the tension of the elastic tape
and synchronously feed tape with sewing machine.
该机适 用于各品 牌人字车、绷缝机等,可用于缝制 内衣衫裤 、运动裤 等产品。
2) Can be applied to any kind of Zig-zag stictch machine,flat lock machine and over lock
machine etc.
微电脑控制和 液晶数位 显示。
3) Microcomputer control and LCD digial display.
连过拉力感应器自动调节器整松紧度,使缝纫机同步。
4) Seamer synchronization with the taut, smooth transportation elastic.
Power(电 源):
Speed(转 速) :
Tape W idth ( 送带宽带 ):
Engineering S ection (工 程 段 ) :
110-240v
Unlimted(可配合各缝纫机转 速)
0-50mm
1-99
1-8(Section)
12 3 4STITCH
SET MODE
STAR T 5678FREE TAPE
SENSITIVITY
FUNC
TION
启动
针数设定 工程记 忆
松带设定 灵敏度
功能
AUTO
自动
SECT ION NO
工程设定
.
ST ITCH
CO UNTER
车缝 计数
1 2 3 4 56 7 8 910
11
12
13-1
13-2
14
PC 1(图1)
1、Function and control panel instruction
产品简介与面板操作说明
A、Product Features:
产品特 点
体积小,易安 装,操作 简单设定 选择的尺 寸后再调旋扭至直连到要 求的尺寸
及速度,以连 至理想效 果。
1
Sensitivity ( 灵 敏 度):

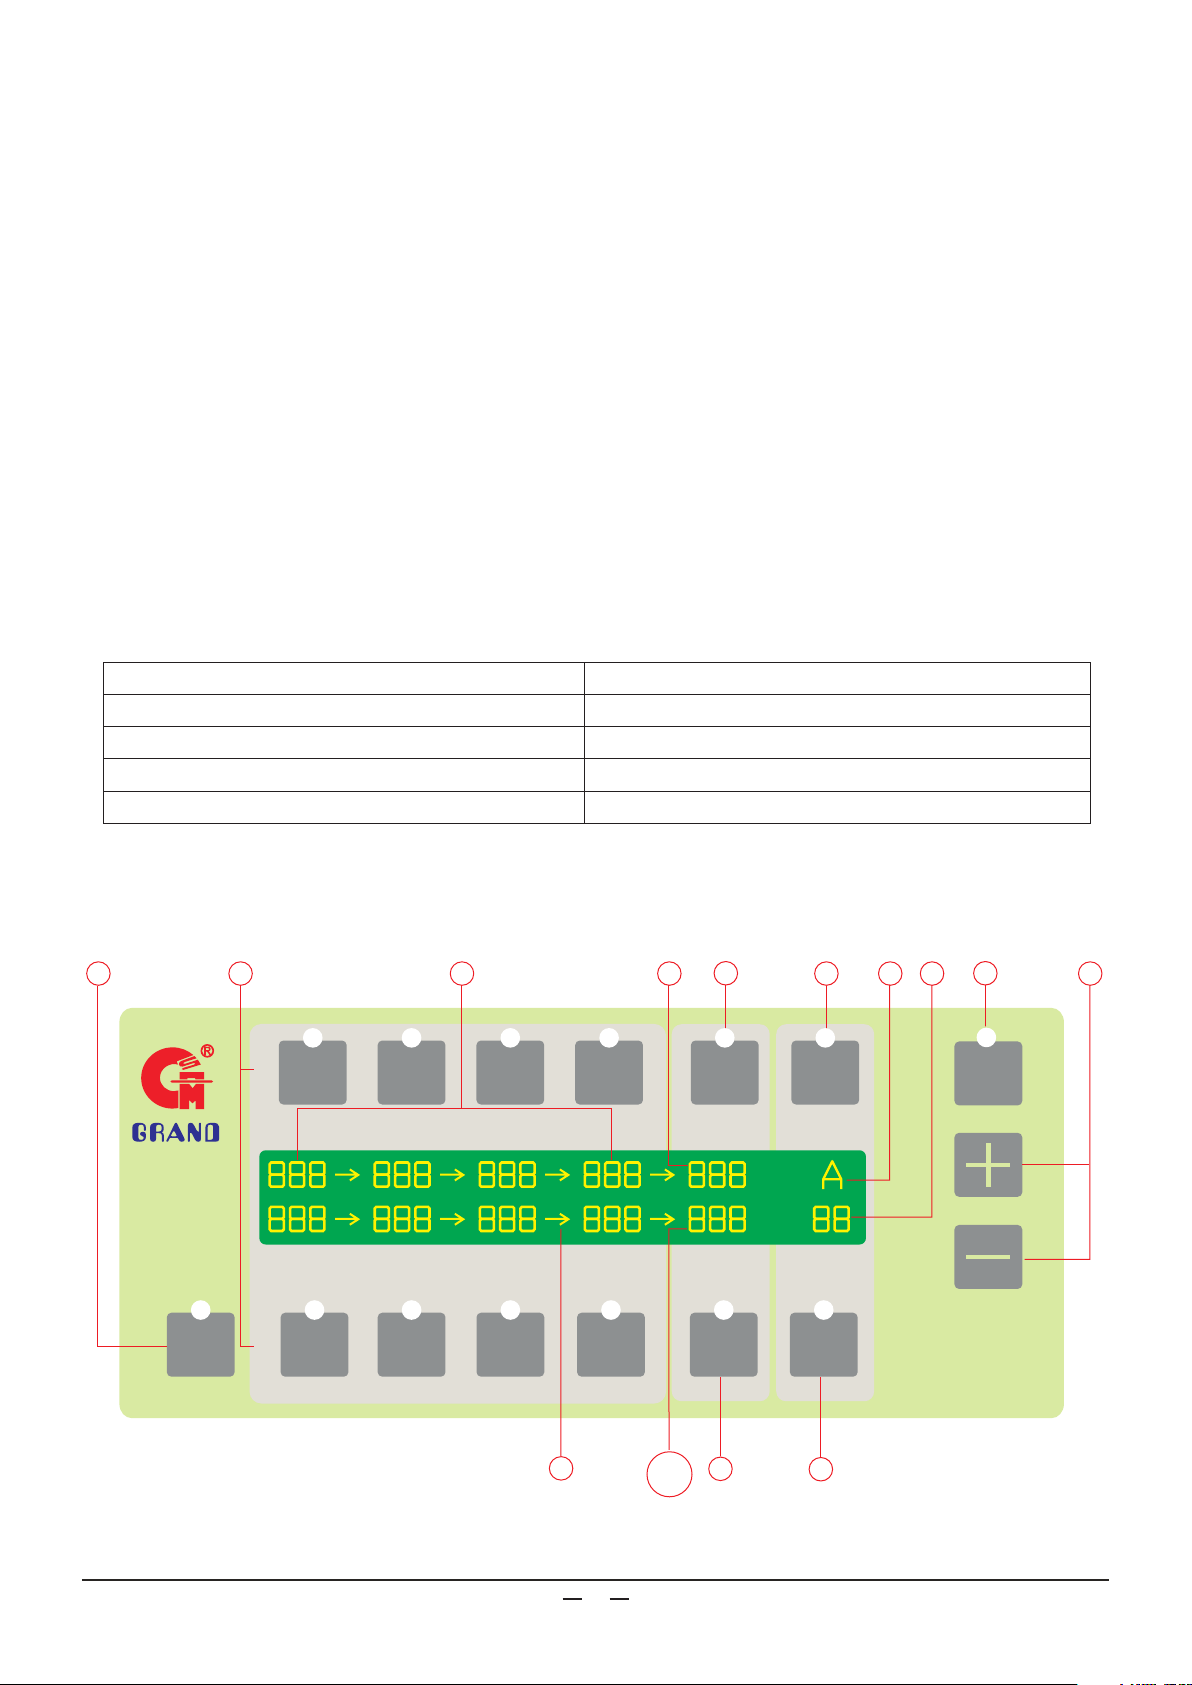
视窗及 按键说明 参 照图一( ): *需 配合计数 器SY装置(选择配件).
送料值 显示窗
针数设 计定显示 窗
针车设定键
工程记忆键
工程记 忆显示窗
灵敏度 显示窗
功能设 定键
灵敏度 设定键
松带值 设定键
工程设 定选择键 共 有八段工程可供设定松紧度。
显示各 段工程松 紧度之设定值,一共有八段,每设定值班均 可
从1-999。
显示针 数设定数 值,空白或1-999.
于自动 换段车缝 时设定使用(参照第7-10页)。
可储蓄26组(A-Z)不同工程内容的资料,每组可在八段
(参照 第 15页)。
显示工 程记忆设 定(A-Z)。
显示灵 敏度之设 定值1-99.
特殊功 能设定( 参照第4页)
+ ,-键 使用+,-键来 更改各项 功能的设定数值。
依紧带及紧度须调整灵敏度,以达到稳定车缝效果(参照第6页)
设定无张力松带值(请参照第14页)。
自动换 段车缝时 ,显示车缝的车数,最多针数999针。
*
*
针数显 示窗
*
Control Panel Instructions (Refer to figure 1):
Counter-SY (Optional).
*These functions are only available with the stitch
SECTION PANEL
STITCH DISPLAY
STITCH SET
MODE
MODE DISPLAY
SENSITIVITY
DISPLAY
FUNCTION
SETTING KEY
+ ,-KEY
SENSITIVITY
FREE TAPE
STITCH COUNTER
DISPLAY
SECTION TENSION To set each sections tension, Up to 8 different sections per program.
Displays all the Sections status from 1-999.
Indicated the number of stitches to be sewn from 1-999 for Auto
section change.
Stich count setting (page 7-10).
Use this key to memorize up to 26 different programs from A-Z.
(Page15)(Each program has 8 sections.)
Indicates the Mode which you have set(A-Z).
Indicates the Sensitivity which you have set from 1-99.
Press this key to activate for setting the SPECIAL
functions (Page ).
4
Use the +,-key to modify all settings.
Adjust this value for different tapes and tensions for stable sewing
(Page 6).
To eliminate Tension on the tape (Page 14).
During stitch Counter-(SY)operation, indicates the number of
stitches sewn up to 999.
START Push Start to normal sewing operation.
启动键 进 入车缝模 式用。
1
2
3
4
5
6
7
8
9
10
11
12
13-1
13-2
14
松带值 显示窗 显示 松带设定值从900-999.
FREE TAPE DISPLAY Indicates the free tape value from 900-999.
自动换段显示箭号 于自动换段时所显示之箭号。
STITCH ARROW Indicates Auto change to the next section.
2

松紧带接触到车头,将会影响到车缝尺寸,可能辅助杆移开。
Please use the Auxiliary Guide to avoid the tape to contact the machin.
辅助杆
Auxiliary Guide
缝纫机
Machine
松紧带 请勿接触 到车头
Do not let the tape to
contact
the machine
松紧带
Tape
辅助杆 调整
2) Auxiliary Guide
高度调 整
1 ) H e i g h t
须预留 车头旋转 空间,但不宜过高。
Please keep some space for machine maintenance.
预留车 头旋转空 间
Space for machine s
maintenance
'
2、Installation guide
安装说明
3

以下情 况须要做 归零校正:
本装置安装完成后。
尺寸有 异常不稳 定时。
C、If the driven roller can not stop. In any section,the driven roller must stop when the tension valueto
be adjusted between 890-900 and the sensitivity is set at 99 after remove the elastic tape from the
sensor bar (Make sure nothing Contact with sensor Bar).
归零校 正时应移 开感应轮之松紧带(如下图)
2)Please remove the elastic tape before calibration (Refer to the following f i gure).
操作说 明(须按2秒以上)
Operation guide :(push more than 2 secretary)
注意
如标准归零 后,其数值不介
于0-99之间 时,即表示装置
有问题,需 要检修。
Notice:
If the value is notbetween10-90
afterRegular Calibration.The
device needs to be REPAIRED.
1
FUNCTION
-
功能
感应轮 在无负载 的状态(移开感应轮 上的松紧带),在任何一段工 程中,送料值 在980- 999
之间的 其中一值,( 灵敏度必须设计在99),驱动轮应 停止转动而未停止 时。
1) Always correct the calibration after the following instances:
A、After installation.
B、If the device is feeding irregularly.
驱动轮
Driven Roller
感应轮
Sensor
0 KGRA MS SE TTI NG 00 42
0 KGRA MS DE FAU LT
0 KGRA MS SE TTI NG 00 42
0 KGRA MS DE FAU LT 00 42
松紧带 移开感应 轮
Remove the elastic tape
from the sensor bar
3、0 kg Calibration
归零校正
4

副轮偏心轴可调整松紧带送带左右的偏差。
Adjust Eccentric shaft of the Auxiliary Roller can let the tape to go the Right or left side.
松紧带
Tape
调整松 紧带往左 边
Adjust to the L eft s ide
记号往 左边
Mark turn to
the Left
记号往 右边
Mark turn to
the Right
驱动轮
Driven Roller
副轮
Auxiliary
Roller
调整松 紧带往右 边
Adjust to the Lef t side
驱动轮
Driven Roller
副轮
Auxiliary
Roller
4、Adjustment for tape sliding over the roller
松紧带左右偏差调整
记号
Mark
副轮偏 心轴
Auxiliary Roller shaft
副轮
Auxiliary Roller 驱动轮
Driven Roller
5

灵敏度调整说明: 车缝时驱动轮及松紧带发生前后颤动不停时(如图二),需适当调整灵敏
度值,每段工程均可调整, 边调灵敏值,边用手拉松紧带,直到无振荡为
止(如图三)(灵敏度值从00-99,出厂设定为↓90)。
If the driven roller and elastic occur lasting vibration forward and backward
while sewing, (Adjustable from 0-99.The default setting is 90) the tape must
be pulled manually while the value is being adjusted. This allows you to feel
if there is any vibration occurring(Please refer to figure 2 & figure 3).
注意!! : 如果灵敏 度值调的过小,虽不会有震荡现象,但会影 响尺寸的 准确度。
因此在 不振荡的 前提下值越大越好。
Notice!!: If the value is too less, it will effect the accuracy. Therefore, the value is
large
better with number without vibration.
例一
2) Example 1.
内容 调整 灵敏度
Context:Adjust the sensitivity value.
工程
Section
送料值 灵敏度
Feed Sensitivity
1 75 0 3 0
Before adjust(调整前 )
驱动轮颤动
Driven roller vibration
松紧带颤动
Tape vibration
上下拉动
Pull up and down
After adjust(调整后)
松紧带不颤动
No tape vibration
1) Sensitivity
Adjustment:
图二
Figure 2
5、Operation guide
操作使用说明
图三
Figure 3
3) Operation guide:
操作说 明
Senstivity
灵敏度
75 0→680 735→
98 0
A
75 0
1 2 3 4
5 6 7 8
STITCH
SET
针数设 定 工程 记忆
MODE
STITCH
COUNTER
车缝针 数
灵敏度
SENSITIVITY
→
START
启动
90
75 0→680 735→
00 0
A
75 0
1 2 3 4
5 6 7 8
STITCH
SET
针数设 定 工程 记忆
MODE
STITCH
COUNTER
车缝针 数
灵敏度
SENSITIVITY
→
30
6

SETTING: 6 are MANUAL.
Section1,2,3,4,5 are all Auto -Section Change. Section 3 and
例二
4) Example 2.
内容
内衣上 围两边缝 制时左右的布纹方向有所不同,因此需要6
段来完成(需要计数器SY装置,选择配件)。
Context: Sewing Two Upper sides Of The Brassiere. Due to the different
tensions require 6 sections (Optional Stitch Counter-SY
Required for Auto-Section Change).
Section Feed Stitch
1
2
3
4
5
6
950
855
965
958
842
936
工程 送料值 针数
225
75
43
68
设定 1,2,3,4,5工程 为自动换 段 3, 6工程为膝 动(或手动)换段。
5) Operation guide:
操作说 明
STITCH
SET
针数设定
1
STITCH
SET
针数设定
2
3
750→680 735→
980
A
90
950
1 2 3 4
5 6 7 8
STITCH
SET
针数 设定 工程记忆
MODE
STITCH
COUNTER 灵敏 度
SENSITIVITY
225
750→680 735→
980
A
90
950
1 2 3 4
5 6 7 8
STITCH
SET
针数 设定 工程记忆
MODE
STITCH
COUNTER 灵敏 度
SENSITIVITY
075855
→
→ →
750→680 735→
980
A
90
950
1 2 3 4
5 6 7 8
STITCH
SET
针数 设定 工程记忆
MODE
STITCH
COUNTER 灵敏 度
SENSITIVITY
965855
→ →
1
2
34
5
6
车缝针 数
车缝针 数
车缝针 数
7

注意
因车缝 过程中的 换段完全由计数器(SY)侦测进行自动换段, 所以须注 意下
列要项 ,以免影 响尺寸及针数设定。
车缝裁 片需要大 小相同。
车缝的 启始位置 必须一致。
Notice:Due to the Auto-Section change function,please care the following.Information to
avoid error in the stitch counter setting.
1.With same cutting size of the material.
2.Always start sewing at the same place for every piece.
STITCH
SET
针数设定
4
STITCH
SET
针数设定
5
6
750→680 735→
980
A
90
950
1 2 3 4
5 6 7 8
STITCH
SET
针数 设定 工程记忆
MODE
STITCH
COUNTER
车缝 针数
灵敏 度
SENSITIVITY
043
1 2 3 4
5 6 7 8
STITCH
SET
针数 设定 工程记忆
MODE
STITCH
COUNTER 灵敏 度
SENSITIVITY
→
1 2 3 4
5 6 7 8
STITCH
SET
针数 设定 工程记忆
MODE
STITCH
COUNTER 灵敏 度
SENSITIVITY
855 965 958
→ → →
750→680 735→
980
A
90
950
→
855 965 958
→ → →
→
750→680 735→
980
A
90
950
→
855 965 958
→ → →
842
→
936
1 2 3 4
5 6 7 8
STITCH
SET
针数 设定 工程记忆
MODE
STITCH
COUNTER 灵敏 度
SENSITIVITY
750→680 735→
000
A
90
950
→
855 965 958
→ → →
842
→
936
068
225
842
ST A RT
启动
车缝 针数
车缝 针数
车缝 针数
8

操作说 明
Operation guide:
当其数 值闪烁时 ,表示其值 处于可修改的状态中。
6) The Value can be modified when the Value is flashing.
于两个段数中出现此符号时,表示具有自动换段之功能。
7) This signal means sections will change automatically by stitch counter-SY.
如不需 要较多的 段数,连续按两次下一段数的键即解除以下 之段数。
8) Push the next section bottom twice to erase setting in selected setting from.
如不需 要自动换 段功能时,连续按两次针数设定键既解除。
9) Push any of the section Stitch Set bottom twice to disable the function of Auto Switch section
function.
2
START
启动
1
STITCH
SET
针数设定
900
750→680 735→ 72 6
62 7 746 98 0
A
90
75 0 680 7 35
1 2 3 4
5 6 7 8
STITCH
SET
针数设 定 工程记忆
MODE
STITCH
COUNTER
车缝针 数
灵敏度
SENSITIVITY
750→680 735→
00 0
A
90
750
1 2 3 4
5 6 7 8
操作说 明
Operation guide:
START
启动
750→680 735→
98 0
A
90
750→6 80
1 2 3 4
5 6 7 8
750→680 735→
00 0
A
90
75 0 680
1 2 3 4
5 6 7 8
2
STITCH
SET
针数设定
STITCH
SET
针数设 定 工程记忆
MODE
STITCH
COUNTER
车缝针 数
灵敏度
SENSITIVITY
07 5
STITCH
SET
针数设 定 工程记忆
MODE
STITCH
COUNTER
车缝针 数
灵敏度
SENSITIVITY
STITCH
SET
针数设 定 工程记忆
MODE
STITCH
COUNTER
车缝针 数
灵敏度
SENSITIVITY
9

例三
10) Example 3.
内容 单段 工程
Context: Single Section
工程
Section
送料值 针 数
Feed Stitch
1 750
START
启动
1
送料值 调整比较 说明
11) Feed value adjustment guide:
送料值 小
number.
Smaller feed
送料值 大
Larger feed number.
750→680 735→
98 0
A
90
750
750→680 735→
00 0
A
90
750
1
操作说 明
Operation guide:
1 2 3 4
5 6 7 8
STITCH
SET
针数设 定 工程记忆
MODE
STITCH
COUNTER
车缝针 数
灵敏度
SENSITIVITY
1 2 3 4
5 6 7 8
STITCH
SET
针数设 定 工程记忆
MODE
STITCH
COUNTER
车缝针 数
灵敏度
SENSITIVITY
10

Section Feed Stitch
1
2
3
4
5
6
750
680
735
726
672
746
1
例四
12) Example 4.
内容 裤口 两边缝制 ,六段工程为手动或膝动换段。
Context: Seeing Two-Leg Openings.All Sections require Manual changes.
Operation guide:
操作说 明
750→680 735→
980
A
90
750
2
3
750→680 735→
750→680 735→
980
980
A
A
90
90
750
750
680
680 7 35
1
2
3
4
5
6
工程 送料值 针数
1 2 3 4
5 6 7 8
STITCH
SET
针数设定 工程记忆
MODE
STITCH
COUNTER
车缝针数
灵敏度
SENSITIVITY
1 2 3 4
5 6 7 8
STITCH
SET
针数设定 工程记忆
MODE
STITCH
COUNTER
车缝针数
灵敏度
SENSITIVITY
1 2 3 4
5 6 7 8
STITCH
SET
针数设定 工程记忆
MODE
STITCH
COUNTER
车缝针数
灵敏度
SENSITIVITY
11

4
750→680 735→
980
A
90
750
1 2 3 4
5 6 7 8
STITCH
SET
针数设定 工 程记 忆
MODE
STITCH
COUNTER
车缝 针数
灵敏度
SENSITIVITY
680 7 35 72 6
5
750→680 735→
980
A
90
750 6 80 73 5 726
6
750→680 735→
980
A
90
750 6 80 73 5 726
672
672 746
750→680 735→
980
A
90
750 6 80 73 5 726
672 746
START
启动
1 2 3 4
5 6 7 8
STITCH
SET
针数设定 工 程记 忆
MODE
STITCH
COUNTER
车缝 针数
灵敏度
SENSITIVITY
1 2 3 4
5 6 7 8
STITCH
SET
针数设定 工 程记 忆
MODE
STITCH
COUNTER
车缝 针数
灵敏度
SENSITIVITY
1 2 3 4
5 6 7 8
STITCH
SET
针数设定 工 程记 忆
MODE
STITCH
COUNTER
车缝 针数
灵敏度
SENSITIVITY
12

1
2
3
STITCH
SET
针数设定
例5
13) Example 5.
内容
第1.2工 程为自动 换段(需要计数器SY装置,选择配件)。
Context: Section 1,2 are Auto -Section change (Optional Stitch
Counter-SY Required).
Section Feed Stitch
1
2
3
750
680
735
100
120
Operation guide:
操作说 明
1
STITCH
SET
针数设定
2
3
750→680 735→
980
A
90
750
1 2 3 4
5 6 7 8
STITCH
SET
针数 设定 工程记忆
MODE
STITCH
COUNTER
车缝 针数
灵敏 度
SENSITIVITY
100
750→680 735→
980
A
90
750 120680
→
→ →
750→680 735→
980
A
90
750 735680
→ →
750→680 735→
000
A
90
750 735680
→ →
100
ST A RT
启动
工程 送料值 针数
1 2 3 4
5 6 7 8
STITCH
SET
针数 设定 工程记忆
MODE
STITCH
COUNTER
车缝 针数
灵敏 度
SENSITIVITY
1 2 3 4
5 6 7 8
STITCH
SET
针数 设定 工程记忆
MODE
STITCH
COUNTER
车缝 针数
灵敏 度
SENSITIVITY
1 2 3 4
5 6 7 8
STITCH
SET
针数 设定 工程记忆
MODE
STITCH
COUNTER
车缝 针数
灵敏 度
SENSITIVITY
13

例六
14) Example 6.
内容 设定 松带功能
Context: Setting Free Tape function.
松带值 的设定:
Free Tape Operation Guide:
T he differe nt ta pe shou ld u se t he differe nt setting.
Otherwi se, t he Fr ee Ta pe Functi on m ay cau se t oo
tig ht or loose(T he defa ult is 980).
例
EX.:
松带设定
Free tape: 980
注: 因松 带设定显 示窗与车缝针数显示窗是共用的,所以须注 意,当按 了松带设 定键
后,显 示窗会出 现一组闪烁数字,此时全表为松带的设定值 ,值越大 越松。设 定
完成后 按启动键 ,显示窗数字则又回到显示车缝针数的状态 。
P.S.: There are two value in this location. One is STITCH COUNTER, the other is Free Tape.
After press the FREE TAPE bottom, the value will become Flashing that means you can
adjust the value of FREE TAPE. Larger Number will become looser. After finishing the
setting, press START bottom, this location s will become STITCH COUNTER display.
,
配合不 同的松紧 带,需要设定不同的值,否则
值过多 会造成松 紧带太松而掉落,反之值太少使
得松紧 带 太紧而 难以移出 布料(出厂设定值:
999) 。
Operation guide:
操作说 明
FREE
TAPE
松带设定
750→680 735→
A
90
950
1 2 3 4
5 6 7 8
STITCH
SET
针数 设定 工程记忆
MODE
STITCH
COUNTER
车缝 针数
灵敏度
SENSITIVITY
980
750→680 735→
A
90
950
1 2 3 4
5 6 7 8
STITCH
SET
针数 设定 工程记忆
MODE
STITCH
COUNTER
车缝 针数
灵敏度
SENSITIVITY
000
ST A RT
启动
14

例七
15) Example 7.
工程
Section
送料值 针 数
Feed Stitch
1
2
3
4
5
6
750
680
735
726
672
746
内容 更换 样式,模 式切换,由模式A换到模式B。
Context: Switch the MODE from MODE A to MODE B.
1
2
3
5
4
6
120
132
66
138
模式
MODE A
工程序 记忆操作 说明:
This function provides user to memorize up to 26 different sewing modes.
User can rapidly switch the MODE which is aleady set.Not necessary to
re-set the MODE again.
Mode operation:
此功能 提供使用 者记忆26组不同的车缝模式使用者可快速选择 事先
储存的 记忆模式 ,无须重新设定。
工程
Section
送料值 针 数
Feed Stitch
1
2
3
4
5
6
738
668
728
716
660
732
1
2
3
5
4
6
105
122
58
118
模式
MODE B
Operation guide:
操作说 明
MODE
工程记忆
750→680 735→
950→680 735→
1 2 3 4
5 6 7 8
STITCH
SET
针数 设定 工程记忆
MODE
STITCH
COUNTER
车缝 针数
灵敏 度
SENSITIVITY
980
START
启动
1
726→120
A
90
672→746
750→680 735→
950→680 728→
1 2 3 4
5 6 7 8
STITCH
SET
针数 设定 工程记忆
MODE
STITCH
COUNTER
车缝 针数
灵敏 度
SENSITIVITY
000
716→105
B
90
660→732
15

送带机 异常振动
Vibration
送带数值999仍然过紧
999 still too tight
送带值000仍然过松
000 still too loose
送带机 无动作
No signal
萤屏不 显示
Blank panel
模式数值无法记忆
Cannot memorize the Mode
启动后,松紧带无法回
拉至所设定的松紧度
After turn on the power, the
elastic tape can not pull back
to reach the setting tension.
支架各固定螺丝松弛
灵敏度值过高
1. F ixed screw loosen.
2. The value of Sensitivity is too high.
感测杆有异物接触碰撞.
感应值不在正常范围.
1. Something contact with the sensor bar.
2. The sensor is not at the working range.
上紧松弛螺丝.
降低灵敏度值,参照第6页调整.
1. Check and Tighten the screws.
2. Lower the value of Sensitivity, refer to
the page 6.
请将异物移除.
参照第4页作归零校正,如值不在 10-90
范围内,通知维修人员进行更换维修
1. Remove the irrelevant object.
2. Redo the 0 kg Calibration page 4. Call the
technician to maintain if the value is not
between 10-90.
请将异物移除.
参照第4页作归零校正,如值不在 10-90
范围内通知维修人员进行更换维修.
1. Remove the irrelevant object.
2. Redo the 0 kg Calibration page Call the
4
technician to maintain if the value is not
between 10-90.
电源未接妥善.
线路系统断路.
控制系统故障.
1. Power is not connected properly.
2. Connecting line is break.
3. Electronic control system error.
接好电源.
检查各线路插座与插头接角是不明松脱.
通知维修人员进行更换.
1. Connected power
2. Check the pin of connecting plug or
socke t are not loose.
3. Call the technician to maintain.
面板故 障
Panel out of order.
通知维 修人员进行更换维修.
Call the technician to maintain.
记忆体故障
Memory out of order.
Switches of Free Tape is not
workingproperly.
Un-plug the Switches of Free tape.
动作不正常.无张力开关
请拆下无张力开关的电源插头后,若可正常
回拉则表示:
无张力开关位置不良,应调整.
If the elastic tape can pull back normally,
i t m ea n s :
1. The position of Switches of Free Tape is
not in good position, please re-adjust.
感测杆有异物接触碰撞.
感应值不在正常范围.
1. Something contact with the sensor bar.
2. The sensor is not at the working range.
Question phenomenon.
问题现象
R e a s o n
原因
Countermeasure.
对策
通知维 修人员进行更换维修.
Call the technician to maintain.
无张力开关故障通知维修人员进行更换维修
2. The Switches of Tape is out of order,
call the technician to maintain.
16
6、Send machine fault diagnosis
送带机故障诊断

进带过程不顺畅:
限宽环A B C 太窄造成送带 程产
生 阻力(如下图).
车缝时松紧带与车头或其他体接
触产生摩擦.
1. Un-smooth feeding path way for
the Tape:
1-1. The width of Elastic Guide Rings
at A B C (Refer to the following
Figure )for the Tape is too narrow
to feed the tape.
1-2. The Elastic Tape contacts to the
Machine Head or other obstacle
which causes friction.
A B C 靠
边器及押脚上之限宽装置均需要调
整略宽松于松紧带(注:如因 此造成
车缝时松紧带左右 移位 时,请调整
A B C,限宽环的正 确位置 ).
限宽环如下图 ,押脚导引
调整辅助杆,将所有松紧带隔离
所有接触的车头或物体(请参照第
3 页: "辅助杆调整 ").
1-1. Ad just the Proper Width of All Gu ide
include on the Pressu re Foot.(P.S.
P l s.Re-location of Elastic Guide
Rings, if the Tape i s sliding to the
r ight or left ir regularly).
1-2. Use A uxiliary Roller to prevent the
Tape from contacting the machine
or other obstacle.
灵敏度调整不当.
缝制员的手势技巧不熟练及布料
裁剪的尺寸不均.
2. I mproper S ensitivity s etting. 灵 敏
度 伸缩度越大,灵敏度调整需越
高,但 如 果调太高灵 敏度时会产
生主机颤动 不 止,而灵敏度太低
时会反应迟缓影响 产品尺寸的准
确 (请参照第6页:“灵 敏度调整
说明”).
依松紧带材质的伸缩性调整
缝制员在车缝过程中,应保持手
势给予布料一致的压力,不可忽 松
忽紧,且布料的裁剪尺寸要一致.
2. Pl s .re-setting the Sensitivity.More
flexible taps is with. Higher value.
It will cause vibration, if the value
is to high. However, Lover value
setting may cause slow reaction
and causes incorrect tension.
车缝时 不准确
Size Control
Unstable Elastic
松紧带已经很松,但车
缝布料结果仍然有缩皱
无法平坦
Can not reach Flat sewing
(Some situation need Flat
sewing result.)
There is with too much differential Feed
Ratio to feed too much material.
因缝纫机的前差动送齿差动太多,送过
多的布料.
Pls.Re -adjust the Differential Feed Ratio
to 1:1 range.
调整缝纫机差动送齿与主送齿的差动
比为同步(1:1).
3. Unskilled operator and
irregularly cutting.
3. Operator must remain the same
pressure to handle the sewing
material and the cutting must
be the same size.
17
Other Grand Industrial Equipment manuals
Popular Industrial Equipment manuals by other brands

Spida Machinery
Spida Machinery Mini 8 Operation & service manual

Endress+Hauser
Endress+Hauser 51517656 CleanFit H CPA 475 operating instructions

Rittal
Rittal CW 120-M operating instructions

EMUGE
EMUGE FRANKEN Softsynchro 6 Operating instruction

ITW Dynatec
ITW Dynatec DYNAMINI 4-HOSE Technical documentation

Blichmann
Blichmann Fermenator Operation, Assembly, Maintenance