Grange GR980 User manual

Sydney Brisbane Adelaide Perth Melbourne Hobart
••••
•
value quality service
•
•
Grange GR980
Grange GR980
USER MANUAL
USER MANUAL
10
Jug Capacity 2.5L
Speed RPM 32,000
Net Weight 5.8Kg
Dimensions mm (LxDxH) 230 x 230 x 540
Power 230V 50Hz
Motor 1680 W
Specifications
www.rfeaustralia.com.au Aus: 1 300 634644


2
Keep this manual with the appliance.
Diese Gebrauchsanweisung bitte beim Gerät aufbewahren.
Bewaar deze handleiding bij het apparaat.
Zachowaj instrukcję urządzenia.
Gardez ces instructions avec cet appareil.
Conservate le istruzioni insieme all’apparecchio.
Păstraţi manualul de utilizare alături de aparat.
Хранить руководство вместе с устройством.
For indoor use only.
Nur zur Verwendung im Innenbereich.
Alleen voor gebruik binnenshuis.
Do użytku wewnątrz pomieszczeń.
Pour l’usage à l’intérieur seulement.
Destinato solo all’uso domestico.
Doar pentru uz la interior.
Использовать только в помещениях.

4
EN
• Never use accessories other than those recommended by the manufacturer. Failure to do
so could pose a safety risk to the user and could damage the appliance. Only use original
parts and accessories.
•This appliance is not intended for use by persons (including children) with reduced
physical, sensory or mental capabilities, or lack of experience and knowledge.
•This appliance must not be used by children under any circumstances.
•Keep the appliance and its cord out of reach of children.
•Always disconnect the appliance from the mains if it is left unattended or is not in use,
and before assembly, disassembly or cleaning.
•Never leave the appliance unattended during use.
Special Safety Regulations
•This machine is designed only for blending and mixing food in commercial use such as in
the food industry and shops. (e.g. catering, restaurant, bar, etc.).
•Use the machine only as described in this manual.
•This machine should be operated and installed by specialized trained personnel in the
kitchen of the food industry such as catering, restaurant, bar, etc.
•All maintenance, installation and repair works should be performed by specialized
trained authorized technicians.
•Do not place the machine on a heating object (gasoline, electric, charcoal cooker, etc.)
Keep the appliance away from any hot surfaces and open flames. Always operate the
machine on a level, stable, clean, heat-resistant and dry surface.
•Do not use the machine near explosive or flammable materials, credit cards, magnetic
discs or radios.
•Wear protective clothing, mask, or protective glasses if necessary during operation.
•This machine is not intended to be operated by means of an external timer or separate
remote-control system.
•Never bypass any safety interlocks on the machine.
•WARNING: Keep all ventilation openings in the appliance clear of obstruction.
•WARNING: ALWAYS switch off the machine and unplug from electrical power supply
before cleaning, maintenance or storage.
•WARNING! ALWAYS keep hands, long hair and clothing away from the moving parts.
•Allow at least 20 cm spacing around the appliance for ventilation purpose during use.
•Caution! Securely route the power cord if necessary in order to prevent unintentional
pulling or contact with the heating surface.
•Do not put hands into the jug when the machine is in operation.
•Do not load too much ingredients in order to prevent overflow of the food products.
•WARNING! Do not fill above the MAX. mark of the jug.
•WARNING! Liquids to blend should be at or below room temperature. If you are going
to blend warm liquids, ensure that the jug lid is correctly in place and use low speed for
processing. Risk of burns and be careful.
•Do not wash the machine with water or a waterjet. Washing with water can cause leakage
and increase the risk of electric shock. No parts are dishwasher safe.

5
EN
•Do not clean or store the machine unless it is completely cooled down.
•Do not move the machine while it is under operation. Unplug the machine when moving
the machine and hold it at the bottom.
•Do not operate the machine without ingredients to avoid overheated.
•Ensure the machine is in STANDBY mode and unplug it after use.
Grounding installation
This appliance is classified as protection class I
appliance and must be connected to a protective
ground. Grounding reduces the risk of electric
shock by providing an escape wire for the electric
current. This appliance is equipped with a cord
having a grounding wire with a grounding plug. The
plug must be plugged into an outlet that is properly
installed and grounded.
Main parts of the machine
Digital control panel
1. Power switch(ON/ STANDBY): Press to
switch ON the machine; Press again to switch to
STANDBY mode
2. Speed control: Select and then press to the de-
sired speed.
( Low / Medium / High)
3. Timer: Select and then press to the desired time
(30s / 45s / 90s)
4. Pulse button : Full speed impulse movement.
Press and hold to operate, re-
lease the button to stop.
5. Digital control display
6. Motor base
7. Control panel
8. Blade assembly
9. Jug
10. Jug lid
11. Cover cap
12. Protective cover

6
EN
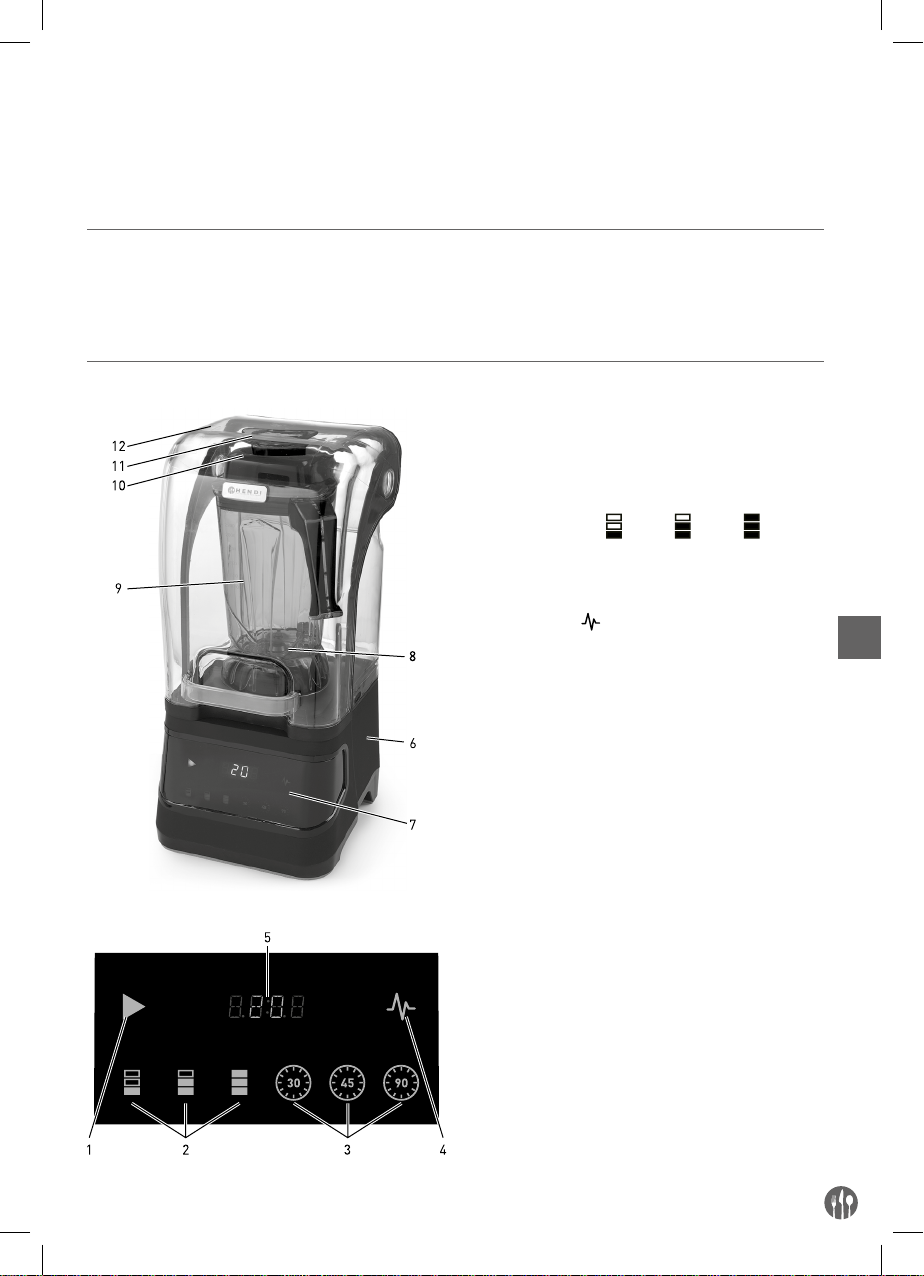
Special safety features
IMPORTANT: This machine has a specially de-
signed safety feature: Protective cover (12).
The machine can only operate when the protective
cover (10) is closed and the jug (9) is installed prop-
erly on the motor base (6).
Preparations before installation
• Remove all protective packaging and wrapping.
• Check the machine for completeness and trans-
port damages. In case of incomplete delivery (e.g.
jug lid, etc) or damage, contact supplier immedi-
ately. DO NOT use the machine. (See == > War-
ranty).
• Clean the machine and the jug (9) before use (See
==> Cleaning and Maintenance).
• Make sure the appliance is completely dry.
Installation
• Read this manual thoroughly and carefully before
installation and operation.
• Ensure the machine is placed in a dry area and
that surface has sufficient strength to support
the machine. Also ensure there are no obstruc-
tions nearby during operation of the machine.
• Ensure that the electrical power supply corre-
sponds with the rating label on the machine.
CAUTION! Never bypass any safety micro switch.
Transportation
• Do not move the machine while it is under op-
eration. Unplug the machine when moving the
machine.
• Always remove the jug (9) when moving.
• Lift only at the motor base (6) when moving.
Operation
Note: For safety reason, the machine can only start to operate with the jug (9) installed properly on the motor
base (6) and the protective over (12) is closed properly.
• Check if the machine is at the STANDBY mode.
• Unplug the machine and open the protective cov-
er (12), take out the jug (9) from the motor
base
(6)
.
• Pour all the ingredients into the jug (9) and close
it with the jug lid (10) and place the cover cap (11)
correctly in place.
• Place the whole jug (9) onto the motor
base (6)
&
close the protective cover (12).
• Connect the power plug to a suitable electri-
cal power supply socket and the machine is in
STANDBY mode now.
• Switch ON the machine by pressing the power
switch (1) and 20 will be shown on the digital
control display (5) or select a suitable speed by
pressing the desired speed control button (2): /
/ will be shown on the digital control display
(5) correspondingly. Default speed setting is 20
when you switch on.
• Select the time for operation (30s / 45s / 90s) by
pressing the timer button (3). Remaining time
will be shown on the digital control display (5).
Once the set time is elapsed, the machine will
stop operation and go to STANDBY mode.
• After use, always press the power switch (1) to
STANDNY mode and disconnect the plug from
the electrical socket.
Note: The digital control panel has 2 brightness in
blue colour. When you press, it will light up bright-
er (dark blue). Otherwise, it will remain in dimmer
mode (light blue).


8
EN
Troubleshooting
If the appliance does not function properly, please check the below table for the solution. If you are still
unable to solve the problem, please contact the supplier/service provider.
Problems Possible causes Possible solution
Machine does not
start running
Protective cover (12) is not in properly closed
position. Check to make sure the protective cover (12)
is closed properly.
Jug (9) is not placed properly. Check to make sure the jug set (9) properly.
Power switch (1) is not pressed Press the power switch (1)
Machine stops during
operation Built-in overloading device activates.
- Switch OFF the machine by pressing the
switch (1) to STANDBY mode and unplug the
machine.
- Leaving the machine for cooling down for
about 30 minutes and then start again.
Technical specification
Item no.: 230695
Operating voltage and frequency: 220- 240V~ 50/60Hz
Rated input power: 1,680W
Protection class: class I
Waterproof protection class: IP23
Maximum capacity: 2,5L
Dimension: 252x258x(H)547mm
Net weight: approx. 9.7kg
Noise level: approx. 85dB(A)
Rotation speed without loading (rpm):
- Low : 8,350 +/- 10%
- Medium: 13,560 +/- 10%
- High : 24,800 +/- 10%
Remark: Technical specification is subjected to change without prior notification.

9
EN
Machine exploded drawing
1
2
3
4
5
6
8
7
9
10
11
12
13
14
15
16
17
18
19
20
21
22
23
24
25
26
27
28
29
30
31
32
33
34
35
36
37
38
39
40
41

10
EN
Machine part list
Part no. Part name Quantity Part no. Part name Quantity
1 Cap cover 1 22 Motor assembly 1
2 Jug lid 1 23 Motor inner housing 1
3 Stamper 1 24 Bottom housing 1
4 Protective cover (rear) 1 25 Bottom plate 1
5 Jug set 1 26 Fixing screw 4
6 Protective cover rubber
sealing (rear) 1 27 Protective cover (front) 1
7Blade assembly 1 28 Protective cover (inner) 1
8Seal ring of the blade as-
sembly 1 29 Jug handle left cover 1
9 Large seal ring 1 30 Jug handle right cover 1
10 Mounting screw 1 31 Control panel PCB 1
11 Clutch 1 32 Control panel inner cover 1
12 Jug holder 1 33 Touch plate 1
13 Jug holder support 1 34 Control panel outer cover 1
14 Rubber seal cover 1 35 Anti-shock dampers 4
15 Motor outer housing 1 36 Mounting screws for
anti-shock dampers 4
16 Safety micro switch assem-
bly 1 37 Magnetic micro switch
assembly 1
17 Internal wire terminal for
safety micro switch 1 38 Internal wire terminal for
the magnetic switch 1
18 Mounting screws for the
micro switch 2 39 PCB assembly 1
19 Power plug 1 40 Screws for fixing PCB
assembly 2
20 Power cord 1 41 Sound absorption cotton 1
21 Power cord clamp 1
Circuit diagram

11
EN
Warranty
Any defect affecting the functionality of the ap-
pliance which becomes apparent within one year
after purchase will be repaired by free repair or re-
placement provided the appliance has been used
and maintained in accordance with the instructions
and has not been abused or misused in any way.
Your statutory rights are not affected. If the appli-
ance is claimed under warranty, state where and
when it was purchased and include proof of pur-
chase (e.g. receipt).
In line with our policy of continuous product devel-
opment we reserve the right to change the product,
packaging and documentation specifications with-
out notice.
Discarding & Environment
At the end of the life of the appliance, please dis-
pose of the appliance according to the regulations
and guidelines applicable at the time.
Throw packing materials like plastic and boxes in
the appropriate containers.
Table of contents