manuals.online logo
Brands
  1. Home
  2. •
  3. Brands
  4. •
  5. Grape Solar
  6. •
  7. Solar Panel
  8. •
  9. Grape Solar GS-400-KIT Assembly instructions

Grape Solar GS-400-KIT Assembly instructions

www.GrapeSolar.com
Tel. 1-877-264-1014 (toll free), 1-541-349-9000
Document Version 20190316
©Copyright 2019, Grape Solar, Inc. All Rights Reserved
400 Watt Off-Grid Charging Kit
(GS-400-KIT)
Quick Connect Guide
IMPORTANT: Please read GS-PWM-COMET-40 charge
controller owner’s manual and GS-STAR-100W Connection
Guide (included with products) before assembling kit.
For additional information about Grape Solar products:
email Support@GrapeSolar.com, or
call 1-877-264-1014 for live telephone support.
GS-400-KIT PHOTOVOLTAIC
POWER GENERATION SYSTEM
QUICK CONNECT GUIDE Rev. 190316
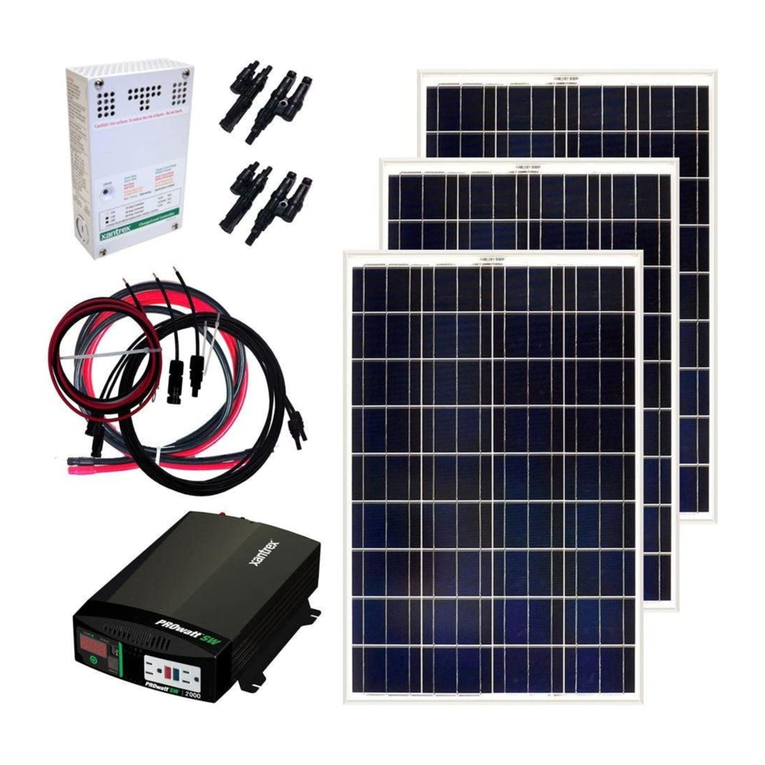
1Check your order to make sure that all parts are included:
 GS-PWM-Comet40 Charge Controller
 4x 10-Amp MC4 In-Line Fuse
 4x GS- STAR-100W Solar Panel
 5-ft. Red/Black 10 AWG Cable Pair
 2x 15-ft. MC4 Cable
 6-in. Red/Black MC4-to-Bare Wire Pair
 5-ft. MC4 Parallel Cable Pair
Additional tools and equipment you will need:
◦Screwdriver– Philips Head
◦12-Volt Deep-Cycle Battery Bank ◦Voltmeter (for Troubleshooting)
[The diagrams in this Quick Connect Guide are not to scale.]
To estimate how much average monthly
power this system should produce in your
area, please use the PV Watts Calculator
found at:
https://pvwatts.nrel.gov/
This System Size= 0.4 kW DC
(only applicable for zip codes in the U.S.A.)

x4
 x2


x4



www.GrapeSolar.com
Tel. 1-877-264-1014 (toll free), 1-541-349-9000
Document Version 20190316
©Copyright 2019, Grape Solar, Inc. All Rights Reserved
GS-400-KIT PHOTOVOLTAIC
POWER GENERATION SYSTEM
QUICK CONNECT GUIDE Rev. 190316
4Attach the bare-wire ends of the MC4-to-Bare
Wire pair  to the charge controller . The red
wire connects to the (+) input and the black wire
connects to the (-) input.
One of the MC4 parallel cables  has 4 female
inputs. Attach an MC4 In-line fuse  to each of the
female inputs.
5
Mount the 100-watt solar panels  so that they are facing due South at approximately the same angle as your
latitude. The ideal area has full sun and no shading. If the following connections are made during daylight, cover
the panels with cardboard, cloth, or a similar opaque material so that the panel does not output power.
Connect the bare wire end of the 10 AWG (thinner) red
battery cable  to the (+) battery terminal on the bottom
of the Comet40 charge controller . Connect the bare
wire end of the 10 AWG (thinner) black cable  to the
(-) battery terminal. A Phillips head screwdriver can be
used to loosen and tighten the screw clamps onto the
wires.
Attach the ring lug end of the red cable  to the positive
terminal of a 12V deep cycle battery. Attach the ring lug
end of the black cables  to the negative terminal of the
battery.
The charge controller  display screen will be visible if
the battery has sufficient charge. If the display screen is
not visible, the battery must be charged from an another
source before processing solar power. The charge con-
troller, which regulates solar power flow to the battery, is
powered by the battery.
2
3
 

*12V deep cycle battery
is not included with kit

 


6
GS-400-KIT PHOTOVOLTAIC
POWER GENERATION SYSTEM
QUICK CONNECT GUIDE Rev. 190316
www.GrapeSolar.com
Tel. 1-877-264-1014 (toll free), 1-541-349-9000
Document Version 20190316
©Copyright 2019, Grape Solar, Inc. All Rights Reserved
Connect the positive panel cables  to the “female” fuse ends  from the previous connections. Connect the
negative panel cables  to the “male” parallel connector ends  of the other MC4 parallel cable.
Notice that for each MC4 parallel connector , the two outer parallel cables are longer than the two inner parallel
cables. Reserve the longer cables for the solar panels  that are further from the MC4 parallel connector “hub.”
Use the two 15-ft. MC4 cables  to connect the Parallel Cable Pair  to the MC4 Charge Controller cables .
Remove the panel covering. In good sunlight, the
charge controller’s  ”BAT %” should increase to
100%. When the controller is set to “LOAD ON,”
the system will provide power through the load
control output or through the USB port.
7
8




4 x 1 panel configuration
2 x 2 panel
configuration






DISCLAIMER:
Installations of this kit could be subject to national and local building and electrical codes. Installers should have adequate knowledge of
national and local code to ensure the installation passes inspection by the local electric authority.
Proper fuses or breakers should be used to comply with all local and national codes. Contact Grape Solar for specific recommendations.
All batteries used for this system should be identical. Do not mix battery types or sizes. Do not mix old batteries with new batteries.
Performance and charging anomalies can occur if types, sizes, or age of batteries are not identical.
Grape Solar does not warrant the accuracy, sufficiency, or suitability to all customers of any technical or other information provided in
product manuals. Grape Solar does not claim any responsibility or liability for losses, damages, costs or other expenses whether special,
indirect, consequential or incidental, which might arise out of the use of such information.
www.GrapeSolar.com
Tel. 1-877-264-1014 (toll free), 1-541-349-9000
Document Version 20190316
©Copyright 2019, Grape Solar, Inc. All Rights Reserved
GS-400-KIT PHOTOVOLTAIC
POWER GENERATION SYSTEM
QUICK CONNECT GUIDE Rev. 190316



This manual suits for next models

1

Other Grape Solar Solar Panel manuals

Grape Solar GS-50-KIT Assembly instructions

Grape Solar

Grape Solar GS-50-KIT Assembly instructions

Grape Solar CS-S-160-DJ Setup guide

Grape Solar

Grape Solar CS-S-160-DJ Setup guide

Grape Solar GS-200-KIT User manual

Grape Solar

Grape Solar GS-200-KIT User manual

Grape Solar GS-200-KIT Assembly instructions

Grape Solar

Grape Solar GS-200-KIT Assembly instructions

Grape Solar GS-1080-KIT Assembly instructions

Grape Solar

Grape Solar GS-1080-KIT Assembly instructions

Grape Solar STAR Series Instruction Manual

Grape Solar

Grape Solar STAR Series Instruction Manual

Grape Solar GS-S-150-SF Setup guide

Grape Solar

Grape Solar GS-S-150-SF Setup guide

Grape Solar GS-P60-265-Fab1 User manual

Grape Solar

Grape Solar GS-P60-265-Fab1 User manual

Grape Solar CS-S-175-DJ Instruction Manual

Grape Solar

Grape Solar CS-S-175-DJ Instruction Manual

Grape Solar GS-S-175-EUG Setup guide

Grape Solar

Grape Solar GS-S-175-EUG Setup guide

Grape Solar GS-100-KIT User manual

Grape Solar

Grape Solar GS-100-KIT User manual

Grape Solar GS-300-KIT Assembly instructions

Grape Solar

Grape Solar GS-300-KIT Assembly instructions

Popular Solar Panel manuals by other brands

Waterboy MIDI ARRAY Installation

Waterboy

Waterboy MIDI ARRAY Installation

Sharp ND-R250A5 installation manual

Sharp

Sharp ND-R250A5 installation manual

PNI PSF6020 user manual

PNI

PNI PSF6020 user manual

Kogan SMARTERHOME KASMSLRPNLA user guide

Kogan

Kogan SMARTERHOME KASMSLRPNLA user guide

HelioZenit HELIOMOTION PV-4 Quick assembly guide

HelioZenit

HelioZenit HELIOMOTION PV-4 Quick assembly guide

Sharp ND-AH325 installation manual

Sharp

Sharp ND-AH325 installation manual

Pleion EGO 150 Installation and user manual

Pleion

Pleion EGO 150 Installation and user manual

Tsun TSOL-ESK400-BA Quick installation guide

Tsun

Tsun TSOL-ESK400-BA Quick installation guide

Panasonic VBHN240SE10 General installation manual

Panasonic

Panasonic VBHN240SE10 General installation manual

Viessman VITOSOL 100-F installation instructions

Viessman

Viessman VITOSOL 100-F installation instructions

Maxeon SPR-P5-545-UPP installation instructions

Maxeon

Maxeon SPR-P5-545-UPP installation instructions

Shell Solar SP150-L installation guide

Shell Solar

Shell Solar SP150-L installation guide

triple solar M2 360 200 landscape manual

triple solar

triple solar M2 360 200 landscape manual

PowerWave M2-60 series installation manual

PowerWave

PowerWave M2-60 series installation manual

Conergy PH 250P installation manual

Conergy

Conergy PH 250P installation manual

BenQ PM200M00 installation guide

BenQ

BenQ PM200M00 installation guide

BMS BMS-FK2000 manual

BMS

BMS BMS-FK2000 manual

NDS DOMETIC BS 115WP Installation and operating manual

NDS

NDS DOMETIC BS 115WP Installation and operating manual

manuals.online logo
manuals.online logoBrands
  • About & Mission
  • Contact us
  • Privacy Policy
  • Terms and Conditions

Copyright 2025 Manuals.Online. All Rights Reserved.