manuals.online logo
Brands
  1. Home
  2. •
  3. Brands
  4. •
  5. Graziadio & C.
  6. •
  7. Industrial Equipment
  8. •
  9. Graziadio & C. K Series User manual

Graziadio & C. K Series User manual

K SERIES
800 - 5000 A
Revisione 2
Pag. 1 di 5
ISTR-K- K25DV60PDV_rev 02.doc
ISTRUZIONI DI MONTAGGIO
ASSEMBLY INSTRUCTIONS
INSTRUCTIONS DE MONTAGE
VALIDE PER/VALID FOR/VALABLE POUR:
•KB630V0 –CASSETTA DI DERIVAZIONE FISSA 630 A VUOTA/TAP OFF
BOX FIXED 630 A EMPTY/COFFRET DE DERIVATION FIXE 630 A VIDE
•KB800V0 - CASSETTA DI DERIVAZIONE FISSA 800 A VUOTA/TAP OFF
BOX FIXED 800 A EMPTY/COFFRET DE DERIVATION FIXE 800 A VIDE
•KB1250V0 - CASSETTA DI DERIVAZIONE FISSA 1250 A VUOTA/TAP
OFF BOX FIXED 1250 A EMPTY/COFFRET DE DERIVATION FIXE 1250
A VIDE
Via Pellice 75 –10098 –Rivoli (TO) –Tel. +39.011.9591991 –Fax +39.011.9574273
website: www.graziadio.it –e-mail: [email protected]
K SERIES
800 - 5000 A
Revisione 2
Pag. 2 di 5
ISTR-K- K25DV60PDV_rev 02.doc
1
Avvicinare i terminali, lasciando uno spazio di 4 cm tra le due estremità con
l’aiuto della dima in dotazione.
Approach the terminals, leaving the space of 4 cm between the two
extremities with the help of the template provided.
Rapprochez les terminales en laissant un espace de 4 cm entre les deux
extrémités en utilisant le gabarit fourni.
2
Inserire il coprigiunto inferiore,
fissandolo agli elementi con le viti
fornite.
Install the lower cover joint,
fixing it to the elements with the
provided screws.
Insérez le couvre-joint inférieur en le
fixant aux éléments avec les vis
fournies.
3
Fissare il coprigiunto superiore su
entrambe le estremità, come
mostrato in figura.
Match the punched upper cover
joint to both extremities as
shown in the picture.
Fixez le couvre-joint supérieur aux
deux extrémités comme indiqué sur
la figure.
K SERIES
800 - 5000 A
Revisione 2
Pag. 3 di 5
ISTR-K- K25DV60PDV_rev 02.doc
4
Appoggiare le cassetta sulla linea,
mettendo in corrispondenza il foro
della cassetta con la giunzione.
Lay the tap off box on the busbar,
corresponding the hole in the box
with the junction.
Placez les coffrets de dérivation sur la
ligne, en faisant correspondre le trou
du coffret avec la jonction.
5
Inserire le due viti lunghe (fornite)
nei fori presenti sul fondo della
cassetta.
Insert the two long screws
supplied inside the holes set at
the bottom of the tap off box.
Insérez les deux longues vis
(fournies) dans les trous au bas du
coffret.
6
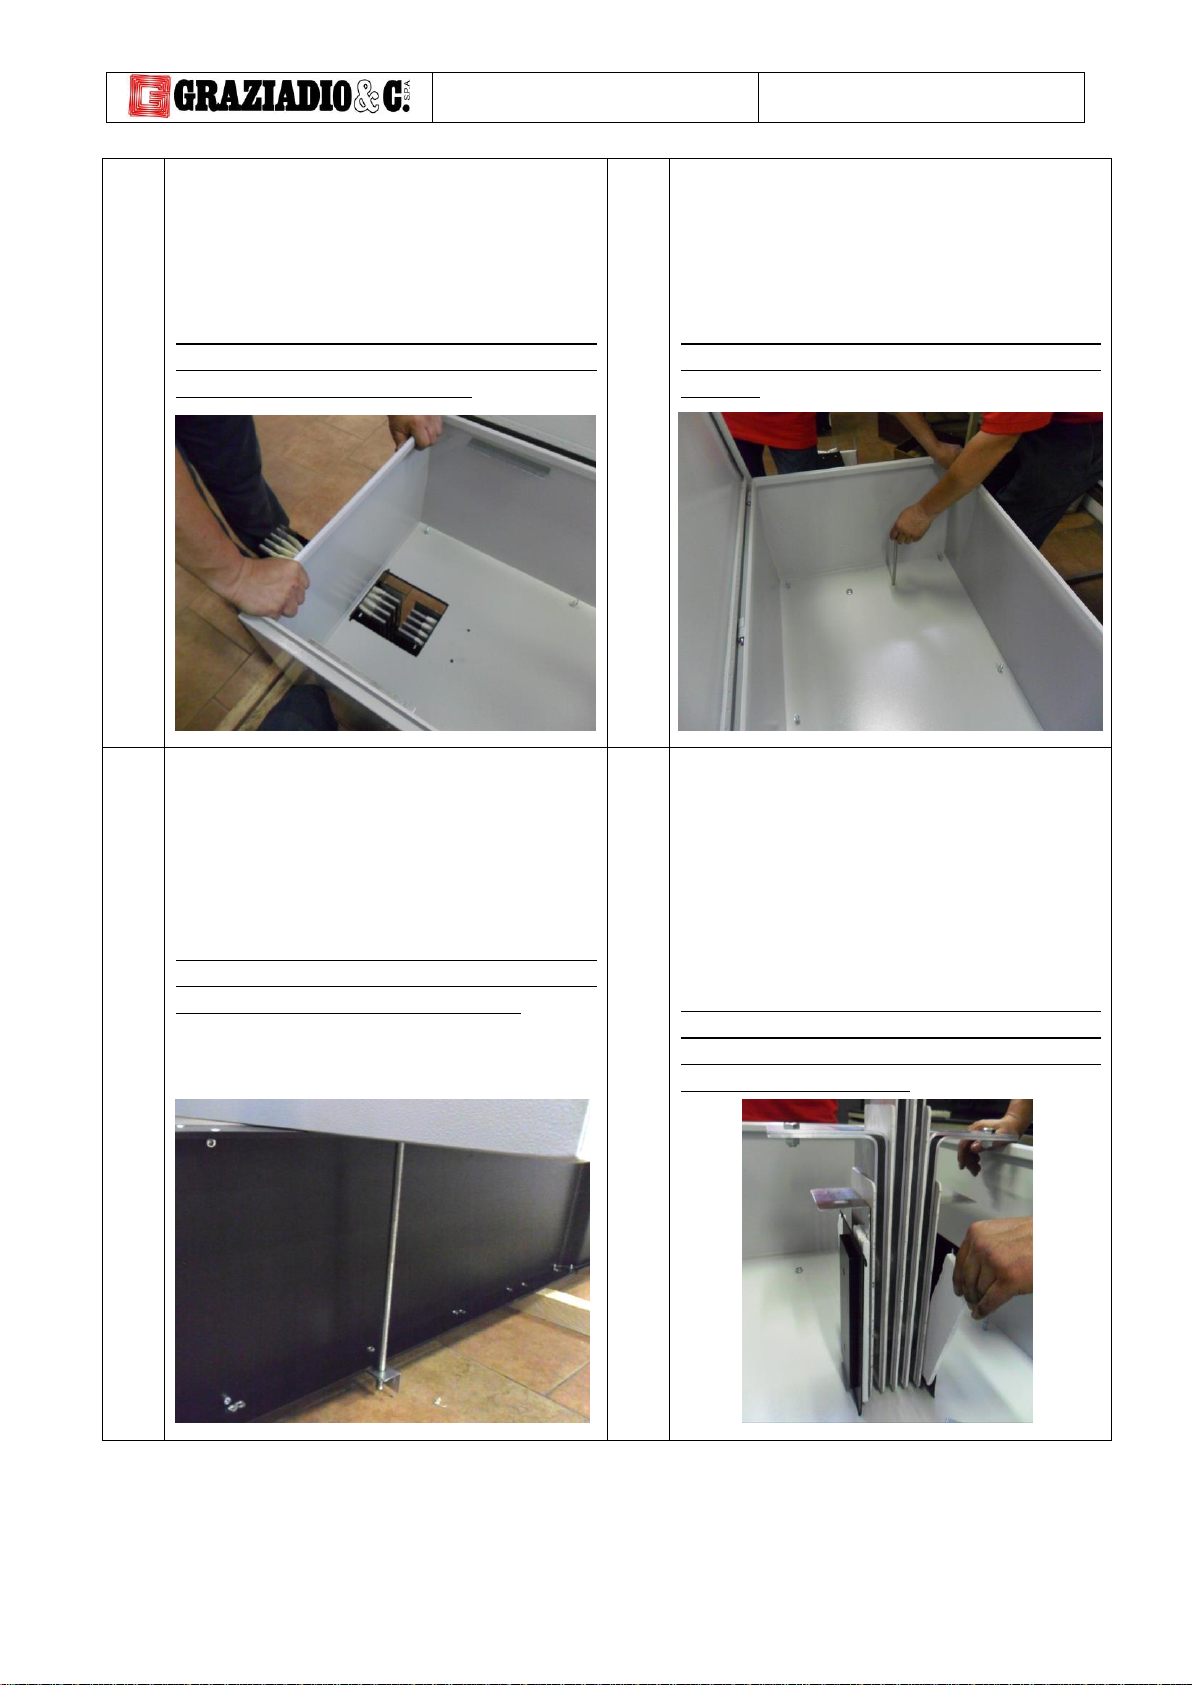
Fissare la cassetta sulla linea,
stringendo la staffa fornita sulle viti
aggiunte in precedenza.
Fix the tap off box on the busbar,
tightening the hanger provided
on the previously added screws.
Fixez le coffret de dérivation sur la
ligne en serrant le support fourni sur
les vis ajoutées précédemment.
7
Allentare le viti del giunto, facendo
attenzione a non svitarle
completamente, e rimuovere il blocco
di polistirene dal giunto.
Loosen the screws of the joint,
paying attention to not unscrew
them completely, and remove the
polystyrene layers from the joint.
Desserrez les vis du joint, en prenant
soin de ne pas les dévisser
complètement, et retirez le bloc de
polystyrène du joint.
K SERIES
800 - 5000 A
Revisione 2
Pag. 4 di 5
ISTR-K- K25DV60PDV_rev 02.doc
8
Inserire il giunto nel foro apposito.
Insert the joint inside the
appropriate hole.
Insérez le joint dans le trou
approprié.
9
Avvitare il giunto finchè la testa della
vite non raggiunge la rottura.
Controllare il serraggio (dovrebbe
essere 80Nm).
Screw the joint until the bolts
head is broken. Check the torque
(should be 80Nm).
Visser le joint jusqu'à ce que la tête
de la vis atteigne la rupture. Vérifiez
le serrage (il doit être de 80 Nm).
10
Posizionare le due flange e serrarle
sull’elemento con le viti fornite.
Accommodate the two flanges
and tight them to the element
with the screws supplied.
Positionnez les deux brides et
serrez-les sur l'élément en utilisant
les vis fournies.
11
Installare la treccia in rame e fissarla
alla cassetta (connessione di terra
della cassetta).
Install the copper twist and fix it
to the tap off box (ground
connection of the tap off box).
Installez la tresse de cuivre et fixez-la
au coffret de dérivation (connexion à
terre du coffret de dérivation).
K SERIES
800 - 5000 A
Revisione 2
Pag. 5 di 5
ISTR-K- K25DV60PDV_rev 02.doc
INDICAZIONI FINALI/FINAL INSTRUCTIONS/INDICATIONS FINALES
Prima di mettere in funzione la linea accertarsi di:
1) Aver correttamente serrato i bulloni come indicato;
2) Effettuare la prova di isolamento con almeno 2200 V.
La resistenza deve essere maggiore di 1000 Ω/V verso terra per ogni
circuito.
Before setting the line at work check that:
1. The bolts are correctly tightened;
2. Make the isolation test under 2200 V at least.
The resistance of each circuit towards earth must be higher than
1000 Ω/V.
Avant de mettre la ligne en service, assurez-vous de:
1) Avoir correctement serré les boulons comme indiqué;
2) Effectuez le test d'isolation avec au moins 2200 V.
La résistance doit être supérieure à 1000 Ω / V à la terre pour chaque
circuit.
PER ULTERIORI INFORMAZIONI/FOR FURTHER INFORMATION/POUR PLUS
D’INFORMATION: tel. +39.011.9591991 e-mail: info@graziadio.it
12
Fissare la piastra metallica sulla
cassetta.
Fix the metal sheet on the tap
off box.
Fixez la plaque métallique au coffret
de dérivation.
FINE
END
FIN
Terminare l’assemblaggio fissando la
lastra in vetro poliestere alla cassetta
con le viti fornite.
Finish the assembly fixing the
glass-polyester cover sheet to the
tap off box with the screws
supplied.
Terminez l'assemblage en fixant la
plaque de verre polyester au coffret
de derivation en utilisant les vis
fournies.

This manual suits for next models

3

Other Graziadio & C. Industrial Equipment manuals

Graziadio & C. GDA401600 User manual

Graziadio & C.

Graziadio & C. GDA401600 User manual

Graziadio & C. K Series User manual

Graziadio & C.

Graziadio & C. K Series User manual

Graziadio & C. DV IS/ Series User manual

Graziadio & C.

Graziadio & C. DV IS/ Series User manual

Popular Industrial Equipment manuals by other brands

lavina V25G-X user manual

lavina

lavina V25G-X user manual

MK GUF-P Technical documentation

MK

MK GUF-P Technical documentation

CommScope ADCP-90-326 user manual

CommScope

CommScope ADCP-90-326 user manual

nissen SpeedSign SMD 750 Translation of original operating instructions

nissen

nissen SpeedSign SMD 750 Translation of original operating instructions

SCHUNK OSE 22 Repair instructions

SCHUNK

SCHUNK OSE 22 Repair instructions

Yale HTP 500 ATEX Operating and maintenance instructions

Yale

Yale HTP 500 ATEX Operating and maintenance instructions

Reer MOSAIC MI8 Quick installation guide

Reer

Reer MOSAIC MI8 Quick installation guide

Digi 700 Series Service manual

Digi

Digi 700 Series Service manual

Bosch BH 500 100-6 Series Installation and maintenance instructions

Bosch

Bosch BH 500 100-6 Series Installation and maintenance instructions

ABB HT610633 Operation manual

ABB

ABB HT610633 Operation manual

SMC Networks CP96N Series Operation manual

SMC Networks

SMC Networks CP96N Series Operation manual

ABB HT843419 Operation manual

ABB

ABB HT843419 Operation manual

D+H KA 34-ACB Original instructions

D+H

D+H KA 34-ACB Original instructions

Balluff BNI IOL-719-002-Z012 user guide

Balluff

Balluff BNI IOL-719-002-Z012 user guide

PAW HeatBloC K31 Installation and operation instruction

PAW

PAW HeatBloC K31 Installation and operation instruction

NRI Currenza C2 Technical documentation

NRI

NRI Currenza C2 Technical documentation

ABB OVR-15 Operator's Quick Reference Guide

ABB

ABB OVR-15 Operator's Quick Reference Guide

Jerguson JMT Series Installation, operation & maintenance instructions

Jerguson

Jerguson JMT Series Installation, operation & maintenance instructions

manuals.online logo
manuals.online logoBrands
  • About & Mission
  • Contact us
  • Privacy Policy
  • Terms and Conditions

Copyright 2025 Manuals.Online. All Rights Reserved.