Green Bike Classic HS User manual

Instruction Manual
Green Bike –Electric Motion Congratulate you on your newly purchased!
Joining Greenbike’s Go Green revolution will open your doors to a whole new world of
freedom!
Green Bike –Electric Motion gives your money the value it deserve, friendly and
professional service and safety for the rider above all.
Please maintain the product-customer-importer relationship to guarantee a quality
experience for the long term. In this manual you will find all the details required to care and
maintain your product.
To ensure safety during riding and to maintain long-term usage experience, please read all
instructions carefully and follow the specified maintenance and usage instructions before
using the bike.
Thank you for choosing Green Bike –Electric Motion!
Approved by CPSC
American Standards (CPSC - 16CFR1512) and is intended for urban cycling.
1-Brake Handles. 2-Grips. 3-Handlebars. 4-Adjustable Stem. 5-Display. 6-Gear Shifter. 7-Front
Brake Cable. 8-Rear Brake Cable. 9-Head light and horn. 10-Front Light. 11-Fender. 12-Tire and
Inner tube. 13-Front Wheel. 14-Frame. 15-Front fork. 16-Crank. 17-Chain guard 18-Pedal assist
sensor. 19-Seat post with shock absorber. 20-Seat Clamp. 21-Lithium battery. 22-Controller. 23-
Pedal. 24-Rear Rack. 25-Rear Light. 26-Rear Brake. 27-Rear Fender. 28-Derailleur. 29-Derailleur
guard. 30-cassette. 31-Motor. 32-Seat.

- Do not allow an additional rider on the bike. This bike is designed to carry one person only.
Any damage to the bicycle resulting from an additional rider is not covered under warranty.
- The height of the seat and handlebars should be adjusted for maximum comfort and
control.
- The seat post and handlebars have a safety strip, be sure it is not visible when adjusting. If
the strip is not set correctly, excess pressure will be created and will damage the cables.
- Be sure that the hinge locks of the seat and handlebars are locked before starting the trip.
- Check the condition of the brakes frequently and adjust when necessary. Braking range on
a dry road is 13 feet and on a wet road can reach 50 feet. Keep more distance on a wet
road.
- The chain is properly adjusted and should not be altered. The chain must be lubricated to
prevent accelerated weathering.
- At night, the headlight and backlight must be switched on by a switch on the control
display.
- Be sure to wear appropriate clothing and do not carry objects or bags in a way that they
can be caught in the wheels or chain. To keep the rider safe - do not bring your legs to close
to the chain.
- Do not ride in weather that does not allow safe riding such as rain, puddles, strong winds,
snow, etc.
- When stopping, use both brakes. Don’t settle with one brake, Use both brakes together in
order to maintain stability and achieve greater control.
- Do not ride under the influence of alcohol, drugs or substances that affect the rider's
alertness.
- When riding, you must hold both handles, do not perform stunts and reckless turns
without examining the area from all sides before proceeding.

- Please follow local and state regulations.
- Do not drop the bike on the ground (due to the sensitivity of the battery, motor and
controller). The bike should be placed on the kickstand carefully.
- Do not jump or climb sidewalks on the road.
- Damage to either the spokes, wheel, or tires resulting from typical cycling injuries and
accelerated wear of the battery (which may result from travel with a curved wheel) are not
covered by the warranty.
Folding the Bike
- The bike can be folded for storage at home or in the trunk of the car.
- The folding time is only 10 seconds. You can get a demonstration at the point of purchase
or watch a tutorial video on our site www.GreenBikeElectric.com
Here are the pictures of the bike in a folded position and in an average car
trunk:
Before You Start to Ride
Raise the seat as shown in Figure 3 and insert the battery into place and lock it.
Picture 3 Picture 4

Classic LCD Display
1.Display function
Speed display, power indication, fault indication, total mileage and ride mileage.
2.Control and setting function
Power switch control, wheel diameter setting, idle automatic sleep time setting.
Setting the backlight brightness, setting the start mode, setting the drive mode, setting
the voltage level and setting the controller's current limit.
3.Communication protocol: UART
The full content of the display

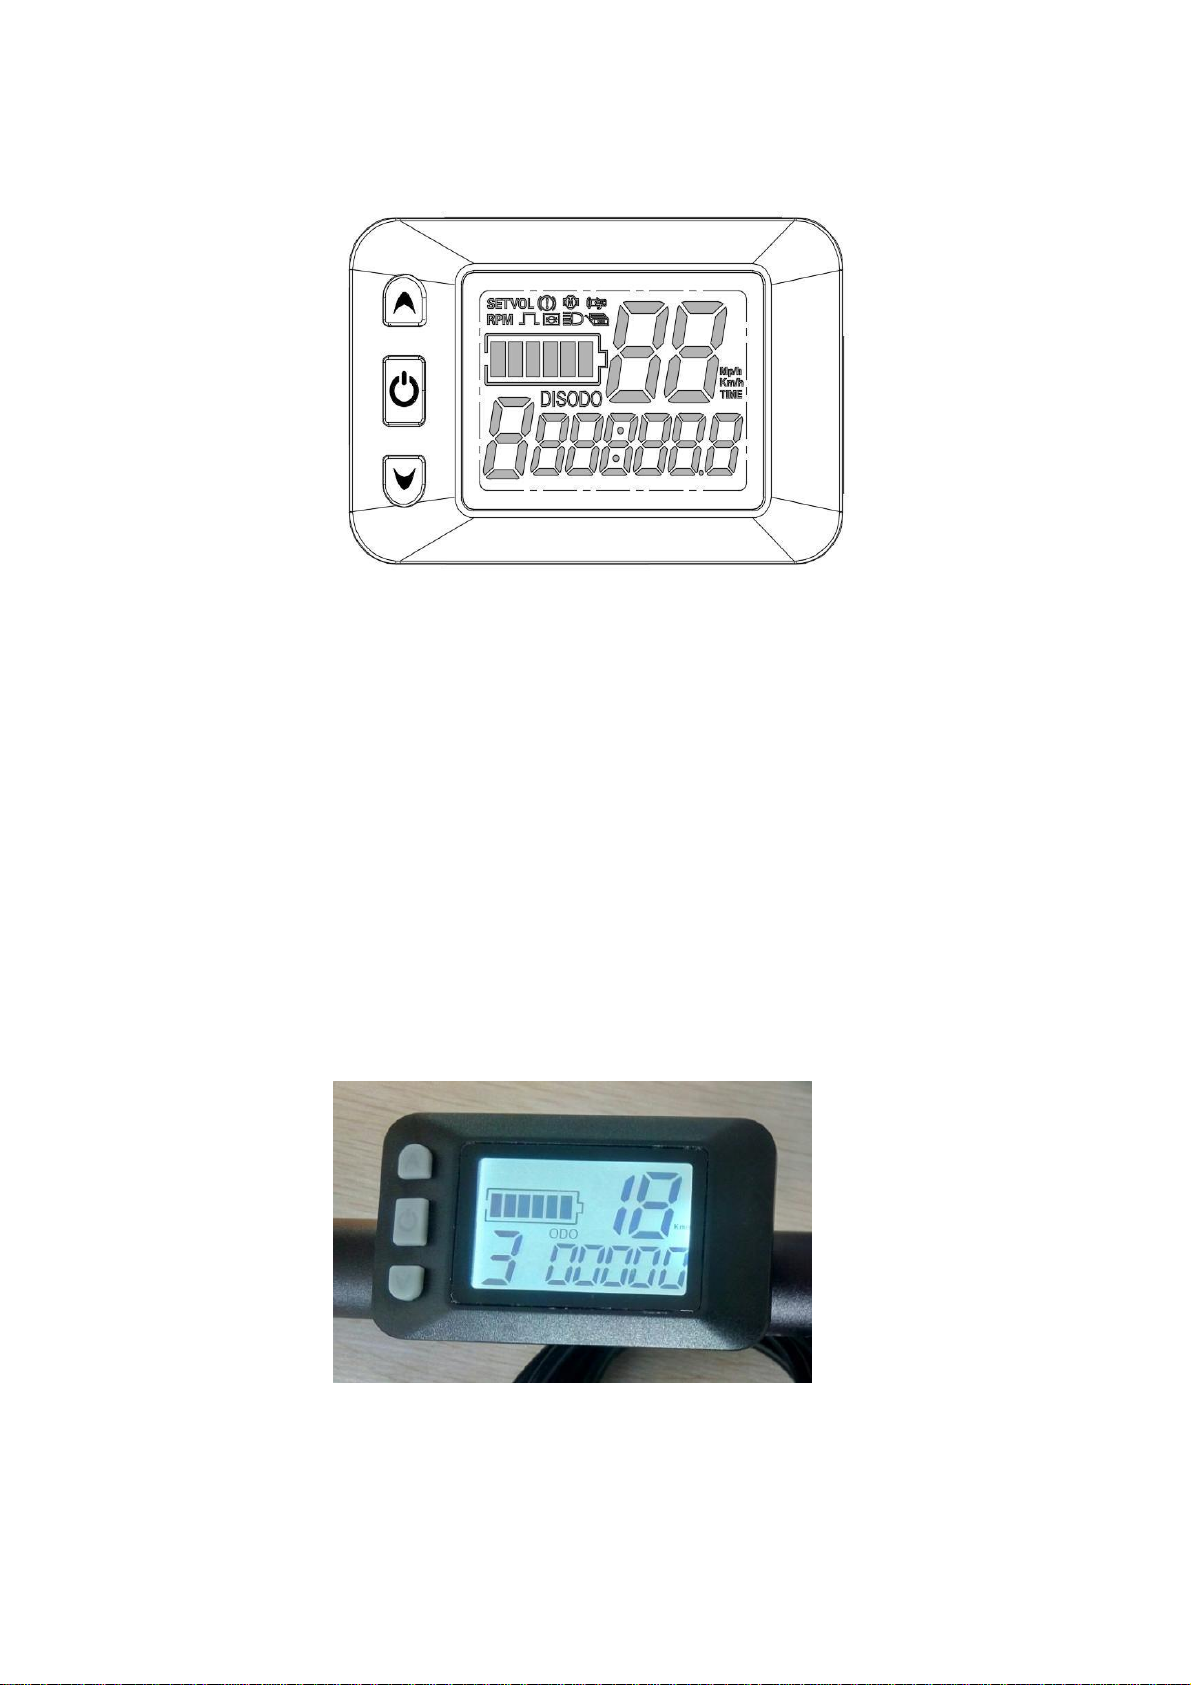
4.Setting up menu introduction
P01:The luminance of the backlight, the darkest at level 1, and the brightest at level 3
P02 - Mile or Kilometer, 0:KM; 1: MILE;
P03: voltage level: 24V, 36V, 48V, 60V, 64V
P04: dormancy time: 0, no dormancy; the rest number is dormancy time, range: 1-60: unit
minute.
P05: number of assist levels: 0, 3 assist levels: 1, 5 assist levels.
P06: wheel diameter
P07: Number of speed magnets: range: 1-100.
P08:Maximum riding speed setting (the Classic models cannot go more than 20mph
with 36V battery).
Note: The P09-P15 menu is valid only in the communication state
P09: zero start, non-zero start setup, 0: zero start, 1: non zero start.
P10: drive mode set 0: boost drive, decide the output power through the power shift,
and turn it off.
a. electric drive (by turning the drive, then the auxiliary gear is invalid).
b. both power drive and electric drive coexist simultaneously
P11: power sensitivity setting range: 1-24.
P12: the setting range of power booting strength: 0-5.
P13: help the magnet plate type set 5, 8, 12 magnetic steel three types.
P14: the controller's current limit is set to the default 12A range: 1-20A.
P15: the under voltage value of the controller.

I. Display operation
1. Turn on and turn off
Long press key,turn on: again long press key,turn off. When the vehicle stops
running and does not operate on the instrument for 10 minutes continuously, the
instrument will automatically turn off and turn off the power source of the electric
vehicle.
2. Display interface 1
Long press key, turn on, Enter the display interface
one.
2.1 Turn on and off the lights
Long press key, turn on the light: again long
press key,off the light.
2.2. Assist levels
Short press and key, Switch 1-5. Assist #1
minimum power gear, assist # 5 gear highest power gear.

2.3. 6KM/H Promoting function
Press key, The sign in the gear area indicates
that the vehicle runs at a speed not greater than 6Km/h.
Release keys, function revocation.
3. Display interface II
In the display interface 1 short press key, enter the
display interface two.
4. Display interface III
In the display interface 2,short press key,enter the
display interface three.

5. Display interface IV
In the display interface 3,short press key,enter the
display interface four.
6. Display interface V
In the display interface 4,short press key,enter the
display interface five.If the electronic control system
fails, the instrument will automatically jump to the
display interface and display the corresponding fault
code.
The meaning of the fault code is shown in the table below:
Status
Code (decimal)
State meaning
0
Normal status
1
retain
2
Brake
3
Helps sensor failure(riding signs)
4
6KM/H cruise
5
Real time cruise.
6
Batteries under pressure
7
Electrical failure
8
Turn it off.
9
Controller malfunction.
10
Communication reception failure
11
Transmission fault.
12
BMS communication failure
13
Headlight malfunction

II. Menu Item Settings
1.Backlight brightness settings(P01)
After boot, Press simultaneously and key,
enterP01menu,set backlight brightness. Short
press or key, Adjust backlight brightness.
After adjustment, short press key, go to next
parameter settings.
2. Common English Unit Settings(P02)
Short press or key, Adjusting metric
units(synchronizing mileage and speed units). After
adjustment, short press key, go to next parameter
settings.
3. Voltage Level Settings(P03)
Short press or key, Adjusting Voltage Level 24V,
36V, 48V, 60VOptional.After adjustment, short
press key, go to next parameter settings.

4. Display turning off automatically time setting(P04)
Short press or key, Adjust time, 0-60Minute
adjustable(0: not turning off).After adjustment,
short press key, go to next parameter settings.
5. Assist levels Settings(P05)
Short press or key, Adjust the number of assist
levels (0: 3, 1: 5, 3: 9).After adjustment, short
press key, go to next parameter settings.
6. Wheel Diameter Settings(P06)
Short press or key, Adjusting wheel diameter(in
inch, range: 5.0-50 .0),After adjustment, short
press key, go to next parameter settings
7. Set the number of measuring magnetic steel(P07)
Short press or key, Adjusting the values of measuring
speed magnetic steel(in sheets, range: 1-255) 。After
adjustment, short press key, go to next parameter settings.

8. Maximum riding speed settings(P08)
Short press or key, Adjusting maximum riding
speed(range: 0-100).After adjustment, short
press key, go to next parameter settings.
*Classic models can’t reach to more than 20 MPH with
36V battery
9. Throttle zero speed start, non-zero speed start settings(P09)
Short press or key, Adjusting zero start/non-
zero start (0:zero start,1:non-zero start).After
adjustment, short press key, go to next parameter
settings.
10.Drive Mode Settings(P10) (not apply to classic models)
11.Sensitivity settings(P11)
Short press or key, Adjusting sensitivity level
(Range :1-24). After adjustment, short
press key,go to next parameter settings.

12.Starting Power Settings(P12)
Short press or key, Adjusting Power Start
strength (Range:1-5). After adjustment, short
press key,go to next parameter settings.
13.Number of PAS Magnets Settings(P13)
Short press or key Adjusting helped magnetic
steel disk type(Range:5,6,7,8,9,10,11,12grain 8
types of magnetic steel plates). After adjustment, short
press key, go to next parameter settings.
14.Controller limit value settings(P14)
Short press or key, Adjusting controller limit
value (Range: 1-20A). After adjustment, short
press key, go to next parameter settings.
15.Controller default value settings(P15)
Short press or key, Adjusting controller
default value (Range:5V adjustable).

The Electrical System is Now Ready!
• Fold the kickstand from the ground, then sit on the seat, Put one foot on the pedal and the other on the
ground.
• Now, start pedaling and the motor will engage.
• To maintain battery life, do not use it until it’s completely drained. When the battery indicator flashes,
turn off the power switch and use the pedal as a regular bicycle. After recharging, you can ride again using
the electric motor.
• The rear rack is not intended to carry people. Maximum load is up to 25 kg, and the luggage should be
tied with straps.
• Park in a safe area, place the bike on the kickstand, turn off the main battery switch and pull out the key
from the battery switch.
• The bike must be locked with a massive lock that make it difficult to steal. It is recommendation to take
the battery with you.
• Charging: The battery must be charged only with the charger that was supplied with the bike. A lithium
battery is only charged by a charger that designated for lithium batteries and not by other charger. The
battery must be charged with the original charger Charging with a different charger can damage and void
battery warranty.
Do not open the battery for testing or repair! Contact us at office@greenbikeelectric for any after sale
service inquiry!
• Charging takes up to 5 hours, depending on battery status. The battery can be charged both on or off the
bike.
• The charging cable must be first connected to the battery and then to the mains socket.
• When the charge indicator light is red, the battery is charging. When the charge light turns green, the
battery is full and must be disconnected from the power source. When charging, the battery must be in a
proper position so the battery won’t fall or be damaged.
• The charger becomes hot during charging. Keep it away from any flammable materials and keep the
vents unblocked
• Be sure to properly dispose of dead batteries at proper recycling plants and do not throw away in the
trash.
• Before beginning the ride, check that all the indicator lights are working and the battery is locked in
place.
• Check tire pressure regularly (40 PSI). Poor pressure will cause overuse of the battery and shorten cycling
time.
• Do not drive in puddles. If water enters the engine, the controller or the battery house may become
damaged. Water damage will void the warranty provided by the manufacturer.

*Store the bike in a dry place. Moisture causes corrosion! Do not leave the bike in the rain. Immediately
treat the corrosion with suitable oil! Water penetration into the electrical mechanisms will void the
warranty.
• Do not put the bike in the sun especially when leaving the battery installed on the bike.
• Do not disassemble the electrical parts. Disassembling them independently will void the manufacturer's
warranty.
• It is important to lubricate the moving mechanical parts such as the wheel hinges, transmission and
gears, cable connections to the brake pads, etc. Do not lubricate the electrical parts themselves!
• Brake maintenance: The right brake is responsible for braking the rear wheel. The left brake is
responsible for braking the front wheel. Always check if the brakes are normal and are optimally tuned.
• An unintentional braking creates unnecessary and harmful resistance to the bicycle and the life of the
electrical system!
• In picture 6 you can see a stretched handle in optimal position.
In addition, you can access any authorized bicycle shop to handle the mechanical parts of the bike but not
the electrical parts.
The electrical parts can only be handled by a workshop authorized by the importer.

National safety regulations must be obeyed.
The bike is designed for riding in cities and in riding paths.
For your safety, please wear a helmet!
Any change to the bike without the importer's approval will result in cancellation of
warranty!
Proper maintenance should be upheld by the bike owner:
Bicycle Cleaning
For the bike to serve you properly, you may want to clean it of sand and mud. If you cannot clean the
entire bike, it is necessary to clean the drive systems (chain, front and rear wheels).
• Cleaning frequency: once in three or four significant rides or after each ride where the bike returns with
sand or mud. You can use sponge and water bucket, solvent for grease, kitchen dishwashing sponge, rags,
special brush with hard fibers.
• Wash: Wash all parts of the bike using a sponge. The hard brush is designed to remove heavy dirt from
the wheels, pedals, etc.
• Drying: Dry the bike with the rags and place them in direct sunlight until fully dried (preferable if not
washed at night or in stormy weather). Immediately after washing and drying, lubricate the chain. It is
recommended to clean brakes with a dedicated material for brakes.
Remember:
Do not allow another rider on the bike.
Disconnect the charger from the power source at the end of each charge.
Do not leave a charging bike / battery unattended.
The bike is a vehicle –Ride wisely and carefully
Always at your Service!

Lithium Li-On Battery 48V-10.6Ah 5300 mAh Made by Boston Power U.S.A
Charger model 36-30 36V 110V-Ah
Made by Guangzhou Electronic Corporation
Mechanical and Electrical Components
Electronic Specifications
Frame
100% Aerospace aluminum 6061
Motor: HT 350 Watt Brushless motor
Type
folding electric bicycles
Tires with
light
reflectors
20" made by 2.125
Rims
100% double-sided aluminum
Driving modes: PAS (pedal assist) and
throttle
Front brake
Disc brake
Rear brake
Disc brake
Gears
Transmission 6 Made by
Front fork
Suspension fork Made by Double
Crown
Battery: 36 Volts 10.6 Amps Lithium Ion
Ergonomic
seat
Wide adapted for urban electric ride
with shock absorber
Intelligent Charging Charger
(Computerized Control) 1-6
Front and
back
lights
LED switch with control switch
Built-in electric horn
The "Crank" axis is made by
Fenders
Aviation aluminum 6061
Performance
Crank
Nickel-plated aluminum arch
Mph set according to standard 19.5 mph
maximum speed
Chain
Stained stainless steel
Range per charge is up to 40 miles using
assist level #2 using PAS only (not
throttle) on a flat surface with up to 160
lbs. rider
Kickstand
%100 steel
Net weight: 47 Lb. with battery ,41 Lb
without the battery

Common Problems and Solutions
• Problem 1: After turning on the main switch, the lights do not turn on and the bike does not move
electrically.
o Cause: The battery poles are not properly connected or a fuse is burned.
Solution: Check the battery contacts if they are dirty and should be cleaned. If the problem is not resolved,
check the battery fuses.
• Problem 2: After turning on the main switch, the lights turn on but the bike does not move with power:
o Cause: Check if the wires coming out of the controller are well connected (only to be handled by an
expert technician)
o Solution: Make sure cable connections are stable and strong. If the problem is not resolved, check for a
break in the wires coming out of the controller.
• Problem 3: The motor rotates on its own after opening the main switch.
o Cause: The controller is malfunctioning or there is a short circuit in the electrical system or disconnection
of the wires.
o Solution: If there is damage to the controller, contact the diagnostic service center and / or replace the
controller.
• Problem 4: Engine power is low, travel distance is not satisfactory even after full charge
o Cause: Tire pressure is too low. The pressure is 40 PSI and / or a large portion of the ride is on the rise or
against the wind. The battery may be old and weak or a curved wheel is inhibiting the brake discs.
o Solution: Add air to the tires to correct pressure and / or replace the inner tube. Check if the brake is on
the wheel and release. Wheel balancing may be required in a professional workshop.
• Problem 5: When charging the plug does not go into the outlet and / or the charging indicator light does
not turn on.
o Reason: a. There is no power supply from the power source at home due to the automatic fuse or power
failure. b. The plug is not properly inserted into the socket.
o c. The fuse is burnt or the charger is damaged.
o Solution: Check the socket plug connection, replace the power supply source to another outlet. If the
problem is not resolved, bring both the charger and battery to the service center for diagnosis and repair.
• Problem 6: The charger is connected to the battery but the indicator light is off.
o Cause: A 15-amp fuse of the battery house is burnt or the connection to the battery outlet is improperly
charged.
o Solution: After testing the power source (wall outlet) or replacing the charger, the charger and battery
must be brought to a service center.

Dear Client,
Green bike –Electric Motion. welcomes you on the purchase of the model: HF 201–48N / HF 202-48N
electric bicycle
is happy to be at your disposal for maintenance and fulfillment of manufacturer's warranty if necessary.
Please carefully read the following warranty conditions.
The warranty provided by Greenbike Company is a comprehensive warranty for all mechanical assemblies
and all electronic components of the bike provided that the fault is caused by reasonable use and the
bicycle is maintained according to the user manual alone.
Please consider the following:
* The warranty will enter into force only after "activation" on the company's website, while filling in all the
details as explained on the web page GreenBikeElectric.com within 30 days of purchasing the bicycle.
* The warranty for the frame, motor controller and the battery is 12 months.. There is no warranty for the
battery that has been 24 months since its production date at the bottom of the battery. The warranty is
contingent on the existence of a warranty certificate signed by the store where it was purchased with a
purchase receipt stating the serial number of the frame and battery.
* The warranty will be canceled if electrical or mechanical changes are made without the written
permission unless by a certified Greenbike- Electric Motion technician, including battery replacement /
opening, or change in any other component.
*The warranty will be canceled if the use is unreasonable and not in accordance with the instructions: in
the event of a crash due to accident or fall, in the event of neglect of the maintenance required, in case of
natural damages, in the event of exposure of the bike to humidity or heat without adequate protection
from rain, mud and direct sunlight.
* The warranty will be canceled if a non-original charger is used to charge the battery.
* The responsibility for the components of the electrical system will be canceled if mechanical condition
resulting from poor use or maintenance or the manner of use contributed to the load on the electrical
system. (Eg ... a curved or broken wheel)
* Green bike - Elecrtic Motion is not responsible for any damage caused to a third party as a result of the
use of an electric bicycle or any damage caused to the rider as a result of an accident or use contrary to
the instructions of the User's Guide, including indirect damage or expenses incurred by the cyclist .
Further Clarification of the Warranty
* The warranty does not include the maintenance, direction or replacement of parts resulting from
reasonable wear or use of bicycles. Including internal replacement in the event of a flat tire, worn tire,
pads, cables, a disc brake or any other part whose wearout results from wear and tear.
* The warranty does not include the replacement of a part or repair resulting from external trauma or a
fracture resulting from an accident or a fall, including , pulling cables from the electrical components,
abrasion of the power cord, short circuit from the national electrical system . Or any damage caused by an
external blow
.

* Green Bike- Electric Motion reserves the right to decide whether to replace the damaged part with a new
or renewed one at its discretion.
*Green Bike- Electric Motion reserves the right to cancel liability and refuse to provide service in the
following cases:
• If the customer refuses to perform maintenance or repair that may endanger the rider including a paid
repair (eg brakes)
• In any case of verbal violence or other violence against a Greenbike –Electric motion employee or
distributor
The warranty is given at Greenbike- Electric Motion workshop only or at a authorized workshop approved
by Green Bike –Electric Motion , during the hours of operation, according to the work procedures,
response times and pricing available to the customers in the website : www.GreenBikeElectric.com . The
responsibility for transporting the bikes to the workshop and returning to the customer's home is the
customer's responsibility only and at his own expense
For any questions or requests for clarification or reporting, please contact us:
Green Bike –Electric Motion LLC
Main Office: 7057 Reseda Blvd, Reseda CA 91335
Phone: (818) 578-3665
Email: office@GreenBikeElectric.com
Website: GreenBikeElectric.com
This manual suits for next models
1
Table of contents
Other Green Bike Bicycle manuals