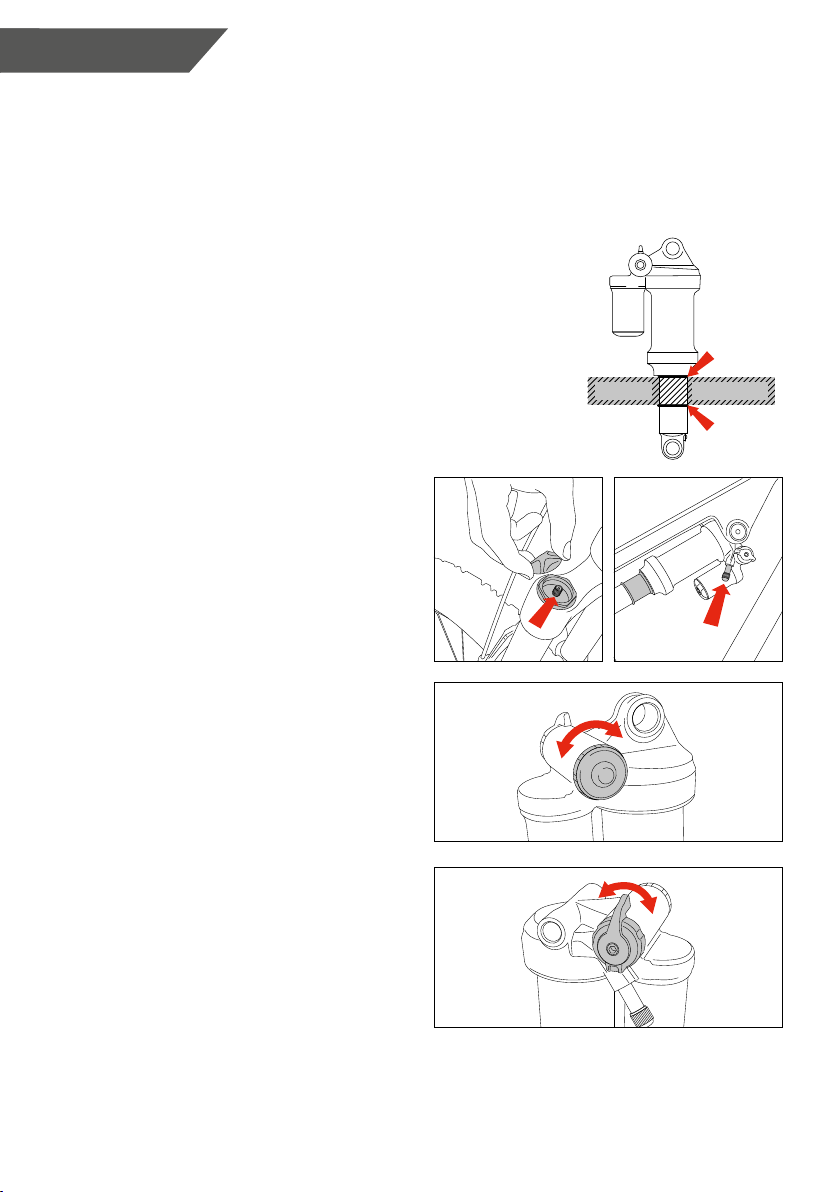
Rotwild R 750 2022 Series User manual

R.750 CONTROL UNIT
GETTING STARTED: How to use the system
Switch your eMTB on by pressing the button.
...you want to use the rocker
switch.
Please note that the most efcient pedalling cadence, which will also keep wear on your eMTB to
aminimum, is between 60 and 90 rpm.
You can nd more information about the control unit in the “Operating
system” section of the ROTWILD instruction manual.
You activate the pushing aid by pressing the button. The message
PUSH appears on the display. Now hold down the bottom button on
the rocker switch (-). The message WALK appears on the display and
the pushing aid starts. To deactivate it, release the button again.
To Choose the level of support...
You increase it by pressing the
top button (+)…
...and reduce it by pressing the
bottom button (-).
QUICK START GUIDE
25
-
30% SAG RANGE
RUBBER AIR
SLEEVE SEAL
INDICATOR
O-RING
To make sure that you get the maximum enjoyment out of your eMTB, you should adjust the
suspensiontoyour bodyweight before you go for your rst ride. You can nd the recommended settings
at: www.rotwild.de/quickstart
Follow these instructions:
1. Set the stiffness by adjusting the air pressure in each suspension
element. Compress the suspension element slowly several times
by around 25% of its travel to balance the air pressure between
the positive and negative air chambers. Push the O-ring up to the
seal of the suspension element. Sit on the eMTB when you are at
your riding weight. Each suspension element should be
compressed by 25 to 30% (sag) when the bike is stationary.
Usethe O-ring as an indicator.
PERFECTLY ADJUSTED: How to adjust the suspension elements
2. Remove the valve cap from the suspension
element and screw a suspension pump onto the
valve on the fork or shock absorber. Increase or
reduce the air pressure until you have reached
the required sag level.
3. Now adjust the rebound damping, which
determines how quickly the shock absorber
rebounds after being under load. Turn the red
adjuster anti-clockwise to make the shock
absorber rebound more quickly. Turn it clockwise
to make the shock absorber rebound more slowly.
4. Finally use the blue lever to adjust the compres-
sion damping, which determines the resistance
of the shock absorber under compression,
depending on the speed of the eMTB. There are
three quick settings: OPEN for downhill runs,
TRAIL for the best combination of damping and
pedalling efciency and CLOSE for ascents and
road riding.
You will nd more detailed information about the settings in the “Suspension” section of the ROTWILD
instruction manual. The enclosed instruction manuals supplied by the fork and shock absorber manufacturers
contain additional information and recommended settings for compression and rebound damping.
SUSPENSION
It is important that the saddle and the cockpit are
correctly adjusted so that you are comfortable and
can make the best use of your pedalling power.
This will allow you to ride more efciently and help
prevent you from suffering any pain.
When adjusting your eMTB for ergonomic
riding, please remember that it has cables routed
inside the frame and cockpit.
Seat post and saddle clamp
1. Undo the saddle clamp with a 5 mm Allen key
and lock the seat post at the recommended
height. Make sure that you guide the cable in
the seat post into the front frame opening.
2. Tighten the saddle clamp again to the specied
torque.
SITTING CORRECTLY: How to adjust the saddle height
EVERYTHING WITHIN REACH: How to adjust the handlebars, brake lever and shiftinglever
Adjust the handlebars, brake lever and shifting lever so that they are in the right ergonomic position
foryou. Follow the instructions in the “Handlebars, stem and headset” section of the ROTWILD instruction
manual.
8Pins seat post
1. Go for a test ride and adjust the saddle height
using the dropper function or the lever on the
left-hand side of the handlebars.
2. As soon as you have found the right height, get
off and use a 2.5 mm Allen key or the 8Pins tool
to turn the rotating part through 45° anti-
clockwise. The height adjustment mechanism
is now open. The plunger moves up.
3. Close the height adjustment mechanism by
turning the rotating part through 45° clockwise.
Make sure that the rotating part clicks back into
its original position.
ERGONOMICS

QUICK CHANGE: How to remove and insert the IPU375
To remove the IPU375, press the release button at
the top of the down tube on the left-hand side
ofthe frame. The battery is gently pushed out by
aspring.
To insert the IPU375, rst insert it into the lower
part of the battery holder and press it sideways
into the down tube. You will hear the IPU375 click
into the battery lock mechanism. For safety
reasons, make sure that the IPU375 is correctly
and rmly secured.
CORRECT CHARGING: How to charge the IPU375
The IPU375 drive battery can be charged both on and off the bike.
Make sure that you plug the charger into the wall socket rst.
Then insert the charger cable...
...or into the charging socket in the IPU375 if you
have removed it from the bike.
...into the charging socket in the motor housing...
R.375 DRIVE BATTERY
SAFE REMOVAL AND INSERTION: How to remove and insert the IPU750
To remove the IPU750, press the battery lock
mechanism against the IPU750 and the head
of the fastening bolt until it folds down. Pull
the fastening bolt out, press the battery lock
mechanism against the motor and remove the
IPU750.
CORRECT CHARGING: How to charge the IPU750
The IPU750 drive battery can be charged both on and off the bike.
Make sure that you plug the charger into the wall socket rst.
Then insert the charger cable...
or into the charging socket in the IPU750 if you
have removed it from the bike.
...into the charging socket in the motor housing...
To insert the IPU750, rst insert it into the upper
part of the battery holder and then swing it into
the down tube, while pressing the battery lock
mechanism down . Release the battery lock
mechanism and allow it to click in place on the
battery. Put the fastening bolt in the opening
provided and lock it in place. Makesure that the
fastening bolt and the IPU750 are securely xed.
Our video tutorial shows you how to adjust the tension on the IPU750:
www.rotwild.de/quickstart
R.750 DRIVE BATTERY
QUICK START GUIDE
To Choose the level of support
you want to use the rocker switch.
You increase it by pressing the
top button...
...and reduce it by pressing the
bottom button.
You can nd more information about the control unit in the “Operating
system” section of the ROTWILD instruction manual.
You activate the pushing aid by pressing and holding the bottom
button on the rocker switch. The message WALK appears on the
display. Release the button. To start the pushing aid, press the
button again. To deactivate it, simply release the button again.
2 sec.
GETTING STARTED: How to use the system
Switch your eMTB on by pressing the button.
Please note that the most efcient pedalling cadence, which will also keep wear on your eMTB to a
minimum, is between 60 and 90 rpm.
R.375 CONTROL UNIT

R.750 CONTROL UNIT
GETTING STARTED: How to use the system
Switch your eMTB on by pressing the button.
...you want to use the rocker
switch.
Please note that the most efcient pedalling cadence, which will also keep wear on your eMTB to
aminimum, is between 60 and 90 rpm.
You can nd more information about the control unit in the “Operating
system” section of the ROTWILD instruction manual.
You activate the pushing aid by pressing the button. The message
PUSH appears on the display. Now hold down the bottom button on
the rocker switch (-). The message WALK appears on the display and
the pushing aid starts. To deactivate it, release the button again.
To Choose the level of support...
You increase it by pressing the
top button (+)…
...and reduce it by pressing the
bottom button (-).
QUICK START GUIDE
25
-
30% SAG RANGE
RUBBER AIR
SLEEVE SEAL
INDICATOR
O-RING
To make sure that you get the maximum enjoyment out of your eMTB, you should adjust the
suspensiontoyour bodyweight before you go for your rst ride. You can nd the recommended settings
at: www.rotwild.de/quickstart
Follow these instructions:
1. Set the stiffness by adjusting the air pressure in each suspension
element. Compress the suspension element slowly several times
by around 25% of its travel to balance the air pressure between
the positive and negative air chambers. Push the O-ring up to the
seal of the suspension element. Sit on the eMTB when you are at
your riding weight. Each suspension element should be
compressed by 25 to 30% (sag) when the bike is stationary.
Usethe O-ring as an indicator.
PERFECTLY ADJUSTED: How to adjust the suspension elements
2. Remove the valve cap from the suspension
element and screw a suspension pump onto the
valve on the fork or shock absorber. Increase or
reduce the air pressure until you have reached
the required sag level.
3. Now adjust the rebound damping, which
determines how quickly the shock absorber
rebounds after being under load. Turn the red
adjuster anti-clockwise to make the shock
absorber rebound more quickly. Turn it clockwise
to make the shock absorber rebound more slowly.
4. Finally use the blue lever to adjust the compres-
sion damping, which determines the resistance
of the shock absorber under compression,
depending on the speed of the eMTB. There are
three quick settings: OPEN for downhill runs,
TRAIL for the best combination of damping and
pedalling efciency and CLOSE for ascents and
road riding.
You will nd more detailed information about the settings in the “Suspension” section of the ROTWILD
instruction manual. The enclosed instruction manuals supplied by the fork and shock absorber manufacturers
contain additional information and recommended settings for compression and rebound damping.
SUSPENSION
It is important that the saddle and the cockpit are
correctly adjusted so that you are comfortable and
can make the best use of your pedalling power.
This will allow you to ride more efciently and help
prevent you from suffering any pain.
When adjusting your eMTB for ergonomic
riding, please remember that it has cables routed
inside the frame and cockpit.
Seat post and saddle clamp
1. Undo the saddle clamp with a 5 mm Allen key
and lock the seat post at the recommended
height. Make sure that you guide the cable in
the seat post into the front frame opening.
2. Tighten the saddle clamp again to the specied
torque.
SITTING CORRECTLY: How to adjust the saddle height
EVERYTHING WITHIN REACH: How to adjust the handlebars, brake lever and shiftinglever
Adjust the handlebars, brake lever and shifting lever so that they are in the right ergonomic position
foryou. Follow the instructions in the “Handlebars, stem and headset” section of the ROTWILD instruction
manual.
8Pins seat post
1. Go for a test ride and adjust the saddle height
using the dropper function or the lever on the
left-hand side of the handlebars.
2. As soon as you have found the right height, get
off and use a 2.5 mm Allen key or the 8Pins tool
to turn the rotating part through 45° anti-
clockwise. The height adjustment mechanism
is now open. The plunger moves up.
3. Close the height adjustment mechanism by
turning the rotating part through 45° clockwise.
Make sure that the rotating part clicks back into
its original position.
ERGONOMICS
This manual suits for next models
1
Table of contents
Other Rotwild Bicycle manuals

Rotwild
Rotwild R.X+ FS 27.5 User manual

Rotwild
Rotwild Mountainbike User manual

Rotwild
Rotwild R.X275 User manual

Rotwild
Rotwild R.T750 HT Series User manual

Rotwild
Rotwild XC-RACE User manual

Rotwild
Rotwild R275 Series Series User manual

Rotwild
Rotwild R.C750 FS Series User manual

Rotwild
Rotwild R.X375 FS Series User manual

Rotwild
Rotwild R. C + HT User manual

Rotwild
Rotwild R.C750 2020 User manual