KIDWELL PICO ROTRPIC01A1 User manual

INSTRUKCJA OBSŁUGI
USER MANUAL
BENUTZERHANDBUCH
ROWEREK 3W1
BICYCLE 3IN1
FAHRRAD 3IN1
PL
PL
EN
EN
DE
DE
PICO

6
12
18
MODEL: ROTRPIC01A1, ROTRPIC01A2, ROTRPIC01A3

3
12
3

4
45
6
7

5
5
8

6

7
Dziękujemy za zakup produktu marki Kidwell.
Priorytetem jest dla nas bezpieczeństwo dziecka oraz tworzenie pięknych wspomnień.
W przypadku jakichkolwiek pytań, prosimy o kontakt na adres e-mail:
Prosimy o dokładne przeczytanie niniejszej instrukcji oraz podążanie za jej poleceniami
Celem instrukcji jest dostarczenie informacji o tym, jak prawidłowo i bezpiecznie
korzystaćz produktu. Po złożeniu produktu proszęupewnićsięczy wszystkie funkcje
działająprawidłowo oraz sązabezpieczone zgodnie z zaleceniami instrukcji (elementy
mocujące, nakrętki, śrubki, łączenia itp.).
Montażproduktu Kidwell powinien byćwykonany przez osobędorosłą.
Brak zastosowania siędo poleceńzawartych w tym dokumencie może spowodować
poważne obrażenia.
WAŻNE: Pamiętaj by usunąć i wyrzucićwszystkie elementy opakowania, które były
załączone do produktu, tak aby nie pozostały w zasięgu dziecka (m.in. elementy
kartonu, plastikowe folie itp.). Mogłoby to spowodowaćryzyko obrażeń, np. zagrożenie
zadławienia.
WAŻNE: Produkt do samodzielnego montażu
WAŻNE!
ZACHOWAĆDO WGLĄDU W PRZYSZŁOŚCI
OSTRZEŻENIE:
• By uniknąć obrażeńupewnij się, że dziecko znajduje sięz dala od miejsca
montowania produktu
• Nigdy nie zostawiaj dziecka bez opieki
• Produkt przeznaczony dla dziecka w wieku powyżej 2 lat i max wadze 25 kg
• Konieczność stosowania środków ochronnych (kasków, rękawic, ochraniaczy
na kolana i łokcie, odpowiednich butów)
• Nie używaćw ruchu ulicznym
• Do użytku pod bezpośrednim nadzorem osoby dorosłej
• Zabawka musi byćużywana z zachowaniem ostrożnośc, ponieważwymaga ona
odpowiednich umiejętności, w celu uniknięcia upadków lub zderzeńpowodujących
zranienie użytkownika lub osób trzecich
• Użytkując zabawkęnalezy upewnićsię, że dziecko posiada niezbędne umiejętnosci
pozwalające na korzystanie z rowerka w sposób bezpieczny’’
• Dla pełnego bezpieczeństwa, dziecko jeżdżące na rowerku powinno byćwyposażone
w kask, ochraniacze m.in. na kolana i łokcie, oraz powinno miećmocno zawiązane
buty by zapobiec ich ześlizgnięciu sięze stopy
• Nie używaj rowerka jeśli jakakolwiek część jest uszkodzona lub gdy jej brakuje
• Przed użyciem należy sprawdzić, czy wszystkie elementy zostały odpowiednio
przymocowane
• Nie używaj akcesoriów ani części zamiennych innych niżzalecane przez producenta
• Rowerek przeznaczony jest dla jednej osoby, nie powinien byćjednocześnie
użytkowany przez więcej niżjedno dziecko
• Zabawkęnależy użytkowaćna powierzchni płaskiej, bez przeszkód, z dala
od schodów

8
• Zawsze upewnij sięczy wszystkie części pasująjak nakazuje tego instrukcja
• Nie podejmuj sięnapraw lub modyfikacji produktu. Tylko wykwalifikowani technicy
serwisowi sądo tego upoważnieni
• Regularnie sprawdzaj produkt czy nie ma żadnych zniszczonych elementów
oraz stan mocowania śrub, nakrętek itp.
• Nie dodawaj przedmiotów do produktu, które mogązagrozićjego prawidłowemu
funkcjonowaniu, lub przedmiotów, które mogłyby wyrządzićkrzywdędziecku
• W przypadku stwierdzenia uszkodzenia należy natychmiast przerwaćużytkowanie
i odłożyćprodukt w miejsce niedostępne dla dziecka, ażdo czasu naprawy produktu
• Wszystkie elementy produktu musząbyćodpowiednio zamontowane, dużą uwagę
należy zwrócićna dokręcenie śrubek i nakrętek
• Produkt nie posiada hamulca
• Nie używaj produktu w jakikolwiek inny sposób niżzakłada tego instrukcja
• Niedopuszczalne jest korzystanie z rowerka po drogach, na których występuje
ruch uliczny, ani jakikolwiek innych dróg, po których przemieszczająsiępojazdy
silnikowe, oraz innych miejsc stanowiących zagrożenie dla zdrowia i życia dziecka
• Nie
należy używaćproduktu na nawierzchniach mokrych, śliskich, piaskowych,
żwirowych itp., które mogąstanowićniebezpieczeństwo utraty równowagi
• Nie należy używaćproduktu po zmroku, podczas mgły lub w innych warunkach
pogodowych ograniczających widoczność
• Przed użyciem produktu należy upewnićsię, że dziecko rozumie jak prawidłowo
użytkowaćprodukt w tym: jak prowadzićrowerek, jak skręcaći jak go zatrzymać.
• Nie należy pozostawiaćproduktu narażonego na warunki atmosferyczne jak
deszcz, śnieg, czy teżwysokie temperatury
• Dla dodatkowego bezpieczeństwa zalecana jest instalacja dodatkowych elementów
takich jak lampka i odblaski.
• Podczas jazdy dziecko musi trzymaćobie ręce na kierownicy, a podczas
rozpędzania siępowinno odpychaćsięnaprzemiennie stopami od podłoża. Należy
pamiętać
by nauczyćdziecko, aby po rozpędzeniu rowerka uniosło stopy, tak aby nie
zawadzićnimi o elementy podłoża
SPECYFIKACJA
• 3w1 – rowerek biegowy, rowerek
trójkołowy, jeździk
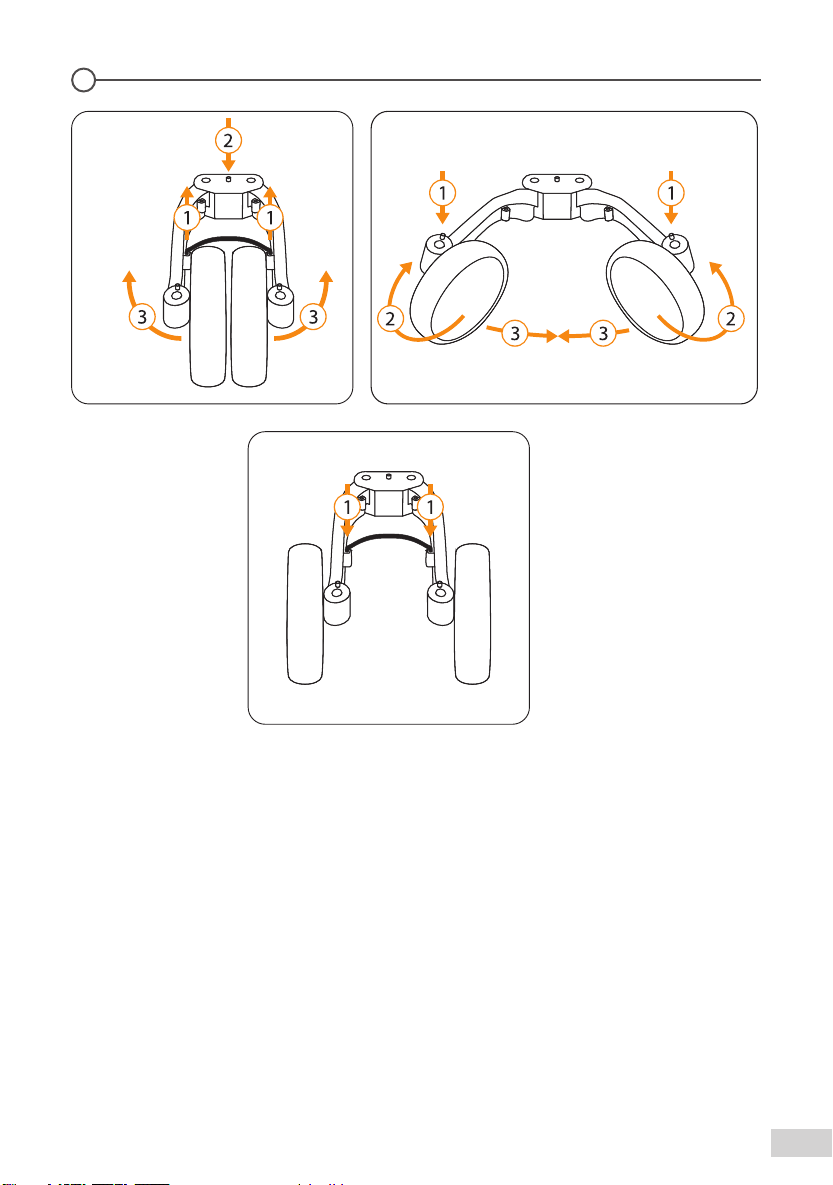
• Dwa tylne koła składane w jedno
podwójne
• Usprawnia koordynacjęruchową
• Rozwija motorykędużą
• Uczy utrzymywaćrównowagę
• Nowoczesny design
• Lekka i solidna konstrukcja
• Piankowe opony EVA - 8” i 9”
absorbujące wstrząsy
• Regulacja siodełka oraz nachylenia
kierownicy
MONTAŻI UŻYTKOWANIE
SCHEMAT
Kierownica
Przycisk regulacji kierownicy
Pedały
1
2
3
Uchwyt na pedały
Przednie koło
Tuleja na pedały
4
5
6

9
1
2
3
4
5
Montażrowerka zacznij od przedniego koła. Nałóżuchwyt na pedały (patrz
nr 4 SCHEMAT), na trzpieńod przedniego koła.
UWAGA: Uchwyt na pedały posiada dwie wypustki, które powinny byćskierowane do
dołu, by połączyły sięz trzpieniem, tużprzed rozwidleniem widelca (patrz rysunek)
A. Przełóżtrzpieńprzedniego koła przez ramęrowerka, a na wystający element
trzpienia nałóżkierownicę.
UWAGA: przez trzpieńoraz kierownicęmusi przejść śrubka zabezpieczająca oba
elementy i scalićje. Dlatego zarówno kierownica jak i trzpieńposiadająotwór na
śrubkę, który powinien siępokrywać.
B. Przełóżprzez otwór śrubkęzabezpieczając jąod drugiej strony nakrętką. Dokręć
śrubkęśrubokrętem krzyżowym.
A. By odkręcićobejmęwystarczy odchylićjej zacisk. Po odblokowaniu obejmy można
włożyćsiodełko. Pamiętaj! Dostosuj do wzrostu dziecka.
B. By zablokowaćsiodełko na wybranej wysokości należy dokręcićobejmęoraz
zamknąć zacisk.
By zmienićustawienie kierownicy należy nacisnąć i przytrzymaćprzycisk znajdujący
siępo bokach kierownicy.
Montażpedałów
A. By połączyćpedały z kołem należy je włożyćw specjalne tuleje po bokach koła. Tak
jak w przypadku uchwytu do przechowywania, należy włożyćpedały w taki sposób
by kołek zabezpieczający przeszedłprzez tuleje i stałsięwidoczny
UWAGA: Jeśli kołek zabezpieczający nie jest widoczny lub pedałzostałwłożony
w sposób uniemożliwiający by kołek przeszedłprzez otwór tulei, nie wolno używać
opcji pedałowania! Należy je wyciągnąć i włożyćpoprawnie w tuleje.
Przechowywanie pedałów
B. Pedały należy włożyćw uchwyt, który znajduje sięna przodzie, tużnad kołem.
7
8
9
10
11
Siodełko
Tylne koła
Przycisk do składania/
rozkładania tylnych kół
Ramiona tylnych kół
Tuleje na pręt zabezpieczający
12
13
14
pozycje rozłożonych kół
Przycisk do zmiany ułożenia tylnych kół
Tuleje na pręt zabezpieczający pozycje
złożonych kół
Pręt zabezpieczający

1010
7
6
8
Pozycja kół
Używanie rowerka jako trójkołowca
Rozdzielanie tylnego koła rozpocznij od wyciągnięcia prętu zabezpieczającego.
By rozchylićramiona kółnaciśnij przycisk znajdujący sięna końcu ramy (patrz rysunek
– krok 2). Gdy ramiona kółwydadządźwięk kliknięcia będzie to oznaczać, że są
w poprawnej pozycji.
Po rozchyleniu kółnależy je zablokowaćprętem zabezpieczającym wkładając
go w tuleje.
UWAGA: rowerek posiada 2 pary tulei na pręt zabezpieczający: Tuleje bliżej siodełka
służą do zablokowania kółw pozycji trójkołowca, zaśtuleje znajdujące siębliżej kół
służą do zablokowania kółw pozycji dwukołowego rowerka biegowego.
By ustawićkoła w pozycji do jazdy, należy nacisnąć i przytrzymaćprzyciski znajdujące
sięna zakończeniu ramion, tużprzy kole. Wtedy można zacząć obracaćkoła
do poprawnej pozycji (patrz rysunek)
Używanie rowerka jako jeździka
Rozdzielanie tylnego koła rozpocznij od wyciągnięcia prętu zabezpieczającego. By
rozchylićramiona kółnaciśnij przycisk znajdujący sięna końcu ramy (patrz rysunek
– krok 2). Gdy ramiona kółwydadządźwięk kliknięcia będzie to oznaczać, że są
w poprawnej pozycji.
By ustawićkoła w pozycji do jazdy, należy nacisnąć i przytrzymaćprzyciski znajdujące
sięna zakończeniu ramion, tużprzy kole. Wtedy można zacząć obracaćkoła
do poprawnej pozycji (patrz rysunek)
Gdy koła sąw odpowiedniej pozycji (na zewnątrz ramion), złóżz powrotem ramiona
i zablokuj je prętem zabezpieczającym poprzez włożenie go w tuleje
UWAGA: rowerek posiada 2 pary tulei na pręt zabezpieczający: Tuleje bliżej siodełka
służą do zablokowania kółw pozycji trójkołowca, zaśtuleje znajdujące siębliżej kół
służą do zablokowania kółw pozycji dwukołowego rowerka biegowego.
Pedały posiadająkołek zabezpieczający, dlatego należy je włożyćw uchwyt w taki
sposób, by kołki przeszły przez uchwyt i stały sięwidoczne.
rowerek biegowy - bez zamontowanych pedałów
jeździk - bez zamontowanych pedałów
rowerek trójkołowy - zamontowane pedały
A
B
C

11
Dla dobra środowiska, po zaprzestaniu użytkowania produktu, prosimy o jego utylizację
do odpowiedniego obiektu na odpady, zgodnego z lokalnąustawą.
Gwarancja nie obejmuje zniszczenia lub zgubienia poszczególnych elementów
na skutek upadku, otarcia, nieprawidłowego montażu, użytkowania niezgodnego
z instrukcją
Rysunki i zdjęcia mająwyłącznie charakter poglądowy. Rzeczywisty wygląd produktu
może sięróżnićod wizualizacji w instrukcji.
MAKSYMALNY WIEK ZALEŻY OD WYSOKOŚCI I MASY DZIECKA
ŚRODOWISKO
OGRANICZENIA GWARANCJI
CZYSZCZENIE I KONSERWACJA
• Rowerek należy czyścićzwilżonąszmatkąw roztworze mydła i wody.
• Nie wolno używaćtwardych szczotek i przedmiotów o ostrych krawędziach
to czyszczenia produktu
• Nie używaj silnych środków chemicznych do czyszczenia zabrudzeń.
• Przed każdym użyciem rowerka upewnij się, że wszystkie śrubki sądobrze
dokręcone.
• Użyj smaru na bazie silikonu do części ruchomych. Używaj go tylko wtedy gdy
zajdzie taka potrzeba.
• W przypadku nadmiaru smaru, usuńgo z produktu za pomocączystej szmatki.
• By uniknąć tarcia ruchomych części, co może spowodowaćuszkodzenie rowerka,
upewnij sięże sąone czyste i nie dostałsiędo nich brud, piasek, czy teżkurz.
• Gdy produkt nie jest używany powinien byćprzechowywany w pomieszczeniu
wolnym od wilgoci oraz skrajnych temperatur.
• Jeśli wystąpi konieczność zastąpienia poszczególnych elementów, należy użyć
oryginalnych części lub autoryzowanych przez producenta.
• Częste korzystanie z części regulujących doprowadza do powolnego zużycia tych
elementów. Gdy stracąone swoje właściwości, należy jak najszybciej je wymienić.
• Demontowanie rowerka odbywa sięw kolejności odwrotnej do montażu.

12

13
Dear Customer!
Thank you for choosing Kidwell,
Our highest priority is the safety of your child and the creation of beautiful memories.
We hope you will enjoy our product, in case of any questions please contact us at:
Please read through the entire manual carefully and follow all instructions. Before you
start using our product make sure that all of the features are working as intended and
are secure (fasteners, nuts, bolts, screws, etc.). The assembly must be performed by an
adult. Failure to comply with the instructions and safety warnings could result in serious
injuries.
IMPORTANT: Remove and dispose of all of the packaging materials which were included
with the product; and keep them out of children’s reach to avoid the risk of harm.
IMPORTANT: Product for self-assembly
IMPORTANT!
KEEP FOR FUTURE REFERENCE
WARNING:
• To avoid injuries, ensure that the child is kept away at a safe distance when
assembling the product
• Never leave your child unattended
• The product is intended for a child over 2 years of age and a maximum weight
of 25kg
• Use protective measures (helmets, gloves, knee and elbow pads, appropriate
shoes)
• Do not use in traffic
• For use under the direct supervision of an adult
• The toy must be used with caution, as it requires appropriate skills to avoid falls
or collisions causing injury to the user or third parties
• When using the toy, make sure that the child has the necessary skills to use the
bicycle safely.
• For full safety, a child riding a bicycle should be equipped with a helmet, protectors
including on the knees and elbows pads, and should have tightly tied shoes
to prevent them from slipping offthe foot
• Do not use the bicycle if any part is damaged or missing
• Before use, check that all components are properly attached
• Do not use accessories or spare parts other than those recommended by
the manufacturer
• The bicycle is intended for one person and should not be used by more than one
child at the same time
• The toy should be used on a flat surface, without any obstacles, away from stairs
• Always check if all parts fit accordingly to the manual
• Regularly check the product for any damaged parts, condition of elements and if all
of the of screws, fastening bolts and nuts, etc. are properly tightened and secure
• Do not add items to the product that may endanger its proper functioning or objects
that could pose a threat to the child
• If any damaged parts have been found, immediately stop using the product

14
SPECIFICATIONS
ASSEMBLY AND USE
PRODUCT COMPONENTS
Handlebars
Handlebars adjustment button
Pedals
Pedal holder
Front wheel
Pedal opening
Saddle
Rear wheels
Rear wheel folding/unfolding button
1
2
3
4
5
6
7
8
9
Rear wheel arms
Security rod sleeves securing
unfolded wheels
Rear wheel position adjustment
button
Security rod sleeves securing folded
wheels
Security rod
10
11
12
13
14
and place it out of the child’s reach until the bike is repaired
• All assembly elements must be properly attached, and particular attention must
be paid to elements such as screws, fastening bolts, and nuts, etc.
• The bike does not have brakes
• Do not use the product for other purposes than for those that it was designed
• Do not use the bike on roads with traffic, or any other roads with motorized vehicle
travel and in places posing a threat to the health and life of the child. Do not use
the bike on slopes, in proximity to swimming pools, on stairs, etc.
• Do not use the product on wet, slippery, sandy, gravelly, etc. surfaces that may
create the risk of the child losing balance
• Do not use the product after dark, in foggy conditions or in any other weather
conditions that limit visibility
• Do not leave the product exposed to weather conditions such as rain, snow or high
temperatures
• For safety reasons, it might be needed to equip the bike with additional elements
such as bike lamps, reflectors, etc.
• During the ride, the child must have both hands placed on the handlebar, holding
the handgrip tightly. When accelerating the child should push offthe ground with
the child’s feet, alternating between the right and the left leg. Remember to teach
the child to raise both feet after acceleration so that they do not get tangled up with
the dirt or debris which might be on the path.
• Diagrams and pictures are for reference purposes only. The actual design of
the product might differ from the visualizations provided in the manual.
• 3in1 - balance bike, three-wheeled
bike, ride-on bike
• Two rear wheels can fold into one
double wheel
• lmproves physical coordination
• Develops gross motor skills
• Teaches how to keep balance
• Modern design
• Lightweight and sturdy construction
• 8 „and 9” EVA foam tires, shock-
absorbing
• Adjustable tilt of handlebar and
height of the saddle

15
1
2
3
4
5
Start the assembly of the balance bike with the front wheel. Put the pedal holder
(see element no. 4 - PRODUCT COMPONENTS ) onto the front wheel head tube.
WARNING: The pedal holder has two protrusions which should be directed downwards
in order to connect to the fork (see drawing 1).
A. Put the rod protruding from the top of the front wheel construction through the bike
frame. Once you do that put the handlebars onto the protruding rod.
WARNING: You need to put a connecting screw simultaneously through both,
the protruding rod and the lower part of the handlebars. This is why both, the
protruding rod and the lower part of the handlebars have openings which should be
aligned and through which the connecting screw should be put.
B. Put the screw through the openings securing it with a cap on the other side. Tighten
the screw properly with a cross screwdriver.
A. In order to release the clamp, pull the lever away from the saddle. After you release
the clamp, you can place the saddle in the opening. Remember to adjust the height
of the saddle to the height of the child!
B. In order to lock the saddle at a desired height, close the clamp by pushing it towards
the saddle.
In order to change the position of the handlebars, press and hold the handlebars
adjustment button and adjust it to a desired position.
Pedal assembly
A. In order to attach the pedals onto the wheels, put the pedals into the opening
located on the sides of the front wheel. Just like in the case of the pedal holder, you
must put the pedals in so that the blocking pins become visible in the openings
WARNING: Do not use the pedaling option if the blocking pins are not visible in the
openings or the pedals were not put in properly in a way that the blocking pins could
not get through the openings. Take them out and put them in properly.
Pedal holder
B. Put the pedals in the holder located right above the front wheel. The pedals have
blocking pins which should be put in the holder in a way that they get through
the holder and become visible in the openings in the holder.

1616
Wheel positions
6
7
8
Using the bike as a tricycle
Start separating the rear wheels from each other by removing the security rod. In order
to spread the rear wheel arms, press the rear wheel folding/unfolding button (see picture
- step 2). As soon as you hear the arms making a ‘’click” sound, that will mean that they
are properly separated.
After spreading the wheels, block their movement by putting the security rod
in the sleeves for unfolded wheels.
WARNING: The bike has two pairs of security rod openings: the ones located closer
to the saddle are used to block the wheels in a tricycle position, and the ones located
closer to the wheels are used to block the wheels in a two-wheel balance bike position.
In order to put the wheels in a riding position, press the buttons located at the ends of
the rear wheel arms, right next to the wheels. Once you do that, turn the wheels to set
them in the riding position (see the picture).
Using the ride-on bike option
Start separating the rear wheels from each other by removing the security rod. In order
to spread the rear wheel arms, press the rear wheel folding/unfolding button (see picture
- step 2). As soon as you hear the arms making a ‘’click” sound, that will mean that they
are properly separated.
In order to put the wheels in a riding position, press the buttons located at the ends
of the rear wheel arms, right next to the wheels. Once you do that, turn the wheels to set
them in the riding position (see the picture).
When the wheels are in the correct position (outside of the rear wheel arms), fold the
arms back, and lock them with the security rod by inserting it into the sleeves as shown
in the picture
WARNING: The bike has two pairs of security rod openings: the ones located closer
to the saddle are used to block the wheels in a tricycle position, and the ones located
closer to the wheels are used to block the wheels in a two-wheel balance bike position.
balance bike - pedals should not be attached
ride-on - pedals should not be attached
three-wheeled bike - attached pedals
A
B
C
CLEANING AND MAINTENANCE
• The product should be cleaned using a damp with a water and soap solution cloth.
• Do not use stiffbrushes or objects with sharp or rough edges to clean the product.

17
Caring for the environment is our top priority, therefore, once you stop using the product
dispose of it in in accordance the legislations in your local jurisdiction.
The warranty does not cover destruction or loss of individual elements due to falling,
abrasion, incorrect assembly and use which is not in accordance with the user manual.
THE MAXIMUM AGE DEPENDS ON THE CHILD’S HEIGHT AND WEIGHT
ENVIRONMENT
LIMITATIONS OF WARRANTY
• Do not use strong chemical detergents to clean the product.
• Make sure that all of the screws are properly tightened before each time you use
the product.
• For movable parts use a silicone-based lubricating oil. Use it only when needed.
• In case of an excessive amount of the lubricating oil, remove it offthe product using
a clean cloth.
• In order to avoid friction of movable parts, which could damage the tricycle, make
sure that the movable parts are clean, and no sand, dirt or dust got into them.
• When not used the product should be stored in places away from humidity
and extreme temperatures.
• Only use original counterparts or those authorized by the manufacturer in case
there are parts needing replacement.
• Frequent use of adjusting parts leads to their slow wear and tear. Make sure to
change them immediately as soon as you notice that they are losing their original
properties.
• Disassembly of the product should be carried out in reverse order to its assembly.

18

19
Danke, dass Sie sich für den Kauf dieses Produkts der Marke Kidwell entschieden
haben. Die Sicherheit des Kindes und das Schaffen schöner Erinnerungen haben für
uns oberste Priorität. Sollten Sie noch Fragen haben, setzen Sie sich bitte mit uns in
Verbindung und schreiben Sie uns an die folgende E-Mail-Adresse:
Lesen Sie diese Anleitung bitte aufmerksam durch und befolgen Sie die in dieser
enthaltenen Anweisungen. Aufgabe dieser Anleitung ist es, Informationen über den
richtigen und sicheren Gebrauch des Produkts bereitzustellen.
Überzeugen Sie sich nach dem Zusammenbau des Kinderfahrrads über die korrekte
Funktionsweise aller Funktionen und dass die Sicherungs- und Schutzeinrichtungen
(Befestigungs- und Fixierelemente, Muttern, Schrauben, Verbindungen u.ä.)
ordnungsgemäß entsprechend den Anweisungen in der Anleitung angebracht wurden.
Die Montage des Kidwell-Produkts hat durch einen Erwachsenen zu erfolgen.
Die Nichtbeachtung der Anweisungen in dieser Anleitung enthaltenen kann zu schweren
Verletzungen führen.
WICHTIG: Denken Sie daran, alle Verpackungselemente, die mit dem Produkt
mitgeliefert wurden, so zu entfernen und zu entsorgen, dass sie nicht in Reichweite
von Kindern gelangen, um eine Gefahr von Schäden, z. B. Erstickungsgefahr
(Kartonelemente, Kunststofffolien usw.) auszuschließen.
WICHTIG: Produkt zur Selbstmontage
WICHTIG!
FÜR KÜNFTIGE VERWENDUNG AUFBEWAHREN
WARNUNG:
• Um Verletzungen zu vermeiden, versichern Sie sich bitte, dass sich keine Kinder in
der Reichweite des zusammengebauten Produkts befinden
• Lassen Sie Ihr Kind niemals unbeaufsichtig
• Das Produkt ist für Kinder ab 2 Jahren mit einem Höchstgewicht von 25 kg
• Treffen Sie Schutzmaßnahmen (Helme, Handschuhe, Knie- und Ellbogenschützer,
geeignete Schuhe).
• Nicht im Straßenverkehr benutzen
• Zur Verwendung unter unmittelbarer Aufsicht eines Erwachsenen
• Das Spielzeug muss mit Vorsicht verwendet werden, da es angemessene
Fähigkeiten erfordert, um Stürze oder Kollisionen zu vermeiden, die zu Verletzungen
des Benutzers oder Dritter führen
• Vergewissern Sie sich bei der Verwendung des Spielzeugs, dass das Kind über die
erforderlichen Fähigkeiten verfügt, um das Fahrrad sicher zu bedienen.
• Um die volle Sicherheit zu gewährleisten, sollte ein Kind, das Fahrrad fährt, mit
einem Helm sowie Protektoren an Knien und Ellbogen ausgestattet sein und fest
gebundene Schuhe haben, um ein Abrutschen vom Fuß zu verhindern
• Verwenden Sie das Fahrrad nicht, wenn Teile beschädigt sind oder fehlen
• Überprüfen Sie vor dem Gebrauch, ob alle Komponenten ordnungsgemäß befestigt
sind
• Verwenden Sie keine anderen als die vom Hersteller empfohlenen Zubehör- oder
Ersatzteile
• Das Fahrrad ist für eine Person bestimmt und darf nicht von mehr als einem Kind

20
LAUFRAD MONTAGE
TEILE
SPEZIFIKATION
gleichzeitig benutzt werden
• Das Spielzeug sollte auf einer ebenen Fläche ohne Hindernisse und abseits von
Treppen verwendet werden
• Vergewissern Sie sich immer, dass alle Teile wie in den Anweisungen dieser
Anleitung beschrieben passen
• Überprüfen Sie das Produkt regelmäßig auf beschädigte Teile und den Zustand der
Befestigungsschrauben, Muttern usw
• Bauen Sie keine Gegenstände an dem Produkt ab, die dessen einwandfreie
Funktion gefährden oder Ihrem Kind Schaden zufügen könnten
• Wird ein Schaden festgestellt, stellen Sie die Verwendung bitte sofort ein und stellen
Sie das Produkt an einem für Kinder unzugänglichen Ort auf, bis die Reparatur
durchgeführt wurde
• Alle Produktteile müssen ordnungsgemäß montiert werden. Achten Sie besonders
darauf, Schrauben und Muttern fest anzuziehen
• Das Produkt ist für den Gebrauch im Innenbereich und im Freien bestimmt.
• Das Produkt hat keine Bremse
• Verwenden Sie das Produkt nur auf die in diesem Handbuch beschriebene Weise
• Das Kinderfahrrad darf nicht auf Straßen mit Straßenverkehr oder anderen Straßen,
auf denen sich Kraftfahrzeuge fortbewegen und an anderen Orten, die eine Gefahr
für die Gesundheit und das Leben des Kindes bilden, wie auf stark abschüssigem
Gelände, in der Nähe von Schwimmbecken und Treppen benutzt werden
• Verwenden Sie das Produkt nicht auf nassen, rutschigen, sandigen oder kiesigen
Oberflächen, auf denen man leicht das Gleichgewicht verlieren kann
• Verwenden Sie das Produkt nicht nach Einbruch der Dunkelheit, bei Nebel oder
anderen Wetterbedingungen, bei denen eingeschränkte Sichtverhältnisse bestehen
• Setzen Sie das Produkt nicht dauerhaft Witterungseinflüssen wie Regen, Schnee
oder hohen Temperaturen aus
• Während der Fahrt muss das Kind beide Hände am Lenker halten und sich beim
Beschleunigen abwechselnd mit den Füßen vom Boden abstoßen. Denken Sie
daran, Ihrem Kind beizubringen, die Füße nach dem Beschleunigen anzuheben,
damit sie nicht mit Teilen am Untergrund in Berührung kommen
• 3 in 1 – Laufrad, Dreirad,
Rutschfahrzeug
• Zwei Hinterräder zu einem
Doppelrad zusammengeklappt
• Verbessert die Körperkoordination
• Großmotorische Entwicklung
• Es lehrt das Gleichgewicht zu halten
• Modernes Design
• Leichte und stabile Konstruktion
• 8 „ und 9” EVA Schaum Rader,
stoßabsorbierende Räder
• Neigungsverstellung des Lenkers
und höhenverstellbarer Sattel
Lenker
Einstellknopf für den Lenker
Pedale
1
2
3
Pedalhalterung
Vorderrad
Hülse für Pedale
4
5
6
This manual suits for next models
2
Table of contents
Languages:
Other KIDWELL Bicycle manuals