Green Blue GB522 User manual

-16 -
Scan QR code to download LivingSense APP:
-01 -
ADD QR
CODE HERE
From Google
GB522

EN WIFI weather station of smart
Technical Data and Features
Base station: Perpetual Calendar Up to Year 2099 • Day of week in 7 languages user
selectable: English, German, Italian, French, Spanish, Netherlands and Danish • Time in
optional 12/24 hour format. • Automatic calibration of network time service • The moon
phase display • Barometric pressure: Barometric pressure measurement ranges: 600
hPa/mb to 1100 hPa/mb / 17.72 inHg to 32.50 inHg / 450.1mmHg to 825.2mmHg
• Pressure alternatively in hPa/mb or inHg or mmHg • Indoor humidity measurable range:
20%RH to 95%RH • Indoor temperature: temperature measurement ranges:-20°C to 60°C
(-4°F to 140°F) • Temperature alternatively in °C or °F. • Minimum/maximum display for
humidity and temperature • The weather forecasting function (according to the change of
air pressure) • Connects directly to wifi network • Power Supply: Battery: 2 x LR6 AA and
mains adapter: DC5V 1A
Wireless Outdoor Sensor: Outdoor temperature measurement ranges: -40°C (-4°F) ~
70°C (158°F) • Outdoor measurable range: 20%RH to 95%RH • Data transmission
frequency: 433 MHz • Wireless range: max. 60 m (open area) • Batteries: 2 x LR06 (UM-3),
1.5 V (size AA) • Protection class: IPX4
Base station Appearance: Part A-Positive LCD:
A1: Weather Forecasting, A5: Outdoor Humidity
A2: Barometric pressure A6: Indoor Humidity
A3: Outdoor Temperature A7: Time/Calendar / Weed
A4: Indoor Temperature A8: Moon Phase
Part B – Back button and power B1: Keypad / B2: Battery compartment
B3: Support frame / B4: Power supply socket / B5: Mains adapter
Part C –Wireless Outdoor Sensor:
C1: LCD display – Temperature
C2: LCD display – Humidity
C3: Transmit signal LED
INITIAL OPERATION:
• Replace Wireless Outdoor Sensor battery compartment cover , Push the Channel selector
switch in the battery compartment of the Wireless Outdoor Sensor, set the correct channel
,Insert 2 x AA batteries observing polarity [ “+” and “–“ marks] • When you insert the
batteries, all the icon on the LCD display will briefly light up for 3 seconds, the Wireless
Outdoor Sensor began to switch to the normal working mode, to detect the temperature
and humidity in the environment . At this time, the sensor will transmit 1 wireless signals,
and the interval of about 1 minutes will automatically transmit the 1 wireless signal, each
transmitted 1 wireless signal emission sensor indicator will flash 1 times.• According to
the appearance of the Base Station icon shows that the power adapter is inserted into the
socket on the Base Station, and the power adapter is connected to the power supply. After
you pass on the power supply, all the symbols on the display screen will be displayed after
about 3 seconds, the base station began to switch to the normal working mode, to detect
the temperature, humidity and air pressure in the environment • The Base Station will now
start to make a connection to the outdoor remote sensor. This operation takes about 3
minutes and is displayed by a flashing reception RF antenna symbol in the “OUTDOOR”
display area on the receiver. the “OUTDOOR” display area will show an animation of the RF
antenna symbol, indicating the base station is searching for the signal from the outdoor
sensor. At the same time the base station began to establish WIFI connections (details see
the following WIFI connection description) • When the Base Station starts normal,Open the
Base Station battery compartment cover, Insert 2 x AA batteries observing polarity [ “+”
and “-” marks], The battery is a backup power supply of the Base Station, which can
ensure the normal operation of the base station after the power adapter is unexpectedly
cut off. Note: after the power adapter is disconnected, the WIFI connection of the base
station will be automatically disconnected.
Outdoor sensor transmission: • When the Base Station successfully receives signals
from the wireless sensor, the temperature and humidity of the OUTDOOR are displayed on
the OUTDOOR column of the Base Station. • The base station can connect up to 3 channel
wireless sensor registration, the use of multiple wireless sensor, the wireless sensor
channel can not choose the same channel at the same time (a total of 1, 2, 3 channel can
choose) • Press the DOWN key can switch the display of different channels of outdoor
temperature and humidity, when displaying the symbol REFRESH, will display the channel
every 5 seconds automatically switch a channel • If the Base Station failed to receive
transmission from outdoor sensor (“- -”display on the LCD), press and hold “DOWN” button
for 3 seconds to receive transmission manually. the outdoor temperature will show an
animation of the RF antenna symbol, the Base Station will re receive the wireless signal of
C4: “°C/°F” button
C5: “TX” button
C6: Channel selector switch
C7: Battery compartment
-02 - -03 -

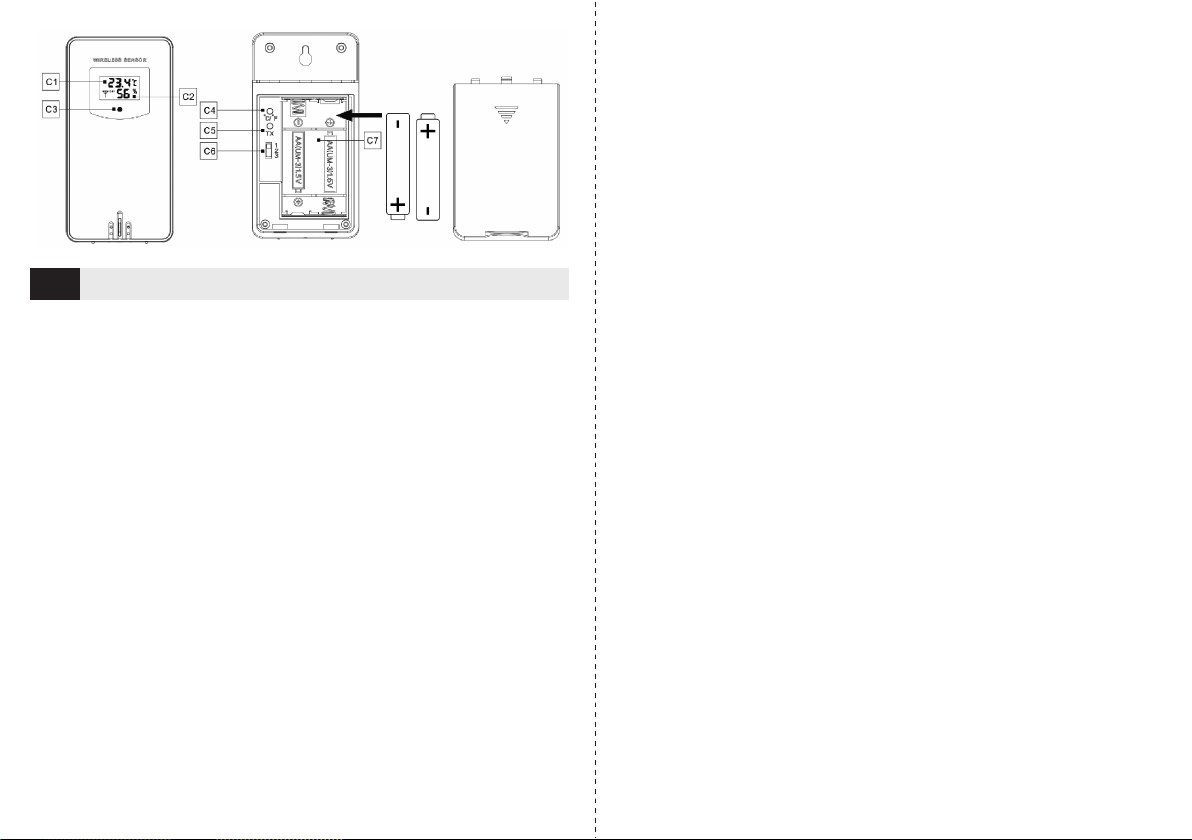
the outdoor sensor • Note: when the wireless sensor set up different channels, the base
station "OUTDOOR" also want to switch to the same channel. When there is no wireless
sensor signal transmission on the channel, "--" will be displayed in the channel of the
base station
Through the WiFi connection network: • Mobile phone to open WIFI function, to ensure
that the phone and wireless router link normal, Open downloaded completed application
"LIVINGSENSE". Click on the app's "PAIR", enter the base station and WIFI pairing
process.• After the jump screen, select the SSID WI-Fi to establish the WIFI name of the
connection, in the "Password" input password. Now press "next" to enter the next step.
• According to the phone screen prompts, Press and hold “”buttons located on the back
side of Base station for 3 seconds until “AP” flashed on the display, Now go back to App
and press “Next” to continue the setting• According to the phone screen prompts, go to
settings chooes “LivingSmart” and thengo back to “LivingSense” to complete the setting.
Now press the "Next" after the prompt "connecting being" wait for the prompt pairing
success.• After the pairing is successful, the application will switch to the weather display
interface, prompt "restart weather station device please"• Now press the "WIFI/UP"
button on the back side of the base station for 3 seconds until the base station does not
display AP • Exit “AP”display, the Base Station will automatically establish a connection
with the router, the establishment of the process, the symbol flashing, when the symbol is
not flashing, the base station and the router to complete the connection. The base station
starts to transmit the data with the server, when the transmission is normal, the symbol
will gradually display into 4 columns, and the server will automatically calibrate the base
station time, at present the correct time display.
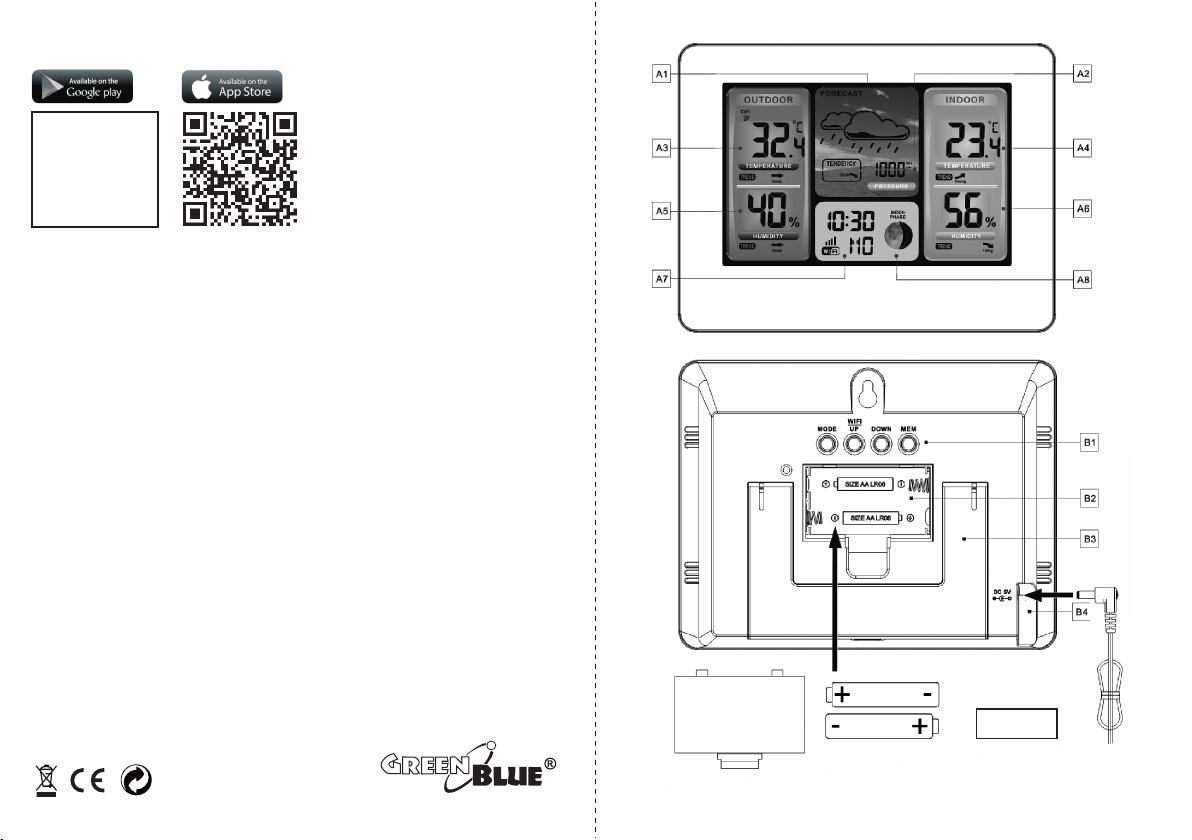
Manual time setting: • Press “MODE” button, can switch the display calendar or
time/second or time/week • Press and hold down the “MODE” button for 2 seconds, the
12/24 hour mode display starts to flash. Now use “UP” and “DOWN” buttons to set the
correct 12/24 hour mode.• Press “MODE” to confirm your setting, the Time zones start to
flash, Now use “UP” and “DOWN” buttons set a correct time zone (-12 to +12).
• Press “MODE” to confirm your setting, the Hour display starts to flash. Now use “UP” and
“DOWN” buttons to set the correct hour.• Press “MODE” to confirm your setting, the
Minute displays starts to flash. Now use “UP” and “DOWN” buttons to set the correct
minute • Press “MODE” button to confirm your setting, the Month and Date icon display
starts to flash. Now use “UP” and “DOWN” buttons to set the date display on Month/Date
or Date/Month • Press “MODE” button to confirm your setting, the Year display 2016 starts
to flash. Now use “UP” and “DOWN” buttons to set the correct year.• Press “MODE” button
to confirm your setting, the Month display starts to flash. Now use “UP” and “DOWN”
buttons to set the correct month.• Press “MODE” button to confirm your setting, the Date
display starts to flash. Now use “UP” and “DOWN” buttons to set the correct date.• Press
“MODE” button to confirm your setting, the language selection for the Weekday displays
starts to flash. Now use “UP” and “DOWN” buttons to select a language.
• Press “MODE” button to confirm your setting, the temperature is display either in °C to
flash. Now use “+” and “-” buttons to set the temperature unit in °C or °F. • Press “MODE”
button to confirm your setting, the barometric pressure is display either in mb/hPa to flash.
Now use “+” and “-” buttons to set the pressure unit in mb/hPa or inHg or mmHg.• Press
“MODE” to confirm your setting and to end the setting procedures, enter the clock mode.
F.Y.I.: After 20 seconds without pressing any button, the clock switches automatically from
Set Mode to Normal Time Mode. There are 7 languages of Weekday: English, German,
Italian, French, Spanish, Dutch and Danish.
Lunar phases and tide indicator: The weather station has a display which automatically
displays the current lunar phase: New moon / Waxing half-moon / Half-moon / Full moon
Waning full moon / Half-moon / Waning half-moon
Displaying temperature / humidity / barometric pressure and temperature / humidity
trend • The current indoor temperature/humidity/barometric pressure and the temp./
humidity trend (indoors) are shown in the LCD display • After successfully connecting with
the outdoor sensor, the weather station can display the outdoor temperature/humidity and
the temperature/humidity trend (outdoor) • You may see the following displays: The
temperature/humidity is rising. / The temperature/humidity is remaining constant. / The
temperature/humidity is falling.
Maximum/Minimum Temperature/Relative Humidity: To toggle indoor/outdoor
maximum, minimum temperature and humidity data, press the “MEMORY” button:
Once to show the maximum temperature and humidity values. Twice to sow the minimum
temperature and humidity values Three times to return to the current temperature and
humidity levels. To reset the maximum and minimum temperature and humidity, press and
hold down the “MEMORY” button about 2 seconds. This will reset all minimum and
maximum data recorded to the current displayed values.
F.Y.I.: If the temperature reading is below ranges, the LL.L will be displayed. If the
temperature reading is above ranges, the HH.H will be displayed. If the battery symbol
appears the batteries in the outdoor sensor should be replaced as soon as possible.
Frost ice tips: When the outdoor temperature is in the range of -1°C-+3°C or +30°F to +
37°F, the symbol ICE flash display
The weather forecast: The weather station calculates a weather forecast for about the
next 12 hours based on the barometric pressure trend. Of course this forecast can‘t
compare to that of professional weather services supported by satellites and high
performance computers, but merely provides an approximate indication of current
developments. Please take the weather forecast from your local weather forecasting
-04 - -05 -

service into account as well as the forecast from your weather station. If there are
discrepancies between the information from your device and from the local weather
forecasting service, please take the advice of the latter as authoritative. The weather
station displays the following weather symbols: sunny / slightly cloudy / cloudy
rainy / Heavy rainy / Snowy • The weather station can display the barometric pressure
trend.
Background lighting: Press the UP button to adjust the brightness of the backlight, you
can adjust the 4 state: 3 different brightness backlight and close the backlight
PL Stacja pogodowa WIFI Smart
Dane techniczne oraz cechy produktu:
Stacja bazowa: Kalendarz do roku 2099 • Dni tygodnia w 7 językach do wyboru:
Angielski, Niemiecki, Włoski, Francuski, Hiszpański, Niderlandzki oraz Duński.
12 lub 24 godzinny format czasu opcjonalnie do wyboru • Automatyczna aktualizacja
czasu • Wyświetlanie faz księżyca • Ciśnienie barometryczne: zakres pomiaru ciśnienia
barometrycznego: 600 hPa/mb do 1100 hPa/mb lub 17.72 inHg do 32.50 inHg
do 450.1mmHg to 825.2mmHg. Jednostka ciśnienia alternatywnie do wyboru w hPa/mb
lub inHg lub mmHg. • Zakres pomiaru wilgotności wewnątrz: 20%RH do 95%RH
Temperatura wewnątrz: zakres pomiaru temperatury: -20`C do 60`C lub - 4`F do 140`F.
• Jednostka ciśnienia alternatywnie do wyboru w `C lub `F. • Wyświetlanie
minimalnej/maksymalnej wilgotności i temperatury • Funkcja prognozowania pogody
(zgodnie ze zmianami ciśnienia atmosferycznego) • Bezpośrednie łączenie się z siecią WIFI
Zasilanie: Bateria : 2x LR6 AA. Zasilanie główne : DC5V 1A
Bezprzewodowy czujnik zewnętrzny: Zakres pomiaru temperatury zewnętrznej:
-40`C (-4`F) do 70`C (158`F). Zakres pomiaru na zewnątrz: 20%-95%RH. Częstotliwość
transmisji danych: 433 MHz - Odległość transmisji na otwartym terenie: max. 60 m
- Baterie: 2 x LR06 (UM-3), 1.5 V (rozmiar AA) - Ochrona: IPX4
Część A – Wyświetlacz LCD
A1: Prognozowanie pogody
A2: Ciśnienie barometryczne
A3: Temperatura zewnętrzna
A4: Temperatura wewnętrzna
Część B – Przyciski z tyłu oraz zasilanie
B1: Przyciski do sterowania B2: Komora na baterie
B3: Rama podporowa B4: Gniazdo zasilania
B5: Zasilacz główny
A5: Wilgotność na zewnątrz
A6: Wilgotność wewnątrz
A7: Czas/Kalendarz
A8: Faza księżyca
Część C – Czujnik bezprzewodowy
C1: Wyświetlacz LCD- temperatura C2: Wyświetlacz LCD- wilgoć
C3: Sygnał transmisji LED C4: „° C lub ° F” przycisk
C5: „TX” przycisk C6: Przełącznik zmiany kanału
C7: Komora na baterie
Uruchomienie: Usuń pokrywę komory na baterie w czujniku bezprzewodowym. Następnie
wybierz odpowieni kanał za pomocą przycisków znajdujących się w komorze na baterie.
Włóż dwie baterie AA zgodnie z polaryzacją oznaczoną za pomocą znaków + i - .
Kiedy włożysz baterie, wszystkie ikony na wyświetlaczu LCD zaświecą się na około 3 sek,
a bezprzewodowy czujnik rozpocznie pracę w swoim trybie aby wykryć temperaturę
a także poziom wilgotności otoczenia. W tym czasie czujnik rozpocznie automatyczną
transmisję sygnału. Każda pojedyncza transmisja będzie zasygnalizowana jednym
mignięciem wskaźnika. Po włożeniu baterii do stacji pogody słychać będzie krótki dźwięk
i zapalą się na 3 sekundy wszystkie segmenty wyświetlacza LCD. Stacja rozpocznie
synchronizację z bezprzewodowym czujnikiem. Stacja bazowa będzie poszukiwać sygnału
radiowego wysyłanego z czujnika zewnętrznego Poczekać do 3 minut aż pojawią się na
wyświetlaczu odczyty (temperatury i wilgotności) z zewnętrznego czujnika bezprzewodo-
wego. W tym samym czasie stacja bazowa rozpocznie stabilizację połączenia z wifi. Kiedy
stacja bazowa uruchomi się prawidłowo, otwórz pokrywę komory baterii i włóż dwie
baterie AA zgodnie z polaryzacją (oznaczoną znakami + i - ). Baterie będą pełnić funkcję
zastępczą w razie braku zasilania z zasilacza głównego lub jego przypadkowego
odłączenia. WAŻNE: Kiedy zasilanie zostanie odłączone, sygnał wifi w stacji bazowej
zostanie automatycznie rozłączony.
Transmisja czujnika zewnętrznego: Kiedy stacja bazowa z powodzeniem otrzyma
sygnał z bezprzewodowego czujnika, na wyświetlaczu LCD stacji pojawią się odczyty
temperatury z zewnątrz. Stacja bazowa może połączyć się z 3 kanałami rejestrującymi
czujnika bez-przewodowego, jednak kanał czujnika nie może wybrać tego samego kanału
w tym samym czasie. Używając przycisku „DOWN” możesz zmienić wyświetlanie różnych
kanałów zewnętrznej temperatury i wilgotności. Symbol odświeżania oznacza, że kanały
będą zmieniane automatycznie co 5 sekund. Jeśli stacja bazowa nie otrzyma sygnału
transmisji od czujnika zewnętrznego, na wyświetlaczu LCD pojawi się wtedy symbol „- -”.
Naciśnij przycisk „DOWN” i przytrzymaj przez 3 sekundy aby ustawić sygnał manualnie.
Pojawi się temperatura zewnętrzna a także animacja symbolu anteny RF. Oznaczać to, że
stacja bazowa nawiązała połączenie z bezprzewodowym czujnikiem.
Uwaga: Kiedy bezprzewodowy czujnik jest ustawiany na różne kanały, stacja bazowa
również będzie wymagała tego samego kanału. Kiedy w bezprzewodowym czujniku
wystąpi brak transmisji danych, na stacji bazowej pojawi się symbol „- -”
-06 - -07 -

Połączenie z siecią WiFi: Użyj telefonu komórkowego i otwórz ustawienia WiFi, aby
sprawdzić i upewnić się, że bezprzewodowy router działa poprawnie. Otwórz pobraną
wcześniej aplikację „Livingsense”, następnie kliknij w aplikacji „Pair” aby sparować stację
bazową z siecią WiFi • Po przeskoczeniu ekranu, wybierz SSID Wi-Fi aby ustalić nazwę
połączenia. Wprowadź hasło. Następnie naciśnij przycisk NEXT aby przejść do następnego
kroku • Według tego co pokazuje wyświetlacz telefonu, naciśnij i przytrzymaj przycisk
„WiFi”/Up umieszczony z tyłu stacji bazowej i przytrzymaj 3 sekundy dopóki „AP” miga na
wyświetlaczu. Następnie wróć do Aplikacji i naciśnij ‘next’ aby kontynuować ustawienia.
• Według tego co pokazuje wyświetlacz telefonu, przejdź do ustawień wybierz LivingSmart
a następnie wróć do LivingSense aby dokończyć ustawienia. Teraz naciśnij „Next”.
Po komunikacie „connecting being” poczekaj na dokończenie procesu parowania.
Kiedy parowanie zostanie zakończone, aplikacja przełączy się wyświetlacz pogody
nakazując zrestartowanie stacji pogody. Naciśnij przycisk Wi-Fi/UP znajdujący się z tyłu
stacji bazowej i przytrzymaj 3 sekundy dopóki na stacji nie wyświetli się „AP”.
Wyjdź z „AP” na wyświetlaczu. Stacja bazowa automatycznie połączy się z routerem
(symbol będzie migać). Koniec migania oznacza, że to stacja bazowa zakończyła łączenie
z routerem. Stacja bazowa rozpoczyna transmisję danych z serwerem. Kiedy transmisja
jest prawidłowa symbol odświeżania stopniowo pojawi się w czterech kolumnach,
a serwer automatycznie zaktualizuje czas w stacji bazowej.
Manualne ustawianie czasu: Naciśnij przycisk „MODE” aby zmienić wyświetlanie
kalendarza lub czasu. Naciśnij i przytrzymaj przcisk „MODE’ przez 2 sekundy. Format
czasu 12/24 zacznie migać na wyświetlaczu. Użyj prtzycisków „UP” i „DOWN” aby ustawić
żądany format czasu. Naciśnij „MODE” aby potwierdzić ustawienia. Na wyświetlaczu
zaczną migać strefy czasowe. Użyj przycisków „UP” and „DOWN” aby wybrać odpowiednią
strefę czasową (-12 do +12). Naciśnij „MODE” aby potwierdzić ustawienia. Na
wyświetlaczu zacznie migac cyfra godziny. Użyj przycisków „UP” i „DOWN” aby ustawić
poprawną godzinę. Naciśnij „MODE” aby potwierdzić ustawienia. Na wyświetlaczu zacznie
migać cyfra minuty. Użyj przycisków „UP” i „DOWN” aby ustawić poprawną minutę.
Naciśnij „MODE” aby potwierdzić ustawienia. Na wyświetlaczu zacznie migać ikona daty.
Użyj przycisków „UP” i „DOWN” aby ustawić format daty Miesiąc/Dzień lub Dzień/Miesiąc.
Naciśnij „MODE” aby potwierdzić ustawienia. Na wyświetlaczu zacznie migać ikona roku.
Użyj przycisków „UP” i „DOWN” aby ustawić odpowiedni rok. Naciśnij „MODE” aby
potwierdzić ustawienia. Na wyświetlaczu zacznie migać miesiąc. Użyj przycisków „UP”
i „DOWN” aby ustawić odpowiedni miesiąc. Naciśnij „MODE” aby potwierdzić ustawienia.
Na wyświetlaczu zacznie migać dzień tygodnia. Użyj przycisków „UP” i „DOWN” aby
ustawić odpowiedni dzień tygodnia. Naciśnij „MODE” aby potwierdzić ustawienia. Na
wyświetlaczu zacznie migać ikona wyboru języka. Użyj przycisków „UP” i „DOWN” aby
ustawić żądany język. Naciśnij „MODE” aby potwierdzić ustawienia. Na wyświetlaczu
zacznie migać ikona jednostki temperatury. Użyj przycisków „+” i „-” aby ustawić °C/°F.
Naciśnij „MODE” aby potwierdzić ustawienia. Na wyświetlaczu zacznie migać ikona
ciśnienia barometrycznego. Użyj przycisków „+” i „-” aby ustawić jednostkę miary
mb/hPa lub inHg lub mmHg. Naciśnij „MODE” aby potwierdzić ustawienia. Aby zakończyć
ustawienia naciśnij tryb zegarowy Informacje dodatkowe:po 20 sekundach nie używania
żadnego z przycisków, zegar automatycznie przejdzie z trybu ustawień na normalny tryb
pracy. Do wyboru jest 7 języków dni tygodnia: Angielski, Niemiecki, Włoski, Francuski,
Hiszpański, Niderlandzki, Duński.
Fazy księżyca: Stacja pogody posiada funkcję automatycznego wyświetlania aktualnych
faz księżyca -Nów -Przybierający -Półksiężyc -Przybierający -Pełnia -Zmniejszający się
-Półksiężyc -Zmniejszający się
Wyświetlanie temperatury/ wilgotności/ ciśnienia barometrycznego/ trendu wilgotności
Na wyświetlaczu LCD pokazywana jest bieżąca wewnętrzna temperatura/ wilgotność/
ciśnienie/ trend wilgotności. Po połączeniu z zewnętrznym czujnikiem bezprzewodowym,
stacja pogody potrafi wyświetlić również zewnętrzną temperaturę/ ciśnienie, trend
wilgotności. Możesz zobaczyć następujące znaki na wyświetlaczu: temperatura/
wilgotność wzrasta. Temperatura/ wilgotność jest stała. Temperatura/ wilgotność spada
Maksymalna/ Mininalna temperatura/ Relatywna wilgotność: Aby przełączać
wewnętrzną/zewnętrzną maksymalną i minimalną temperaturę oraz wilgotność, naciśnij
przycisk „MEMORY”. Raz aby pokazywać wartość maksymalnej temperatury oraz
wilgotności. Dwa razy aby pokazywać wartość minimalnej temperatury oraz wilgotności.
Trzy razy aby powrócić do bieżących ustawień temperatury oraz wilgotności.
Aby zresetować ustawienia, naciśnij przycisk „MEMORY” i przytrzymaj przez 2 sekundy.
Zresetują się wszystkie minimalne i maksymalne zapisane ustawienia.
Informacje dodatkowe: Jeśli temperatura jest poniżej zakresu, na wyświetlaczu pojawi
się LL.L. Jeśli temperatura jest powyżej zakresu, na wyświetlaczu pojawi się HH.H.
Jeśli pojawi się symbol baterii: oznacza to że powinniśmy jak najszybciej wymienić baterie
w zewnętrznym czujniku ruchu.
Wskazówki w przypadku mrozu: Kiedy zewnętrzna temperatura znajduje się w zakresie
– 1`C - +3`C lub +30`C do 37`C, na wyświetlaczu pojawi się symbol
Prognozowanie pogody: Stacja pogody kalkuluje prognozę pogody na najbliższe 12
godzin, na podstawie trendu ciśnienia barometrycznego. Urządzenia oczywiście nie można
porównywać z serwisami pogodowymi, które używają satelit a także zaawansowanych
technologicznie urządzeń, natomiast potrafi oszacować przewidywaną pogodę.
Prosimy o sugerowanie się prognozą pogody z lokalnego serwisu prognozowania pogody.
Jeśli występują jakiekolwiek dysproporcje między stacją pogody a lokalnym serwisem
prognozowania, prosimy traktować jako autorytarne te z drugiego źródła. Stacja pogody
-08 - -09 -

wyświetla następujące symbole: słońce / częściowe zachmurzenie / zachmurzenie
deszcz / obfity deszcz / śnieg. Stacja pogody posiada funkcję wyświetlania trendu
ciśnienia barometrycznego
Podświetlanie: Naciśnij przycisk UP aby zmienić poziom jasności wyświetlacz, możesz
wybrać spośród 3 trybów jasności, lub całkowicie wyłączyć podświetlanie.
DE Smart WIFI Wetterstation
Technische Daten und Eigenschaften:
Basisstation:
• Immer währender Kalender bis zum Jahr 2099 • Wochentage in 7 Sprachen einstellbar:
englisch, deutsch, italienisch, französisch, spanisch, niederländisch und dänisch
• Zeit im 12/24 Stundenformaty einstellbar • Automatische kalibrirung des Netzwerk Zeit
Services • Mondphasen Display • Luftdruck : Luftdruck Messbereich: 600hPa/mb bis
1100 hPa/mb 17.72 inHg bis 32.50 inHg 450.1mmHg bis 825.2mmHg • Druck
ersatzweise in hPa/mb oder inHg oder mmHg Innenluftfeuchtigkeit • Messbereich: 20%RH
bis 95%RH • Innentemperatur: Temperatur Messbereich: -20°C bis 60°C
-4°F bis 140°F • Temperatur ersatzweise in °C oder °F • Minimal/Maximal Display für
Luftfeuchtigkeit und Temperatur • Wettervorhersage Funktion (Den Veränderungen des
Luftdrucks zufolge) • Verbindet direkt mit WIFI-Netzwerk • Stromzufuhr: Batterie: 2x LR6
AA und Hauptadapter: DC5V 1A
Kabelloser Außentemperatur Sensor: Außentemperatur Messbereich: -40°C (-4°F) ~ 70°C
(158°F) Außenluftfeuchtigkeit Messbereich: 20%RH bis 95%RH
Datenübertragungsfrequenz: 433 MHz Kabellose Reichweite: max. 60m (geöffneter Raum)
Batterien: 2x LR06 (UM-3), 1.5 V (Größe AA) Schutzklasse: IPX4
Basisstation Aussehen:
Teil A – Positivanzeige LCD
A1: Wettervorhersage
A2: Luftdruckanzeige
A3: Außentemperatur
A4: Innentemperatur
A5: Außenluftfeuchtigkeit
A6: Innenluftfeuchtigkeit
A7: Zeit / Kalender / Woche
A8: Mondphasen
Teil C – Kabelloser Außentemperatur Sensor: C1: LCD Display - Temperatur C2: LCD
Display - Luftfeuchtigkeit C3: Verbindungssignal LED C4: °C / °F - Knopf
C5: TX - Knopf C6: Kanal Wahlschalter C7: Batteriefach
Inbetriebnahme: Nehmen Sie die Abdeckung des kabellosen Außensensors Batteriefach ab,
Schalten Sie auf dem entsprechenden Kanal mit dem Wahlschalter im Batteriefach des
Außensensors, Fügen Sie 2 x AA Batterien bei den Sie auf die Polarisierung achten ( „+“
und „-“ Markierung) Nachdem Sie die Batterien eingefügt haben werden alle Symbole auf
dem LCD Display kurz für bis zu 3 Sekunden aufleuchten und der Außensensor beginnt in
den normalen Betriebsmodus zu schalten um die Temperatur und Luftfeuchtigkeit in der
Umgebung zu erkennen. Ab diesem Punkt wird der Sensor ein Signal in einem Interval von
einer Minute automatisch senden. Jede empfangene Signalabgabe wird auf dem Indikator
mit einer Aufleuchten bestätigt. Dem Aussehen der Basisstation nach zeigen die Symbole
an das der Adapter in die Steckdose der Basisstation eingesteckt und mit einer
Stromquelle verbunden ist. Nachdem Sie die Stromquelle verbunden haben werden alle
Symbole auf dem Display nach etwa 3 Sekunden angezeigt und die Basisstation beginnt in
den normalen Betriebsmodus zu schalten um die Temperatur und Luftfeuchtigkeit in der
Umgebung zu erkennen. Die Basisstation wird nun beginnen sich distanziert mit den
Außensensor zu verbinden. Dieses Vorgehen braucht etwa 3 Minuten und wird durch ein
aufleuchtendes RF-Empfangsantennen Symbol im Außenbereich des Displays angezeigt.
Der Außenbereich des Displays wird nun eine Animation des Empfangsantennen Symbols
anzeigen, was bedeutet dass die Basisstation nach dem Signal des Außensensors sucht.
Zur gleichen Zeit wird die Basisstation die WIFI Verbindung einführen (genaue
Beschreibung in der WIFI Verbindung Beschreibung). Sobald die Basisstation normal
funktioniert, öffnen Sie das Batteriefach dieser und fügen Sie 2 x AA Batterien hinein bei
den Sie auf die Polarisierung achten ( „+“ und „-“ Markierung). Die Batterieversorgung
dient als Unterstützende Stromquelle der Basisstation falls die Stromversorgung des
Adapters unerwartet unterbrochen wird. Hinweis: Nachdem der Adapter von der
Basisstation getrennt wird, wird die WIFI Verbindung mit der Basisstation automatisch
abgebrochen.
Außensensor Übertragung: Sobald die Basisstation erfolgreich ein Signal von dem
kabellosen Sensor bekommt, wird die Außen- Temperatur und Luftfeuchtigkeit in der
Außenbereich Kolonne der Basisstation angezeigt.Die Basisstation kann sich mit bis zu 3
Kanälen für den Gebrauch von mehreren kabellosen Sensoren verbinden und registrieren.
Der Kabellose Sensor Kanal kann nicht gleichzeitig den gleichen Kanal wählen (eine
Auswahl an Kanal 1, 2 oder 3 ist möglich). Drücken Sie den „DOWN“ Knopf um zwischen
den verschiedenen Kanälen von Außen- Temperatur und Luftfeuchtigkeit zu wählen. Wenn
das „WIEDERHOLUNG“ Symbol angezeigt wird, schaltet der Display zwischen den Kanälen
ale 5 Sekunden automatisch um. Falls die Basisstation kein Signal des kabellosen Sensors
erhält ( „- -“ auf dem LCD Display), drücken und halten Sie „DOWN“ für etwa 3 Sekunden
um manuell einen Empfang zu erhalten. Die Außentemperatur wird eine Animation des RF-
Empfangsantennen Symbol anzeigen und die Basisstation wird erneut Signale vom
Teil A – Hinterseite Knöpfe
B1: Tastenfeld
B2: Batteriefach
B3: Stehklappe
B4: Stromversorgungsbüchse
B5: Netzteil
-10 - -11 -

Außensensor erhalten. Hinweis: Wenn der kabellose Sensor verschiedene Kanäle einstellt,
stellt die Basisstation ebenso in den gleichen Kanal. Wenn es kein Signal des kabellosen
Sensors gibt wird „- -“ auf dem Kanal der Basisstation angezeigt.
WIFI Verbindungs Netzwerk: Schalten Sie die WIFI Funktion Ihrer Mobiltelefones ein um
sicher zu gehen dass das Telefon und der kabellose Router sich normal verbinden. Öffnen
Sie die heruntergeladene Aplikation „LINVINGSENSE“. Klicken Sie in der Aplikation auf
„PAIR“ um die Basisstation mit dem WIFI Paarungsprozes zu verbinden.
Nach dem Jump Screen wählen Sie SSID WI-FI um den WIFI Namen der Verbindung
einzuführen. In dem „Passwort“ schreiben Sie Passwort ein. Nun drücken Sie „Next“ um
fortzufahren.Des Telefonbiltschirms zu folge, drücken und halten Sie den „WIFI – UP“ Knopf
auf der Rückseite der Basisstation für 3 Sekunden bis „AP“ auf dem Display aufleuchtet.
Nun gehen Sie zur App zurück und drücken „Next“ um in den Einstellungen fortzufahren.
Dem Telefonbildschirms zu folge, gehen Sie in Einstellungen > Wi-Fi, drücken Sie
„LivingSmart“ und gehen Sie zu „LivingSense“ um die Einstellungen zu beenden. Drücken
Sie nun „Next“ nachdem „connecting being“ auf die erfolgreiche Verbindung wartet.
Nachdem die Paarung erfolgreich verlaufen ist, wird die Applikation zum Wetter Display
Interface wechseln welches „restart weather station device please“ veranlasst.
Drücken Sie nun den „WIFI – UP“ Knopf auf der Rückseite der Basisstation für 3 Sekunden
bis die Basisstation nicht mehr „AP“ anzeigt.
Verlassen Sie den „AP“ Display, die Basisstation wird automatisch eine Verbindung mit den
Router aufnehmen. Bei Einfführung des Prozeses leuchtet ein Symbol auf. Falls das Symbol
nicht aufleuchtet, verbindet sich die Basisstation immer noch mit dem Router. Die
Basisstation beginnt die Daten über den Server zu leiten. Wenn die Übertragung normal ist
leuchtet das ““ Symbol langsam in 4 Kolonnen auf, und der Server wird automatisch die
Basisstations Uhrzeit kalibrieren.
Manuelle Zeit Einstellung: Drücken Sie den „MODE“ Knopf um im Displaykalender die
Zeit in Zeit/Sekunden oder Zeit/Woche einzustellen.Drücken und halten Sie den „MODE“
Knopf für 2 Sekunden, der 12/24 Stundenmodus auf dem Display fängt an zu blinken.
Benutzen Sie nun den „UP“ und „DOWN“ Knopf um den gewünschten Modus einzustellen.
Drücken Sie „MODE“ um die Einstellung zu bestätigen. Der Zeitzone fängt an zu blinken,
benutzen Sie nun „UP“ und „DOWN“ um die entsprechende Zeitzone zu wählen (-12 bis
+12). Drücken Sie „MODE“ um die Einstellung zu bestätigen. Der Stundendisplay fängt an
zu blinken, benutzen Sie nun „UP“ und „DOWN“ um die richtige Stunde einzustellen.
Drücken Sie „MODE“ um die Einstellung zu bestätigen. Der Minutendisplay fängt an zu
blinken, benutzen Sie nun „UP“ und „DOWN“ um die richtige Minute einzustellen.
Drücken Sie „MODE“ um die Einstellung zu bestätigen. Das Monat / Tage Symbol fängt an
zu blinken, benutzen Sie nun „UP“ und „DOWN“ um das Datum einzustellen im Monat/Tag
oder Tag/Monat Modus.
Drücken Sie „MODE“ um die Einstellung zu bestätigen. Der Jahresdisplay fängt an zu
blinken, benutzen Sie nun „UP“ und „DOWN“ um das richtige Jahr einzustellen. Drücken
Sie „MODE“ um die Einstellung zu bestätigen. Der Monatsdisplay fängt an zu blinken,
benutzen Sie nun „UP“ und „DOWN“ um den richtigen Monat einzustellen.Drücken Sie
„MODE“ um die Einstellung zu bestätigen. Der Datumsdisplay fängt an zu blinken,
benutzen Sie nun „UP“ und „DOWN“ um das richtige Datum einzustellen. Drücken Sie
„MODE“ um die Einstellung zu bestätigen. Der Sprachendisplay für die Wochentage fängt
an zu blinken, benutzen Sie nun „UP“ und „DOWN“ um die richtige Sprache einzustellen.
Drücken Sie „MODE“ um die Einstellung zu bestätigen. Der Temperaturdisplay fängt an in
°C zu blinken, benutzen Sie nun „+“ und „-“ um die Temperatur in °C oder °F einzustellen.
Drücken Sie „MODE“ um die Einstellung zu bestätigen. Der Luftdruckdisplay fängt an zu
blinken, benutzen Sie nun „+“ und „-“ um die richtige Sprache einzustellen.
Drücken Sie „MODE“ um die Einstellung zu bestätigen und um die Einstellungen zu
beenden, betretten Sie den Uhrzeit-Modus. Nur Info: Nach 20 Sekunden ohne eine
Tastenwahl wird die Uhr automatisch von den Einstellungen in den normalen Uhrzeit-
Modus schalten. Es werden 7 Sprachen der Wochentage zur Verfügung gestellt: englisch,
deutsch, italienisch, französisch, spanisch, niederländisch und dänisch
Mondphasen und Gezeitenanzeige: Die Wetterstation hat ein Display welches
automatisch die derzeitige Mondphase anzeigt. Neumond Wachsender Halbmond
Wachsender Vollmond Vollmond Abnehmender Vollmond Halbmond Abnehmender Vollmond
Display Temperatur/Luftfeuchtigkeit/Luftdruck und Temperatur/Luftfeuchtigkeit
Tendenz
Die derzeitige Innentemperatur/Luftfeuchtigkeit/Luftdruck und die Temperatur/
Luftfeuchtigkeit Tendenz (Innen) werden auf dem LCD Display angezeigt.
Nach erfolgreicher Verbindung mit dem Außensensor, kann die Wetterstation die
Außentemperatur/-Luftfeuchtigkeit und die Temperatur/Luftfeuchtigkeit Tendenz (Außen)
anzeigen.Sie können folgende Symbole sehen: Die Temperatur/Luftfeuchtigkeit ist
ansteigend. Die Temperatur/Luftfeuchtigkeit bleibt konstant. Die
Temperatur/Luftfeuchtigkeit ist absteigend.
Maximum/Minimum Temperatur/relative Luftfeuchtigkeit: Um Innen/Außen auf Maximum
zu schalten, Minimum Temperatur und Luftfeuchtigkeit Daten, drücken Sie den „MEMERY“
Knopf: Einmal um die maximal Temperatur und Luftfeuchtigkeitswerte anzuzeigen
Zwei mal um die minimal Temperatur und Luftfeuchtigkeitswerte anzuzeigen.
Drei mal um zu den derzeitigen Temperaturen und Luftfeuchtigkeitswerten zurück zu
kehren. Um die maximal und minimal Temperatur und Luftfeuchtigkeit zurück zu setzen,
drücken und halten Sie den „MEMERY“ Knopf für etwa 2 Sekunden. Dies wird alle
aufgezeichneten minimal und maximal Werte zu den derzeitigen Display Werten
zurücksetzen.
-12 - -13 -

Zur Info: Falls die Temperatur unter den Messbereich liegt, wird LL.L auf dem Display
angezeigt. Falls die Temperatur über dem Messbereich liegt, wird HH.H auf dem Display
angezeigt. Falls das Batterie Symbol erscheint sollte die Batterie des Außensensors so
schnell wie möglich ersetzt werden.
Frosteis Tips: Wenn die Außentemperatur den Messbereich von -1°C bis +3°C oder +30°F
bis +37°F erreicht, wird das Frostsymbol auf dem Display angezeigt.
Die Wettervorhersage: Die Wetterstation rechnet gemäß der Luftdrucktendenz eine
Wettervorhersage für die nächsten 12 Stunden aus. Selbstverständlich kann diese
Wettervorhersage nicht mit professionellen Wettervorhersagen von Sateliten und
Hochleistungscomputern verglichen werden, bietet jedoch eine ungefähre Vorhersage der
derzeitigen Wetterverhältnise dar. Bitte ziehen Sie die sowohl Wettervorhersage Ihres
lokalen Wettervorhersage-Dienstes als auch die der Wetterstation in Betracht. Bei
Unstimmigkeiten der Wettervorhersage Ihres lokalen Dienstes und der Ihrer Wetterstation,
befolgen Sie die Wettervorhersage der ersten. Die Wetterstation hat ein Display welches
folgende Wettersymbole anzeigt: Sonnig Leicht bewölkt Bewölkt Regnerisch Heftiger
Regen Schnee Die Wetterstation kann die Luftdruck Tendenz anzeigen.
Hintergrundlicht: Drücken Sie den „UP“ Knopf um die Helligkeit des Hintergrundlichtes
einzustellen. Sie können über 4 Zustände auswählen: 3 verschiedene Helligkeitstufen und
das Ausschalten des Hintergrundlichtes.
FR Station météo intelligent WIFI
Données techniques et caractéristiques: Calendrier perpétuel jusqu'a année 2099
Jour de la semaine en 7 langues sélectionnable par l'utilisateur: anglais, allemand, italien,
français, espagnol, pays-bas et danois • Heure en format optionnel 12/24 heures
Calibrage automatique du service de temps réseau • L'affichage de la phase de lune
Pression barométrique: - Plage de mesure de la pression barométrique: 600 hPa/mb a
1100 hPa/mb (17,72inHg a 32,50inHg) 450,1mmHg a 825,2mmHg - Pression
alternativement en hPa/mb ou inHg ou mmHg • Gamme mesurable de l'humidité
intérieure: 20% HR a 95% RH • Température intérieure: plages de mesure de
température: -20°C a 60°C (-4°F a 140°F) Température alternativement en °C ou °F
Affichage minimum/maximum de l'humidité et de la température • La prévision
météorologique (en fonction du changement de pression d'air) • On se connecte
directement au réseau wifi
Source de courant: Batterie: 2xLR6 AA et adaptateur secteur: DC5V 1A
Capteur extérieur sans fil: - Plage de mesure de la température extérieure: -40°C (-4°F) -
70°C (158°F)
Partie A - LCD positif
A1: Prévisions météorologiques
A2: Pression barométrique
A3: Température extérieure
A4: Température intérieure
A5: Humidité extérieure
A6: Humidité intérieure
A7: Heure / Calendrier / Semaine
A8: Phase de lune
Partie B - Bouton retour et alimentation
B1: Clavier
B2: Compartiment des piles
Premiere mise en service: -Remplacez le couvercle du compartiment des piles du capteur
extérieur sans fil, poussez le sélecteur de canal dans le compartiment a piles du capteur
extérieur sans fil, réglez le canal correct, insérez des piles 2XAA en respectant la polarité
(marques "+" et "-")
-Lorsque vous insérez les piles, toutes les icônes de l'écran LCD s'allumeront brievement
pendant 3 secondes, le capteur extérieur sans fil allume en mode de fonctionnement
normal, il détecte la température et l'humidité dans l'environnement. A ce moment, le
capteur transmettra 1 signaux sans fil, et l'intervalle d'environ 1 minutes transmettra
automatiquement le signal 1 sans fil, chaque 1 indicateur de capteur d'émission de signal
sans fil transmis 1 clignotera.
-Selon l'apparence de l'icône de la station de base, l'adaptateur secteur est inséré dans la
prise de la station de base, et l'adaptateur d'alimentation est connecté a l'alimentation.
Apres avoir passé l'alimentation, tous les symboles sur l'écran d'affichage seront affichés
apres 3 secondes, la station de base allume en mode de fonctionnement normal pour
détecter la température, l'humidité et la pression atmosphérique dans l'environnement.
-La station de base va chercher des signaux radio envoyés par un capteur externe.
Attendez 3 minutes jusqu'aux données apparaîtra sur d'affichage (température et
humidité) d'un capteur sans fil externe. Dans le meme temps, la station de base
commence la connexion stabilisation du wifi. Lorsque la station de base démarre
correctement, ouvrez le couvercle du compartiment a piles et insérez deux piles AA en
respectant la polarité (marquée signes + et -). Les piles remplacent en l'absence de la
source d'alimentation ou le débranche.
Remarque: lorsque alimentation est débranché, le signal wifi dans la station de base sera
déconnectée automatiquement.
Partie C - Capteur extérieur sans fil:
C1: Affichage LCD - Température
C2: Affichage LCD - Humidité
C3: Signal de transmission LED
C4: Touche "°C/°F"
C5: Touche "TX"
C6: Sélecteur de canal
C7: Compartiment des piles
B3: Cadre de support
B4: Prise d'alimentation
B5: Adaptateur secteur
-14 - -15 -

Transmission du capteur externe:
-Lorsque la station de base reçoit avec succes un signal de la station de capteurs sans fil
sur l'écran LCD apparaît a partir des relevés de température en dehors
-La station de base peut se connecter aux 3 canaux enregistrés du capteur sans fil,
cependant, le canal de capteur ne peut pas sélectionner le meme canal en meme temps.
-Utilisez le bouton "DOWN" et vous pouvez modifier l'affichage des différents canaux de
température extérieure et l'humidité. Le symbole indique que les canaux
seront changés automatiquement toutes les 5 secondes. -Si la station de base ne reçoit
pas le signal de la transmission d'un capteur externe, le symbole "--" affichera sur l'écran
LCD. Appuyez sur le "DOWN" pendant 3 secondes pour régler le signal de la transmission
manuellement. La température extérieure et le symbole d'animation de l'antenne RF
afficherent. Signifient que la station de base est maintenant connecté au capteur sans fil.
Remarque: Lorsque le capteur sans fil est réglé sur différents canaux, la station de base
exigera également le meme canal. Lorsque le capteur sans fil se produira le manque de
données, sur la station de base affichera le symbole „- -”.
Connexion avec WiFi: -Utilisez le téléphone et ouvrez les parametres WiFi pour vérifier et
assurer que le routeur sans fil fonctionne correctement. Ouvrez l'application téléchargée
"Livingsense", puis cliquez sur l'application "Pair" pour appairer de la station de base a un
réseau WiFi. -Apres le changement de l'écran, sélectionnez le SSID Wifi pour donner le
nom de la connexion. Entrez le mot de passe. Appuyez ensuite sur le buton "next" pour
aller a l'étape suivante.
-Selon ce que l'écran affiche du téléphone, appuyez et maintenez le button "wi-fi/Up" de
la station de base a l'arriere et. maintenez 3 secondes jusqu'a ce que «AP» clignote sur
l'écran. Puis retour a l'application et appuyez sur «Next» pour continuer le paramétrage.
-Selon ce que l'écran affiche votre téléphone, accédez aux parametres Sélectionnez
"LivingSmart" puis retour a "LivingSense" pour terminer les réglages. Maintenant,
appuyez sur "next". Apres le message "connexion étant"
attendre la fin du processus d'évaporation.
-Lorsque l'appairage est terminé, l'application change, l'application passe a l'interface
d'affichage de la météo. Réinitialisez le périphérique de la station météo, s'il vous plaît.
-Appuyez sur le button Wi-Fi/UP de la station de base a l'arriere et maintenez 3 secondes
jusqu'a ce que la station n'a pas afficher "AP". -Quittez le "AP" a l'écran. La station de
base se connecte automatiquement au routeur (symbole clignotera). Fin du clignotement
signifie que la station de base a terminé la connexion au routeur. La station de base
commence la transmission de données a partir du serveur. Lorsque la transmission est
correcte, le symbole "" apparaît progressivement en quatre colonnes,
et le serveur met a jour automatiquement le temps dans la station de base.
Réglage manuel de l'heure:
-Appuyez sur le button "MODE" pour changer l'affichage du calendrier ou de temps.
-Appuyez et maintenez le button "MODE" pendant 2 secondes. Format de l'heure 12/24
clignote sur l'écran. Utilisez le "UP" et "DOWN" pour régler le format de l'heure souhaitée.
-Appuyez sur le button "MODE" pour confirmer les réglages. Les fuseaux horaires
commencent clignoter sur l'affichage.
Utilisez le "UP" et "DOWN" pour sélectionner le bon fuseau horaire (-12 a +12).
-Appuyez sur le button "MODE" pour confirmer les réglages. Les heures de chiffres
commencent clignoter sur l'affichage.
Utilisez le "UP" et "DOWN" pour régler l'heure correcte.
-Appuyez sur le button "MODE" pour confirmer les réglages. Les heures de minutes
commencent clignoter sur l'affichage.
Utilisez le "UP" et "DOWN" pour régler les minutes.
-Appuyez sur le button "MODE" pour confirmer les réglages. L'icône du jour ou mois
commence clignoter sur l'affichage.
Utilisez le "UP" et "DOWN" pour définir le format de date Mois/Jour ou Jour/Mois.
-Appuyez sur le button "MODE" pour confirmer les réglages. L'icône d'an commence
clignoter sur l'affichage. Utilisez le "UP" et "DOWN" pour
régler l'an correspondante.
-Appuyez sur le button "MODE" pour confirmer les réglages. Le mois commence clignoter
sur l'affichage. Utilisez le "UP" et "DOWN" pour régler le mois correct.
-Appuyez sur le button "MODE" pour confirmer les réglages. Le jour de la semaine
commence clignoter sur l'affichage. Utilisez le "UP" et "DOWN" pour régler le jour correct.
-Appuyez sur le button "MODE" pour confirmer les réglages. L'icône de la langue
commence clignoter sur l'affichage.
Utilisez le "UP" et "DOWN" pour sélectionner la langue souhaitée:
-Appuyez sur le button "MODE" pour confirmer les réglages. L'icône des unités de
température commence clignoter sur l'affichage.
Utilisez le "+" et "-" pour régler °C/°F. -Appuyez sur le button "MODE" pour confirmer les
réglages. L'icône barométrique commence clignoter sur l'affichage.
Utilisez le "+" et "-" pour régler l'unité de mesure mb/hPa ou inHg ou mmHg.
-Appuyez sur le button "MODE" pour confirmer les réglages. Pour terminer les réglages,
appuyez sur le mode de l'horloge.
Informations complémentaires: Apres 20 secondes ne utilise aucun boutons, l'horloge
change le mode automatiquement de mode de réglage a mode normal.
Pour le choix est de 7 langues des jours par semaine : anglais, allemand, italien, français,
espagnol, néerlandais, danois. Phases de lune: La station météo a la function du affichage
automatique de la phase actuelle de la lune. Nouvelle lune Premier croissant Premier
quartier Lune gibbeuse croissante Pleine lune Lune gibbeuse décroissante
ernier quartier Dernier croissant Affichage de la température/humidité/pression
-16 - -17 -

barométrique/tendance de l'humidité L'écran LCD affiche la température interne
actuelle/humidité/pression/tendance de l'humidité.
Apres avoir la connexion avec un capteur sans fil externe, la station météo peut afficher la
température extérieure/pression, tendance de l'humidité.
Vous pouvez voir ces signes sur l'écran: température/humidité augmente
Température/humidité est constante Température/humidité diminue
La température maximum/minimum/humidité relative: Pour changer la température
intérieur/extérieur maximale/minimale et l'humidité, appuyez sur le bouton "MEMORY".
Une fois pour afficher la valeur maximale de la température et de l'humidité.
Deux fois pour afficher la valeur de la température et l'humidité minimum.
Trois fois pour revenir a la configuration actuelle de la température et de l'humidité.
Pour réinitialiser, appuyez sur la "MEMORY" et maintenez pendant 2 secondes.
Réinitialiser tous les réglages minimum et maximum stockés.
Informations complémentaires: Si la température est inférieure a la plage, l'affichage LL.L.
Si la température est supérieure a la plage, l'affichage sera HH.H. Si le symbole de la
batterie apparaît, cela signifie que vous devez remplacer les piles dans le capteur externe
rapidement.
Conseils en cas de gel: Lorsque la température extérieure est dans la gamme de -1C a
+3C ou de +30F a 37F, l'écran affiche le symbole:
Prévisions météo: La station météo calcule la météo pour les prochaines 12 heures en
fonction de la tendance de la pression barométrique. Le dispositif, bien sur, il ne peut etre
comparé avec le service météo professionnel qui utilise des satellites ainsi que des
équipements technologiquement avancés, mais il peut estimer le temps prévu. S'il vous
plaît, vous suggérez le météo du service de prévision météorologique locale.
En cas de disparité entre la station et le service de prévision météorologique locale, s'il
vous plaît vous considérez une deuxieme météo.
La station météo affiche les symboles suivants: Ensoleillé pas de nuage: Ensoleillé
quelques nuages: Nuageux: Nuageux Légeres chutes de pluie: Nuageux Fortes chutes de
pluie: Nuageux Fortes chutes de neige La station météo peut affiche la pression
barométrique.
Rétro-éclairage: Appuyez sur le button "UP" pour changer le niveau de l'affichage de la
luminosité, vous pouvez choisir parmi 3 modes de luminosité
ou désactiver completement le rétro-éclairage.
ES Estación meteorológica inteligente WIFI
Las especificaciones y características:
Unidad central: Calendario hasta el ano 2099. • Día de la semana visualizado en 7
idiomas: inglés, alemán, italiano, francés, espanol, holandés y danés • Formato de hora
ajustable 12/24 • La actualización automática de tiempo. • Vista de fases de la luna
La presión barométrica • Gama de medición de presión barométrica: 600 hPa/mb hasta
1100 hPa/mb (17.72 inHg hasta 32.50 inHg) 450.1mmHg hasta 825.2mmHg.
• Unidad de presión para elegir: hPa / mb o inHg o mmHg. Rango de medición de
humedad dentro del 20% de humedad relativa a 95% de humedad relativa
La temperatura del interior: - gama de medición de la temperatura: -20`C hasta 60`C
(- 4`F hasta 140`F) La unidad de presión con posibilidad para elegir `C o `F • Vista de
temperatura, máxima y/o mínima y humedad • La predicción del tiempo (de acuerdo a los
cambios en la presión atmosférica) • Conección directa con una red wifi
Alimentación: Batería : 2x LR6 AA / Alimentación principal : DC5V 1A
Sensor exterior inalámbrico: - El alcance de la temperatura exterior: -40`C (-4 F) a 70`C
(158`F)- Rango de medición en el exterior 20% HR a 95% HR- Frecuencia de transmisión
de datos: 433 MHz- La distancia de transmisión en campo abierto: máx. 60 m- Baterías:
2 x LR06 (UM-3) y 1,5 V (tamaño AA)- Protección: IPX4
Parte A - Pantalla LCDA1: Predicciones de fenómenos meteorológicosA2: La presión
barométrica A3: Temperatura exterior A4: La temperatura interna A5: Humedad exterior
A6: La humedad en el interior A7: Hora / Calendario A8: Fases de la luna
Parte B - Botones en la parte posterior y alimentación B1: Botones para controlar
B2: Compartimiento de la batería B3: Bastidor de soporte B4: Toma de corriente
B5: Fuente de alimentación principal
Parte C – Sensor inalámbrico / C1: Pantalla LCD de temperatura / C2: Pantalla LCD de
humedad / C3: La transmisión de la señal LED / C4: Botón °C o °F / C5: Botón „TX”
C6: Conmutador para cambiar el canal / C7: Compartimento de la batería
Puesta en marcha: Obstáculos pueden afectar la calidad de transmisión de la senal.
Protege el transmisor de los rayos de sol directos. Abre el compartimiento para las
pilas en la parte trasera del transmisor e inserte las pilas. Respete la correcta polaridad de
las pilas. Selecciona la unidad de temperatura °C o °F deslizando el interruptor que se
encuentra encima del compartimiento para las pilas. Cierre el compartimiento para las
pilas. Cuando haya introducido las pilas, todos los iconos de la pantalla LCD se iluminarán
durante 3 segundos, después podrá oír un pitido y se podrá medir la temperatura y la
-18 - -19 -

humedad del interior. El receptor establecerá ahora la conexión con el sensor remoto
para exteriores. Está operación llevará unos 3 minutos y se mostrará con un símbolo de
antena de recepción de RF parpadeante en el área de visualización "EXTERIOR" del
receptor. Una vez el receptor haya creado una conexión con el sensor remoto para
exteriores, entrará en el modo reloj. Nota: Cuando se desconecta la alimentación, señal wifi
en la unidad central se desconectará automáticamente.
La transmisión del sensor externo: Cuando la unidad central recibe con éxito una señal
de la estación inalámbrica de sensores, en la pantalla LCD aparecerá la inormación sobre
la temperatura. La unidad central puede conectarse a un sensor inalámbrico de tres
canales de registro, pero el canal de sensor no puede elegir el mismo canal al mismo
tiempo.
Utilizando la opción "DOWN" se puede cambiar la visualización de varios canales de
temperatura y humedad exterior. El símbolo significa que los canales serán cambiados
automaticamente cada 5 segundos. Si la estación base no recibe la señal de emisión de un
sensor externo, la pantalla LCD se pondrá como "- -". Pulse la tecla "ABAJO" y mantenga
pulsado durante 3 segundos para ajustar la señal de forma manual. Aparece el valor la
temperatura exterior y el símbolo de antena de RF. Esto significa que la unidad central está
conectada al sensor inalámbrico.
Nota: Cuando el sensor inalámbrico se establece en diferentes canales, la también
requerirá el mismo canal. Cuando el sensor inalámbrico no realizará ninguna transmisión
de datos en la unidad central se muestra el símbolo "- -" .
Conexión con la red WiFi: Utilice el teléfono y abra la configuración de WiFi para
comprobar y asegurarse de que el router inalámbrico está funcionando correctamente.
Abra la aplicación descargada previamente "Livingsense"y, a continuación, haga clic en la
aplicación "par" para emparejar la estación base a una red WiFi. Después de saltar de la
pantalla, seleccione el SSID Wifi para determinar el nombre de la conexión. Introduzca la
contraseña. A continuación, pulse "siguiente" para ir al siguiente paso.De acuerdo con
esto lo que muestra la pantalla del teléfono, pulse la tecla "wi-fi" / Arriba en la parte
posterior de la estación base y pulsar 3 segundos hasta que parpadee "AP" en la pantalla.
A continuación, volver a la aplicación y pulse 'Siguiente' para continuar ajuste.
Según la información relejada en la pantalla del teléfono, pasa a la aplicación ( los
símbolos ),elija „LivingSmart”, después vuelva a „LivingSense” para terminar la
configuración. Presione el botón „next”. Después del comunicado „connecting being”
espere la terminación del proceso de sincronización. Cuando se ha terminado la
sincronización satisactoriamente, la aplicación cambiará para mostrar el tiempo y pedirá
reinicio de estación meteorológica. Pulse el Wi-Fi / UP en la parte trasera de la unidad
central , mantenga pulsado durante 3 segundos hasta que la estación no muestra "AP".
Salir de la "AP" en la pantalla. La unidad central se conectará automáticamente al router
(el símbolo parpadea). Cuando se termina el parpadeo, la unidad central esta conectada
correctamente al router. La unidad central inicia la transmisión de datos desde el servidor.
Cuando la transmisión es correcta el símbolo "" aparecerá gradualmente en cuatro
columnas, y el servidor actualiza automáticamente la hora en la unidad.
Ajuste manual de la hora:
Pulse el botón "MODE" para cambiar la visualización del calendario o la hora.
Mantenga pulsada la tecla "MODE" durante 2 segundos. Formato de hora 12/24 parpadea
en la pantalla. Utilice prtzycisków "UP" y "DOWN" para ajustar el formato de hora deseado.
Pulse el botón "MODE" para confirmar los ajustes. La pantalla parpadearán las zonas
horarias. Utilice la opción "UP" y "DOWN" para seleccionar la zona horaria
correcta (-12 a +12)
Pulse el botón "MODE" para confirmar los ajustes. En la pantalla comienza a parpadear la
hora dígita. Utilice la opción "UP" y "DOWN" para ajustar la hora correcta.
Pulse el botón "MODE" para confirmar los ajustes. La pantalla comienza a parpadear los
minutos dígitos. Utilice la opción "UP" y "DOWN" para ajustar los minutos correctos.
Pulse el botón "MODE" para confirmar los ajustes. En la pantalla comenzará a parpadear
ícono de fecha. Utilice la opción "UP" y "DOWN" para ajustar el formato de fecha Mes / día
o Día / mes. Pulse el botón "MODE" para confirmar los ajustes. En la pantalla parpadea el
ícono del año. Utilice la opción "UP" y "DOWN" para ajustar el año correspondiente.
Pulse el botón "MODE" para confirmar los ajustes. En la pantalla comienza a parpadear el
ícono del mes. Utilice la opción "UP" y "DOWN" para ajustar el mes correcto.
Pulse el botón "MODE" para confirmar los ajustes. En la pantalla comienza a parpadear el
día de la semana. Utilice la opción "UP" y "DOWN" para ajustar el día correcto.
Pulse el botón "MODE" para confirmar los ajustes. En la pantalla comenzará a parpadear el
ícono para seleccionar el idioma. Utilice la opción "UP" y "DOWN" para ajustar el idioma
deseado Pulse el botón "MODE" para confirmar los ajustes. En la pantalla comenzará a
parpadear el ícono de unidades de temperatura. Utilice el signo "+" y "-" para ajustar ° C
/ ° F. Pulse el botón "MODE" para confirmar los ajustes. En la pantalla comenzará a
parpadear el ícono de presión barométrica. Utilice el signo "+" y "-" para fijar la unidad de
medida mb / hPa o inHg o mmHg. Pulse el botón "MODE" para confirmar los ajustes. Para
completar la configuración, pulse el modo de reloj.
Información adicional: Después de 20 segundos de mantener los botones parados el reloj
entrará automáticamente del modo de configuración al modo normal.
Fases de la luna: Estación meteorológica tiene una visualización automática de la fase
actual de la luna: -Luna nueva -Cuarto creciente -Cuarto creciente -Luna llena
-Cuarto menguante -Luna nueva -Cuarto menguante
Visualización de la temperatura / humedad / presión barométrica / humedad tendencia
-20 - -21 -

La pantalla LCD muestra la presión / humedad / la temperatura interna actual/ humedad.
Conectando el sensor inalámbrico externo, estación meteorológica puede mostrar también
la temperatura de exterior / presión, las tendencias de humedad.
Se puede ver las siguientes características en la pantalla: temperatura/ humedad cuando
crece Temperatura/ humedad cuando está fija Temperatura/ humedad está bajando
La temperatura mínima/ máxima/ La humedad relativa:Para alternar entre la temeratura
máxima / mínima interior / exterior y la humedad, pulse "MEMERY". Una vez para ensenar
el valor máximo o mínimo de la temperatura y de la humedad. Dos veces para ensenar el
valor mínimo de la temperatura o humedad. Tres veces para volver a los valores actuales
de temperatura y de la humedad.Para restablecer, pulse la "memoria" y mantener durante
2 segundos. Se restablecen todos los valores mínimos y máximos guardados.
Información adiccional: Si la temperatura está por debajo del rango, en la pantalla
aparece LL.L. Si la temperatura está por encima del rango, en la pantalla aparece HH.H.
Si aparece el símbolo de la batería Significa que debemos tan pronto como sea posible
reemplazar las baterías en el sensor de movimiento externo.
Consejos en caso de irregularidades: Cuando la temperatura externa está entre –
1`C/+3`C o +30`C/37`C, en la pantalla aparecerá el símbolo. La predicción meteorológica:
Estación meteorológica calcula el pronóstico para las próximas 12 horas basándose en la
tendencia de la presión barométrica. La unidad, por supuesto, no se puede comparar con
los servicios profesionales que utilizan satélites, así como equipos de tecnología avanzada.
Esta unidad puede estimar el tiempo esperado. Por favor, consulte los resultados
obtenidos por la unidad con el servicio meteorológico para su región. Si vas a observar las
discrepancias en los resultados recibidos, trate los resultados obtenidos del servicio
meteorológico regional como autoritativos. Estación meteorológica muestra los siguientes
símbolos: sol / parcialmente nublado nublado / lluvia / lluvia abundante / nieve Esta
estación meteorológica tiene la función de mostrar la tendencia de la presión barométrica.
Caratteristiche del prodotto: Stazione di base:
Calendario fino a 2099. Giorni della settimana in 7 lingue da scegliere: inglese, tedesco,
italiano, francese, spagnolo, olandese e danese. Formato 12/24 ore
Aggiornamento automatico dell’ora. Visualizzazione delle fasi lunari
Pressione barometrica: La gamma di misurazione della pressione barometrica:
600 hPa / mb - 1100 hPa / mb (17.72 inHg - 32,50 inHg) 450.1mmHg – 825.2mmHg.
Unità di pressione da scegliere hPa / mb o inHg o mmHg. Gamma di misurazione
dell'umidità all’interno: dal 20% al 95%. La temperatura all'interno, l’unità di misurazione
della temperatura da scegliere in ° C oppure F.dal-20 ° C al 60 ° C dal- 4 F al 140 F
IT Stazione meteo WIFI intelligente
La funzione di visualizzazione della minima / massima temperatura e umidità
La visualizzazione delle previsioni meteo (in base alle variazioni della pressione
atmosferica) Collegamento direttamente alla rete wifi. Alimentazione: Alimentazione
principale: DC5V 1A. Alimentazione di riserva: Batteria: 2x AA LR6
Sensore esterno senza fili: - Il campo di misura della temperatura esterna: -40`C (-4`F) a
70`C (158`F) - Campo di misura della umidità all’esterno dal 20% al 95% - Frequenza di
trasmissione dei dati: 433 MHz - La distanza della frequenza di trasmissione a cielo aperto:
max. 60 m - Batterie: 2 x LR06 (UM-3) e 1,5 V (formato AA) - Protezione: IPX4
Parte A - Display LCD
A1: Previsione del tempo
A2: Pressione barometrica
A3: Temperatura esterna
A4: Temperatura interna
A5: Umidità esterna
A6: Umidità all'interno
A7: Ora / calendario
A8: Fase lunari
Parte B - I pulsanti sul dorso e Potenza
B1: Pulsanti del controllo
B2: Vano batterie
Avviamento: Togliere il coperchio del vano delle batteria nel sensore senza fili. Quindi
selezionare il canale desiderato utilizzando i pulsanti situati nel vano batterie. Inserire due
batterie AA secondo la polarità segnata da segni + e - Quando le batterie vengono inserite
tutte le icone sul display LCD si accendono per circa tre secondi, e il sensore wireless
inizierà a lavorare per rilevare la temperatura e l’umidità dell’ambiente. A questo punto,
il sensore avvia automaticamente la trasmissione del segnale. Ogni singola trasmissione
verrà segnalata da un lampo dell'indicatore. Dopo aver inserito le batterie si sentira’ un
breve segnale acustico e si accendno per 3 secondi tutti gli indicatori del display LCD. La
stazione iniziera’ la sincronizzazione con il sensore wireless. La stazione base cerchera’ il
segnale della radio inviato dal sensore esterno. Attendere circa 3 minuti finche’ i dati
appaiono sul display (temperatura e umidità) da un sensore wireless esterno. Allo stesso
tempo, la stazione base iniziera’ la tabilizzazione della connessione wifi. Quando la
stazione base si accende correttamente, apri il coperchio del vano delle batteria e inserire
due batterie AA secondo la polarità ( + / -). Le batterie svolgono la funzione di
alimentazione di riserva in assenza di alimentazione dalla rete elettrica principale o
scollegamento accidentale.
Parte C – Sensore wireless
C1: Display LCD - temperatura
C2: Display LCD - umidità
C3: LED - segnale di trasmissione
C4: Il pulsante°C / °F
C5: il pulsante "TX"
C6: interruttore per cambiare il canale
C7: Vano batterie
B3: Telaio di sostegno
B4: Presa di alimentazione
B5: Alimentazione principale
-22 - -23 -

Nota: Quando l'alimentazione è scollegata, il segnale wifi della stazione di base verrà
disconnesso automaticamente.
Trasmissione di sensore esterno: Quando la stazione di base riceve con successo un
segnale dalla stazione di sensore wireless sul display LCD viene visualizzata la
temperatura esterna.
La stazione di base può connettersi con 3 canali di registrazione del sensore wireless, ma
il canale sensore non può scegliere lo stesso canale allo stesso tempo.
Utilizzare il tasto "DOWN" è possibile modificare la visualizzazione dei vari canali di
temperatura esterna e umidità.
Il simbolo indica che i canali saranno cambiati automaticamente ogni 5 secondi.
Se la stazione base non riceve il segnale di trasmissione da un sensore esterno, sul display
appare il simbolo "- -".Premere il tasto "DOWN" e tenerlo premuto per 3 secondi per
impostare manualmente il segnale. Viene visualizzata temperatura esterna e anche il
simobolo dell'antenna RF. Questo significa che la stazione base è adesso collegata al
sensore wireless.
Attenzione: Quando il sensore wireless è impostato su canali diversi, la stazione base
richiederà anche lo stesso canale. Quando il sensore wireless eseguirà nessuna
trasmissione dei dati alla stazione base mostra "- -"
Connessione con la rete WiFi: Prendi il cellulare e vai alle impostazioni WiFi per verificare
che il router wireless funzioni correttamente. Aprire l'applicazione "Livingsense"
precedentemente scaricato quindi cliccare sul tasto „PAIR” per sincronizzare la stazione di
base con una rete WiFi. Dopodiche’, selezionare l'SSID Wi-Fi per determinare il nome della
connessione. Inserire la password. Quindi premere "Next" per passare alla fase
successiva.
Secondo questo che appare sul cellulare, premi e tieni premuto il tasto"wi-fi"/ Up che trovi
dietro la stazione di base, tieni premuto per 3 secondi fino a quando lampeggia l’iconcina
di "AP" sul display. Poi torna alla applicazione e premi ‘next’ per continuare l'impostazioni.
Secondo questo che appare sul display del telefono, vai alle impostazioni poi seleziona
"LivingSmart" e quindi torna a "LivingSense" per completare le impostazioni. Adesso
premere "Next" e dopo il messaggio „connecting being” attendere il completamento del
processo di sincronizzazione.
Quando la sincronizzazione è completata, l'applicazione passa per visualizzare il tempo e
richiede il riavvio della stazione meteorologica
Premere il tasto Wi-Fi / UP dietro la stazione di base e tieni premuto per 3 secondi finche’
sulla stazione non appare il simbolo "AP".
Uscire dalla sezione "AP". La stazione di base si collegherà automaticamente al router
(simbolo lampeggiera’). Quando finisce di lampeggiare significa che la stazione base ha
completato il collegamento al router. La stazione base inizia la trasmissione dei dati con il
server. Quando la trasmissione è corretta appare il simbolo "" in tutte le quattro colonne, e
il server aggiorna automaticamente l'ora nella stazione di base.
Impostazione dell'ora in modo manuale: Premere il tasto "MODE" per modificare la
visualizzazione del calendario o di tempo. Premere e tenere premuto il pulsante "MODE"
per 2 secondi. Formato dell’ora 12/24 lampeggiera’ sul display. Utilizzare i tasti "UP" e
"DOWN" per impostare il formato dell’orario desiderato. Premere il tasto "MODE" per
confermare le impostazioni. Sul display appaiono le zone. Utilizzare il tasto "UP" e "DOWN"
per selezionare il fuso orario corretto (da -12 a +12). Premere il tasto "MODE" per
confermare le impostazioni. Sul display inizieranno a lampeggiare le cifre delle ore.
Utilizzare i tasti "UP" e "DOWN" per impostare l'ora corretta. Premere il tasto "MODE" per
confermare le impostazioni. Sul display inizieranno a lampeggiare le cifre delle minuti.
Utilizzare i tasti "UP" e "DOWN" per impostare i minuti. Premere il tasto "MODE" per
confermare le impostazioni. Sul display inizia a lampeggiare l’icona della data. Utilizzare i
tasti "UP" e "DOWN" per impostare il formato della data mese/ giorno o giorno /mese.
Premere il tasto "MODE" per confermare le impostazioni. Sul display inizia a lampeggiare
l’icona dell'anno. Utilizzare i tasti "UP" e "DOWN" per impostare l'anno corrispondente.
Premere il tasto "MODE" per confermare le impostazioni. Sul display inizia a lampeggiare
l’icona del mese. Utilizzare i tasti "UP" e "DOWN" per impostare il mese corretto. Premere
il tasto "MODE" per confermare le impostazioni. Sul display iniziano a lampeggiare i giorni
della settimana. Utilizzare i tasti "UP" e "DOWN" per impostare il giorno corretto. Premere
il tasto "MODE" per confermare le impostazioni. ISul display inizia a lampeggiare l'icona
per scegliere la lingua. tilizzare i tasti "UP" e "DOWN" per impostare la lingua desiderata:
Premere il tasto "MODE" per confermare le impostazioni. Sul display inizia a lampeggiare
l'icona dell’unità di temperatura. Usare i tasti "+" e "-" per impostare ° C / ° F.
Premere il tasto "MODE" per confermare le impostazioni. Sul display inizia a lampeggiare
l’icona della pressione barometrica. Usare i tasti "+" e "-" per impostare l'unità di misura
mb/hPa o inHg o mmHg. Premere il tasto "MODE" per confermare le impostazioni. Per
completare le impostazioni, premere la modalità dell’orologio. Ulteriori informazioni:
Dopo 20 secondi di inattivita’ l'orologio passa automaticamente dlla modalità di
impostazioni alla modalità normale. E’ possibile scegliere da 7 lingue: inglese, tedesco,
italiano, francese, spagnolo, olandese, danese.
Fasi lunari: La stazione meteo possiede la funzione di visualizzazione automatica della
fase attuale della luna: -Luna Piena -Gibbosa Crescente -Pprimo quarto -Luna crescente
-Luna nuova -Luna calante -Ultimo quarto -Gibbosa calante
Visualizzazione della temperatura / umidità / pressione barometrica / tendenza di umidità.
Il display visualizza la corrente temperatura all’inteno / umidità / pressione / tendenza di
umidità. Dopo il collegamento con il sensore wireless esterno, stazione meteo e’ in grado
di visualizzare la tendenza della temperatura esterna / pressione / tendenza di umidità.
-24 - -25 -

È possibile vedere le icone seguenti sul display: temperatura/ umidità è costante
temperatura/ umidità aumenta temperatura/ umidità cade
Massima / minima temperatura / umidità relativa Per passare dalla massima interna /
esterna temperatura e l'umidità, premere il tasto„MEMERY”. Una volta per visualizzare il
valore massimo di temperatura e umidità. Due volte per visualizzare il valore minimo della
temperatura e umidità. Tre volte per tornare alle impostazioni correnti di temperatura e
umidità. Per azzerare, premere "memery" e tenere premuto per 2 secondi. Tutte le
impostazioni minime e massime venogo ripristinate.
Ulteriori informazioni: Se la temperatura è sotto della gamma, sul il display appare il
simbolo LL.L. Se la temperatura è sopra della gamma, sul il display appare il simbolo
HH.H. Se viene visualizzato il simbolo della batteria Ciò significa che dobbiamo sostituire le
batterie nel sensore di movimento esterno appena possibile.
Consigli in caso di gelo: Quando la temperatura esterna è nell'intervallo dal - 1 °C al 3 °C
oppure dal 30 °C al 37 °C , il display mostra il simbolo
Previsioni meteo: Stazione meteo calcola le previsioni del tempo per le prossime 12 ore
sulla base di tendenza della pressione barometrica.Dispositivo, naturalmente, non può
essere confrontato con i siti meteo professionali che utilizzano i satelliti e attrezzature
tecnologicamente avanzate, pero’ e’ in grado di stimare il tempo previsto.
Si prega di seguire le previsioni meteo del servizio di previsioni locali. Se c'è una disparità
tra la stazione e il servizio di previsioni meteo locali, si prega di considerare questi
provenienti dalla TV o internet come più affidabili.
Previsioni meteo: Stazione meteo visualizza i seguenti simboli: sole parzialmente
nuvoloso nuvoloso pioggia abbondante pioggia neve stazione meteo ha la funzione di
visualizzare della tendenza della pressione barometrica
Retroiluminazione: Premere il tasto "UP" per cambiare il livello di luminosità del display, è
possibile scegliere tra 3 modalità di luminosità, o disattivare completamente la
retroilluminazione.
-26 - -27 -
Table of contents
Languages:
Other Green Blue Weather Station manuals
Popular Weather Station manuals by other brands

La Crosse Technology
La Crosse Technology WS-2310 Quick setup manual

La Crosse Technology
La Crosse Technology WS-9013U instruction manual

Thies CLIMA
Thies CLIMA Compact WSC11 Short instructions for use

La Crosse Technology
La Crosse Technology WS6890 Instructional manual

Hama
Hama TH-100 Operating instruction

Hama
Hama 00186369 operating instructions