Green Gear SatRDay User manual

Using Your Bike Friday®:
SatRDay™
Green Gear Cycling, Inc.
3364 W 11th Ave. Eugene, OR 97402
800-777-0258 USA & Canada
+1-541-687-0487 Int’l • +1-541-687-0403 Fax
www.bikefriday.com • info@bikefriday.com
November 2006
Queen Voice of Bike Friday, Gaylynn HanavanCoon, rides the SatRDay in the Cinderella
Century, 2006. Visit her www.bikefriday.com/bf/gaylynn
www.bikefriday.com/satrday

2www.bikefriday.com 800-777-0258 • +1-541-687-0487
Extra Accessories
We also sell an extensive (and growing!) line of bicycle and
travel accessories. Whether you are riding the local back roads or
venturing into foreign lands, we have the gear you need. Call us for
info on spare tires & tubes, replacement parts, fenders, racks, bags,
or other items to complete your Travel System.
Congratulations!
Your bike has been carefully designed and constructed for your
personal travel needs. All of our bikes are manufactured in our
Eugene, Oregon factory by real cyclists who care about our
products and our customers.
Please take your time reviewing this manual and, if possible,
watch the movie clips at www.bikefriday.com/satrday before you
new bicycle fun and reliable anywhere you go!
More Information
Bike Friday events and Yak with other Bike Friday owners on the
bulletin board, go to our main web site at www.bikefriday.com. Or
just call us at 800-777-0258.
Welcome to the fold, from the Bike Friday Travel Team
Visit www.bikefriday.com/satrday for more tips
This edition last updated Nov 10, 2006 by Lynette Chiang
If You Need Help . . .
If you need technical assistance with any Green Gear®Cycling
product, or are unclear on the proper operation of your Bike Friday
travel bicycle, please call us and a Service Technician will help you
get back on the road. Our toll-free number in the US and Canada
is 800-777-0258, international is +1-541-687-0487. Normal business
hours are 8 a.m. to 5 p.m. Monday through Friday, and 9 a.m. to 4
questions to service@bikefriday.com.
24-hour technical support in emergencies. If necessary, please call
our regular number and our answering service can forward you to
a Service Technician on call.

3
www.bikefriday.com800-777-0258 • +1-541-687-0487
Table of Contents
A Word on Safety 5
Anatomy of a SatRDay (Touring) 6
Getting Started 7
Assembly: Unpacking 8
Unfold Frame 10
Insert wheels 11
Unfold boom 12
Install Cranks 13
Install Chain/Stem 15
Install Bars 16
Install Seat 17
Front Wheel 19
Install Pedals 21
Packing the SatRDay: Materials 22
Seat 24
Handlebars 26
Remove Stem/Crank 27
Remove Pedals/Crank 28
Remove left crank 29
Remove right crank 30
Front wheel 31
Important protection 32
Folding the boom 33
Folding the frame 34
Place bike in suitcase 35
Pack rear wheel 36
Crush protector 38
Fitting it all in 39
Quick Folding the SatRDay 40
Quick Fold/TravelBag 47
Getting a Good ‘Sit’ 48
Eccentric 50
Accessories:TravelTrailer 51
Folding Rear Rack 55
Fenders 57
Using a Quick Release 58
About V-brakes (Tour model) 60
About 2006 Shimano Cranks 62
DualDrive™ Hub 63

4www.bikefriday.com 800-777-0258 • +1-541-687-0487
Trouble Shooting 68
Bike Friday Service 69
Travel Tips 70
Warranty Information 71
Notes 72
Table of Contents cont’d

5
www.bikefriday.com800-777-0258 • +1-541-687-0487
A Word on Safety
Bicycles are a lot of fun, but they can also hurt if you don’t
ride carefully. So please always ride safe!
• Always wear a helmet.
• Follow the rules of the road, and be courteous. (We all need to
represent the best of cycling to the world.)
• Dress appropriately for the weather and the season.
• Always carry a spare tube, patch kit, pump and a tool kit.
• Keep your bicycle in good shape.
• Check your tire pressure before every ride.
• Make sure all quick releases are secure!
• Have your bicycle routinely serviced for trouble-free travels.
Your Tools
Your SatRDay comes with a combination 5/6mm S-
wrench (pictured) stored in a rubber sleeve holding
the cables together. This wrench should get your new
bike on the road (along with your own pedal wrench).
Keep it in the cable sleeve so that you always have it
handy. All bikes ordered with a TravelCase™ suitcase
-
nation headset and pedal/axle nut wrench (15mm), and a 4mm
cages, racks, and other accessories. If we needed to remove your
right crank arm in order to pack your bike, we also included a long
handled 8mm Allen wrench.
We also sell more
extensive tool kits for
home repair work. We
encourage you to learn
how to work on your
own bike. If you are not
familiar with bicycle
maintenance, consider
taking a local class. It will
you venture across the
globe.

6www.bikefriday.com 800-777-0258 • +1-541-687-0487
Anatomy of a SatRDay (Touring)
Boom
Seat Support
Rear Derailleur Chain Stays
Bottom
Bracket
Idler Pulley
Stem Riser
Handlebars
Shifters
Stem hinge and
quick release
Head Tube
Chain Catch
Crank Arm
Chain
Rings
Front Derailleur
Seat Support Quick Release
Cassette (Cogs)
Fork
Seat
Seat Rail
Rim
Head Set
Front Brake
Elastomer
suspension
Brake Levers
Monotube
Rear brake
Stem Collar
Front hub
Pedal
Eccentric
(touring
model only)
Seat Adjustment

7
www.bikefriday.com800-777-0258 • +1-541-687-0487
Getting Started
Where to Begin
sight, particularly if you ordered many extra travel accessories with
your Bike Friday travel bicycle. Don’t worry, we work hard to keep
using your new bicycle will become second nature to you.
these instructions, and some room to spread out. This manual
will address the fundamentals: packing and assembly tips and
techniques that are common to all of our travel bikes. However,
because this bike has been custom made for you, you may discover
the one in this manual. Wherever possible, we mark any packing
materials unique to your bike.
Furthermore, you do not have to repack your bike in exactly the
-
sories, and we encourage you to experiment. If you discover a
particularly good way of doing things, let us know. Some of our
best ideas have come from members of the Bike Friday family.
instructions do not help, call us. Our goal is to get you quickly on
the road so that you can enjoy your Bike Friday SatRDay.
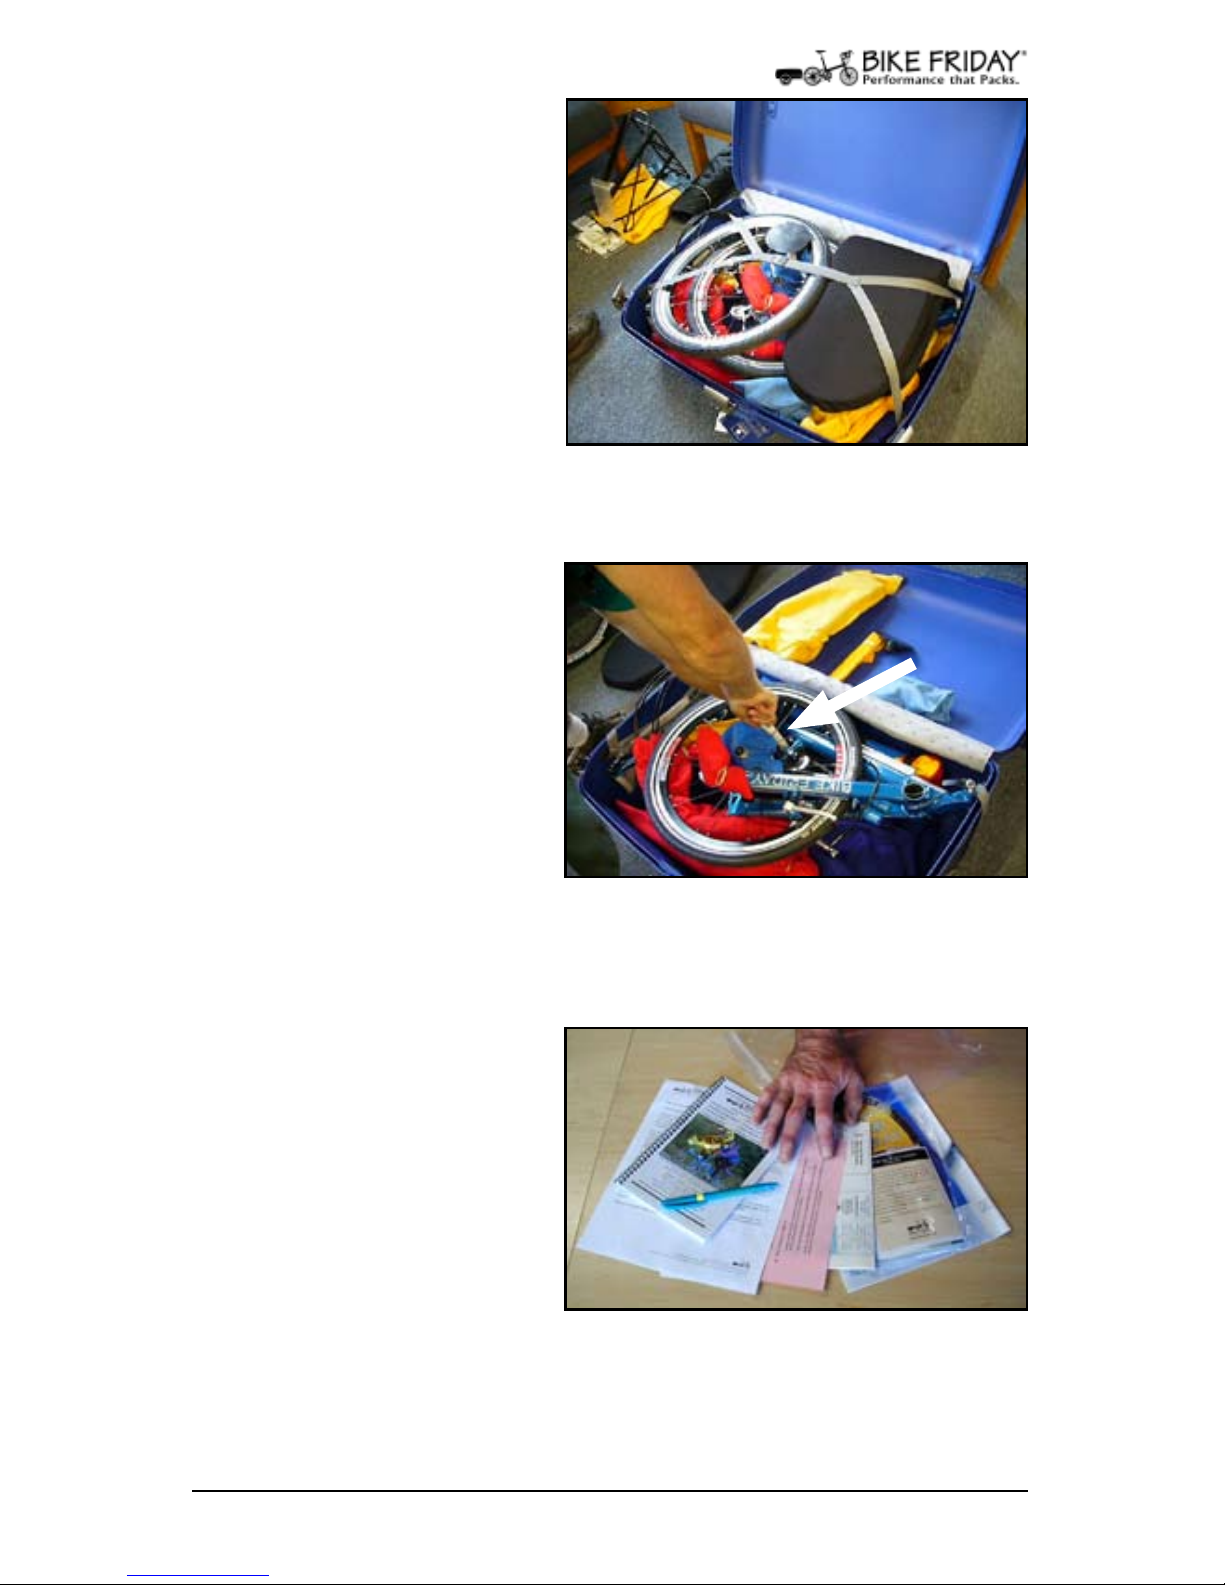
Illustrated Accessories
In order to illustrate the assembly and use of all of our travel acces-
sories, the bike on the following pages has nearly everything we
could think of for a fully loaded tour. Your own bike may have only
a few or none of these accessories. If you ever choose to purchase
some of these accessories, this manual should help you pack the
extra items.
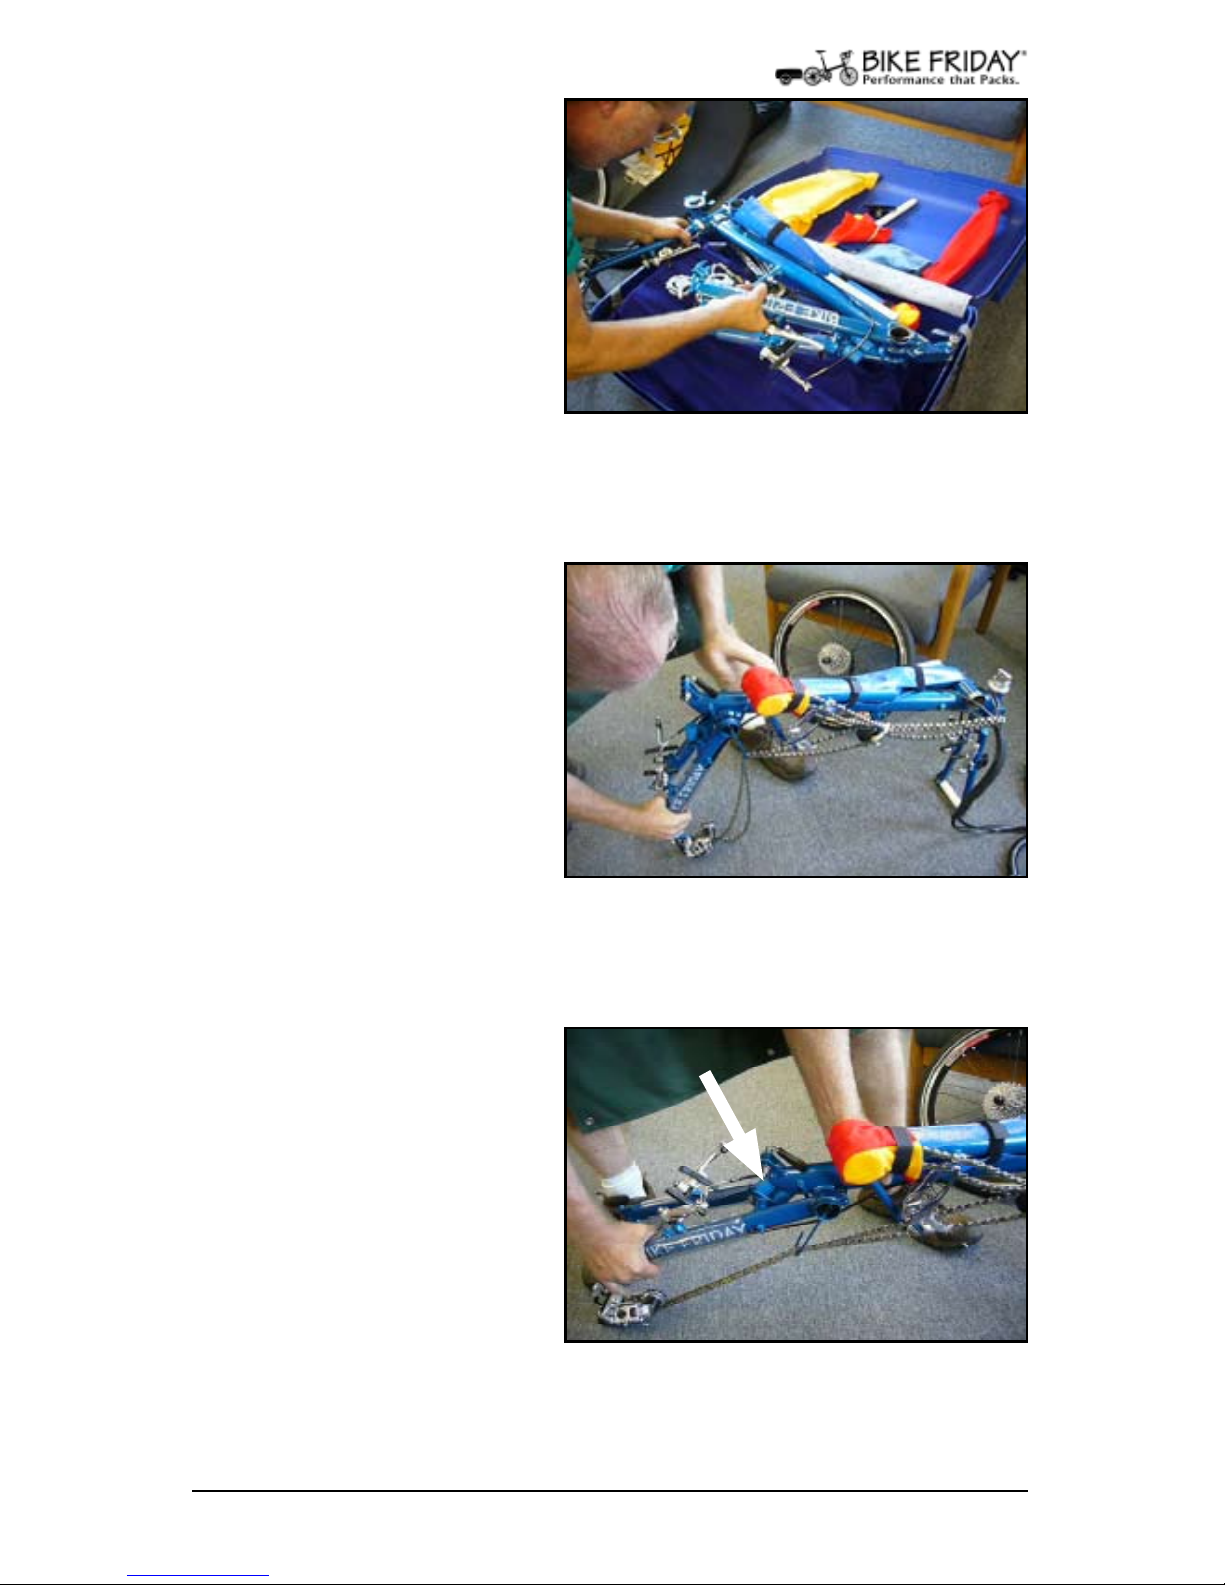
The SatRDay does not normally come with pedals, unless you
Tip: remember with all threaded
manner. Be careful not to strip the threads.
The assembly and packing steps are generally the same across
wrench sizes and the number of bolts per clamp may vary from the
illustrations.

8www.bikefriday.com 800-777-0258 • +1-541-687-0487
Assembly: Unpacking
1. Open The TravelCase
Start by removing some of
the obviously loose items
from the case including
colored felt bags, trailer
wheels, the plastic pouch
with extra materials, and so
on. Put any accessories such
as racks and trailers out of
the way for now. The lid is
a good place to hold components and prevent parts being lost.
Assembly on grass is not recommended!
Fig. 1 The fully equipped travel bicycle
2. Crush Protector
The crush protector is a PVC
caps on the ends. This piece
is a critical bit of packing
material: it spans the case so
that luggage dropped on top
of your bike is supported by
the dowel and not your bike.
The caps are lightly pressed
Fig. 2 Remove crush protector
3.The Goodie Bag
for this pouch, but we’ve
always called it the Goodie
Bag. This bag holds a variety
of miscellaneous loose items
for your new bike. This may
include the technical liter-
ature that came with your
components, spare spokes, some labels and decals, and always a
surprise! The component literature is not required reading, but we
supply it for those who are technically inclined.
Fig. 3 The goodie bag

9
www.bikefriday.com800-777-0258 • +1-541-687-0487
5. Remove Rear Wheel
With the crush protector
removed, remove the rear
wheel. Locate the rear wheel
quick release, usually in
the tool pouch, and insert,
remembering that the
narrow ends of the two
springs face toward the hub.
See page 58 ‘Using a Quick Release’.
Fig. 5 Remove front wheel and set up
4. Remove Tool Pouch
The tool pouch that comes
with the case is a light blue
colored felt bag with a cord
around it. Inside you should
all of the Allen wrenches and
screwdrivers you will need
to assemble your bike, a pair
for quick road-side adjustments.
Fig. 4 The tool pouch.
Assembly: Unpacking
6. Remove handlebars
The handlebars will be in
them out, and let them drape
Fig. 6 Remove front wheel and bars.

10 www.bikefriday.com 800-777-0258 • +1-541-687-0487
7. Remove Bike Frame
suitcase.
Note items stashed neatly
in lid.
Fig. 7 Remove bike frame.
8. Unfold rear end
As you unfold the rear end
of your bike, make sure
cables are not caught on the
hinges.
Fig. 8 Unfold rear end.
Assembly: Unfold Frame
9. Unfold rear end
Swing rear end of the bike
until the two Suspension
Elastomers are seated against
the frame.
Remove protective packing
material.
Fig. 9 Unfold rear end.

11
www.bikefriday.com800-777-0258 • +1-541-687-0487
10. Remove rubber band
insert the rear wheel if you
holding the chain to to the
Idler Pulley.
Fig. 10 Remove rubber band.
11. Insert rear wheel
If you have a DualDrive hub,
the click box. See page 62
‘About the Dual Drive’ for
more information.
Insert rear wheel onto the
chainstays. Pull the rear
derailleur down and loop
Fig. 11 Insert rear wheel.
12. Close rear brake
Seepage60‘AboutV-Brakes’
for tips on closing V-brakes
(SatRDay tour model).
Fig. 12 Close rear brake.
Assembly: Insert wheels

12 www.bikefriday.com 800-777-0258 • +1-541-687-0487
Assembly: Unfold boom
14. Check chain path
Make sure the chain is not
kinked and runs as follows:
From the crank, the UPPER
chain passes UNDER the
idler pulley ...
Fig. 14 Check chain path
13. Unfold boom
Extend the boom fully and
remove protective packing
material. The front wheel
is installed in a later step,
allowing the front fork to act
as a stand while assembling
the SatRDay.
TOURING MODEL ONLY:
You will have an eccentric adjustment ‘ring’ below the boom and in
front of the forls. This ring adjusts the rise of your boom to an angle
most comfortable to you. Once set, there is no need to re-adjust it
Please see page 50 ‘Geing a
Good Sit - Eccentric’
Fig. 13 Unfold boom.
15. Check chain path
... where it sits between the
teeth of the small, inner idler
pulley cog, and a braze-on
pin to keep it in place.
Fig. 15 Upper chain sits on inside teeth.

13
www.bikefriday.com800-777-0258 • +1-541-687-0487
Assembly: Install Cranks
16. Check chain path
cont’d
From the idler pulley, the
chain travels back to the rear
derailleur and back to the
idler pulley where it sits on
the outer groove as shown.
Fig. 16 Upper chain sits on inside teeth.
17. Install right crank arm
Remove the crank from the
blue bag. The following
steps refer to the newer
2006 Shimano/FSA cranks.
See page 62 ‘About 2006
Shimano Cranks’ to see if
this relates to your model.
All other cranks require
simply tightening with a
8mm crank wrench supplied.
Fig. 17 Remove cap and ring.
18. Install crank
Slide the crank spindle
through the hole on the
right side of the bike until it
Slide the dustcap back onto
the bike.
Fig. 18 Insert crank, replace dustcover.

14 www.bikefriday.com 800-777-0258 • +1-541-687-0487
20. Install the crank
Replace black screw cap
Locate the special circular
tightening tool, applicable
only to 2006 Shimano/FSA
cranks (see page 62 ‘About
2006 Shimano Cranks’) and
screw cap down. The tool is
designed to prevent over-
torquing of this cap.
Fig. 20 Replace cap and screw it down.
21. Install crank
Using the 6mm Allen
wrench from your multi-
tool, to initially tighten the
crank Allen most of the way.
Remember to do both sides
evenly!
For the 2006 Shimano/FSA
cranks only:
Finish tightening ot the
prescribed torque with the supplied torque wrench (see page 62
‘About 2006 Shimano Cranks’). Do not over torque!
Fig. 21 Tighten crank allen bolts
Assembly: Install Cranks cont’d
19. Install the crank
ensuring that it is 180 degrees
opposed to the right crank.
Fig. 19 Install left crank

15
www.bikefriday.com800-777-0258 • +1-541-687-0487
22. Install chain
Pull the chain (spring loaded
by the rear derailleur) over
the smallest chain ring.
Fig. 22 Install chain.
23. Release chain catch
Unhook the chain from the
chain catch and swing the
catch out of the way. It is
spring loaded and will stay
neatly against the frame. Re-
check chain path through the
rear derailleur mechanism to
make sure it is in alignment
all the way through.
Fig. 23 Release chain catch.
24. Install stem
Start by removing the
headset protector tube and
safety plug from the head
tube as shown.
Fig. 24 Remove safety plug and protec-
tor tube.
Assembly: Install Chain/Stem

16 www.bikefriday.com 800-777-0258 • +1-541-687-0487
25. Insert stem
Remove the stem from red
felt bag and pop it into the
head tube. Make sure cables
are routed behind the stem
before insertion.
Fig. 25 Insert stem.
27. Install handlebars
Remove the bars from felt
bags and slip into their
respective slots on the stem.
Fig. 27 Install handlebars.
Assembly: Install Bars
26.Tighten stem
the fork tab hits the stop.
Align the hinge to point
directly to the right. Now
turn the fork back to facing
forward (brakes are on the
back of the fork) and line up
the handlebars with the fork
using the upper clamp. With
the fork pointing forward, the hinge should be set to fold down to
about the 8:00 position when viewed from above. Tighten the stem
bolt with your multi tool. Tight!
Fig. 26 Tighten stem bolt.

17
www.bikefriday.com800-777-0258 • +1-541-687-0487
29. Close stem quick
release
Close stem quick release
lever. Not that the lever can
be used to keep your sleeve
of cables neatly out of harm’s
way.
Assembly: Install Seat
28.Tighten handlebars
Make sure bars are pushed
in as far as the blue rings
will allow. Tighten BOTH
top clamp bolts as shown.
Fig. 29 Close stem quick release.
Fig. 28 Install handlebars.
30. Install seat
Take the seat out of the large
blue felt bag and unfold so it
looks like this.
Fig. 30 Remove seat.

18 www.bikefriday.com 800-777-0258 • +1-541-687-0487
32. Install seat
Mount front of seat on seat
rail.
31. Install seat
Mount seat support bar on
rear bracket just behind your
nameplate. Don’t tighten just
yet.
Fig. 32 Mount front of seat.
Fig. 31 Mount seat support.
33. Install seat
Mount front of seat on seat
rail, sliding it all the way
back, and lock down the
quick release.
Fig. 33 Slide seat onto seat rail.
Assembly: Install Seat

19
www.bikefriday.com800-777-0258 • +1-541-687-0487
35. Install front wheel
Remove the fork spreader
tube from the fork. Be careful
not to lose the two small
springs that accompany
your front wheel quick
release skewer.
34. Lock down seat
support quick release.
Double check that the seat
support quick release behind
is secure.
Fig. 35 Remove fork spreader.
Fig. 34 Tighten seat support quick
release.
36. Install front wheel
Insert skewer in front wheel
making sure: a) the tire tread
turns in the correct direction
if applicable (usually
indicated by an arrow on
the sidewall); b) the quick
release lever will be on the
tapered ends of the springs
face towards the hub and d) if you have a computer magnet installed
on the spokes, make sure it will end up facing the sensor mounted
on the fork.
Fig. 36 Install front wheel quick release.
Assembly: Front Wheel

20 www.bikefriday.com 800-777-0258 • +1-541-687-0487
37. Install front wheel
cont’d
Make certain the wheel
is fully seated in the fork
dropouts, and securely close
the quick release as illus-
trated on page 58 ‘Using a
Quick Release’. If you have
a side-pull brake, close the
small lever on the brake
capiter at this point.
Fig. 37 Install front wheel.
Assembly: Front Wheel
39. Install seat cushion
Place seat cushion over the
velcro tabs.
Fig. 39 Install seat cushion.
38 . Close brake
Close front wheel brake. If
it’s hard to close, use barrel
adjuster hear handlebar to
adjust length of brake cable
for more slack.
See page 60 ‘About V-Brakes’ for
more info.
Fig. 38 Close front brake.
Fig. 38a Adjust brake cable length.
Table of contents
Other Green Gear Bicycle manuals