Greiner Vibrograf ACS 900 User manual

ACS 900
Manual English
Greiner Vibrograf AG
Mittelstrasse 2
4900 Langenthal
Switzerland
T: +41 62 923 44 33
F: +41 62 923 18 46
www.greinervibrograf.ch
Helmut Klein GmbH
Fritz-Neuert-Strasse 31
75181 Pforzheim
Germany
Tel. +49 7231 9535 0
Fax +49 7231 9535 95
www.klein-messtechnik.de Greiner
Gebrüder Boley GmbH & Co. KG
Julius-Hölder-Str. 32 - D-70597 Stuttgart
Tel. +49-(0)711-13271-0 - Fax. +49-(0)711-13271-90
[email protected] - www.boley.de

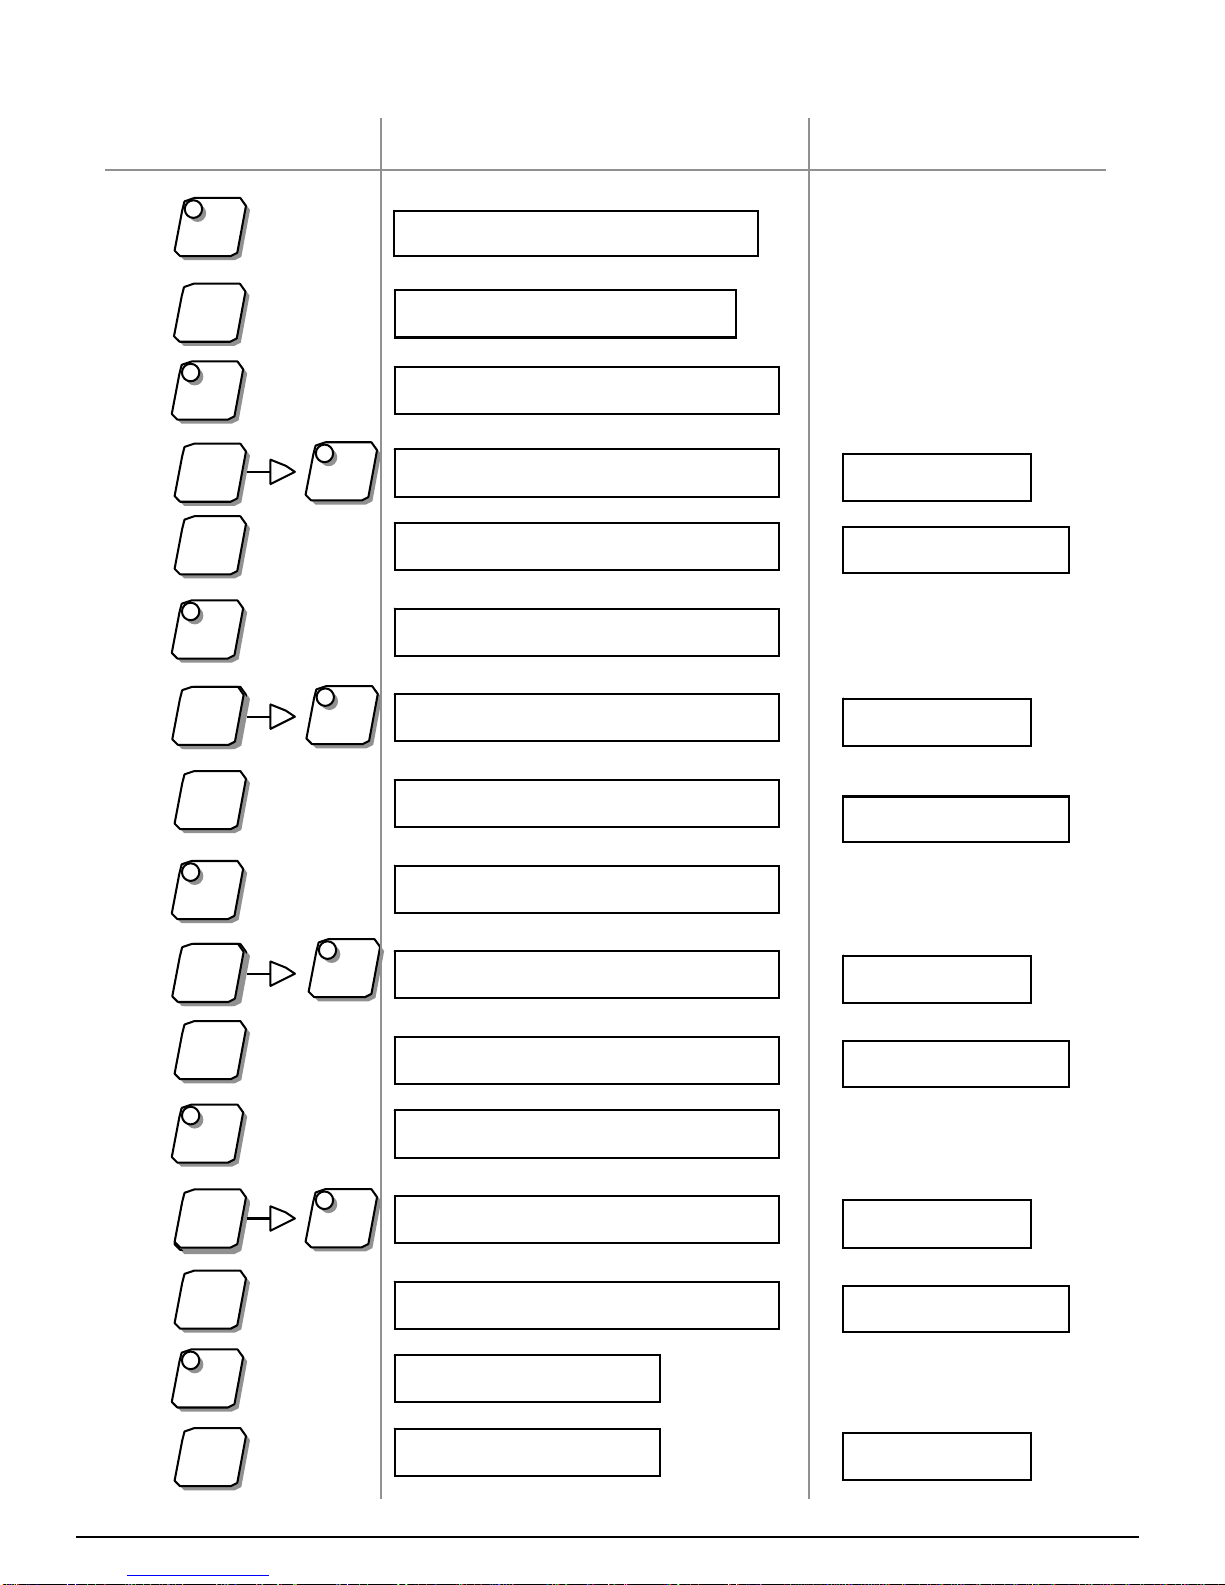
Introduction ACS 900 -------------------------------
Loading of the jars -----------------------------------
Fixed cleaning programs ---------------------------
Select your own cleaning program-------------
Display explanation --------------------------------
Programming ------------------------------------------
Programming ------------------------------------------
Start cleaning program -----------------------------
Placing a password ---------------------------------
Help --------------------------------------------------------
Accessories --------------------------------------------
page 2
page 3
page 4
page 5
page 6
page 7
page 8
page 9
page 10
page 11
page 12-18
Contents
Page 1
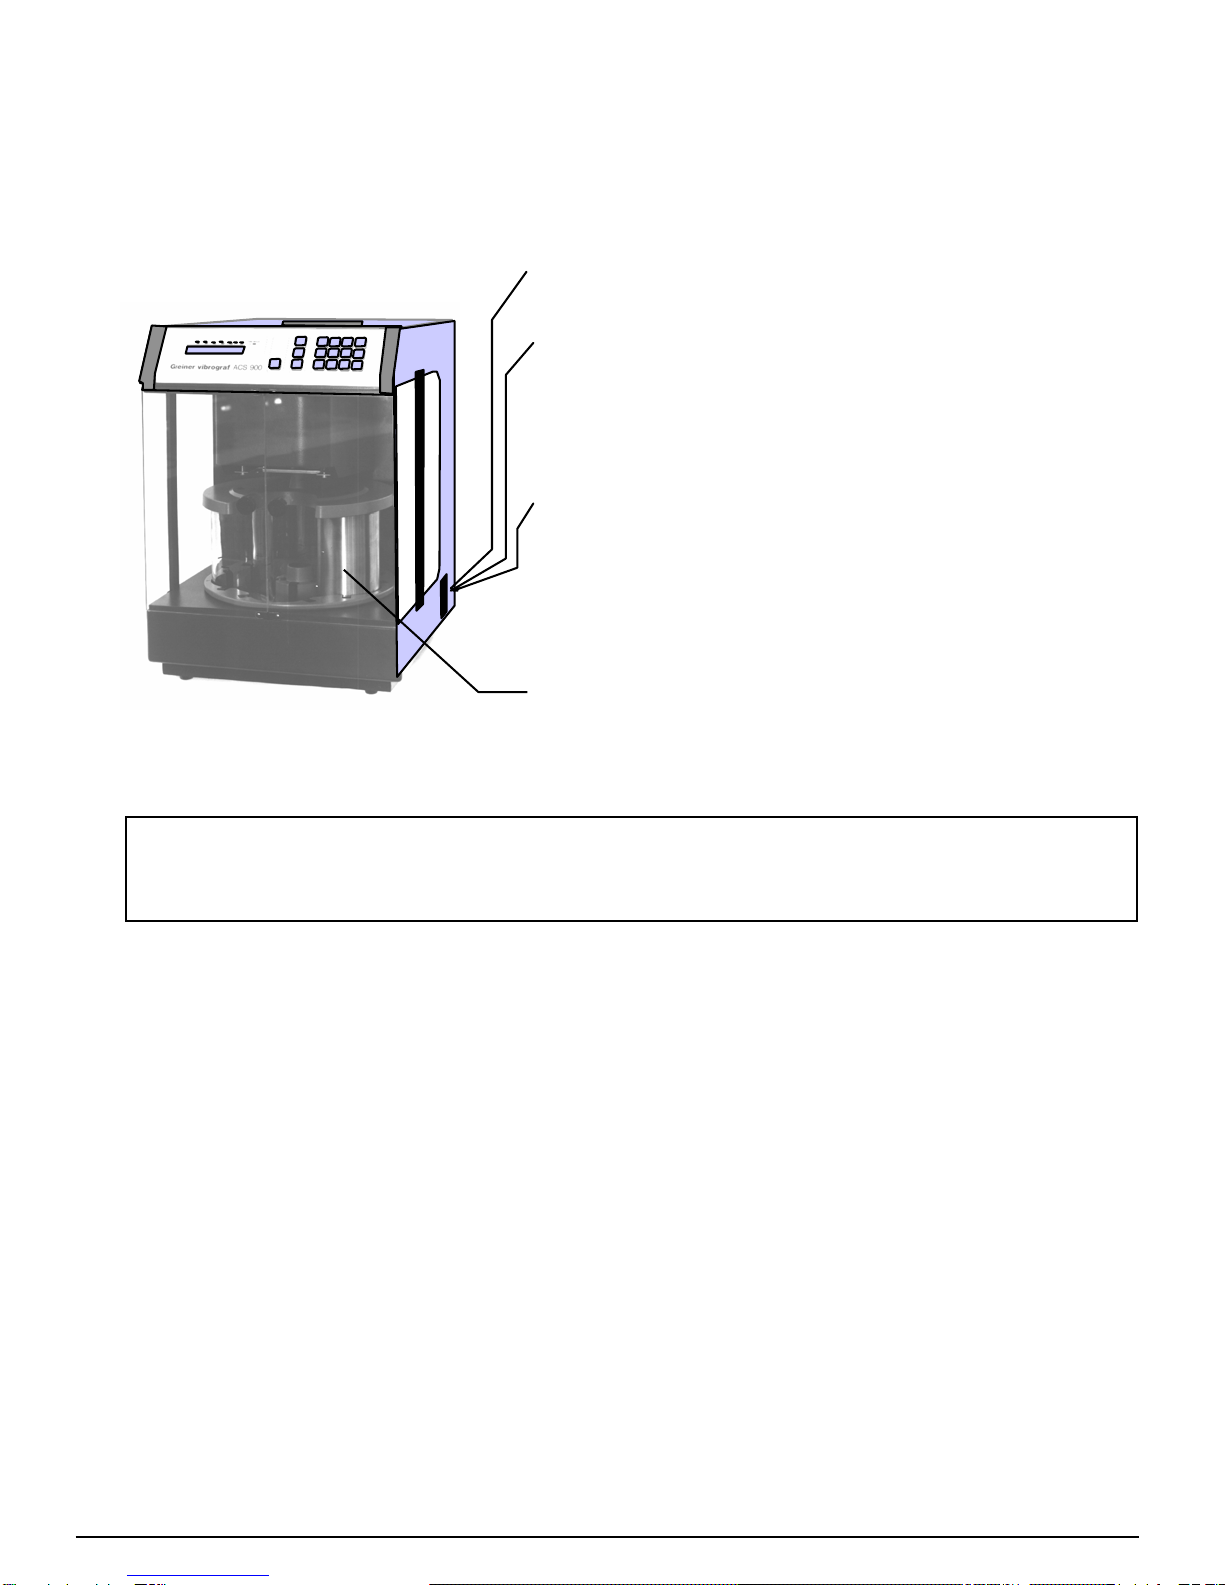
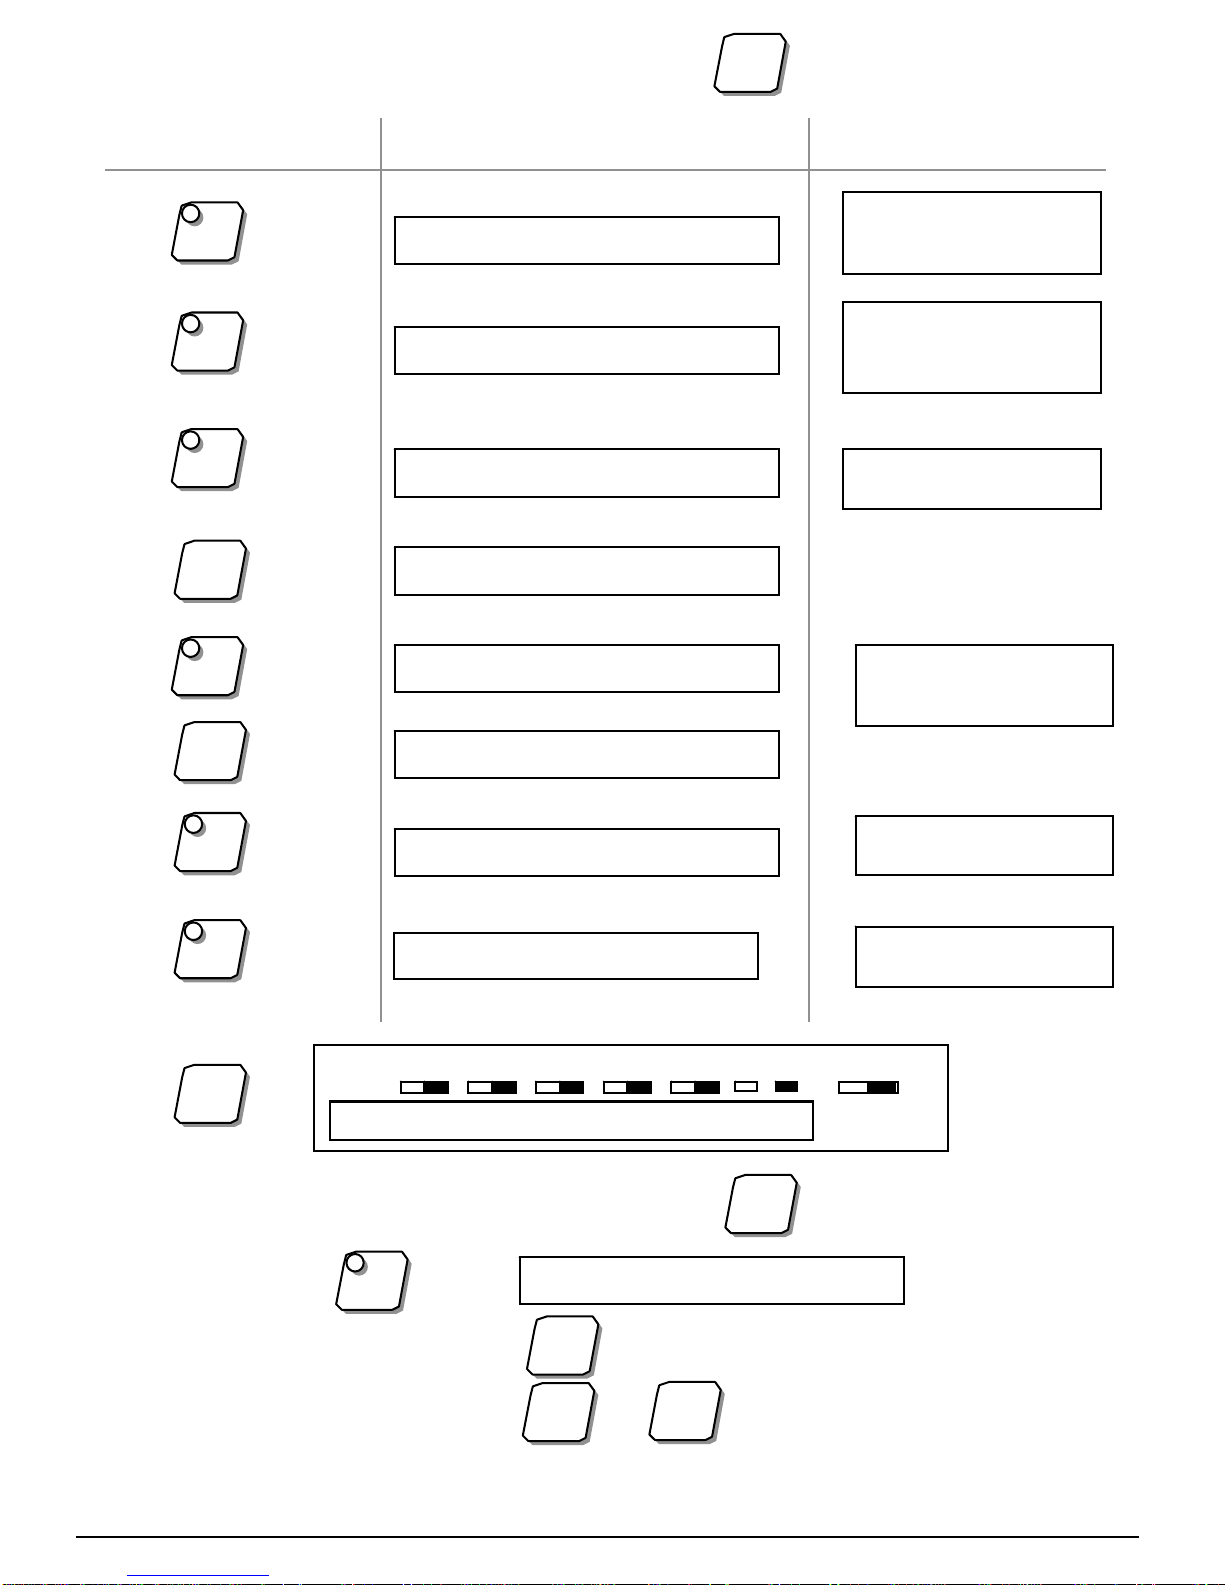
Introduction ACS 900
Page 2
Standby position = Position 5 of turn table is in front. Bracket of basket holder
is in front. An arrow on the display is moving from left to right.
The machine is ready to start.
Caution:
Do not place anything on top of the instrument that could block the ventilation.
The ventilator fan that evacuates the fumes during the cleaning process from the machine is
located on the top. When process is finished, ventilator stops automatically after 5 min.
Preparation of the baths
Pos. 1 = cleaning bath (with or without ultra-sound)
Pos. 2 = cleaning bath or 1st rinsing bath
Pos. 3 = rinsing bath
Pos. 4 = cleaning or lubrication bath
Pos. 5 = remains empty (drying position)
Take care not to exceed the maximum level of fluids indicated on the jar and ultrasonic
tank.
(quantity 0,55 l).
Unpack the ACS-900 and install it on the working place.
Open the front doors and remove all packing material inside the instrument.
1. Main switch off.
2. Connect the ACS 900 with the delivered power-
cable to the power socket.
Please observe the voltage (230 or 115 Volts)
marked on the label.
3. Switch on the main power switch.
The basket-holder moves upwards, the turn-table
turns to Pos. 5 in front and the bracket of basket
holder turns to front.
The instrument is now in stand-by position.
4. Press the „LOAD“ key on the keyboard to install
the ultra-sound and the glass jars.

Loading of the jars
Page 3
1. Press LOAD
2. Press ENTER
3. Put ultrasonic tank in Pos. 1
4. Press ENTER
5. Put jar in Pos. 2
. Continue as described in point 2
till all the jars are installed.
7. Press EXIT
8. Load the baskets with the parts you
want to clean, insert in lower
basket-holder and close fixture.
9. The machine is ready for service.
You can start a test
for example: Program 7
10. Press
11. Press
12. Press
Display shows:
Next or Pos. 1 - 5.
Basket holder moves upwards.
Turn-table turns to the Pos. 1.
If you operate 1,2,3,4 or 5 instead of ENTER,
the turn-table turns directly to the
corresponding position.
If ultra-sound is not requested, you can install
a cleaning jar instead.
Turn-table turns to the next position,
Pos. 2
--
ACS 900 changes over to stand-by position.
--
--
Display says:
Which cleaning program?
Display shows you data in program 7
Cleaning program 7 is running.
LOAD
ENTER
ENTER
EXIT
CLEAN
7
ENTER
Fixed cleaning programs
Page 4
Buttons 78 9 are fixed programs (factory set).
They can not be changed.
Description of the programs:
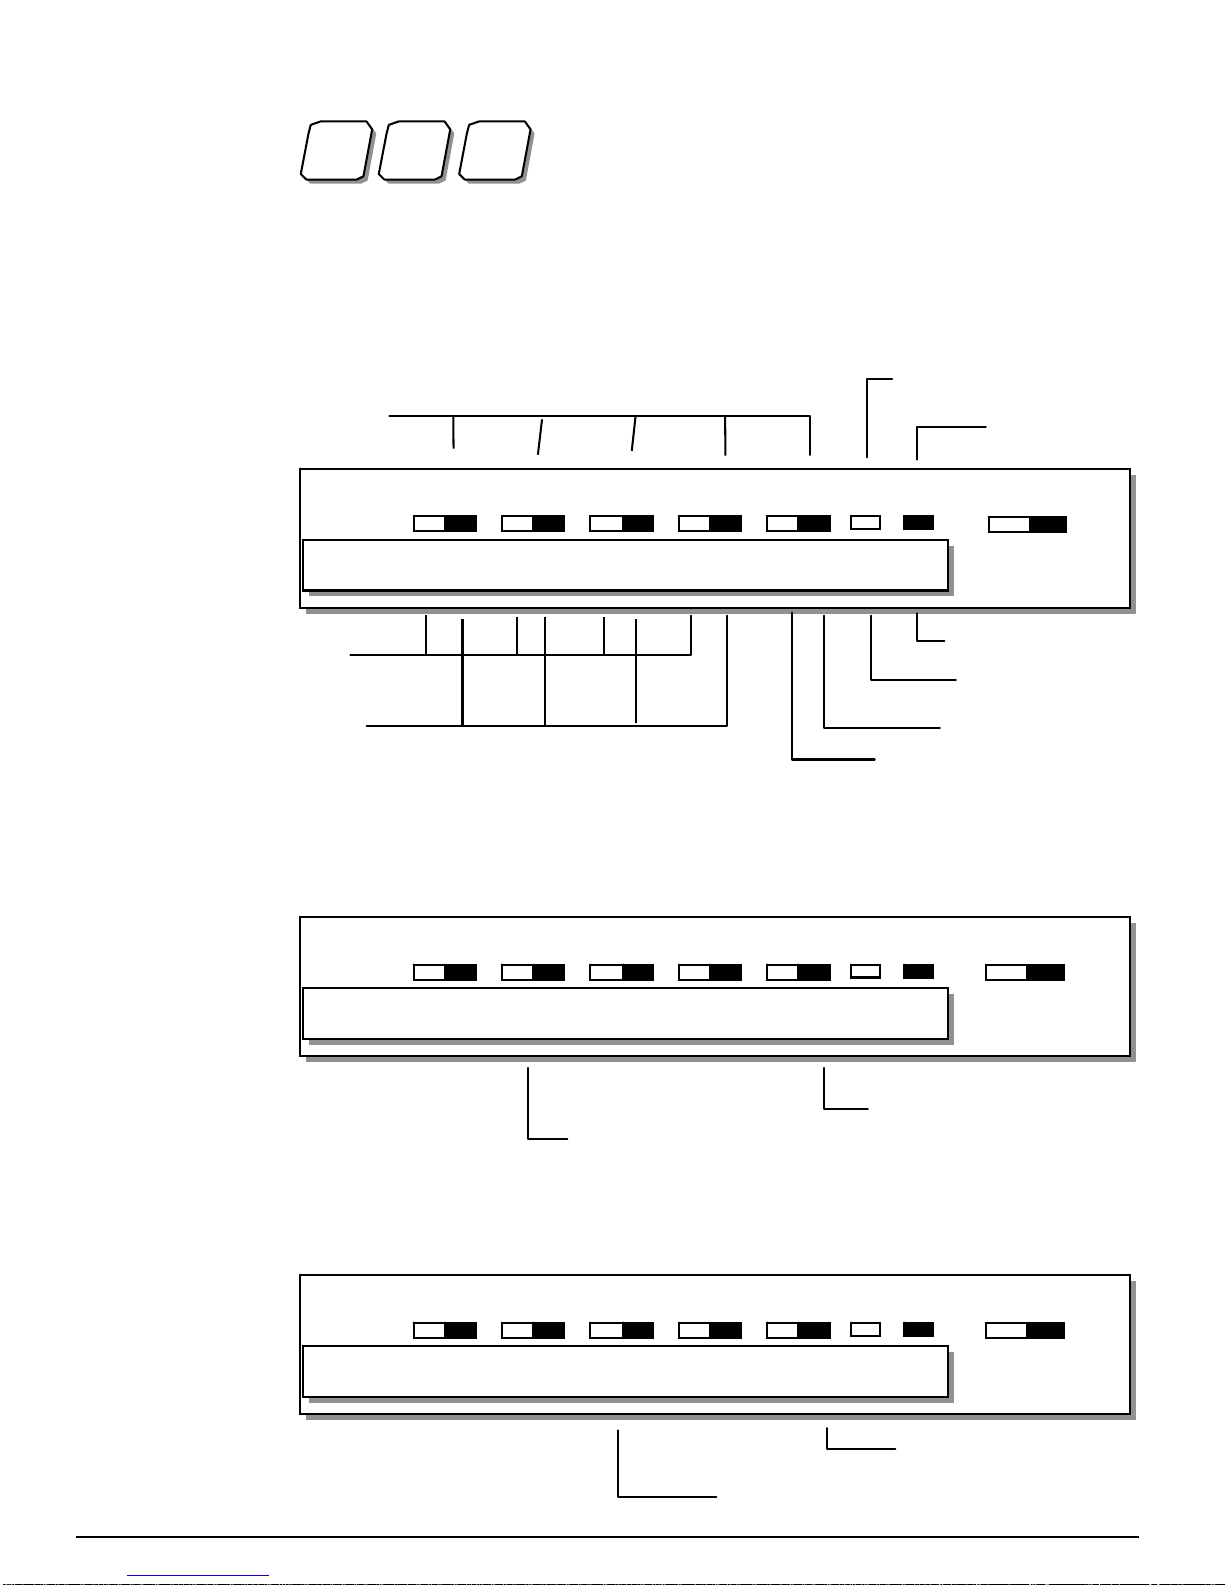
Program 7
Cold air
7 > 3 0 - - 1 1 3 1 5 F 1 U
TIME MODE
1 2 3 4 5 S US
Position turntable Spinning time
Ultra-sound
Ultra-sound Yes
1 Minute
Cleaning time
in minutes
Basket
movement typ Drying time
Program 8
8 > 3 0 - - 1 3 3 3 5 H 1 U
TIME MODE
1 2 3 4 5 S US
Warm air
Positions which are not used
Programm 9
9 > 5 0 2 5 - - 3 3 5 H 1 U
TIME MODE
1 2 3 4 5 S US
Positions which are not used
Warm air
Page 5
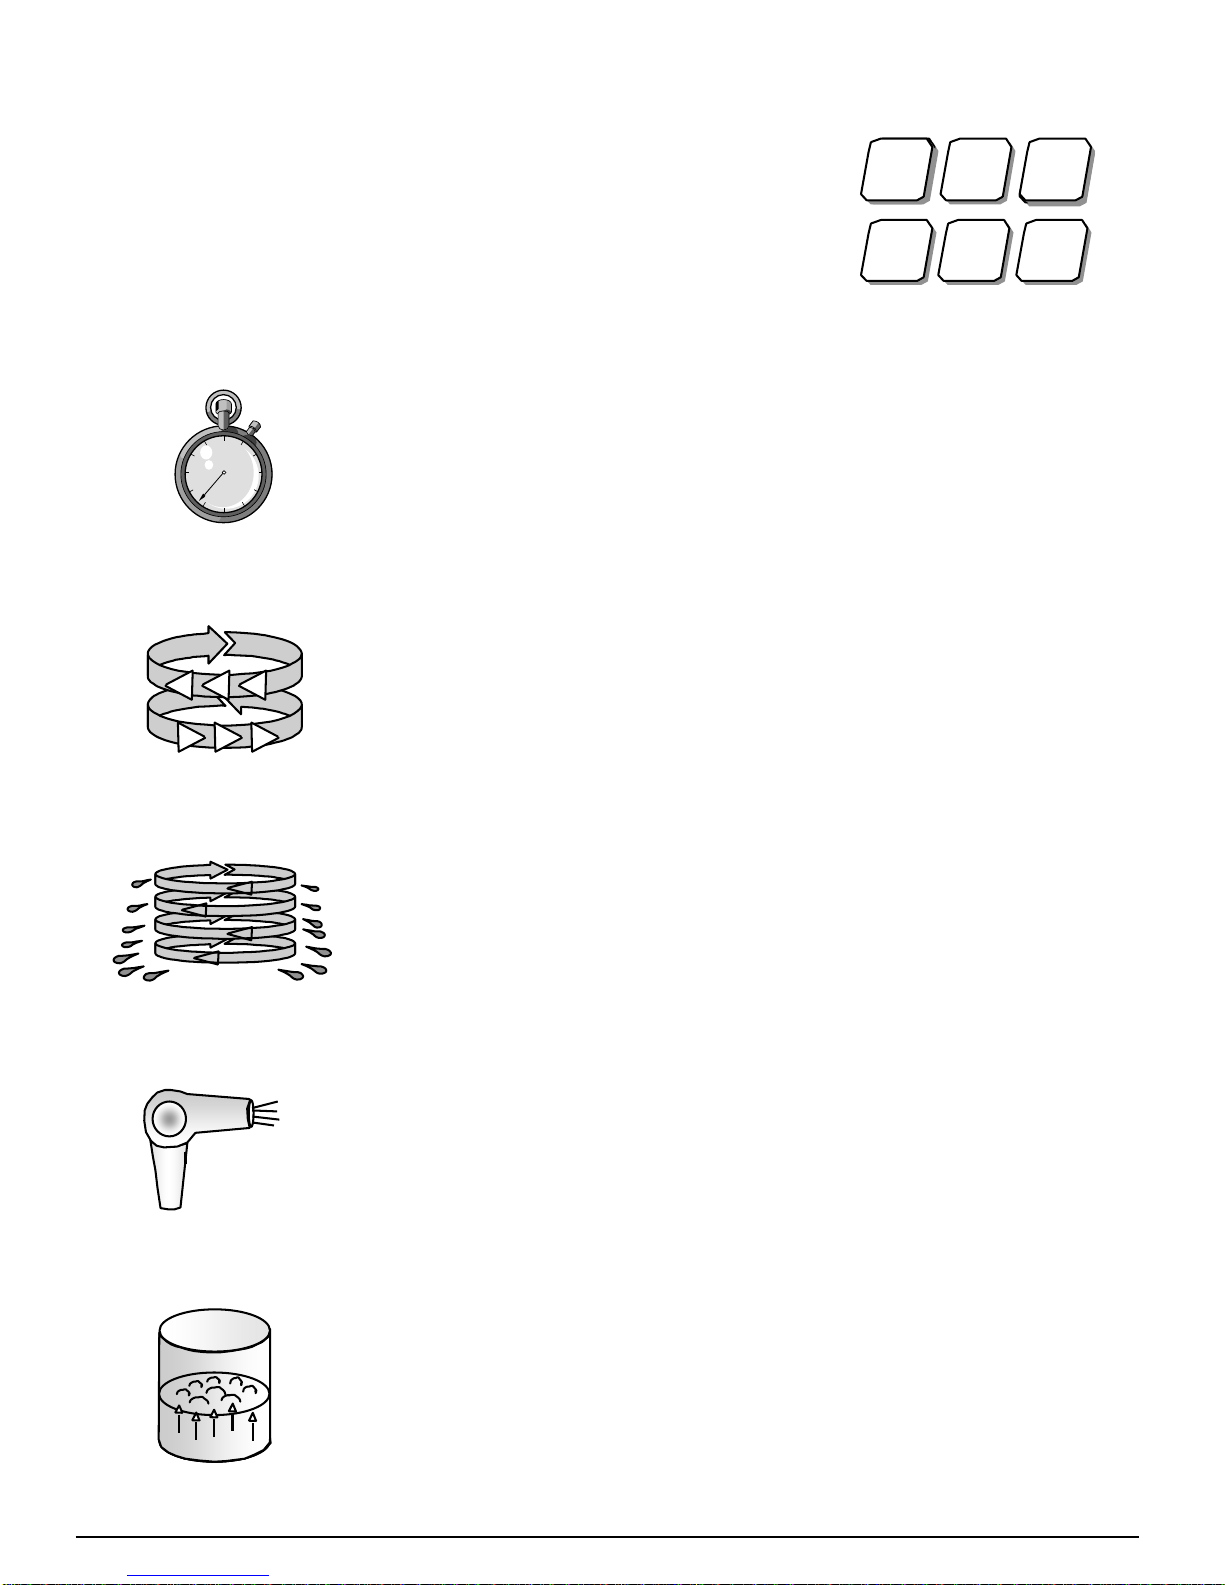
123
5
4 6
Important: Button 1-6 can be used for cleaning procedures.
Programming of ACS 900 is possible in standby
status or during cleaning program.
Explanation of the settings:
Time programming positions 1-5 ( 0 - 9 minutes )
0 = Position is inactive
1 - 9 Basket stays in the jar between 1-9 minutes
Time
Acc
Movement type of the basket 0 - 5
0 = Basket turns slowly in one direction half of the time and in the
reverse direction the other half of the selected time. No agitation
1 = Movements are very slow and stretched.
2 = Movements are slow and less stretched.
3 = Mean movements .
4 = Quick and short movements.
5 = Very quick and very short movements.
Drying
Drying (warm or cold)
H = warm air Switch on or off with button 1
F = cold air
Remark: When jar 4 is selected, the temperature of warm air
is already reached when basket runs for drying.
Spin
Spin 1 - 5 minutes
Spinning is effected in the upper part of the jars.
Selected time is between 1 – 5 minutes.
The selected time is for all jars.
Ultra-sound
Programming of ultra-sound is effected with Pos. 1 of turn-table. With
Button 1 you can switch it on or off. Movement status 0 is suggested
during cleaning with ultra-sound.
US
Select your own cleaning program
Page 6
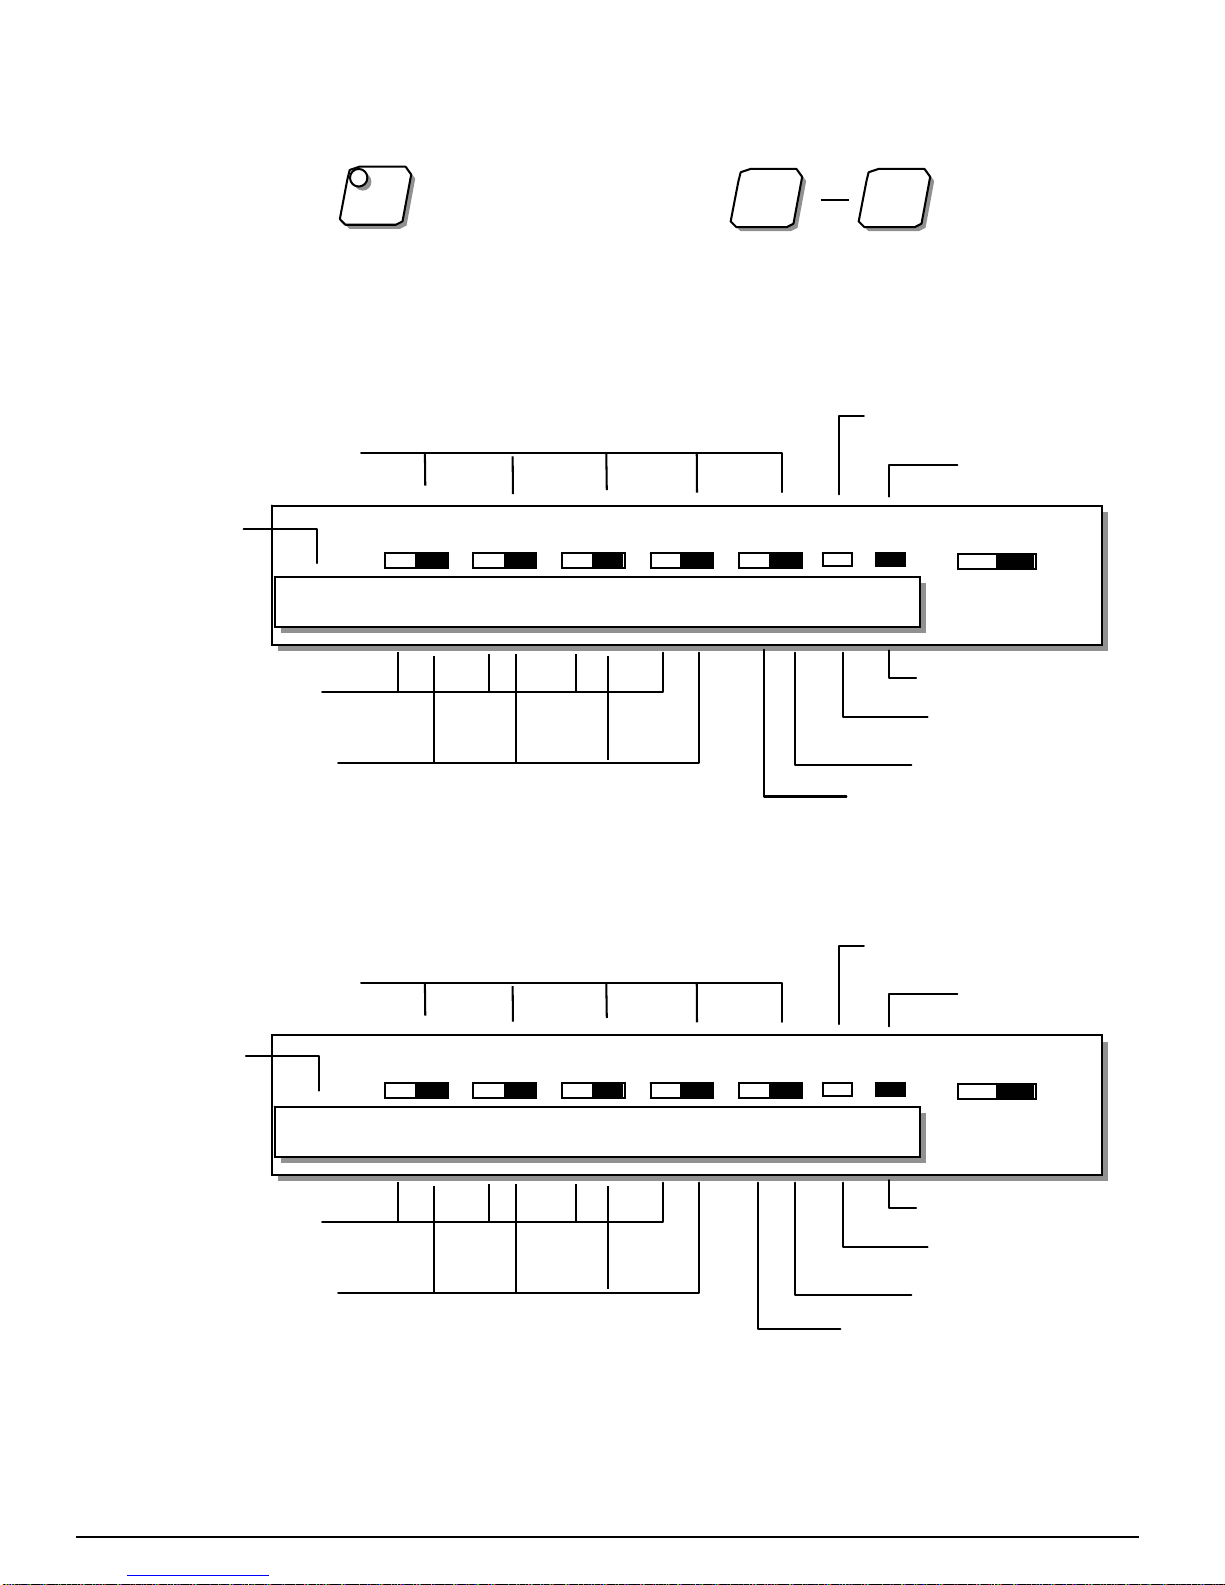
Display explanation
Warm air
7 > 3 0 - - 1 1 3 1 5 H 1 -
TIME MODE
1 2 3 4 5 S US
Position turntable Spinning time
Ultra-sound
Ultra-sound no
1 bis 5 minutes
Cleaning time
In minutes
Basket
movement typ Drying time
Button-No.
When you press key and 1 of the keys
The programs are shown on the display as you can see in the following example:
CLEAN
1 9
Cold air
1 > 3 0 - - 1 1 3 1 5 F 1 U
TIME MODE
1 2 3 4 5 S US
Position turntable Spinning time
Ultra-sound
Ultra-sound yes
1 minute
Cleaning time
in minutes
Basket
movement typ Drying time
Button-No.
Page 7
Programming
Key application display Indication Remark
PROG
ENTER
1
5
ENTER
0
ENTER
4
ENTER
1
ENTER
4
ENTER
2
ENTER
6
3
ENTER
Which cleaning program ?
1 > -- -- -- -- -- 1 -
Pos 1 > Time: # Acc: #
Pos 1 > Time: 5 Acc: #
Pos 1 > Time: 5 Acc: 0
Pos 2 > Time: # Acc: #
Pos 2 > Time: 4 Acc: #
Pos 2 > Time: 4 Acc: 1
Pos 3 > Time: # Acc: #
Pos 3 > Time: 4 Acc: #
Pos 3 > Time: 4 Acc: 2
Pos 4 > Time: # Acc: #
Pos 4 > Time: 6 Acc: #
Pos 4 > Time: 6 Acc: 3
Pos 5 > Time: 0
9
ENTER
Pos 5 > Time: 9
Time pos. 1
Movement type
Time pos. 2
Movement type
Time pos. 3
Movement type
Time pos. 4
Movement type
Time pos. 5
See next page
Which program ?
Page 8
1 > 5 0 4 1 4 2 6 3 9 H 1 U
TIME MODE
1 2 3 4 5 S US
Programming with button (example)
Key application Display indication Remark
1
ENTER
ENTER
ENTER
1
Fan : OFF 1. ON By pressing button 1, fan
for drying is activated or
deactivated.
1
ENTER
Heat : OFF 1. ON By pressing button 1,
heat for drying is
activated or deactivated.
Spin btwn stations : #
Spin btwn stations : 1
Spinning time
1 to 5 minutes
US : OFF 1. ON By pressing button 1,
ultra-sound is activated
or deactivated.
US : ON 1. OFF
EXIT
> > > > > > > > > > > > > > Arrow is moving to the
right
PROG
Which cleaning program ? For controlling fixed
programs.
1
Is cleaning program of button 1 correct ?
1
EXIT
> > > > > > > > > > > > > >
Programming of button is installed and stored.
Programming of button - can be done in the same
way. On page 5 you will find all the adjustments which are possible.
1
26
If yes,
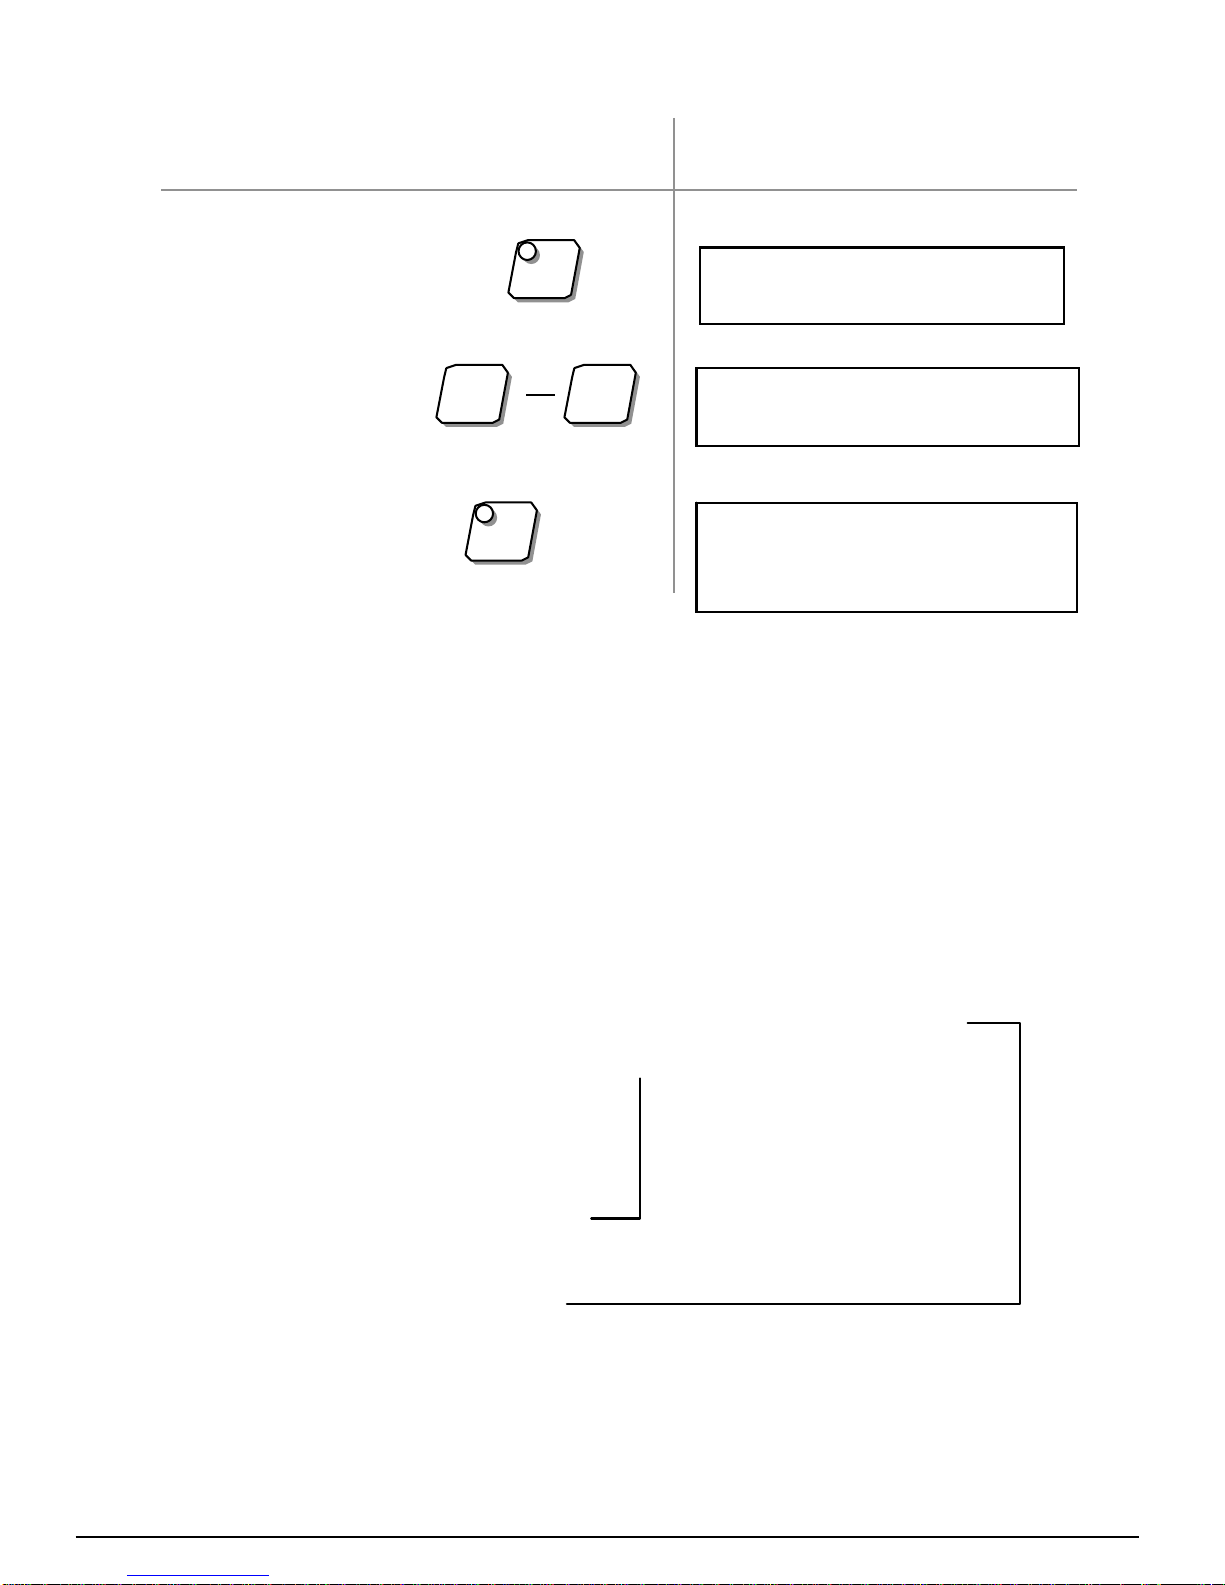
Start cleaning program
Page 9
Key application Display indication
ENTER
1 9
CLEAN
Which cleaning program ?
Press button
Press button Indication of the dates from
the selected program.
Press button Cleaning program is started
and whole run time is
indicated.
Interruption of cleaning program
You can interrupt the cleaning at any time.
1. Press button BREAK
2. Press button EXIT
Other manuals for ACS 900
2
Table of contents


