Grex Ultra-Dynamics MXF8 User manual

MXF8 manual version 1.0 January 2004. Copyright Grex Ultra Dynamics Ltd.

Later version of this manual will be automated to jump to pages in the PDF document

The buttons numbered 1 to 8 in Volume Mode
switch in and out midi channels 1 to 8 and
send controller number 7 (Volume).
Ensure that your external midi gear is
responding correctly to each of the channel
buttons.
Selecting "midi learn"in programs such as
Live or Reason and then briefly toggling the
button on your MXF8 once you have selected a
suitable icon on the computer programs inter-
face assigns the controller sent at that
moment by your MXF8.
Rotary controls are primarily volume level con-
trols in MXF8 Volume Mode.
MXF8 is "polyphonic"meaning you can mute
and unmute several channels at once if you
press the buttons simultaneously.
The red LED above the Grex logo shows when
midi data is being sent... or received during a
download procedure.
Press buttons numbered 1 to 8 and associated LEDs next to rotary controls light Red or Off...Holding down "?" whilst doing this will toggle LED Green or Orange
Red LEDs indicate that channels are controlling volume directly and only from the rotary control position...Green LEDs indicate channels selected through fader
OFF LEDs indicate that channels are muted (zero volume is sent)...Orange also indicates mute and fact that next keypress will unmute and route channel through fader
Channels routed through fader have their volumes affected according to the fader position...eg channel 2 (Green) with fader at extreme right will be at zero volume
Fader curve by default has long flat central section...custom curves will be available as downloads soon
Comments and tips:
Your MXF8 sends midi controller number 7 from the channel buttons in Volume Mode which is usually used for volume control as a default in many software and hard-
ware midi devices. You might wish to experiment with setting synths and so on with midi learn to repond to these messages so that you can x-fade up to 8 parameters.
Buttons 1 to 8 in Volume Mode Previous Main Next 1 of 1

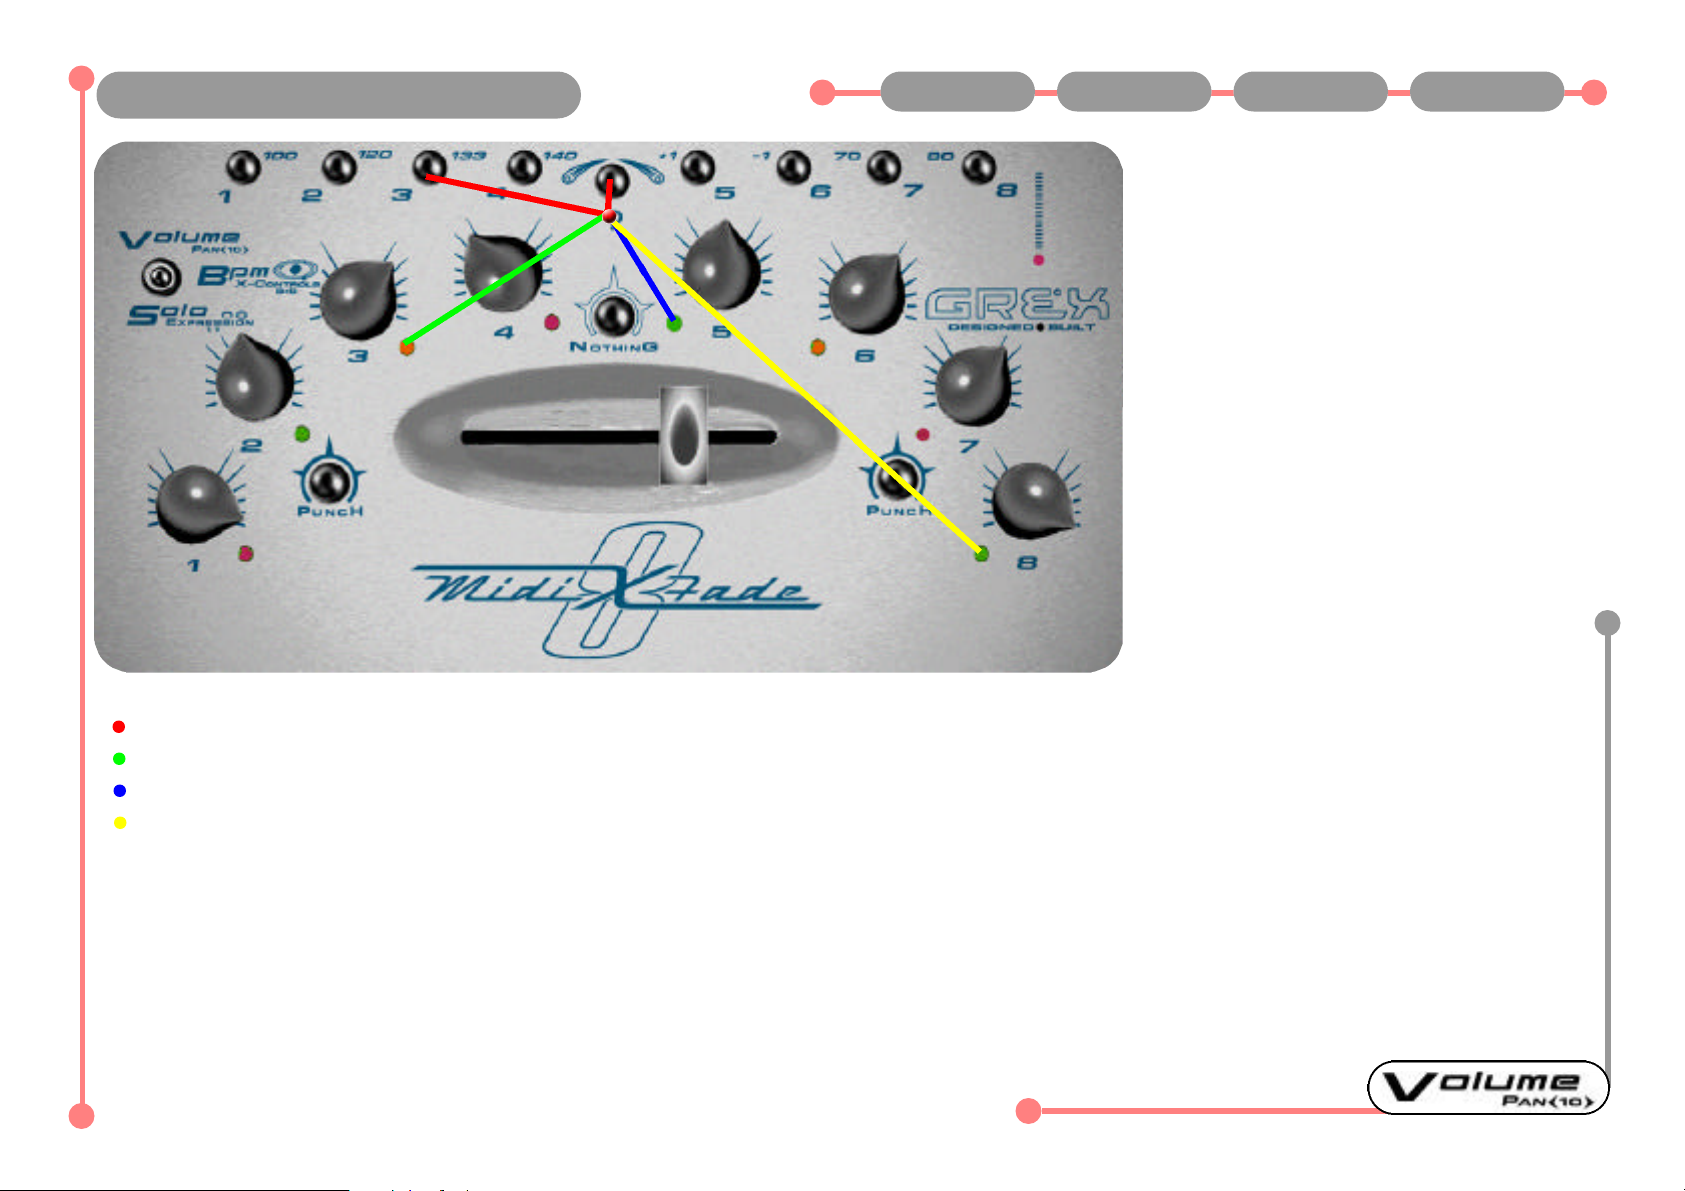
X-Fader has only one function in Volume
Mode; the controlling of any routed channels
in precisely the way you would expect a DJ
mixer to behave.
Orange lit channels are unmuted but ready to
immediately be routed through the X-Fader
simply by pressing the channel button(s).
The curve on the X-Fader features a fairly
long "flat"part, roughly between the 4 and 5
LEDs, where channels on either side of the
machine, if routed through the X-Fader, will be
turned up as high as the value of the rotary
controls will permit.
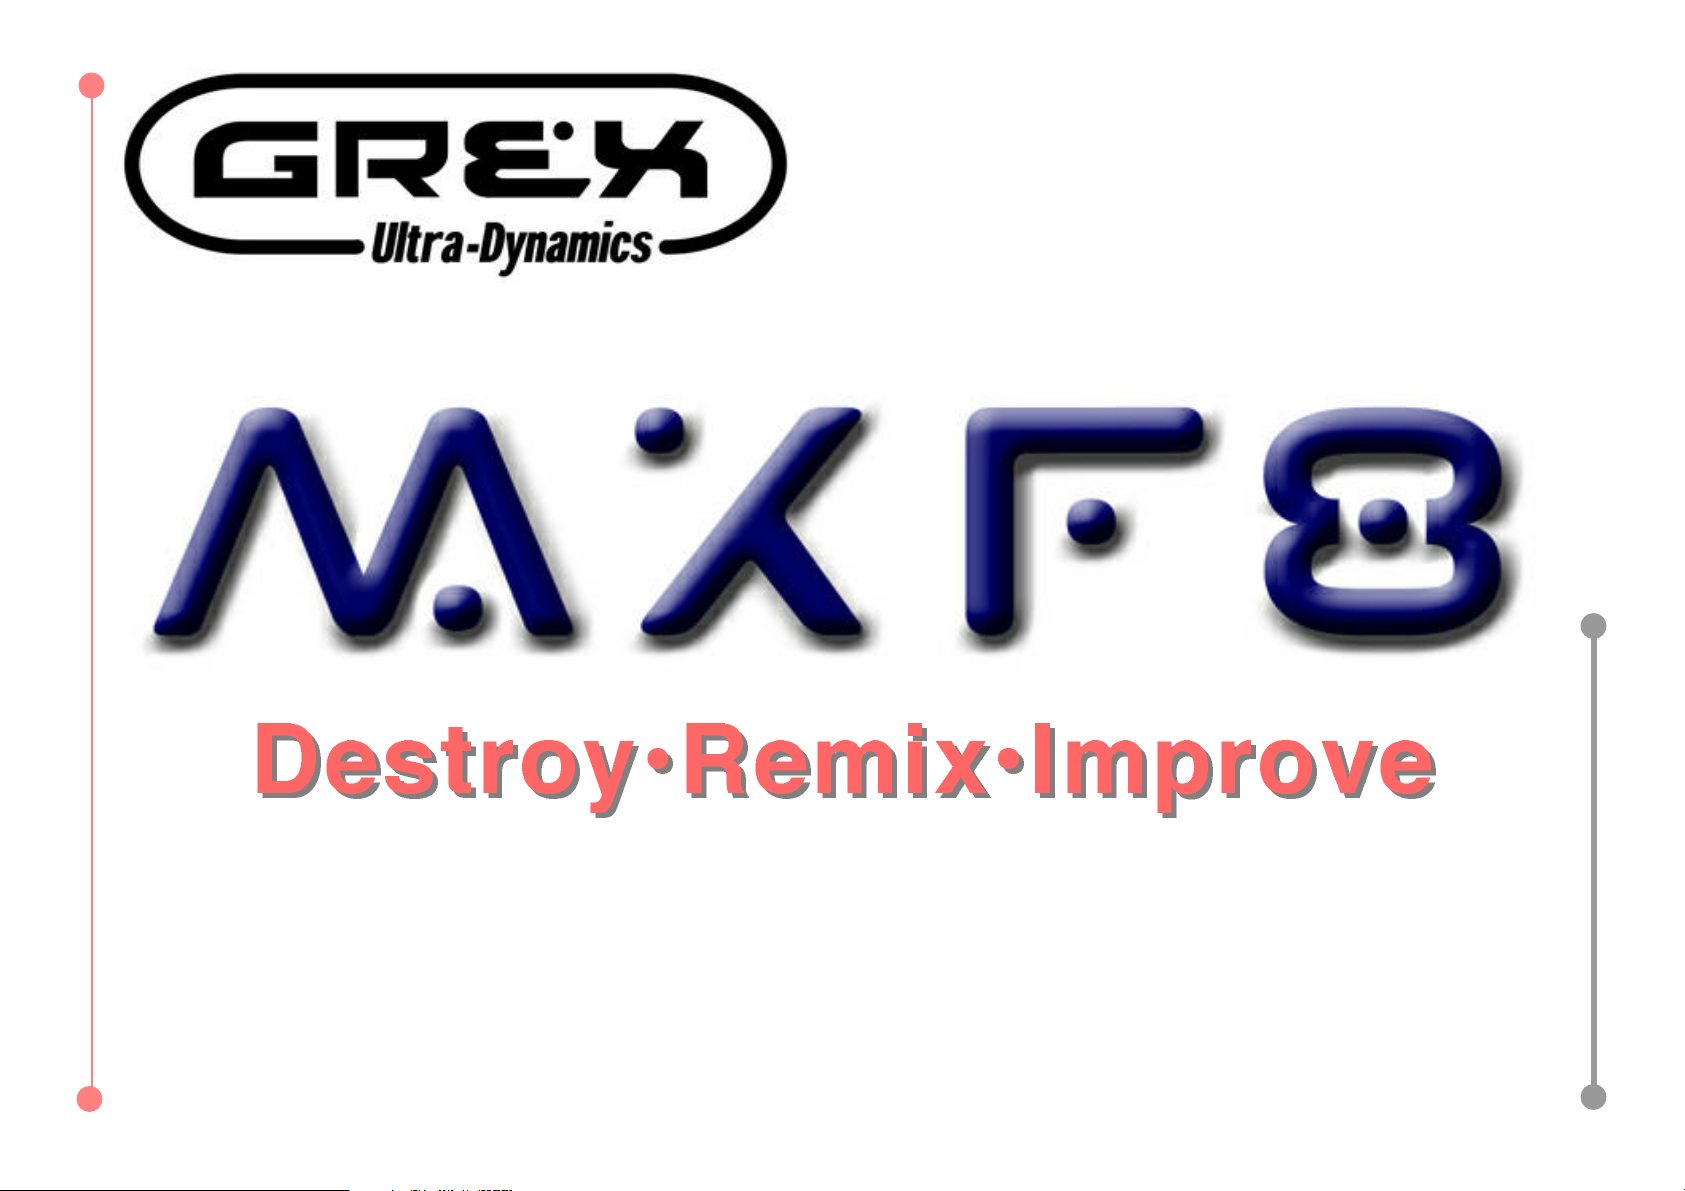
The Rotary Controls for each channel and the
X-Fader itself perform the same basic function
nearly all the time in all modes in the MXF8 to
give you X-Fading power instantly and direct
control over the channel volumes.
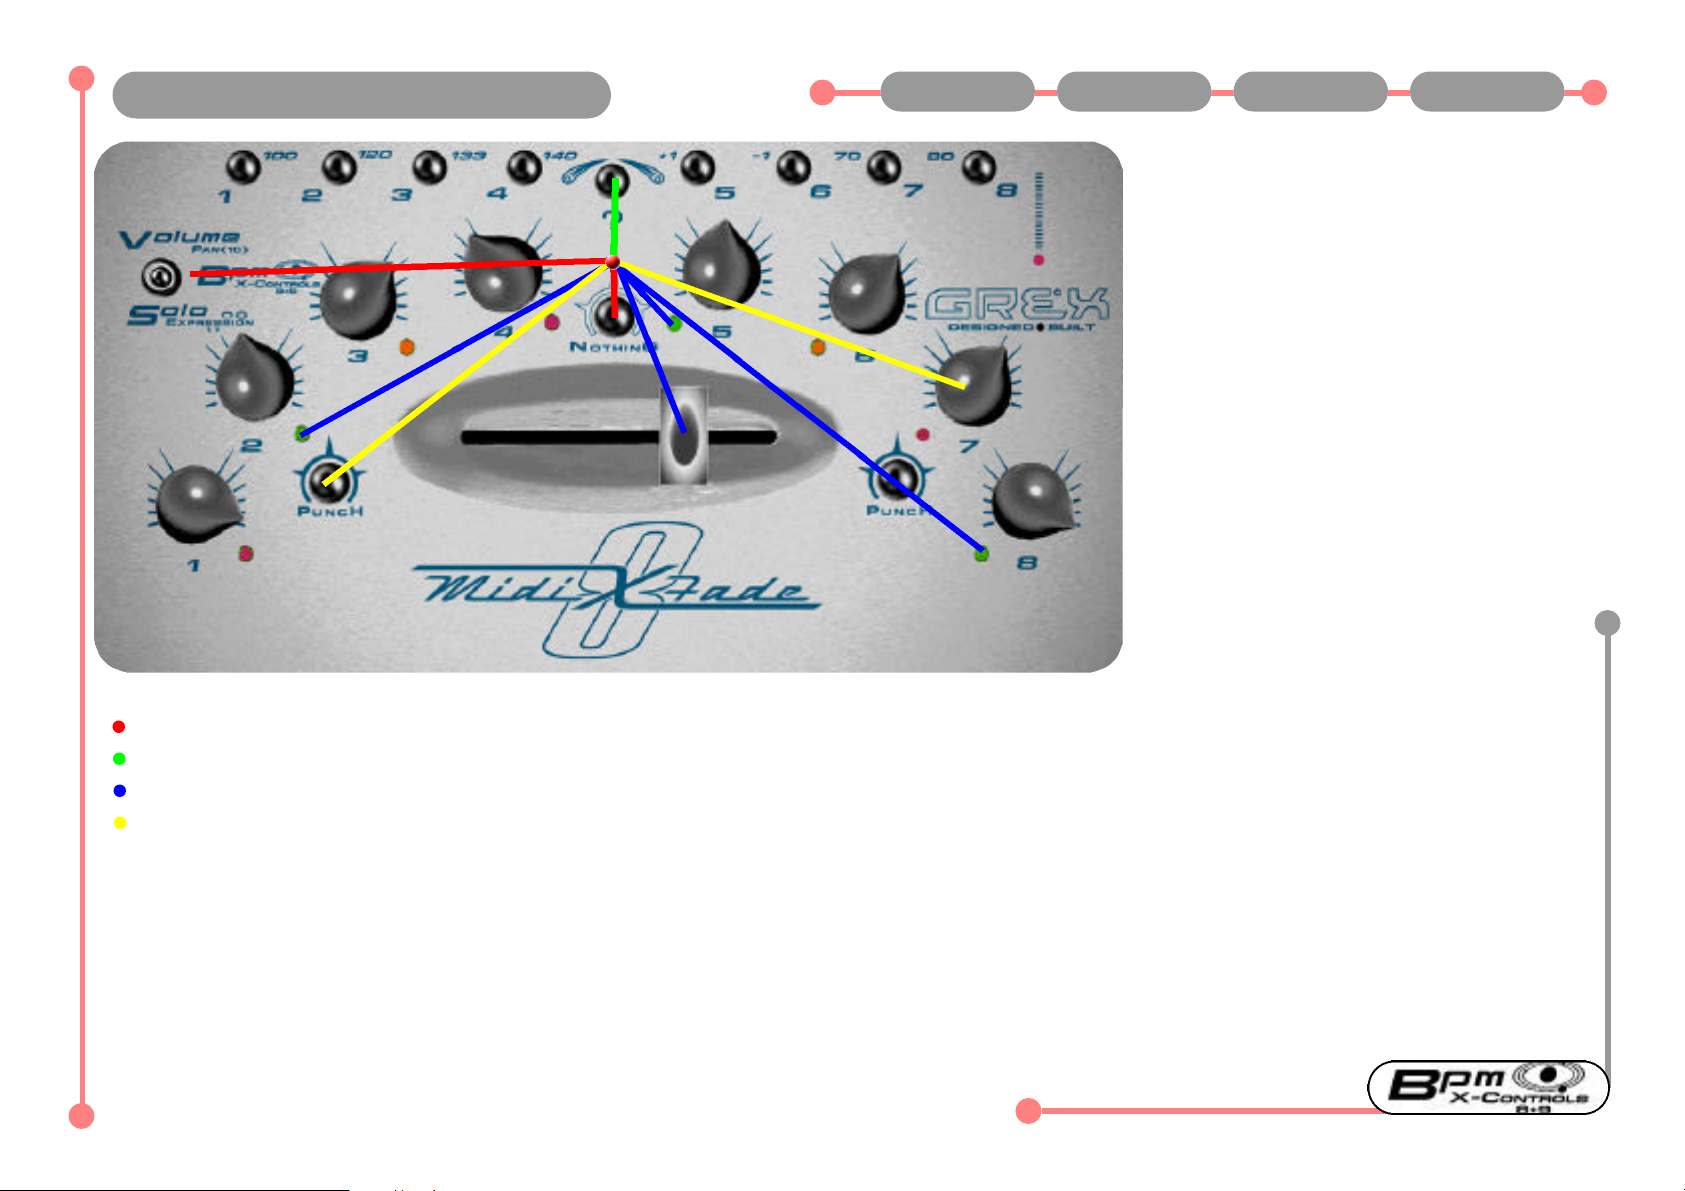
Move the X-Fader and any Green lit channels will be appropriately altered
With X-Fader set to extreme left or right channels on the opposite side will be turned fully off (0 Volume value is sent)
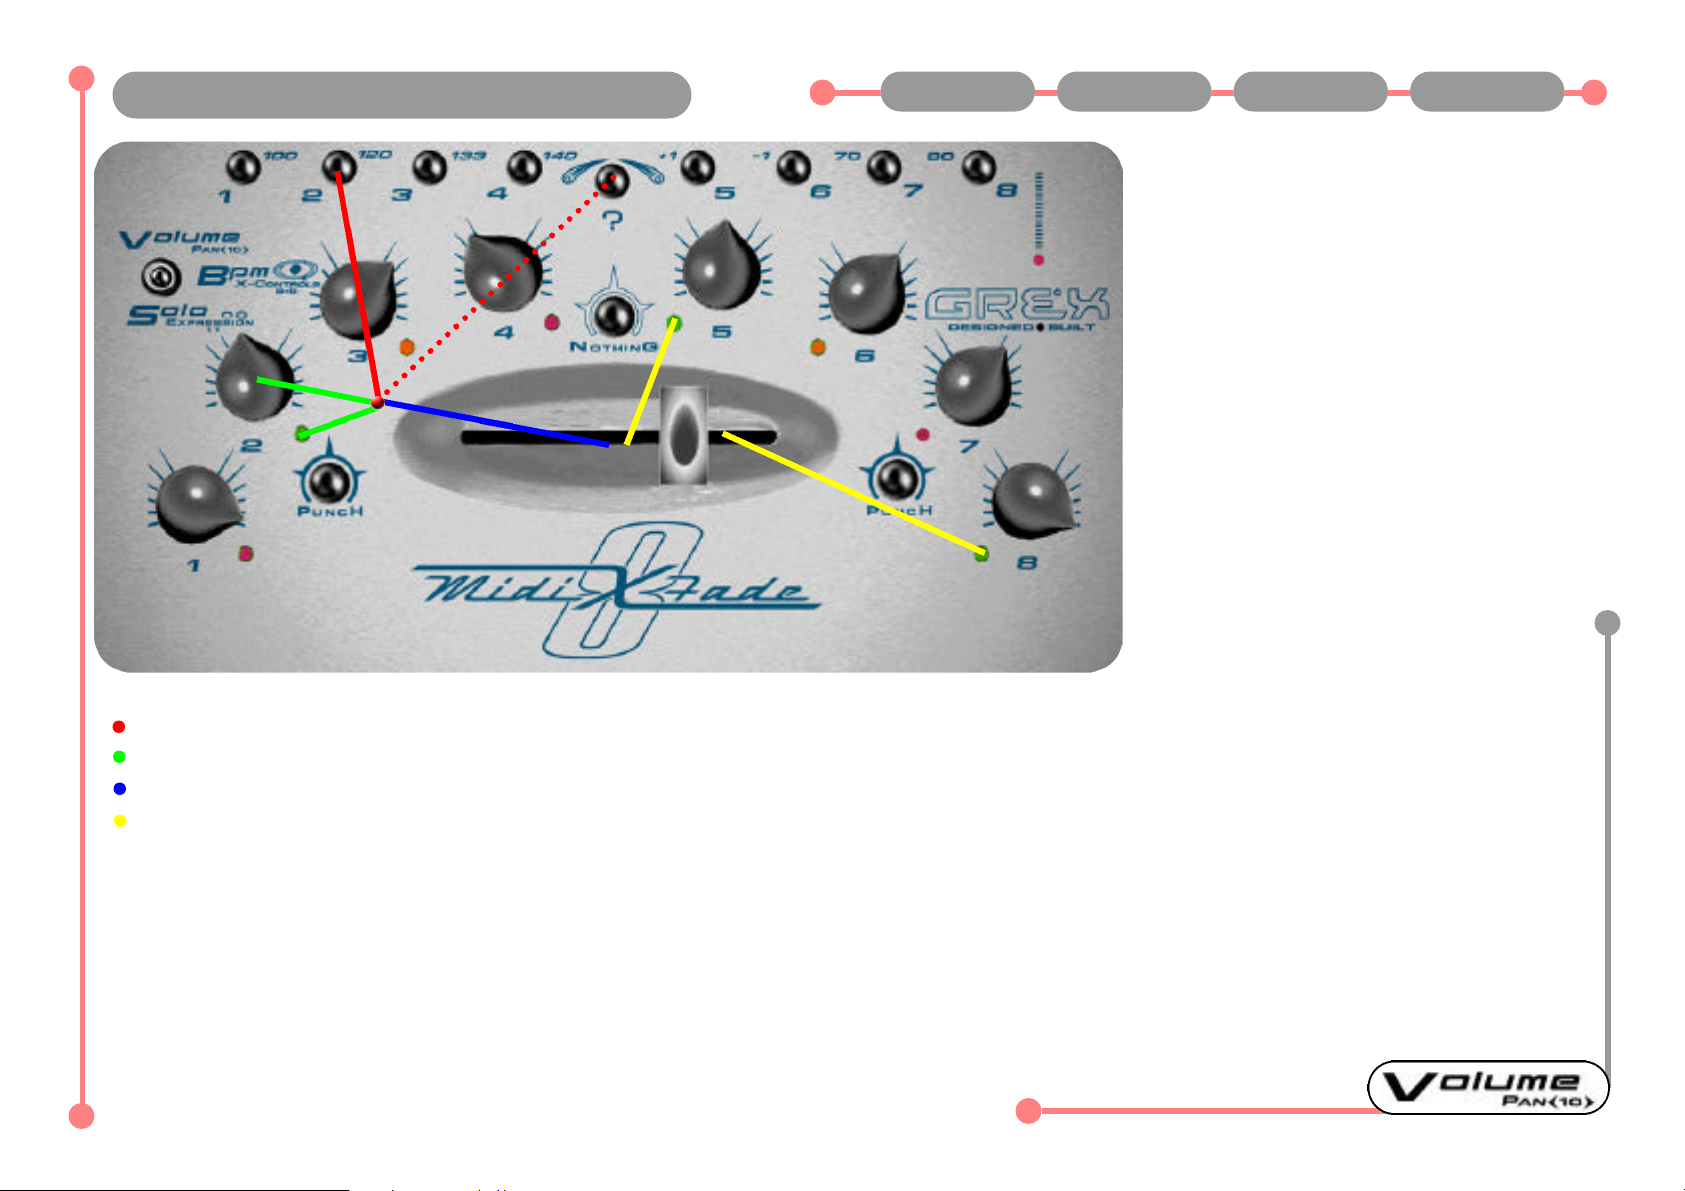
Note the use of X-Fader when pressing and holding down Nothing button...Green lit channels will be brought in and X-Faded...acts as a sort of group solo
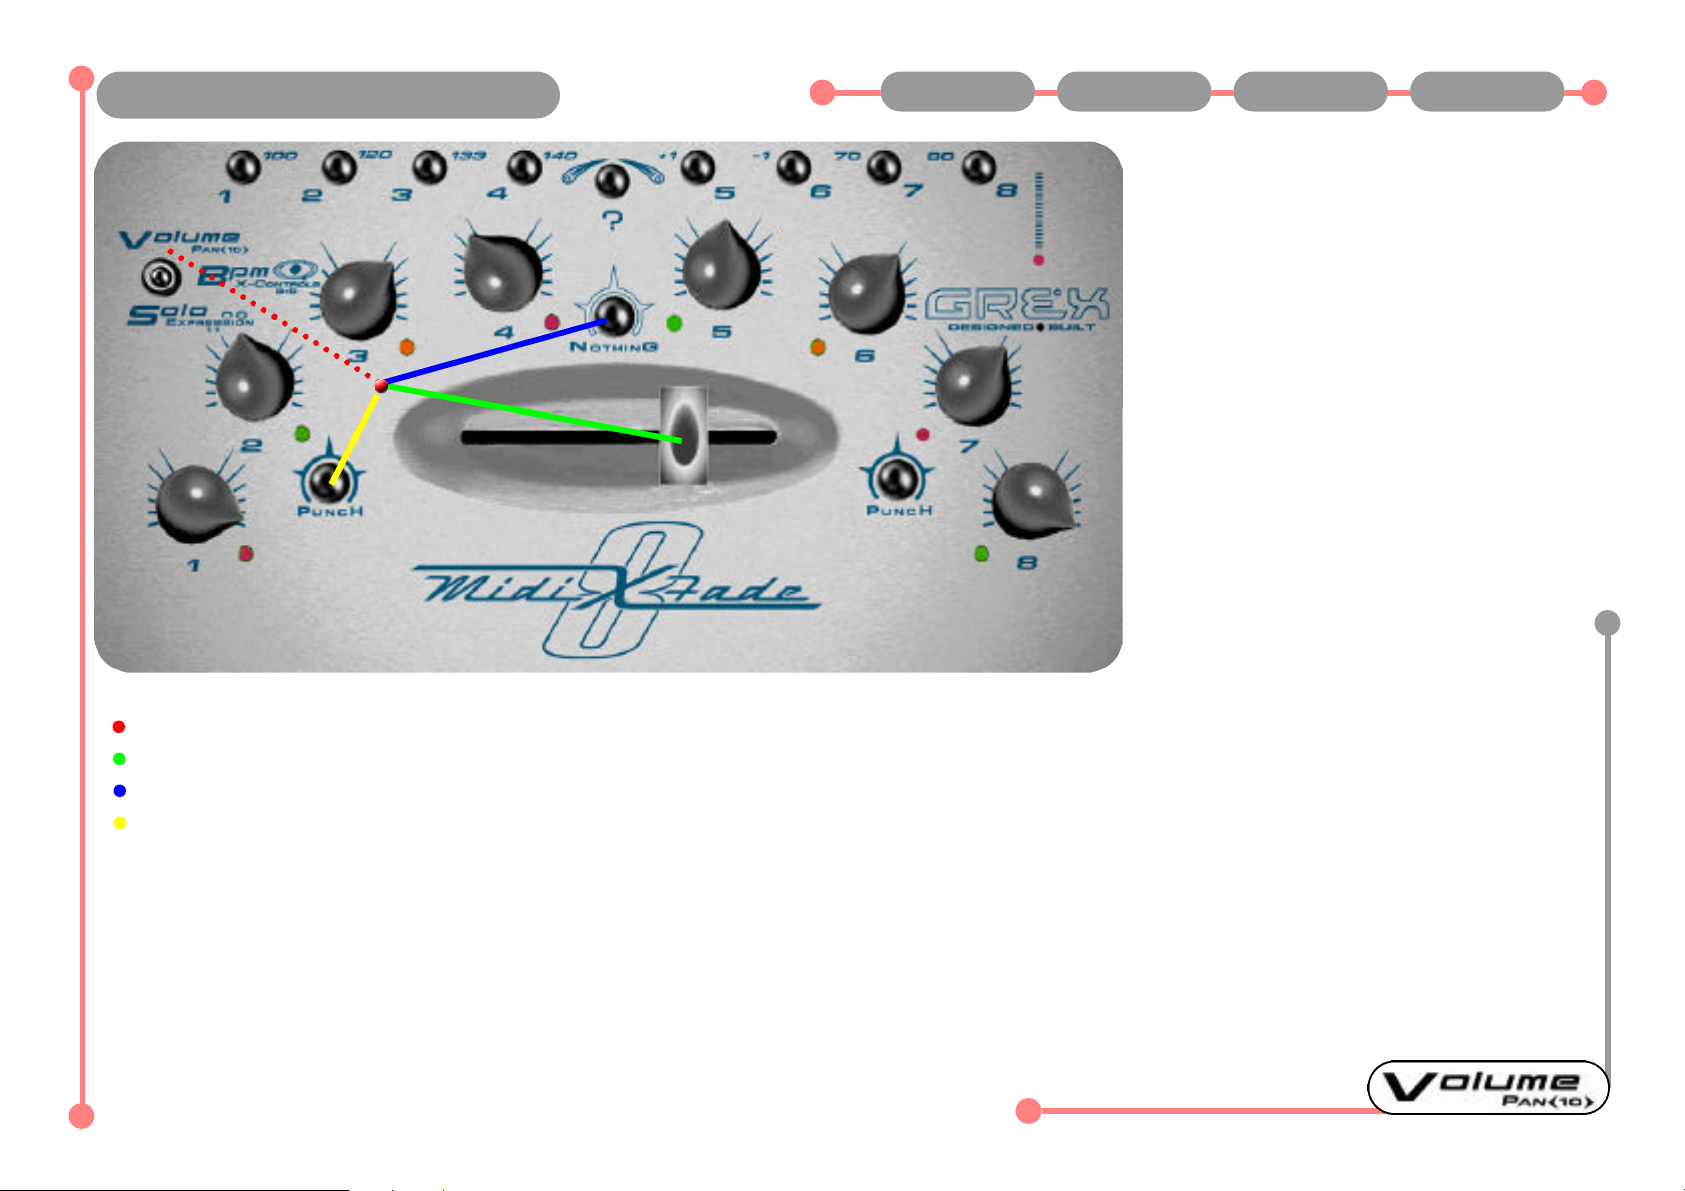
Note: Pressing Punch buttons cancels X-Fader assignments during the keypress...moving the X-Fader whilst holding a Punch Button down has no effect until release
Watch our website for custom X-fader curves- or devise your own and we can implement them for you
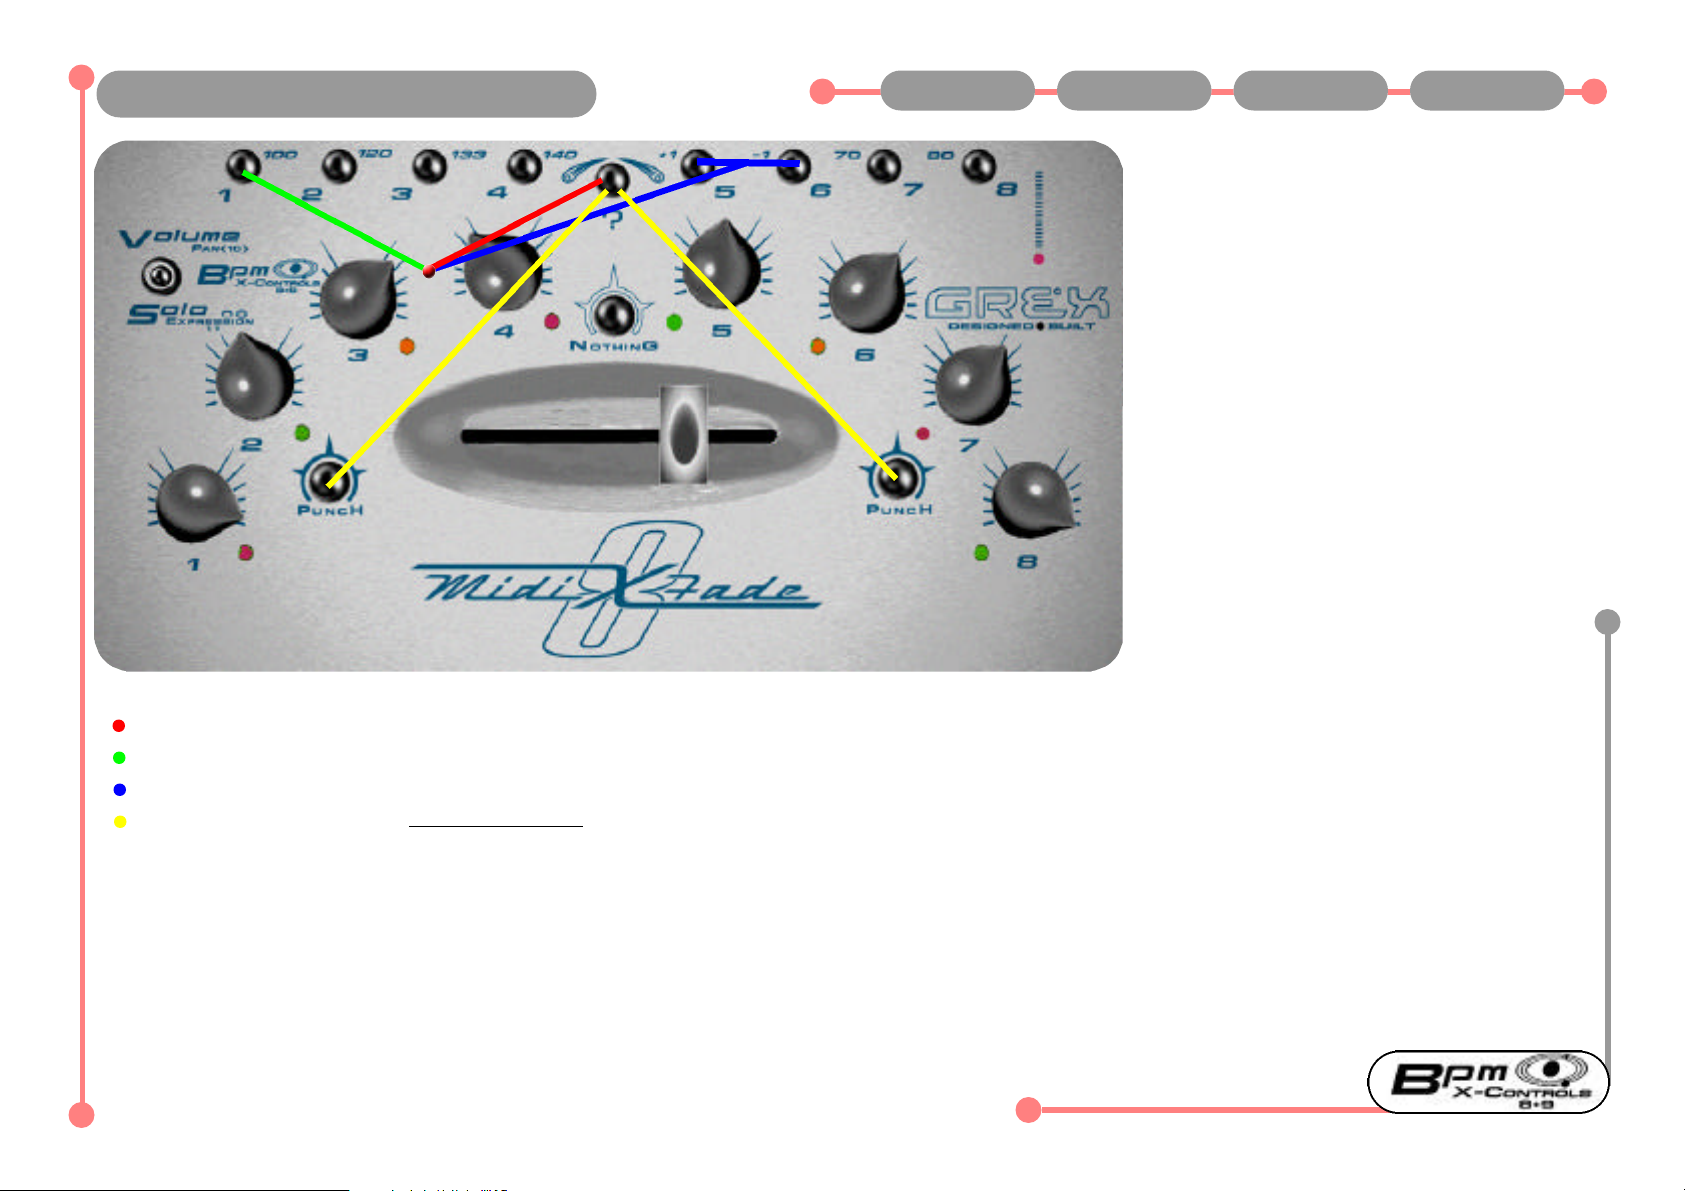
Comments and Tips:
The X-Fader works as such in all modes providing no other buttons are held down.
Notice that you can hold down the "?" button to disengage the X-Fader in all modes, so you can move it to another position without upsetting the mix. Of course, you will
get a new mix if you are "out of position"with the last place the fader was at say, prior to using the X-Control function.
X-Fader in Volume Mode Previous Main Next 1 of 1

Punch Buttons in Volume mode allow chan-
nels 1 to 4 or 5 to 8 to be switched in at the
current volume position indicated by rotary
controls...whether the channel is routed
through the fader or not...just as long as it
isn't muted.
Releasing the punch button restores volumes
with respect to the X-Fader position again.
Pressing Punch on left of the MXF8 brings in
channels 1 to 4 at rotary control position
whilst sending zero volumes for channels 5
to 8.
Rotary controls can be turned whilst holding
down Punch...this will change the volume
sent from within the "Punched"channels if
they are "live".
Punch Buttons performing the same basic
functionality across all modes providing the
keypress is simply pressing the Punch
Buttons with no other keypresses in force.
In Volume Mode...
Press Punch 1 (left hand side) and channels 1 to 4 are punched in...
Press Punch 2 (right hand side) and channels 5 to 8 are punched in...Note: Fader position has no effect on volume levels of punched in channels
Releasing a Punch button restores volumes on channels to include the fader position where applicable
Comments and Tips:
As the volume of "un punched"channels are instantly cut to zero any of these channels which were going though reverb or delay sends will pleasantly die away.
Dont forget- you may swap the Punch buttons round so that the opposite to above happens when pressing them. See Re-configuring Punch Buttons.
Punch Buttons in Volume Mode Previous Main Next 1 of 1

Pressing "Nothing"will give you Nothing!
Silence from Volume mode.
All channels are turned to zero Volume for
the duration of the keypress.
You can stab at the button to produce chop-
ping effects on the audio as it rapidly turns
up and down all 8 channels.
Nothing can also be used as a way of can-
celling any "locked"states...see Solo section.
The Nothing button can also be used as an
access to Green only channels in conjunction
with the X-Fader see page 2.
Also, with the "Nothing"button held down, a
slight turn of the rotary control on Red lit
channels unmutes them.
The Nothing Button performs the same basic
function across all modes providing the key-
press is simply pressing the Nothing Button
with no other keypresses in force.
Press Nothing Button...All channels are turned down to Zero volume...any "Locked Solo"channels are cancelled
Releasing Nothing Button returns volumes to current rotary / combined rotary and fader levels
Moving X-Fader whilst Nothing is held down will bring in any channels routed through the fader (lit Green)
Moving rotary controls whilst Nothing is held down will unmute any channels lit Red.
"Nothing"button is named in honour of the mighty Meshuggah...Swedish "maths metal"masters
Comments and Tips:
“Nothing” Button in Volume Mode Previous Main Next 1 of 2

Afew more points about the Nothing Button
follow...
With the Mode Switch in BPM position ONLY
the Nothing Button can be virtually locked
down by pressing and holding down both
the Nothing button and "?" button , then
releasing the Nothing button first.
From this "locked state"the Green lit chan-
nels can be isolated for X-Fader action.
By simply moving the Fader the Green chan-
nels are brought in at there respective vol-
umes just like you would expect. You can
also bring in Red channels by a slight move-
ment of their Rotary Controls- these will not
be routed through the fader, of course.
There is no visual feedback for this feature
so be aware of what you are doing...
Cancelling this state is easy; just briefly
press one of the Punches or Nothing again.
In BPM mode only...Press Nothing and hold it down...
Now press and Hold Down the "?" button ...then, release the Nothing button before releasing the "?" button...the Nothing button is now virtually held down...
Moving the fader now will bring in ONLY Green lit channels at appropriate volumes...
Rotate slightly any Red lit channel Rotary Controls to bring in these channels also...Pressing any Punch or Nothing briefly will "unlock"this state.
"Destroy•Remix•Improve"is a modified acknowledgement of Meshuggahs "Destroy, Erase, Improve"
Comments and Tips:
It is easy to learn how to do this set of instructions in a seamless way...just experiment.
Notice that moving the Mode Switch does not cancel the locked state...only pressing the Punches or Nothing briefly can do this once you've set a locked Nothing or Solo
state.
Locking “Nothing” Button Previous Main Next 2 of 2

The "?" button in Volume Mode is a sort of
shift key. It allows access to further functions
from the buttons and rotary controls.
Primary use is to access routing the channels
1-8 to X-Fader on and off.
Other use of ? button in Volume Mode is to
access Rotary Controls for alternate Midi
Controller function; the Pan or controller
number 10 as shown on the casing.
Whilst ? button is held down in Volume Mode
the X-Fader is not looked at by the processor
and can be moved without updating its posi-
tion until release of the "?" button and a
slight nudge of the X-Fader.
Whilst ? button is held down in Volume Mode
the Punch buttons and Nothing are not read
by the processor and have no function at that
time.
Press and hold down?.... then press channels 1-8....or several of the 1-8 buttons at once for "polyphonic"switching.
The LEDs for each channel pressed will change from OFF to Green or, if already Red to Green....or if already Orange to OFF
LEDs lit Green indicate channels are unmuted and Routed through X-Fader...Orange channels are muted but routed through X-Fader
Repeating held down ? button plus any channel buttons toggles LEDs on appropriate channels to next state in the order described earlier
Didn't like the look of, or the word "shift". So called it the "?" button...
Comments and Tips:
? Button in Volume Mode Previous Main Next 1 of 1

In Volume Mode access Pan or controller
number 10 using the rotary controls by hold-
ing down ? and rotating chosen control for
the midi channel 1 to 8.
The LED next to the rotary flashes to indicate
when the knob is out of position relative to
its previous Volume setting...
Restore the knob to its previous Volume set-
ting by releasing the ? button then slowly
rotating the knob(s) on affected channels
until the flashing stops.
The Volume level set before entering this
controller mode is now restored.
No data is sent during rotation of the channel
control if ? is released until Volume setting is
restored.
MXF8 is now ready to continue sending
Volume messages from that channel.
In Volume Mode only...Press ? button and hold it down
Rotate chosen channel control(s)....Channel LED(s) start flashing
When finished sending controller 10 (Pan) data release the ? button....LED continues flashing until...
Rotating channel rotary control until it is back at the previous level for Volume it was at before entering the controller 10 mode
Dont Panic if LEDs are flashing! Slowly rotate your way out...no controllers are sent until restore is done
Comments and Tips:
Just because a controller has a number or name, like "Pan"or "Volume"doesn’t mean you are obliged to use it as such.
You can map virtually any controller to any mappable parameter using midi.
You can, with some imagination, map the use of the X-Fading Controllers to control softsynths and so-on in bizzare ways.
Rotary Midi Controllers...”Pan” Previous Main Next 1 of 1

MXF8 must be powered up whilst holding
down channel button 1 to enable sending of
Midi Clocks. This powerup keypress can be
done whatever position the Mode switch is in.
The speed of the MXF8’s internally generated
effects such as Beatgate and Ratio
Sequencer are governed by the MXF8's
current BPM setting.
Control of BPM can only be achieved with
Mode Switch in BPM position.
With MXF8 in BPM mode press and hold
down ? button and then momentarilly press
Punch 1 (left hand punch button) to send
Midi Start and clocks at current BPM. Your
external gear should respond if set to do so
correctly.
To stop your external gear or the flow of BPM
data from MXF8 press and hold down ? then
momentarilly press Punch 2 (right hand
Punch button).
Follow detailed instructions to get going...to change BPM press and hold down ? then press any of the 1-8 buttons
To select 100 BPM do the above keypress combination followed by channel button 1...for 80BPM do the same but press button 8
For small increments/decrements press ? then stab at the +1 / -1 buttons on channels 5 and 6 to get to the BPM you want
From BPM Mode only...and with Midi Clocks enabled...Midi Start Message is sent via "?" + Punch 1...Midi Stop Message is "?" + Punch 2
"Grex Ultra Dynamics"is an anagram of...?
Comments and Tips:
The way midi works maintains that a stream of Midi Clocks should be sent at all times to connected gear prior to a Start Message being sent. This helps with real time
pickup responses. You may find that some external programs respond fairly slowly to BPM changes and "ramp"to new BPMs.
BPM and Synchronisation Previous Main Next 1 of 1

Sending Controller 8 is very easy...Hold down
a channel button and move the X-Fader.
Controller 9 (NOT available if MXF8 is send-
ing Midi Clocks!) involves Holding Down "?"
the Channel Button AND moving the Fader.
From this Mode the X-Fader sends a value of
Zero from the far left and 127 from the far
right with values in between.
This function is good for sending controller
messages individually or polyphonically
(Holding down several channel buttons at
once) by whipping the X-Fader back and
forth to send the controller values.
From BPM Mode only...To send Controller 8 on midi channel 1 from X-Fader...Press and Hold Down Channel Button 1....
Move the X-Fader to send the amount...Zero at left...max to full right...
Holding Down several Channel Buttons whilst moving X-Fader sendsmultiple Midi Channels of Controller 8...
Controller 9 is sent in the same way...ONLY when Midi Clocks are NOT enabled...Send Controller 9 by adding "?" + Channel Button + X-Fader movement
A bijou and compact piece of technological genius.
Comments and Tips:
Remember, if you are sending Midi Clocks you will lose the ability to send Midi Controller number 9.
In the Ableton Live template we have added a Simple Delay Wet/Dry Controller from Channel 1 button plus X-Fader movement and a low cut off from Channel 2 Button
plus X-Fader to highlight how this function might be used. The effect is placed in the Master set of effects in Live and therefore is over the entire mix when applied.
Be careful not to leave this wet/dry setting set in the middle of its travel otherwise you will have a constant echo across your mix!
X-Controls...midi controllers 8 & 9 Previous Main Next 1 of 1

Beatgate is an interruption of Volume mes-
sages at various spacings based on midi
clock intervals.
Channel button 1 will activates a volume cut
and restore every alternate midi clock; button
2 every 2 clocks and so on.
This function has, in our experience high-
lighted the sluggishness and downright
incorrect timing response of certain software
sequencers to incoming Volume Control data!
Using this function on good old hardware
samplers demonstrates that this is nothing to
do with the MXF8 sending variable timing.
Needless to say, good useable effects can be
created by interacting with the 4,5 and 6
spacings of the Beatgate.
Later on we will be adding interesting pattern
based spacings for this function in the future.
In BPM Mode only...
Press and Hold Down any of the 1-8 channel buttons, then...
Press and Hold Down “Nothing”...The different Beatgate spacings (currently straight, even gaps) will flicker the Volume Levels between zero and their current settings
Add further 1-8 button combinations in your combined keypress for different values...Button 1 is 1 midi clock spacing, 2=2 etc...
Comments and Tips:.
The internal tempo that your MXF8 is running at determines the speed of the BeatGate. So, you can powerup witithout Midi Clock enabled, change the BPM that your
MXF8 is running at internally- sorry no visual confirmation for this- and then use the Beatgate at a totally unrelated speed to the tempo of the work in progress.
Try mapping the Volume controls (Midi Controller 7) to something other than Volume in your external gear to modulate other parameters.
Try keyprerss combinations and release your hold on the “Nothing” button periodically to create more complex stuttering effects.
BeatGate Activation & Tempo Previous Main Next 1 of 1

We realised that we could squeeze in another
rotary activated midi controller from the BPM
mode- here it is!
Activates and responds in a similar way to
controllers 10 and 11 with the accompanying
“flashing” mechanism.
It's another controller which may find uses
asaper channel send in your setup.
As ever, functions are piled up on the con-
trols but values don't get sent until some
movement of the controls has occurred.
If you want to blend in a send amount and
you were previously using the Volume set
high, you will need to “whip” the rotary down
to zero before commencing a tasteful blend.
This works fine if you practise this movement
and become aware of the strengths and limi-
tations at hand.
From BPMMode only...Press ? button and hold it down
Rotate chosen channel control(s)....Channel LED(s) start flashing
When finished sending controller 12 data release the ? button. LED continues flashing until...
Rotating channel rotary control until it is back at the previous level for Volume it was at before entering the controller 12 mode
Comments and Tips:
Midi Controller 12...(unmarked!) Previous Main Next 1 of 1

Main use for Channel buttons is as a Solo for
the appropriate channel(s).
Polyphonic and additive in behaviour...try
pressing and holding down 1 then adding 2
etc...Notice that as soon as you release a but-
ton in a Polyphonic keypress the entire Solo
state is cancelled.
Principal interesting behaviour of Solo on
MXF8 is the emulation of analogue push but-
ton selectors on old Hi-Fi’s...
Soloing a channel by holding down the but-
ton 1-8 Solos that channel at the current
Rotary Control position with no reference to
the X-Fader...
Releasing a Soloed Channel has the effect of
bringing back in all the other Channels
In Solo Mode Only...
Press and Hold Down any Channel Button or combination of Channel Buttons...Add one after another...Note: Releasing any one of those held down ends Solo state
To Lock the Solo(ed) channel(s)... Hold Down the button(s) then... also Hold Down “?”...Now release the Solo’d buttons first, then release“?”...Channels are “Locked”
Unlock, from any Switch Mode position, by pressing Nothing or the Punches briefly...Lock state remains in force until this is done.
Comments and Tips:
Go through these instructions slowly- they read worse than they are to carry out
Soloing and ”Locking” channels Previous Main Next 1 of 1

In Solo Mode access Expression (controller
number 11) using the rotary controls by hold-
ing down ? and rotating chosen control for
the midi channel 1 to 8.
The LED next to the rotary flashes to indicate
when the knob is out of position relative to
its previous Volume setting...
Restore the knob to its previous Volume set-
ting by releasing the ? button then slowly
rotating the knob(s) on affected channels
until the flashing stops. The Volume level set
before entering this controller mode is now
restored.
No data is sent during rotation of the channel
control if ? is released until Volume setting is
restored. MXF8 is now ready to continue
sending Volume messages from that channel.
From Solo Mode only...Press ? button and hold it down
Rotate chosen channel control(s)....Channel LED(s) start flashing
When finished sending controller 11 (Expression) data release the ? button. LED continues flashing until...
Rotating channel rotary control until it is back at the previous level for Volume it was at before entering the controller 11 mode
Comments and Tips:
Flashing LEDs?...Remember, this just indicates that a Rotary controller is "out of position"with its previous volume setting. Slowly rotate a rotary control to find its
previous setting then you won't get huge volume jumps once the MXF8 has internally switched back to using the rotary for volume control.
If you are going into a controller sending mode for effects you are in danger of sending a sudden huge amount when you might really wish to slowly blend...Practice rap-
idly turning the pot down to zero as you enter the mode and you can get around this problem.
“Expression” Midi Control 11 Previous Main Next 1 of 1

This feature sends controller values of 127
then 0 with alternate keypresses and is useful
for switching midi controllable effects and
such fully on or off.
Controller number 13 is sent in this "tog-
gling"state for each midi channel. Use Midi
Learn in your external gear to set up the
responses you want.
For example, you might set up a chorus
effect which you wish to switch in and out
rhythmically.
You have up to 8 switchable states from this
arrangement.
As there is no visual feedback from the MXF8
for these states be aware that leaving some-
thing set On or Off might be causing mayhem
with your sound when you don't want it!
With Mode Switch in Solo position...Hold Down the "?" button...then press buttons 1-8 to briefly send Midi Controller 13 on Channels 1 to 8
Full On value (127) for Controller 13 is only for duration of key press. Releasing this keypress sends a value of "0""
Lock"the Full On value by Holding Down the Channel Button 1-8 with the "?" held then releasing the "?" button BEFORE releasing the Channel Button
Unlock a locked state here by repeating the above instruction...sorry no visual feedback for this state
Comments and Tips:
The Ableton Live template sets up a couple of effects to toggle in and out for this function to give you an idea of one way it can be used
“Toggling” Midi Controller 13 Previous Main Next 1 of 1

Instructions for Access and Use of the powerup states

This isn't a function. But it's useful for us
when the machine is assembled...but in case
you stumble into it on power up you can see
the lights flash to prove everything is work-
ing.
To cancel out of this test...
Power off then powerup again but only either
with no other keypresses or whilst Holding
Down buttons 1 to 3 depending on your wish-
es for functionality present at startup.
Enjoy.
Hold down Channel Button 8 as power is turned on.
In Volume Mode pressing any buttons produces LED feedback.
In BPM Mode Holding down buttons 1-8 then rotating the appropriate Channel Rotary controls causes LED feedback.
In Solo Mode moving the X-Fader causes LED feedback. Active Sensing Message is sent at all times during test to light Midi Confidence light.
Comments and Tips:
Hardware Test Routine Previous Main Next 1 of 1

Do not do this until we send new features!
If you get stuck DON'T PANIC!
In any case...you will NOT be able to use this
feature until we release the Grex Utility
Downloader to enable downloads via email.
If you do happen to powerup your machine
whilst holding down button five all LEDs will
light Orange and nothing further will hap-
pen...for the time being.
Power off and powerup again to the desired
mode and continue using MXF8 as ever.
New features and tables which fundamentally
enhance the machine will be ready soon.
Enter Download mode by powering up whilst Holding Down Channel Button 5...
All LEDs will light Orange unless Midi lead is connected with incorrect data flowing which will cause an immediate ALL Red LED state...
Full instructions to follow on release of Grex Utility Downloader for computer / midi interface to allow sys ex into MXF8...
Watch website for news on new downloadable functions, number crunching tables and tweaks...
Comments and Tips:
Software Download Previous Main Next 1 of 1

Ordinarily your MXF8 will startup with the
Mute states as they were the last time you
changed the BPM.
The last BPM you used is also recalled at
powerup.
The speed the MXF8 is running the Ratio
Sequencer and BeatGate internally is the
BPM used and is not reset.
If you want to startup quickly with a "clean
slate"of Mute States this procedure will do it.
Power up whilst Holding Down Channel
Button 4.
That's it.
Powerup whilst Holding Down Channel Button 4...Hold Down Channel Button 1 at the same time to enable Midi Clocks and blank LED state
All Off LED state for all channels will now be in force...all channels are muted and next press of channel button will turn its LED Red unless you Hold Down "?" for Green
MXF8 stores the current Mute States for all Channels, but not the Rotary Control positions, whenever you change BPM
All channels are muted and next press of channel button will turn its LED Red... unless you Hold Down "?" to assign it Green (routed through X-Fader)
Comments and Tips:
Startup with No Saved Mute States Previous Main Next 1 of 1
Table of contents