Griven nanoParade AL4484 User manual

nanoParade User Manual
Griven S.r.l. - Via Bulgaria, 16
46042 Castel Goffredo
Mantova - Italy
© Copyright Griven 2017 - Griven reserves the right to make
changes to this product and related instructions at any time
without prior notice and such changes shall be effective
immediatly.
Tel. +39.0376.779483
Fax +39.0376.779682
E-mail: [email protected]
Web: www.griven.com
AL4484
Rev. 1.00
Date: 27/06/2017
AL4484 nanoParade
Length / Lunghezza 320 mm 620 mm 1220 mm
Weight / Peso 0,2 Kg ( 0,44 Lbs) 0,4 Kg ( 0,88 Lbs) 0,8 Kg (1,76 Lbs)
Housing / Corpo proiettore Anodized Alluminum, Stainless Steel Brackets
IK rating / classe IK IK08
IP rating / grado IP IP67
Ambient temp./ Temperatura ambientale -40°C to 50°C ( -40°F to122°F)
Power consumption / Alimentazione 24 Vdc
Leds per meter / Numero di Leds 50 (RGB) 70 (White)
Power consuption / Potenza massima 4.6 W (RGB) 3W (White) 9.2 W (RGB) 6W (White) 18.4 W (RGB) 12W (White)
Nominal current / Corrente nominale 0,6 A /m (RGB) 0,4 A /m (White) 0,6 A /m 0,4 A /m (White) 0,6 A /m 0,4 A /m (White)
Thermal protection / Protezione termica Electronic
Electrical class / Classe elettrica III
Cable length / Lunhezza del cavo 200 mm
Control system / Sistema di controllo USITT DMX-512 - RDM ( only RGB version)
DMX Channels / Canali 3 ch.(RGB) 1 ch. (WHITE)
Color range / Colori
RGB version Theoretical variety of innite color hues. Theoretical variety of innite color hues. Theoretical variety of innite color hues.
Optics/ Ottiche 120°
Order codes
CODES EXTENSION
LENGTH LED TYPE
03 320 mm RG RGB
06 620 mm CW COLD WHITE
12 1220 mm WW WARM WHITE
DW DYNAMIC WHITE ON REQUEST
OPTIONS
AActive LED bar with in-built DMX receiver
PPassive LED bar without in-built DMX receiver
AWith cables and connectors Fitted with IN and OUT power and data cables (L=200) and IP67 connectors
BWith cables Fitted with IN and OUT power and data cables ( L=200mm)
SStandard xing Fixing system for perpendicular projection
LWith xing bracket Adjustable xing bracket for beam orientation ( for 320mm long bars)
FWith xing brackets Adjustable xing brackets for beam orientation ( for 620mm and 1220mm long bars)
Exemple of code combination AL4484 03 RG A B L
Please combine the required
AL4484 + LENGTH + LED TYPE + OPTION to order
Technical Data

AL4484 nanoParade - Rev. 1.00
nanoParade 620 mm
620 mm [ 24 3/8”]
200 mm
[ 7 7/8”]
50 mm
[ 2”]
26mm
[ 1”]
20 mm [ 3/4”]
nanoParade 1220 mm
200 mm
[ 7 7/8”]
1220 [ 48” ]
20 mm
[3/4”]
26 mm
[ 1”]
50 mm
[ 2”]
nanoParade is shown here in the version with connectors. A version with 200 mm cable without connectors is also available.
nanoParade 320 mm
[ 12 5/8" ]
320 mm
200 mm
[ 7 7/8”]
50 mm
[ 2”]
26mm
[ 1”]
20 mm [ 3/4”]
Size

AL4484 nanoParade - Rev. 1.00
Important notices / Avvertimenti importanti
- This product must be installed in accordance with applicable national and local electrical and construction codes by a person familiar with the construction and
operation of the product and the hazards involved. Failure to comply with the following installation instructions may result in death or serious injury.
Questo prodotto deve essere installato secondo le normative locali, da personale specializzato. La mancata osservanza delle istruzioni di installazione può
portare a situazioni di pericolo all’incolumità della persone.
- Do not stare at the operating light source.
Non ssare la sorgente luminosa durante il suo funzionamento.
- The xture might be damaged by excess voltage. The installation of an overvoltage protection device on the electrical system may
reduce the risk of damage.
Apparecchiatura sensibile alle sovratensioni. L’installazione di un dispositivo di protezione delle sovratensioni sull’impianto elettrico attenua l’intensità di questi
fenomeni proteggendo gli apparecchi dal rischio che vengano danneggiati.
- The use of an adequate magnetothermic switch along the power supply line is recommended.
E’ consigliato l’uso di un adeguato interruttore magnetotermico/differenziale sulla linea di alimentazione.
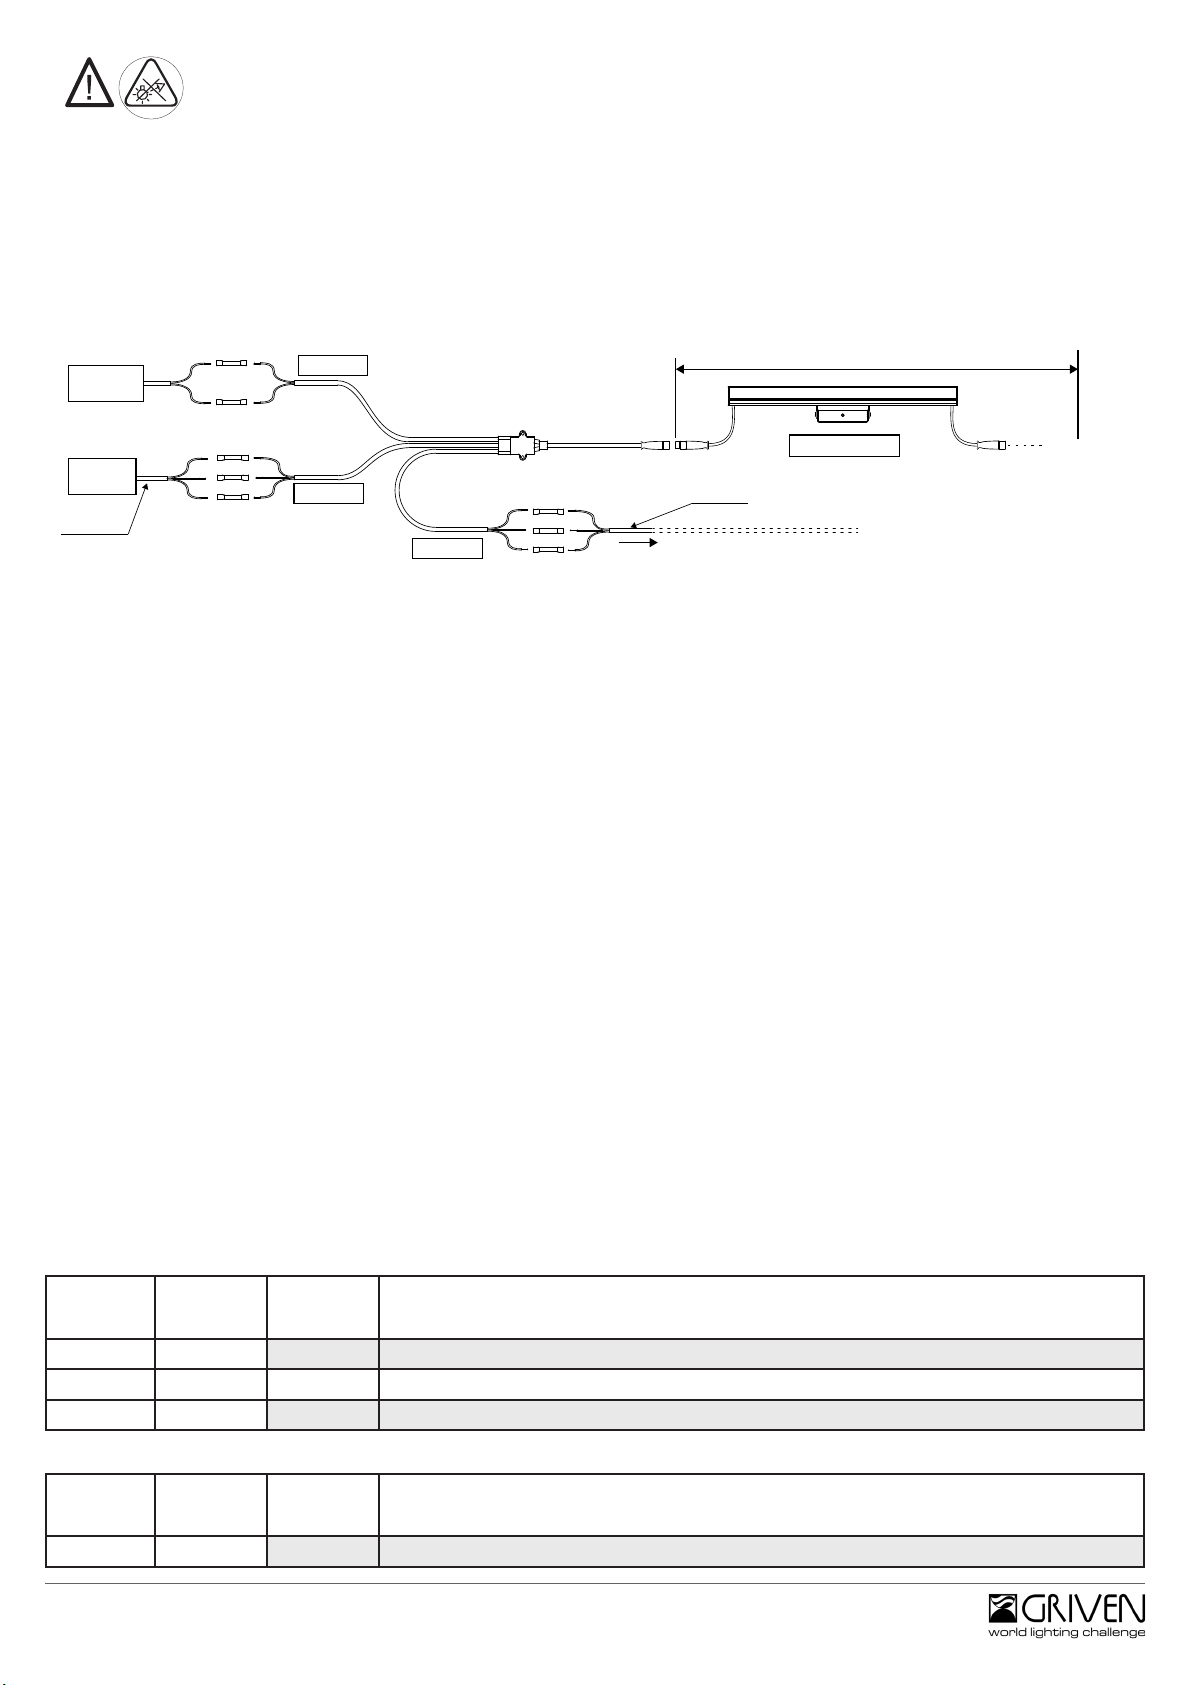
- Connect the xtures to each other only when disconnected from mains.
Collegare tra loro i proiettori solo quando nessuno di essi è collegato alla rete elettrica.
- Never leave cables and connectors unconnected or unprotected for long periods.
Non lasciare mai per lungo tempo agli agenti atmosferici cavi e connettori non collegati o non protetti.
- Disconnect power before installing or servicing to avoid electrical shock.
Togliere l’alimentazione prima di effettuare qualsiasi operazione all’interno dell’apparecchiatura.
- Disconnect power before any connection operation.
Togliere l’alimentazione prima di effettuare qualsiasi operazione di connessione tra gli apparecchi.
- Check voltage and frequency before powering the xture. Do not exceed xture speci ed voltage.
Prima di connettere l’apparecchio alla rete elettrica, veri cate la compatibilità di tensione e frequenza.
- Do not handle the unit with wet hands or in wet environments.
Non maneggiate il prodotto con mani bagnate o in presenza di acqua.
- Apply to quali ed staff for any maintenance service not described in this instructions manual.
Rivolgersi ad un tecnico quali cato per qualsiasi operazione di manutenzione ordinaria non descritta nel presente manuale.
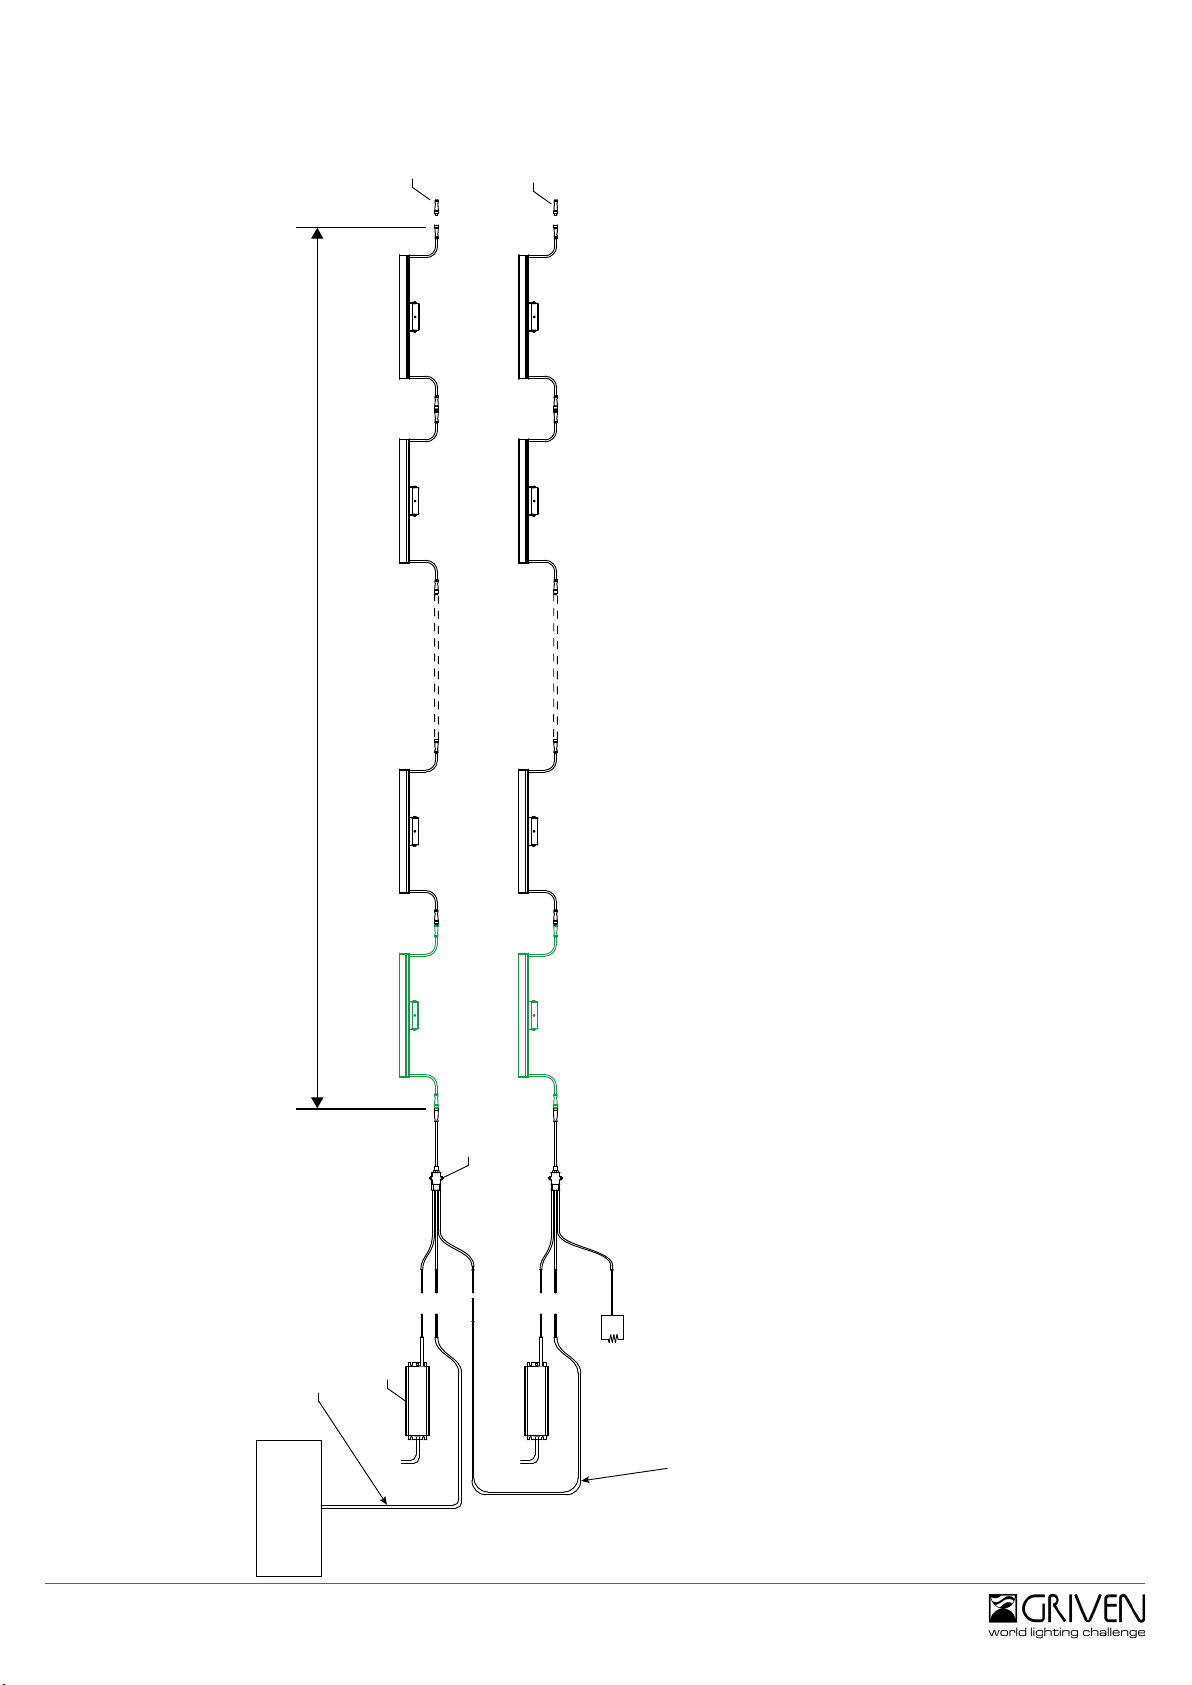
- Do not exceed the maximum quantity of xtures per line in order to avoid power surges.
Non superare il numero massimo speci cato di apparecchi per linea per evitare pericolori sovraccarichi di corrente.
- Before powering the unit, ensure to use cables and connectors with proper section and length, according to its power consumption.
Prima di effettuare le connessioni veri care la portata dei cavi / connettori e la lunghezza dei cavi tenendo conto dell’assorbimento del prodotto.
- Fix the projector by using screws, hooks or other adequate supports that can bear its weight.
Fissare il proiettore con viti, ganci o altri supporti in grado di sostenerne il peso.

nanoParade User Manual
Griven S.r.l. - Via Bulgaria, 16
46042 Castel Goffredo
Mantova - Italy
© Copyright Griven 2017 - Griven reserves the right to make
changes to this product and related instructions at any time
without prior notice and such changes shall be effective
immediatly.
Tel. +39.0376.779483
Fax +39.0376.779682
E-mail: [email protected]
Web: www.griven.com
AL4484
Rev. 1.00
Date: 27/06/2017
Fixing
WARNING ! xing and connecting operations must be carried out by qualied personnel only !
ATTENZIONE ! le operazioni di installazione e connessione devono obbligatoriamente essere eseguite solo da
personale specializzato !
WARNING ! Ensure power supply is o before connecting or disconnecting xtures !
ATTENZIONE ! Assicurarsi che l’alimentazione sia disattivata prima di collegare o scollegare i proiettori!
Standard version
196
Ø6,50
496
548 548
nanoParade 320 mm
nanoParade 620 mm
nanoParade 1220 mm
Connect the two devices using the M8 connectors. Place the connectors as shown in the image below,
xing the cable inside the LED bar prole / Connettere i due apparecchi attraverso i connettori M8.
Posizionare i connettori come indicato nell’immagine sottostante, alloggiare ed incastrare il cavo all’in-
terno del prolo della barra a led.
Fix the prole to the ground or wall through the xing holes as shown by the images below. / Fissare il
prolo al terreno o a muro utilizzando i fori di ssaggio come indicato nelle immagini sottostanti.
Place the connectors and cables as
shown in the image

AL4484 nanoParade - Rev. 1.00
Press and slot the led bar into the prole previously xed to the ground or wall / Premere ed incastrare
a pressione la barra led sul prolo precedentemente ssato al terreno o al muro.
PRESS & FIX
PRESS & FIX

AL4484 nanoParade - Rev. 1.00
Version with brackets - interaxis distances
Ø6
30
270 3030
470 3030
nanoParade 320 mm
nanoParade 620 mm
nanoParade 1220 mm
Fix the xture to the ground or wall through
the holes in the bracket - Fissare l’apparec-
chio al terreno utilizzando i fori nella forcella
-90°/ +90°
Size 2,5 (ISO)
Allen key
Beam aiming

AL4484 nanoParade - Rev. 1.00
CAUTION: prolonged staring at the LED source should be avoided by placing the xture in a proper position.
GND
GND
BROWN
POWER SUPPLY
UNIT 24 Vdc
DMX
CONTROLLER
BLACK
RED RED ( DATA+)
BLACK ( DATA-)BLACK
GND
V+
V-
to the next AL4487 Startline Cable in the daisy-chain
RED
BLACKBLACK
RED
GND
POWER IN
DMX IN
DMX OUT
*DMX cable
*DMX cable
*DMX cable: 2x0.34 mmq impedance 110 Ω , capacity 43pF/m, resistance 50 Ω/Km.
Max. length of daisy-chain: 5 m
( 4X nanoParede 1220 mm or 8X nanoParade 620 mm or 16X nanoParade 320 mm )
FIRST FIXTURE OF DAISY-CHAIN MUST BE ACTIVE; THE FOLLOWINGS ONES PASSIVE
ACTIVE FIXTURE
Channel
Canale
Function
Funzione
Value
Valore
Description
Descrizione
1 R 0-255 0-100% proportional control red - controllo proporzionale rosso 0-100%
2 G 0-255 0-100% proportional control green - controllo proporzionale verde 0-100%
3 B 0-255 0-100% proportional control blue - controllo proporzionale blu 0-100%
RGB version
Channel
Canale
Function
Funzione
Value
Valore
Description
Descrizione
1W 0-255 0-100% proportional control White - controllo proporzionale bianco 0-100%
White version
DMX charts
- The power and signal connections can be carried out by using the connection kit supplied with the
xture. Follow the instructions provided along with the connection kit.
- Le connessioni dei cavi di alimentazione e segnale possono essere eseguite utilizzando il kit di con-
nessione in dotazione al proiettore. Seguite le istruzioni fornite con il kit.
Connecting
RDM functions:
When operating in DMX mode the xture can accept the following RDM commands:
• discovery: Upon request of the RDM controller, the xture signals its own presence (the RDM controller will display the xture on a list).
• DMX address reading and setting.
• Channels number reading and setting.
• On / Off identi cation: This command is used to identify the xture you want to get access to (the identi cation happens by switching on all the LEDs at full
intensity).
• Manufacturer: it displays the name of the manufacturer (Griven).
• Model description: it displays the xture’s model.
• Software version description: it displays the current version of the rmware.
• Temperature: it displays the LEDs operating temperature value.
In modalità DMX il proiettore accetta i seguenti comandi RDM:
· discovery: dierto richiesta del controller, il proiettore segnala la sua presenza ( il controllere evidenzierà il proiettore su una lista).
· Lettura ed impostazione dell’indirizzo DMX.
· Lettura ed impostazione del numero di canali.
· On/Off identi cation: questo comando è usato per rintracciare l’unità sulla quale si vuole operare ( il proiettore si metterà in evidenza accendendo tutti
i LED a massima intensità).
· Manufacturer: viene mostrato in nome del produttore ( Griven ).
· Model description: viene mostrato il modello del proiettore.
· Software version description: viene mostrata la attuale versione software installata sull’apparecchio.
· Temperature: viene mostrata l’attuale temperature dei LED.

AL4484 nanoParade - Rev. 1.00
Actions of the DMX red led
Comportamento del Led Rosso DMX
Information / Informazione
Steady on / Acceso sso Supply present, no DMX signal, no
error.
Alimentazione presente, nessun se-
gnale DMX, nessun errore
Flashing (about 8Hz) / Lampeggiante a
circa 8Hz
DMX presence.
Presenza DMX.
Quick ash (1 each second) / Breve
ash 1 volta al secondo
DMX reception error / Errore ricezio-
ne DMX
After two seconds since supply, the LED ashes as many times as the sets of
ten Celsius degrees measured by the thermic sensor.
For exemple if the temperature is between 20° and 29° two short shut-downs
will be visible.
Dopo due secondi dall’alimentazione, il led esegue un numero di impulsi
(spento su acceso) pari alle decine di gradi celsius rilevati dalla sonda termica.
Ad esempio se la temperatura e’ compresa fra 20 e 29 gradi, si vedranno due
brevi spegnimenti.
If no event occurs, the LED turns o after 10 seconds.
In assenza di eventi, il led si spegne dopo 10 secondi.
DMX red led / Led Rosso Dmx

AL4484 nanoParade - Rev. 1.00
Congurations Scheme

AL4484 nanoParade - Rev. 1.00
100-277 Vac
100-277 Vac
120 Ω Resistor
AL4487/ 3
LINE END CAP
DMX CONTROLLER
AL 4487/ 2 - IP67 Power Supply 120W nanoParade L=320 mm
ACTIVE
nanoParade L=320 mm Slave
PASSIVE
AL4487 Startline Cable
24 Vdc
24 Vdc
AL0512
DMX Cable or equivalent
AL0512
DMX Cable or equivalent
-Use a DMX repeater on each 32nd ACTIVE fixture of the daisy-chain or in case the total DMX cable length exceeds 1000 ft ( 300 m.)
-Install a 120 Ω resistor on the DMX OUT cable of the last Startline Cable of the daisy-chain as described in the AL4487 Startline Cable manual.
-For further details on fixture connection and installation, please refer to the relevant instruction manual.
-This is only an example of a possible configuration scheme. Other configurations can be tailores to the client’s needs.
AL4487/ 3
LINE END CAP
nanoParade L=320 mm Slave
PASSIVE nanoParade L=320 mm Slave
PASSIVE
Maximum length of the chain: 5 m
( 16X nanoParade 320 or 8X nanoParade 620 or 4X nanoParade 1220 )
It’s possible to install fixtures of different lengths.
An ACTIVE fixture is always required at the beginnig of the daisy-chain.

AL4484 nanoParade - Rev. 1.00

AL4484 nanoParade - Rev. 1.00
Table of contents