Groov-e SOUNDBAR 75 User manual


30 Day Right To Return
WWe do not envisage any problems occurring
with your groov-e GV-SB03 75W Compact
Bluetooth Soundbar. However, for your peace
of mind, should any fault occur, please return
it within 30 days to your retailer with proof
of purchase for an exchange or refund.
12 Month Guarantee
This p
This product is guaranteed for twelve
months. Please retain your receipt as this will
be required as proof of purchase in the event
that the device does not perform as
expected then please contact your original
point of purchase, should you require further
assistance then please contact us.
E
Extended Warranty
Please register your product within 30 days
from date of purchase
www.groov-e.co.uk/warranty.
Proof of purchase required.
Contact Us
Reach out to us at info@groov-e.co.uk
or visit
or visit www.groov-e.co.uk
01

02
“Congratulations on your purchase and Thank You for choosing the groov-e
GV-SB03 75W Compact Bluetooth Soundbar. Please read the guide carefully
before using”.
CAUTION
1• Keep the product and all its parts out of reach of small children.
2
2• Do NOT leave it in high temperatures as electronic devices and plastic parts may
warp in heat. No naked flame sources, such as lighted candles, should be placed on
the product.
3• Do NOT leave it in low temperatures as moisture can form inside the product,
which may damage the circuit board.
4
4• Do NOT attempt to open the product. This product does not contain any user
serviceable parts. Unauthorised handling of the device may damage it and will void
your warranty.
5• Disconnect your Soundbar from the mains power supply during thunderstorms.
6• Always check that you have completely switched off your Soundbar, before you
change or disconnect the power supply.
7
7• Never throw batteries in a fire or attempt to open the outer casing. Batteries
should not be exposed to excessive heat such as sunshine, fire or the like. Dispose
of old batteries carefully.
8• Batteries are harmful if swallowed, so keep away from young children.
Box Contents
GV-SB03 Soundbar x 1
Remote Control x 1
P
Power Adapter x 1
Optical Cable x 1
Wall Mount Template and Fixings x1
User Manual x1
OVERVIEW

03
BACK VIEW
Power
Input RCA
Input AUX
Input
Optical
Input USB
Input
Power On/Off
Mode
(Short Press)
Bluetooth
Pairing
( Long Press)
Prev (Short Press)
Vol- Long Pres) Next (Short Press)
Vol+ Long Pres)
Functions
SIDE VIEW

04
Remote Buttons
Using the Remote Control
The remote control sensor at the front of the soundbar is sensitive to the remote
control’s commands up to a maximum of 8 metres away and within a maximum arc
of 30 degrees. Please note that the operating distance may vary depending on the
brightness of the room.
Power On/Off
Switch the unit between
on and Standby mode
Volume +
Press to increase the volume
Previous
Use in USB or Bluetooth
mode to go back a track
Play/Pause
Press to play and pause
Bass Decrease
Press to decrease the bass
EQ
Press the button to adjust
the equaliser. Press and hold
the button to turn the
soundbar LED light on and off
Bass Increase
Press to increase the bass
Bass Increase
Press to increase the bass
Treble Increase
Press to increase the treble
Treble Decrease
Press to decrease the treble
Next
Use in USB or Bluetooth
mode to go forward a track.
Volume -
Press to decrease the volume
MODE
Press button repeatedly
to switch between
soundbar modes

05
Instructions
Connecting to the mains supply
Ensure that the power supply voltage is in the voltage of 100V~240V.
This unit is designed
This unit is designed to use the supplied adapter only. Connecting the unit to any
other power source may cause damage to the unit. Unwind the mains cable to its
full length. Connect the mains plug to a mains socket. Make sure the mains plug is
fully inserted into the mains socket. Connect the adapter to the unit via the DC
input Socket.
(DC-18V-IN)
N
NOTE: Ensure all audio connections of the unit are connected before connecting to
the mains power socket.
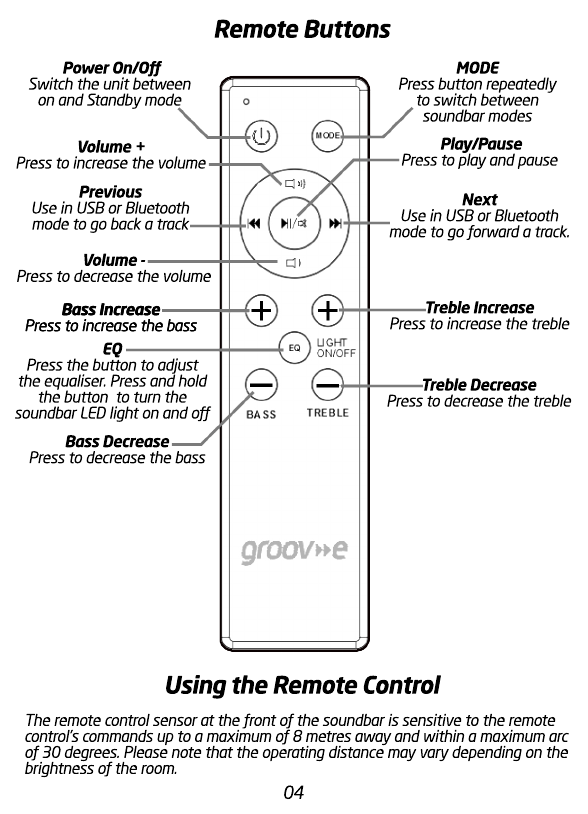
Using the Bluetooth
P
Pairing a Bluetooth Device for the First Time. Press the POWER button on the unit
or the POWER button on the remote control to switch on the unit. Select and press
the MODE button repeatedly on the remote control until in Bluetooth mode or press
the Mode button repeatedly on the soundbar to enter Bluetooth mode. Using the
controls on your Bluetooth device, select the “GV-SB03” in your Bluetooth settings
to pair. Refer to the user manual for your specific device for instructions on pairing
and connecting Bluetooth devices. When successfully paired and connected, a beep
will issue f
will issue from the unit. After initial pairing, the unit will stay paired unless unpaired
manually by the user. If your device should become unpaired or you find it is unable
to connect, repeat the above steps.
Playing Audio Wirelessly
Follow the instructions for pairing a Bluetooth device. Use the controls on the
connected Bluetooth Device to select a track. To Play/Pause the track or Skip
Forwards/Backwards to a selected track, use the remote control. Audio played
through the connected Bluetooth device will now be heard.
Mains
Socket
DC
Input

06
Instructions
Using USB
Insert a USB driInsert a USB drive to Play Music Automatically. Select and press the MODE button
repeatedly on the remote control until in USB mode or press the Mode button
repeatedly on the sound bar to enter USB mode. To Play/Pause the track or Skip
Forwards/Backwards to a selected track, use the remote control. Audio played
through the connected USB device will now be heard.
Using the RCA IN Cable
Use an Use an RCA Stereo Audio Cable (not supplied) to connect to the TV’s stereo RCA
(L/R) audio output sockets. Connect the audio output cable of the soundbar via the
‘RCA’ input sockets of the unit. Then press MODE on the remote control or press the
Mode button on the unit to scroll to the RCA function.Turn on your television
T
Troubleshooting: If you are not receiving a picture or encountering interference,
please ensure that the RCA cable is being connected to the ‘output ’RCA port on
your TV set. This will ensure that the sound is being exported correctly. If your TV
does not have ‘output’ RCA port, please use an alternative connection method.
RCA Stereo Audio Cable
RCA In
Back of TV Unit

07
Instructions
Using Optical Input
You will need: An audio source with an Optical Audio Output and an Optical cable
(included).
C
Connect the Optical Audio cable to the optical output on the audio source and to the
Optical Input on the soundbar. Press the POWER button on the soundbar or
POWER button directly on the remote control to switch on the unit. Press the
MODE button on the remote control to switch to Optical mode or select the MODE
button on the main unit press repeatedly to select the Optical mode.
Using the
Using the controls on your connected device, make sure the audio settings are set
to PCM or Audio and are turned On. Audio from the connected audio source will now
be played through the speakers.
Using the AUX
Plug one end of a 3.5mm to 3.5mm Aux In cable (not supplied) into the AUX port on
the unit. Before use, disconnect any cables connected to the Stereo RCA Inputs.
Then plug the
Then plug the other end of the cable into the audio output or an MP3 player or
other audio source. Press the Power button on the soundbar or Power button
directly on the remote control to switch on the unit. Press the Mode button
repeatedly on the soundbar or press the MODE button on remote control repeatedly
to enter AUX mode. Audio played through the connected device will now be heard
through the speakers.
3.5mm to 3.5mm
Audio Cable
AUX In Audio Player
Optical Cable
Optical In Back of TV Unit

08
Troubleshooting
If the soundbar does not work properly as desired, please check the following.
Malfunction
No power / function
No sound
No sound from Bluetooth connection
Function disturbance
Remote control does not work
[p
[properly]
Possible Cause/Measures
Check whether the power is switched on
or off at the wall.
Check whether the power adaptor is
properly connected to power outlet or
not.
Check wh
Check whether cables are properly
installed.
If they are, please try alternative cable to
connect to your TV if possible.
Check unit is out of standby and in mode.
Disconnect the soundbar from your
device and reconnect.
Swi
Switch off and unplug the unit. Leave it
for 2 minutes and switch it on again.
If a particular mode is causing problems,
please try an alternative connection to
your TV such as Optical or Bluetooth.
Check whether the batteries have run
out or not.
R
Replace with a new ones if necessary.
Check whether there is an obstacle
blocking the remotes signal.

09
Locate the screw holes on the
paper guide and mark a point
with a pencil.
5 mm
It is advisable to leave no more than
5mm between the head of the screw
and the wall to minimise the inclination
angle of the Soundbar.
1. 2.
3. 4.
5.
For better sound experience,
it is advisable to place the
Soundbar at the same height as
your ears.
Verify with a level gauge that the
inclination of the Soundbar is
zero degrees
Place the paper guide on the
wall where you want to hang
the Soundbar
Make the holes with the
corresponding drill bit according
to the type of wall.
Wall Mount Installation
6.

BATTERY REMOVAL/DISPOSAL
This product contains batteries and should not be treated as normal household
waste and should be recycled. Please take it to your nearest collection facility or
for further details contact your local council or visit www.recycle-more.co.uk
B
Batteries contain substances that may be harmful to the environment and human
health. Keep out of the reach of children and seek immediate medical help if
swallowed.
Never throw batteries into a fire or attempt to open the outer casing.
Should your product develop a fault and your battery needs replacing for further
advice on how to safely remove your battery please visit our website at
www.groov-e.co.uk
GGUARANTEE
Subject Subject to the conditions stated below, Groov-e guarantees this equipment
against defects in workmanship or materials of its mechanical and
electronic component parts (excluding styling, battery cells, magnetic
tapes, re-chargeable batteries, user removeable memory devices, with the
exception where the battery is inbuilt into the product) for a period of one
year from the date of purchase. This product will be repaired or if
necessary replaced free of charge if it has been proven to be defective
within the one
within the one year warranty period.
10
SPECIFICATIONS
Bluetooth chipset: 5.0
Bluetooth profiles: A2DP, AVRCP,
SPP
Bluetooth frequency range:
2.402-2.480 GHZ
RF output p
RF output power 2dB
Wireless range: 10M (open area)
Power supply:
AC100~240V/50~60Hz, DC
18V/1.3A
Speaker power: 30W (2 x 15W)
Speaker channel: 2.0
FEATURES
•Speakers: 30W RMS power & 75W peak power
•Full-range speakers with super bass
•Compatible with most TV’s for home theatre sound
•Wireless Bluetooth speaker
-
-connect to your TV, PC, Laptop, Computer,
•Smartphone, Tablet
•LED display panel
•Crisp & clear sound with deep base
•3 sound modes (Music, Movie, Voice)
•Base & Treble controls
•Easy controls
•5 Input modes: O
•5 Input modes: Optical, RCA, USB, AUX (3.5mm)
Bluetooth
•1.5M Optical cable (included)
•Wall mountable (kit included)
•Remote control (included)
-requires 2 x AAA batteries (not included)

1) Claims under this guarantee should be made through the authorised
dealer/retailer from whom the equipment was purchased. If this is not possible,
please contact Groov-e directly.
2) This guarantee is only valid when the equipment is purchased and retained
within the United Kingdom and a valid proof of purchase has been provided.
3) This Guarantee Excludes:
(i)
(i) All damage caused through accident, misuse, wear and tear, neglect, installation
and/or use in a manner inconsistent with technical and safety standards.
(ii) Alterations or adjustments made to equipment
(iii) Loss of data resultant from malfunction of hard drive or other storage device
(iv) Damage caused to any third party device as a result of using the product.
4) No liability under this guarantee shall be incurred:
(i) In respect of damage or loss occurring during transit to or from the purchaser
(ii)
(ii) Where the serial number plate of the equipment has been removed or altered in
any way.
5) Groov-e shall not be liable for consequential damage, loss or injury arising from
or in connection with the equipment, excepting only that nothing in this condition
shall or shall be construed so as to exclude or restrict liability for negligence.
6) The cost of carriage to and from Groov-e shall be borne by the purchaser.
7) This guarantee is personal to the original purchaser and is not transferable.re
8)
8) If the equipment, in respect of which a claim hereunder is made, is found on
examination to comply with the published specifications, a test fee may be
incurred.
This gua
This guarantee is in addition to and does not in any way affect any statutory
or other right of consumer purchasers, including those rights in relation to
sections 13 to 15 of the Sale of Goods Act 1979, the Sale and Supply of
Goods to Consumer Regulations 2002, The Consumer Rights Act 2015 or the
Sale of Goods and Supply of Services Act 1980 (for ROI).
DECLARATION OF CONFORMANCE
GGroov-e hereby declares that this product is in compliance with the essential
requirements and other relevant provisions of the Radio Equipment Directive
2014/53/EU. The complete declaration of conformity can be requested from us at:
Unit J
Braintree Industrial Estate
Braintree Road
Ruislip
Middles
Middlesex
HA4 0EJ UK
www.groov-e.co.uk
Email: info@groov-e.co.uk
Telephone: 020 8839 0978
Register your purchase for extended warranty
www.groov-e.co.uk/warranty MADE IN CHINA
Authorised EU Representative
Rashmian EU Ltd
Robwyn House
Suite 3E
Corrintra
Castleblayney
C
Co. Monaghan
Ireland
11
This manual suits for next models
1
Other Groov-e Speakers System manuals