Grundfos 98842487 User manual

Selcoperm test kit 98842487
Operating instructions
GRUNDFOS INSTRUCTIONS
Other languages
http://net.grundfos.com/qr/i/99066305

2

3
Table of contents
Selcoperm test kit 98842487
English (GB)
Installation and operating instructions. . . . . . . . . . . . . . . . . . . . . . . . . . . . . . . . . 4
Deutsch (DE)
Montage- und Betriebsanleitung . . . . . . . . . . . . . . . . . . . . . . . . . . . . . . . . . . . . . 9
Español (ES)
Instrucciones de instalación y funcionamiento . . . . . . . . . . . . . . . . . . . . . . . . . 15
Français (FR)
Notice d'installation et de fonctionnement. . . . . . . . . . . . . . . . . . . . . . . . . . . . . 21
Polski (PL)
Instrukcja montażu i eksploatacji . . . . . . . . . . . . . . . . . . . . . . . . . . . . . . . . . . . 26
Română (RO)
Instrucţiuni de instalare şi utilizare . . . . . . . . . . . . . . . . . . . . . . . . . . . . . . . . . . 32
Русский (RU)
Руководство по монтажу и эксплуатации . . . . . . . . . . . . . . . . . . . . . . . . . . . 37
中文 (CN)
安装和使用说明书 . . . . . . . . . . . . . . . . . . . . . . . . . . . . . . . . . . . . . . . . . . . . . . . 43

English (GB)
4
English (GB) Installation and operating instructions
Original installation and operating instructions
CONTENTS
Page
1. General instructions
1.1 Safety instructions
• Keep away from heat.
• Store in a cool place.
• Keep away from food, drink and animal feeding
stuffs.
• Keep out of the reach of children. Reagents are
designed for use in chemical analysis only.
• Wash hands after working with the test kit. Take
off contaminated clothing immediately.
• Avoid contact with skin and eyes. Wear safety
goggles and gloves.
• Do not eat, drink or smoke at the place of work.
2. Test kit content
Fig. 1 Test kit content
1. General instructions 4
1.1 Safety instructions 4
2. Test kit content 4
3. Checking the concentration of the
NaClO solution 5
3.1 Required material 5
3.2 Fitting the dispenser tip to the
HandyStep S titrator 5
3.3 Filling and zeroing the HandyStep S
titrator 6
3.4 Titration steps 7
3.5 Calculation 7
3.6 Removing the dispenser tip 7
4. Checking the water hardness 8
4.1 Water hardness test procedure 8
4.2 Result 8
4.3 Conversion of water hardness 8
5. Checking the specific gravity (SG) of
the electrolyte 8
5.1 SG test procedure 8
6. Checking the temperature of the
NaClO solution 8
7. Spare parts 8
8. Disposal 8
Read this document before installing the
product. Installation and operation must
comply with local regulations and accepted
codes of good practice.
CAUTION
Hazardous chemicals
Minor or moderate personal injury
- Read the method description completely
before performing the tests. Read the
Material Safety Data Sheets (MSDS).
- MSDS are available on:
net.grundfos.com/qr/i/98734551
TM07 5510 4319
Pos. Description
1 Measuring cylinder, 250 ml
2 HandyStep S titrator
3 Hydrometer
4 Dispenser tip
5 Acidifying GP tablets, 100 pcs
6 Chlorine HR tablets, 100 pcs
7 Sampling container
8 Total hardness test kit
9 Syringe, 6 ml
10 Stirring rod
11 Thermometer
12 Neutral tube, 5 ml
13 Small bottle with 30 ml titrant (2N Sodium
Thiosulphate solution (Na2S2O3))
14 Test jar, crystal clear, 60 ml
5
1
3
4
6
12
2
7
13
14
8 9 1110

English (GB)
5
3. Checking the concentration of the
NaClO solution
The HandyStep S titrator enables accurate titrimetric
analysis in the field, using small quantities of sample
and reagent consumables.
3.1 Required material
• HandyStep S titrator
• Dispenser tip
• Syringe, 6 ml
• Test jar, crystal clear, 60 ml
• Neutral tube, 5 ml
• Stirring rod
• Titrant: 30 ml of 2N sodium thiosulphate solution
(Na2S2O3)
• Chlorine HR tablets
• Acidifying GP tablets
• Softened water (from soft-water sample valve ot
the Selcoperm system)
HandyStep S titrator
Fig. 2 HandyStep S titrator
3.2 Fitting the dispenser tip to the
HandyStep S titrator
Fig. 3 Fitting the dispenser tip to the titrator
1. Hold the HandyStep S titrator (fig. 1, Pos. 2)
vertically (titrating position). Push the
locking/filling lever (fig. 2, Pos. 4) to its lower stop
(A).
2. Push the locking/filling lever down gently until it
inclines (B).
– The locking bar inside the titrator opens.
3. Insert the top of the dispenser tip (fig. 1, Pos. 4)
into the titrator. Pull the locking/filling lever back
into its starting position (C).
– The locking bar inside the titrator closes.
The dispenser tip is now held firmly inside the titrator
ready to use.
TM06 6285 1016
Pos. Description
1 Stroke setting wheel (slow/rapid dispense)
2 Dispensing lever
3 Titration scale (units dispensed)
4 Locking/filling lever
5 Syringe ejector
4
5
1
3
2
TM06 6284 1016
BCA

English (GB)
6
3.3 Filling and zeroing the HandyStep S
titrator
1. Open the bottle with 2N sodium thiosulphate
solution (titrant) (Fig. 1, Pos. 13).
2. Fill a small amount (approx. 2 ml) into the neutral
tube (Fig. 1, Pos. 12) to prevent contamination of
the solution.
3. Dip the end of the dispenser tip (Fig. 1, Pos. 4)
into the titrant in the neutral tube.
4. Move the locking/filling lever (Fig. 2, Pos. 4)
upwards until its upper stop.
– Titrant is drawn from the neutral tube into the
dispenser tip.
5. Make sure that no air is trapped inside the
dispenser tip.
– To remove air, hold the titrator at an angle and
push and pull the locking/filling lever up and
down a few times.
– Move the locking/filling lever upwards until its
upper stop (see Fig. 4).
Fig. 4 Top position of locking/filling lever
– The dispenser tip is full of titrant.
6. Hold the end of the dispenser tip over a waste
receptacle or tissue paper. Gently push the
dispensing lever.
– Titrant is discharged from the dispenser tip.
7. Push the dispensing lever, until the bottom of the
locking/filling lever is levelled with the zero mark
on the titration scale (see Fig. 5).
Fig. 5 Bottom of locking/filling lever levelled
with zero mark
– A small quantity of titrant is discharged. The
titrator is primed for titration.
8. Remove any excess titrant from the bottom of the
dispenser tip carefully with a piece of clean tissue
paper.
9. Make sure that the stroke setting wheel (Fig. 2,
Pos. 1) is set to position "1" (see Fig. 6).
Fig. 6 Stroke setting wheel
– Setting the stroke setting wheel to a higher
number increases the quantity of titrant
dispensed per full depression of the
dispensing lever.
The titrator is zeroed and ready to titrate.
TM06 6295 3719TM06 6298 3719
0
10
20
30
40
50
60
70
80
90
100
0
10
20
30
40
50
60
70
80
90
100
TM06 6296 3719

English (GB)
7
3.4 Titration steps
1. Take a NaClO sample from the Selcoperm
system. See Selcoperm installation and
operating instructions.
2. Fill 20 ml of softened water into the test jar (Fig.
1, Pos. 14).
3. Add 2 Chlorine HR tablets (Fig. 1, Pos. 6) and
pound them with the stirring rod.
4. Add 2 Acidifying GP tablets (Fig. 1, Pos. 5) and
pound them with the stirring rod.
5. Mix well by swivelling carefully.
– It is possible that small parts of the tablets are
not dissolved. This has no effect to the test
result.
6. Fill the 6 ml syringe (Fig. 1, Pos. 9) with 5 ml of
NaClO solution sample.
– Make sure that no air bubbles are drawn into
the syringe.
7. Add the 5 ml of sample to the reagents in the test
jar. Swivel carefully.
– The colour of the sample turns into a reddish
brown immediately.
8. Hold the HandyStep S titrator (Fig. 1, Pos. 2) in
one hand and the test jar in the other hand. Insert
the dispenser tip (Fig. 1, Pos. 4) into the test jar
so that its end is submerged in the sample.
9. Push the dispensing lever (Fig. 2, Pos. 2) to add
titrant, while swivelling the sample in the test jar.
– The titrant is mixed homogeneously for highly
accurate results.
10. Add titrant until the colour of the sample has
turned from reddish brown to clear.
11. The position of the bottom of the locking/filling
lever (Fig. 2, Pos. 4) at the titration scale (Fig. 2,
Pos. 3) shows the number of units that have been
dispensed.
– Note down the number of units dispensed.
3.5 Calculation
1. Read the number of units dispensed at the
titration scale (Fig. 2, Pos. 3).
2. Multiply the number of units dispensed by the
conversion factor 0.16:
– Units dispensed x 0.16 = value g/l chlorine
3.6 Removing the dispenser tip
1. Hold the end of the dispenser tip (Fig. 1, Pos. 4)
over the neutral tube (Fig. 1, Pos. 12).
2. Push the locking/filling lever (Fig. 2, Pos. 4) to its
lower stop.
– Unused titrant is discarded.
– Always use new titrant in the neutral tube in
order to obtain a safe result at the next
measurement.
3. Push the locking/filling lever down and forward to
release the locking bar.
4. Push down the syringe ejector (Fig. 2, Pos. 5)
and remove the dispenser tip.
5. Push the locking/filling lever back in its original
starting position.
Measure the concentration immediately
after extracting the sample.
Do not touch the reagent tablets with the
fingers.
Add the reagents in the correct sequence.
Stop adding titrant when the sample turns
clear.
This marks the endpoint of the titration.
Units dispensed Chlorine [g/l]
35 5.60
36 5.76
37 5.92
38 6.08
39 6.24
40 6.40
41 6.56
42 6.72
43 6.88
44 7.04
45 7.20
46 7.36
47 7.52
48 7.68
49 7.84
50 8.00
51 8.16
52 8.32
53 8.48
54 8.64
55 8.80

English (GB)
8
4. Checking the water hardness
A properly functioning water softener is crucial for
the efficiency and longevity of the Selcoperm
system. High levels of calcium carbonate in the
electrolyte lead to a visible precipitation on the
electrodes of electrolyser cell.
The water hardness test is a drop test. The hardness
is determined by counting the drops of reagent, until
the colour changes.
4.1 Water hardness test procedure
1. Take a sample from the soft water sample valve
at the Selcoperm system. See Selcoperm
installation and operating instructions.
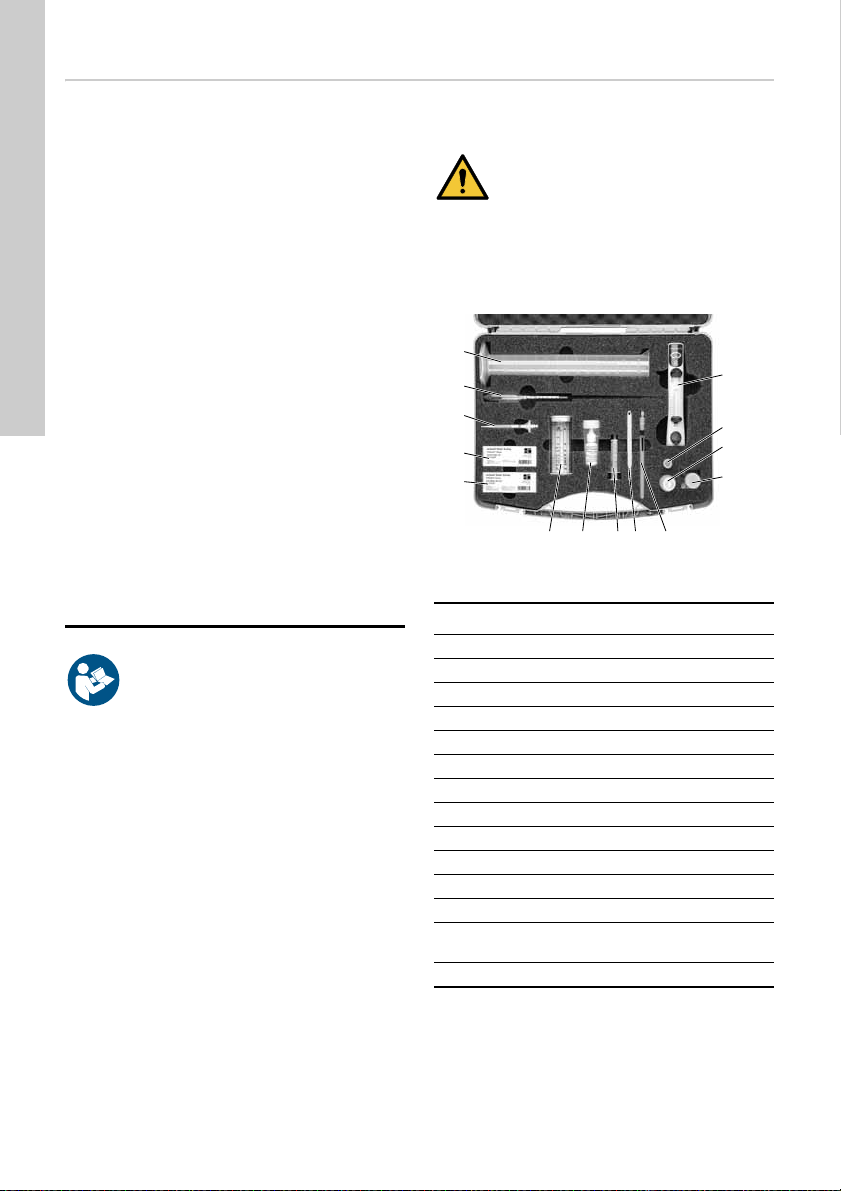
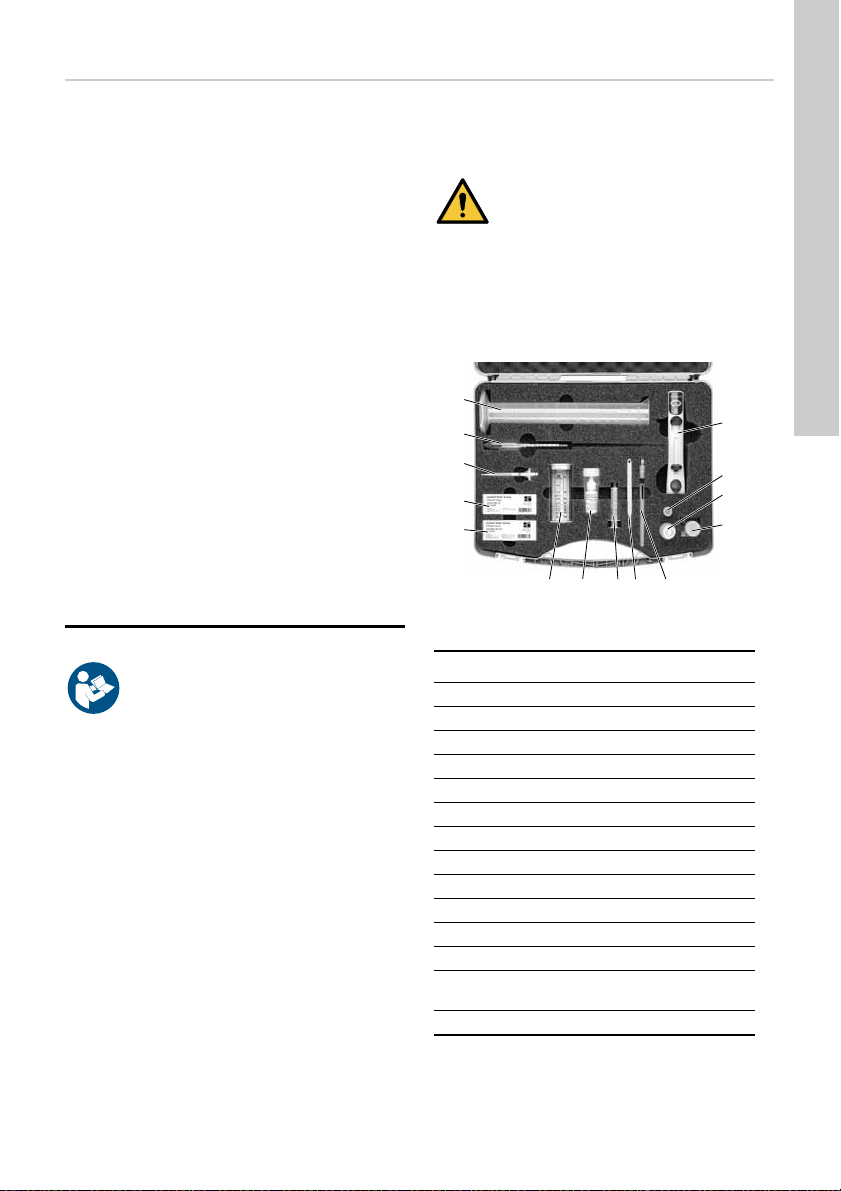
2. Fill the sampling container (Fig. 1, Pos. 7) to the
5 ml mark.
3. Hold the reagent bottle vertically. Add the reagent
drop by drop while swivelling the sample
carefully, until its colour turns from red to green.
– Count the number of drops. One drop equates
to one degree of total water hardness.
4.2 Result
• If the sample turns green with one drop of
reagent, the water is soft.
– The water softener is functioning properly.
• If the sample turns red and requires more than
one drop to turn green, the water is not soft.
– The water softener needs regeneration or the
resin beads must be replaced.
4.3 Conversion of water hardness
5. Checking the specific gravity (SG)
of the electrolyte
SG is the specific gravity of the electrolyte entering
the electrolyser cell. See Selcoperm installation and
operating instructions.
5.1 SG test procedure
1. Flush a clean and dry measuring cylinder (Fig. 1,
Pos. 1) with electrolyte from the electrolyte
sample valve.
2. Fill the measuring cylinder with a sample from the
electrolyte sample valve.
3. Place the hydrometer (Fig. 1, Pos. 3) in the
measuring cylinder.
4. Take the reading from the hydrometer.
6. Checking the temperature of the
NaClO solution
1. Take a sample from the NaClO solution sample
valve at the Selcoperm system.
2. Place the thermometer (Fig. 1, Pos. 11) in the
sample and take the reading.
– The temperature should not exceed 40 °C.
7. Spare parts
8. Disposal
This product or parts of it must be disposed of in an
environmentally sound way:
1. Use the public or private waste collection service.
2. If this is not possible, contact the nearest
Grundfos company or service workshop.
The used analysis sample can be flushed down the
drain with tap water. Unused, expired reagent must
be disposed of according to local regulations.
See also end-of-life information at
www.grundfos.com/product-recycling.
°d °e °f mg/l
CaO mg/l
CaCO3mmol/l
1 1.3 1.8 10 18 0.18
2 2.5 3.6 20 36 0.36
3 3.8 5.4 30 54 0.54
4 5.0 7.1 40 71 0.71
5 6.3 8.9 50 89 0.89
6 7.5 10.7 60 107 1.07
7 8.8 12.5 70 125 1.25
8 10.0 14.3 80 143 1.43
9 11.3 16.1 90 161 1.61
10 12.5 17.8 100 178 1.78
Description Product
number
Hydrometer 98504212
Thermometer 98708063
Stirring rod 95727771
Dispenser tip, 5 pcs 99619798
Total hardness test kit 98948745
Set of 100 Acidifying GP tablets
and 100 Chlorine HR tablets 98144705
Set of 30 ml titrant (2N sodium
thiosulphate solution (Na2S2O3))
and dispenser tip 99619819

Deutsch (DE)
9
Deutsch (DE) Montage- und Betriebsanleitung
Übersetzung des englischen Originaldokuments
INHALTSVERZEICHNIS
Seite
1. Allgemeine Hinweise
1.1 Sicherheitshinweise
• Keiner Wärme aussetzen.
• An einem kühlen Ort aufbewahren.
• Von Nahrungsmitteln, Getränken und Futtermit-
teln fernhalten.
• Außerhalb der Reichweite von Kindern aufbe-
wahren. Die Reagenzien sind nur für chemische
Analysen bestimmt.
• Waschen Sie sich gründlich die Hände, nachdem
Sie mit dem Testkit gearbeitet haben. Ziehen Sie
kontaminierte Kleidung sofort aus.
• Vermeiden Sie Haut- und Augenkontakt. Tragen
Sie Schutzhandschuhe und eine Schutzbrille.
• Am Arbeitsplatz darf nicht gegessen, getrunken
oder geraucht werden.
2. Inhalt des Test-Kits
Abb. 1 Inhalt des Test-Kits
1. Allgemeine Hinweise 9
1.1 Sicherheitshinweise 9
2. Inhalt des Test-Kits 9
3. Prüfen der Konzentration der
NaClO-Lösung 10
3.1 Erforderliches Zubehör 10
3.2 Anbringen der Dispenserspitze am Han-
dyStep S 10
3.3 Befüllen und Nullsetzen des HandyStep S 11
3.4 Schritte der Titration 12
3.5 Berechnung 12
3.6 Entfernen der Dispenserspitze 12
4. Überprüfen der Wasserhärte 13
4.1 Verfahrensweise beim Wasserhärtetest 13
4.2 Ergebnis 13
4.3 Umrechnen der Wasserhärte 13
5. Überprüfen der relativen Dichte (d) des
Elektrolyts 13
5.1 Verfahrensweise beim Test der relativen
Dichte 13
6. Überprüfen der Temperatur der
NaClO-Lösung 13
7. Ersatzteile 13
8. Entsorgung 14
Lesen Sie vor der Installation das vorlie-
gende Dokument sorgfältig durch. Die Ins-
tallation und der Betrieb müssen nach den
örtlichen Vorschriften und den Regeln der
Technik erfolgen.
VORSICHT
Gefährliche Chemikalien
Leichte oder mittelschwere Personenschä-
den
- Lesen Sie die Beschreibung zur Verfah-
rensweise gründlich durch, bevor Sie
mit dem Test beginnen. Lesen Sie die
Sicherheitsdatenblätter.
- Die Sicherheitsdatenblätter sind verfüg-
bar unter: net.grund-
fos.com/qr/i/98734551
TM07 5510 4319
Pos. Beschreibung
1 Messbecher, 250 ml
2 Titrator HandyStep S
3 Aräometer
4 Dispenserspitze
5 Acidifying-GP-Tabletten, 100 Stück
6 Chlorine-HR-Tabletten, 100 Stück
7 Probenbehälter
8 Gesamthärte-Testkit
9 Spritze, 6 ml
10 Rührstab
11 Thermometer
12 Neutrales Röhrchen, 5 ml
13 Fläschchen mit 30 ml Maßlösung (2 N
Natriumthiosulfatlösung (Na2S2O3))
14 Testbehälter, durchsichtig, 60 ml
5
1
3
4
6
12
2
7
13
14
8 9 1110

Deutsch (DE)
10
3. Prüfen der Konzentration der
NaClO-Lösung
Der Titrator HandyStep S ermöglicht eine genaue tit-
rimetrische Analyse vor Ort. Dabei werden kleine
Mengen von Proben und Reagienzien als Ver-
brauchsmaterialien verwendet.
3.1 Erforderliches Zubehör
• Titrator HandyStep S
• Dispenserspitze
• Spritze, 6 ml
• Testbehälter, durchsichtig, 60 ml
• Neutrales Röhrchen, 5 ml
•Rührstab
• Maßlösung: 2 N Natriumthiosulfatlösung
(Na2S2O3) - 30 ml
• Chlorine-HR-Tabletten
• Acidifying-GP-Tabletten
• Enthärtetes Wasser (aus dem Weichwasser-
Probenahmeventil der Selcoperm-Anlage)
Titrator HandyStep S
Abb. 2 Titrator HandyStep S
3.2 Anbringen der Dispenserspitze am
HandyStep S
Abb. 3 Anbringen der Dispenserspitze am Tit-
rator
1. Halten Sie den Titrator HandyStep S (siehe Abb.
1, Pos. 2) senkrecht (Titrationsstellung). Schie-
ben Sie den Hebel zum Arretieren/Befüllen
(siehe Abb. 2, Pos. 4) vollständig nach unten (A).
2. Schieben Sie den Hebel zum Arretieren/Befüllen
vorsichtig nach unten, bis er sich neigt (B).
– Der Arretierbügel im Titrator öffnet.
3. Stecken Sie die Oberseite der Dispenserspitze
(siehe Abb. 1, Pos. 4) in den Titrator. Schieben
Sie den Hebel zum Arretieren/Befüllen wieder in
die Ausgangsposition (C).
– Der Arretierbügel im Titrator schließt.
Die Dispenserspitze sitzt nun fest im Titrator und
kann verwendet werden.
TM06 6285 1016
Pos. Beschreibung
1Hub-Einstellrad (langsame/schnelle
Dosierung)
2 Dosierhebel
3 Titrationsskala (dosierte Einheiten)
4 Hebel zum Arretieren/Befüllen
5Auswurftaste
4
5
1
3
2
TM06 6284 1016
BCA

Deutsch (DE)
11
3.3 Befüllen und Nullsetzen des HandyStep
S
1. Öffnen Sie die Flasche mit 2 N Natriumthiosulfat-
lösung (Maßlösung) (Abb. 1, Pos. 13).
2. Füllen Sie eine kleine Menge (ca. 2 ml) in das
neutrale Röhrchen (Abb. 1, Pos. 12), um eine
Verunreinigung der Lösung zu vermeiden.
3. Tauchen Sie das Ende der Dosierspitze (Abb. 1,
Pos. 4) in die Maßlösung im neutralen Röhrchen.
4. Schieben Sie den Hebel zum Arretieren/Befüllen
(Abb. 2, Pos. 4) vollständig nach oben.
– Dabei wird die Maßlösung aus dem neutralen
Röhrchen in die Dispenserspitze gezogen.
5. Achten Sie darauf, dass keine Luft in die Spitze
gelangt.
– Um Luft zu entfernen, halten Sie den Titrator
schräg und schieben Sie den Hebel zum Arre-
tieren/Befüllen einige Male nach oben und
nach unten.
– Schieben Sie den Hebel zum Arretieren/Befül-
len bis zum oberen Anschlag (siehe Abb. 4)
Abb. 4 Vollständig nach oben geschobener
Hebel zum Arretieren/Befüllen
– Die Spitze ist vollständig mit der Maßlösung
gefüllt.
6. Halten Sie das Ende der Dispenserspitze über
ein Abfallgefäß oder über Papiertaschentücher.
Drücken Sie den Dosierhebel vorsichtig nach
unten.
– Dabei wird die Maßlösung aus der Dispenser-
spitze gedrückt.
7. Drücken Sie den Dosierhebel weiter nach unten,
bis die Unterseite des Hebels zum Arretie-
ren/Befüllen auf der Null-Kennzeichnung der Tit-
rationsskala liegt (Abb. 5).
Abb. 5 Unterseite des Hebels zum Arretie-
ren/Befüllen auf einer Ebene mit der
Null-Kennzeichnung
– Eine kleine Menge Maßlösung tritt aus. Der Tit-
rator ist nun für die Titration vorbereitet.
8. Entfernen Sie überschüssige Maßlösung sorgfäl-
tig mit einem sauberen Papiertaschentuch von
der Dispenserspitze.
9. Stellen Sie sicher, dass das Hub-Einstellrad
(Abb. 2, Pos. 1) auf "1" eingestellt ist (siehe Abb.
6).
Abb. 6 Hub-Einstellrad
– Durch Einstellen des Hub-Einstellrads auf eine
höhere Zahl wird die Menge der dosierten
Maßlösung pro vollem Herunterdrücken des
Dosierhebels erhöht.
Der Titrator ist jetzt auf Null gesetzt und bereit für die
Titration.
TM06 6295 3719
0
10
20
30
40
50
60
70
80
90
100
TM06 6298 3719TM06 6296 3719
0
10
20
30
40
50
60
70
80
90
100

Deutsch (DE)
12
3.4 Schritte der Titration
1. Entnehmen Sie eine Probe der NaClO-Lösung
aus der Selcoperm-Anlage. Beachten Sie die
Montage- und Betriebsanleitung der Sel-
coperm-Anlage.
2. Geben Sie 20 ml enthärtetes Wasser in den Test-
behälter (Abb. 1, Pos. 14).
3. Geben Sie 2 Chlorine-HR-Tabletten (Abb. 1, Pos.
6) hinzu und zerkleinern Sie sie mit dem Rühr-
stab.
4. Geben Sie 2 Acidifying-GP-Tabletten (Abb. 1,
Pos. 5) hinzu und zerkleinern Sie sie mit dem
Rührstab.
5. Schwenken Sie den Behälter vorsichtig, um die
Flüssigkeit gründlich zu vermischen.
– Es kann vorkommen, dass sich kleine Teile der
Tabletten nicht vollständig auflösen. Dies hat
keine Auswirkungen auf das Testergebnis.
6. Befüllen Sie die 6-ml-Spritze (Abb. 1, Pos. 9) mit
5 ml der NaClO-Probelösung.
– Achten Sie darauf, dass keine Luftblasen in die
Spritze gelangen.
7. Geben Sie die 5 ml der NaClO-Lösung zu den
Reagenzien in den Testbehälter. Schwenken Sie
den Behälter vorsichtig.
– Die Farbe der Probe verändert sich unmittelbar
zu einem Rotbraun.
8. Halten Sie den Titrator HandyStep S (Abb. 1,
Pos. 2) in einer Hand und den Testbehälter in der
anderen. Tauchen Sie die Dispenserspitze (Abb.
1, Pos. 4) in die Probe im Testbehälter.
9. Drücken Sie den Dosierhebel (Abb. 2, Pos. 2)
nach unten, um die Maßlösung hinzuzugeben,
und schwenken Sie dabei den Testbehälter.
– Die Maßlösung vermischt sich homogen mit
der Probe, sodass äußerst genaue Ergebnisse
erzielt werden.
10. Fahren Sie mit dem Hinzugeben der Maßlösung
fort, bis die Farbe der Probe von rotbraun zu
durchsichtig gewechselt hat.
11. Wie viele Einheiten dosiert worden sind, lässt
sich an der Position des Hebels zum Arretie-
ren/Befüllen (Abb. 2, Pos. 4) erkennen. Lesen
Sie dazu auf der Titrationsskala (Abb. 2, Pos. 3)
den Wert am unteren Rand des Hebels ab.
– Notieren Sie die Anzahl der dosierten Einhei-
ten.
3.5 Berechnung
1. Lesen Sie die Anzahl der dosierten Einheiten auf
der Titrationsskala (Abb. 2, Pos. 3) ab.
2. Multiplizieren Sie die Anzahl der dosierten Ein-
heiten mit dem Umrechnungsfaktor 0,16:
– Dosierte Einheiten x 0,16 = Wert g/l Chlor
3.6 Entfernen der Dispenserspitze
1. Halten Sie das Ende der Dispenserspitze (Abb.
1, Pos. 4) über das neutrale Röhrchen (Abb. 1,
Pos. 12).
2. Schieben Sie den Hebel zum Arretieren/Befüllen
(Abb. 2, Pos. 4) vollständig nach unten.
– Entsorgen Sie nicht verwendete Maßlösung.
– Verwenden Sie immer neue Maßlösung im
neutralen Röhrchen, um das Ergebnis der
nächsten Messung nicht zu verfälschen.
3. Drücken Sie den Hebel zum Arretieren/Befüllen
nach unten und vorn, um den Arretierbügel zu
lösen.
4. Drücken Sie auf die Auswurftaste (Abb. 2, Pos.
5), um die Dispenserspitze zu entfernen.
5. Schieben Sie den Hebel zum Arretieren/Befüllen
in seine Ausgangsposition zurück.
Messen Sie die Konzentration unmittelbar
nach der Entnahme.
Berühren Sie die Reagenztabletten nicht
mit den Händen.
Geben Sie die Reagenzien in der richtigen
Reihenfolge hinzu.
Beenden Sie die Hinzugabe der Maßlö-
sung, wenn die Probe durchsichtig ist.
Damit ist die Titration beendet.
Dosierte Einheiten Chlor [g/l]
35 5,60
36 5,76
37 5,92
38 6,08
39 6,24
40 6,40
41 6,56
42 6,72
43 6,88
44 7,04
45 7,20
46 7,36
47 7,52
48 7,68
49 7,84
50 8,00
51 8,16
52 8,32
53 8,48
54 8,64
55 8,80

Deutsch (DE)
13
4. Überprüfen der Wasserhärte
Ein einwandfrei funktionierender Wasserenthärter ist
entscheidend für die Wirksamkeit und die Langlebig-
keit der Selcoperm-Anlage. Ein hoher Anteil an Kal-
ziumkarbonat im Elektrolyt führt zu sichtbaren Abla-
gerungen an den Elektroden der Elektrolysezelle.
Bei dem Test zum Bestimmen der Wasserhärte han-
delt es sich um einen Tropfentest. Um die Wasser-
härte zu bestimmen, zählen Sie die Anzahl der Rea-
genztropfen, die erforderlich sind, bis sich die Farbe
verändert.
4.1 Verfahrensweise beim Wasserhärtetest
1. Entnehmen Sie eine Probe aus dem Weichwas-
ser-Probenahmeventil der Selcoperm-Anlage.
Beachten Sie die Montage- und Betriebsanlei-
tung der Selcoperm-Anlage.
2. Befüllen Sie den Probenbehälter (Abb. 1, Pos. 7)
bis zur 5-ml-Marke.
3. Halten Sie die Reagenzflasche senkrecht. Geben
Sie das Reagenz tropfenweise hinzu und
schwenken Sie dabei die Probe vorsichtig, bis
sich die Farbe der Probe von rot zu grün verän-
dert.
– Zählen Sie die Anzahl der Tropfen. Ein Tropfen
entspricht einem Gesamthärtegrad.
4.2 Ergebnis
• Wenn sich das Wasser nach nur einem Reagenz-
tropfen grün verfärbt, ist das Wasser weich.
– In diesem Fall funktioniert der Wasserenthärter
ordnungsgemäß.
• Wenn sich die Probe rot färbt und mehr als ein
Tropfen erforderlich ist, bis sie sich grün färbt, ist
das Wasser nicht weich.
– In diesem Fall muss der Wasserenthärter
erneuert oder die Harzperlen müssen ausge-
tauscht werden.
4.3 Umrechnen der Wasserhärte
5. Überprüfen der relativen Dichte (d)
des Elektrolyts
Bei d handelt es sich um die relative Dichte des
Elektrolyts in der Elektrolysezelle. Beachten Sie die
Montage- und Betriebsanleitung der Sel-
coperm-Anlage.
5.1 Verfahrensweise beim Test der
relativen Dichte
1. Spülen Sie einen sauberen und trockenen Mess-
becher (Abb. 1, Pos. 1) mit dem Elektrolyt aus
dem Elektrolyt-Entnahmeventil aus.
2. Befüllen Sie den Messbecher mit einer Probe aus
dem Elektrolyt-Entnahmeventil.
3. Platzieren Sie das Aräometer (Abb. 1, Pos. 3) im
Messbecher.
4. Lesen Sie die Anzeige des Aräometers ab.
6. Überprüfen der Temperatur der
NaClO-Lösung
1. Entnehmen Sie eine Probe der NaClO-Lösung
aus dem Probenahmeventil der Sel-
coperm-Anlage.
2. Legen Sie das Thermometer (Abb. 1, Pos. 11) in
die Probe und lesen Sie die Anzeige ab.
– Die gemessene Temperatur sollte 40 °C nicht
überschreiten.
7. Ersatzteile
°d °e °f mg/l
CaO mg/l
CaCO3mmol/l
1 1,3 1,8 10 18 0,18
2 2,5 3,6 20 36 0,36
3 3,8 5,4 30 54 0,54
4 5,0 7,1 40 71 0,71
5 6,3 8,9 50 89 0,89
6 7,5 10,7 60 107 1,07
7 8,8 12,5 70 125 1,25
8 10,0 14,3 80 143 1,43
9 11,3 16,1 90 161 1,61
10 12,5 17,8 100 178 1,78
Beschreibung Produktnum-
mer
Aräometer 98504212
Thermometer 98708063
Rührstab 95727771
Dispenserspitze, 5 Stück 99619798
Gesamthärte-Testkit 98948745
Set aus 100 Acidifying-GP-Tab-
letten und 100 Chlorine-HR-Tab-
letten 98144705
Set aus 30 ml Maßlösung (2 N
Natriumthiosulfatlösung
(Na2S2O3)) und Dispenserspitze 99619819

Deutsch (DE)
14
8. Entsorgung
Dieses Produkt sowie Teile davon müssen umwelt-
gerecht entsorgt werden:
1. Nutzen Sie die öffentlichen oder privaten
Entsorgungsgesellschaften.
2. Ist das nicht möglich, wenden Sie sich bitte an
eine Grundfos-Niederlassung oder eine von
Grundfos anerkannte Servicewerkstatt in Ihrer
Nähe.
Die verwendete Testprobe kann mit Leitungswasser
in das Wassernetz gespült werden. Nicht verwen-
dete Reagenzien, deren Verfallsdatum überschritten
ist, müssen in Übereinstimmung mit den geltenden
Vorschriften entsorgt werden.
Siehe auch die Informationen zur Entsorgung auf
www.grundfos.com/product-recycling.

Español (ES)
15
Español (ES) Instrucciones de instalación y funcionamiento
Traducción de la versión original en inglés
CONTENIDO
Página
1. Instrucciones generales
1.1 Instrucciones de seguridad
• Mantener alejado de fuentes de calor.
• Conservar en un lugar fresco.
• Mantener alejado de alimentos, bebidas y pien-
sos para animales.
• Mantener fuera del alcance de los niños. Los
reactivos están diseñados exclusivamente para
el uso como parte de análisis químicos.
• Lavarse las manos después de trabajar con el kit
de pruebas. Desprenderse inmediatamente de
las prendas contaminadas.
• Evitar el contacto con la piel y los ojos. Usar
gafas y guantes de seguridad.
• No comer, beber ni fumar en el lugar de trabajo.
2. Contenido del kit de pruebas
Fig. 1 Contenido del kit de pruebas
1. Instrucciones generales 15
1.1 Instrucciones de seguridad 15
2. Contenido del kit de pruebas 15
3. Comprobación de la concentración de la
solución de NaClO 16
3.1 Materiales necesarios 16
3.2 Conexión de la punta dispensadora al
valorador HandyStep S 17
3.3 Llenado y calibración del valorador Han-
dyStep S 17
3.4 Proceso de valoración 18
3.5 Cálculo 19
3.6 Extracción de la punta dispensadora 19
4. Comprobación de la dureza del agua 19
4.1 Procedimiento de prueba de la dureza del
agua 19
4.2 Resultado 19
4.3 Conversión de dureza del agua 19
5. Comprobación de la densidad relativa
del electrolito 20
5.1 Procedimiento de prueba de la densidad
relativa 20
6. Comprobación de la temperatura de la
solución de NaClO 20
7. Piezas de repuesto 20
8. Eliminación 20
Por favor, antes de realizar la instalación,
lea detenidamente este documento. La
instalación y el funcionamiento deben rea-
lizarse de acuerdo a los reglamentos loca-
les en vigor y los códigos aceptados de
prácticas recomendadas.
PRECAUCIÓN
Sustancias químicas peligrosas
Lesión personal leve o moderada
- Lea íntegramente la descripción del
método antes de llevar a cabo las prue-
bas. Lea las Fichas de Datos de Seguri-
dad (FDS).
- Las FDS están disponibles en:
net.grundfos.com/qr/i/98734551
TM07 5510 4319
Pos. Descripción
1 Probeta, 250 ml
2 Valorador HandyStep S
3 Hidrómetro
4 Punta dispensadora
5 Tabletas de acidificante GP (100 uds.)
6 Tabletas de cloro HR (100 uds.)
7 Contenedor de muestra
8 Kit de prueba de dureza total
9 Jeringa, 6 ml
10 Varilla agitadora
11 Termómetro
12 Tubo de vidrio neutro, 5 ml
13 Frasco pequeño con 30 ml de valorante
(solución de tiosulfato de sodio 2 N
(Na2S2O3))
14 Recipiente de pruebas, cristal transpa-
rente, 60 ml
5
1
3
4
6
12
2
7
13
14
8 9 1110

Español (ES)
16
3. Comprobación de la concentración
de la solución de NaClO
El valorador HandyStep S permite hacer una valora-
ción exacta sobre el terreno usando pequeñas canti-
dades de muestra y de consumibles (reactivos).
3.1 Materiales necesarios
• Valorador HandyStep S
• Punta dispensadora
• Jeringa, 6 ml
• Recipiente de pruebas, cristal transparente,
60 ml
• Tubo de vidrio neutro, 5 ml
• Varilla agitadora
• Valorante: 30 ml de solución de tiosulfato de
sodio 2 N (Na2S2O3)
• Tabletas de cloro HR
• Tabletas de acidificante GP
• Agua ablandada (obtenida a través de la válvula
de muestreo de agua del sistema Selcoperm)
Valorador HandyStep S
Fig. 2 Valorador HandyStep S
TM06 6285 1016
Pos. Descripción
1Rueda de ajuste de recorrido (dispensación
lenta/rápida)
2 Palanca de dispensación
3Escala de valoración (unidades
dispensadas)
4 Palanca de bloqueo/llenado
5 Eyector de jeringa
4
5
1
3
2

Español (ES)
17
3.2 Conexión de la punta dispensadora al
valorador HandyStep S
Fig. 3 Conexión de la punta dispensadora al
valorador
1. Sostenga el valorador HandyStep S (fig. 1,
pos. 2) en posición vertical (posición de valora-
ción). Presione la palanca de bloqueo/llenado
(fig. 2, pos. 4) hasta el tope inferior (A).
2. Con cuidado, presione la palanca de bloqueo/lle-
nado hacia abajo hasta que se incline (B).
– Se abrirá la barra de bloqueo situada dentro
del valorador.
3. Inserte el extremo superior de la punta dispensa-
dora (fig. 1, pos. 4) en el valorador. Tire de la
palanca de bloqueo/llenado hasta su posición ini-
cial (C).
– Se cerrará la barra de bloqueo situada dentro
del valorador.
La punta dispensadora quedará firmemente fijada al
valorador y lista para usar.
3.3 Llenado y calibración del valorador
HandyStep S
1. Abra el frasco de solución de tiosulfato de sodio
2 N (valorante) (fig. 1, pos. 13).
2. Agregue una pequeña cantidad (unos 2 ml) en el
tubo de vidrio neutro (fig. 1, pos. 12) para evitar
la contaminación de la solución.
3. Sumerja el extremo de la punta dispensadora
(fig. 1, pos. 4) en el valorante del tubo de vidrio
neutro.
4. Tire de la palanca de bloqueo/llenado (fig. 2,
pos. 4) hacia arriba, hasta alcanzar el tope supe-
rior.
– Se aspirará valorante desde el tubo de vidrio
neutro hasta la punta dispensadora.
5. Asegúrese de que no quede aire atrapado en la
punta dispensadora.
– Para eliminar el aire, sostenga el valorador en
ángulo y presione y tire de la palanca de blo-
queo/llenado hacia arriba y hacia abajo varias
veces.
– Tire de la palanca de bloqueo/llenado hacia
arriba, hasta alcanzar el tope superior
(consulte la fig. 4).
Fig. 4 Posición superior de la palanca de
bloqueo/llenado
– La punta dispensadora estará llena de valo-
rante.
6. Sostenga el extremo de la punta dispensadora
sobre un receptáculo de residuos o papel tisú.
Presione con cuidado la palanca de dispensa-
ción.
– El valorante se descargará desde la punta dis-
pensadora.
7. Continúe presionando la palanca de dispensa-
ción hasta que el extremo inferior de la palanca
de bloqueo/llenado alcance el cero de la escala
de valoración (consulte la fig. 5).
TM06 6284 1016
BCA
TM06 6295 3719
0
10
20
30
40
50
60
70
80
90
100

Español (ES)
18
Fig. 5 Extremo inferior de la palanca de blo-
queo/llenado ajustado al cero de la
escala
– Se descargará una pequeña cantidad de valo-
rante. El valorador quedará cebado para la
valoración.
8. Con cuidado, elimine el exceso de valorante del
extremo inferior de la punta dispensadora
empleando papel tisú limpio.
9. Asegúrese de que la rueda de ajuste de recorrido
(fig. 2, pos. 1) se encuentre ajustada en la posi-
ción "1" (consulte la 6).
Fig. 6 Rueda de ajuste de recorrido
– Ajustar la rueda de ajuste de recorrido a un
valor superior incrementaría la cantidad de
valorante dispensado por presión completa de
la palanca de dispensación.
Una vez hecho todo lo anterior, el valorador estará
calibrado y preparado para valorar.
3.4 Proceso de valoración
1. Tome una muestra de solución de NaClO del sis-
tema Selcoperm. Consulte las instrucciones de
instalación y funcionamiento del sistema Selco-
perm.
2. Introduzca 20 ml de agua ablandada en el reci-
piente de pruebas (fig. 1, pos. 14).
3. Agregue 2 tabletas de cloro HR (fig. 1, pos. 6) y
deshágalas con la varilla agitadora.
4. Agregue 2 tabletas de acidificante GP (fig. 1,
pos. 5) y deshágalas con la varilla agitadora.
5. Mezcle bien agitando con cuidado.
– Puede que las tabletas no se disuelvan por
completo. Esto no afecta al resultado de la
prueba.
6. Llene la jeringa de 6 ml (fig. 1, pos. 9) con 5 ml
de muestra de solución de NaClO.
– Asegúrese de que la jeringa no aspire burbujas
de aire.
7. Agregue los 5 ml de muestra a los reactivos en el
recipiente de pruebas. Agite con cuidado.
– El color de la muestra adquirirá un tono marrón
rojizo inmediatamente.
8. Sostenga el valorador HandyStep S (fig. 1,
pos. 2) con una mano y el recipiente de pruebas
con la otra. Introduzca la punta dispensadora
(fig. 1, pos. 4) en el recipiente de pruebas, de tal
forma que el extremo quede sumergido en la
muestra.
9. Presione la palanca de dispensación (fig. 2,
pos. 2) para agregar valorante mientras agita la
muestra en el recipiente de pruebas.
– El valorante se mezclará homogéneamente,
aportando precisión a los resultados.
10. Agregue valorante hasta que el color de la mues-
tra pase de marrón rojizo a completamente trans-
parente.
11. La posición del extremo inferior de la palanca de
bloqueo/llenado (fig. 2, pos. 4) en la escala de
valoración (fig. 2, pos. 3) muestra el número de
unidades dispensadas.
– Anote el número de unidades dispensadas.
TM06 6298 3719TM06 6296 3719
0
10
20
30
40
50
60
70
80
90
100
Mida la concentración inmediatamente
después de tomar la muestra.
No toque las tabletas de reactivos con los
dedos.
Agregue los reactivos en el orden
correcto.
Deje de agregar valorante cuando la
muestra sea transparente.
Dicho suceso determina el final de la valo-
ración.

Español (ES)
19
3.5 Cálculo
1. Lea el número de unidades dispensadas en la
escala de valoración (fig. 2, pos. 3).
2. Multiplique el número de unidades dispensadas
por el factor de conversión 0,16:
– Unidades dispensadas x 0,16 = valor de cloro
en g/l
3.6 Extracción de la punta dispensadora
1. Sostenga el extremo de la punta dispensadora
(fig. 1, pos. 4) encima del tubo de vidrio neutro
(fig. 1, pos. 12).
2. Presione la palanca de bloqueo/llenado (fig. 2,
pos. 4) hasta el tope inferior.
– El valorante que no se haya usado se des-
echará.
– Agregue siempre valorante nuevo en el tubo
de vidrio neutro para garantizar que el resul-
tado sea correcto en la siguiente medida.
3. Presione la palanca de bloqueo/llenado hacia
abajo y hacia adelante para liberar la barra de
bloqueo.
4. Presione hacia abajo el eyector de la jeringa
(fig. 2, pos. 5) y extraiga la punta dispensadora.
5. Tire de la palanca de bloqueo/llenado hasta
situarla en su posición inicial.
4. Comprobación de la dureza del
agua
Es muy importante disponer de un ablandador de
agua que funcione correctamente para garantizar la
eficiencia y longevidad del sistema Selcoperm. La
presencia de altos niveles de carbonato cálcico en el
electrolito da lugar a una precipitación visible en los
electrodos de la celda electrolítica.
La prueba de dureza del agua es una prueba de
goteo. La dureza se determina contando las gotas
de reactivo que caen hasta que cambia el color.
4.1 Procedimiento de prueba de la dureza
del agua
1. Tome una muestra a través de la válvula de
muestreo de agua ablandada del sistema Selco-
perm. Consulte las instrucciones de instalación y
funcionamiento del sistema Selcoperm.
2. Llene el contenedor de muestra (fig. 1, pos. 7)
hasta la marca de 5 ml.
3. Sostenga el frasco de reactivo en posición verti-
cal. Agregue el reactivo gota a gota mientras
agita la muestra con cuidado hasta que el color
cambie de rojo a verde.
– Cuente el número de gotas. Una gota equivale
a un grado de dureza total del agua.
4.2 Resultado
• Si la muestra se vuelve verde con una gota de
reactivo, el agua es blanda.
– El ablandador de agua funciona correcta-
mente.
• Si la muestra se vuelve roja y requiere más de
una gota hasta volverse verde, el agua no es
blanda.
– Será preciso regenerar el ablandador de agua
o sustituir las cuentas de resina.
4.3 Conversión de dureza del agua
Unidades dispensadas Cloro [g/l]
35 5,60
36 5,76
37 5,92
38 6,08
39 6,24
40 6,40
41 6,56
42 6,72
43 6,88
44 7,04
45 7,20
46 7,36
47 7,52
48 7,68
49 7,84
50 8,00
51 8,16
52 8,32
53 8,48
54 8,64
55 8,80
°d °e °f mg/l
CaO mg/l
CaCO3mmol/l
1 1,3 1,8 10 18 0,18
2 2,5 3,6 20 36 0,36
3 3,8 5,4 30 54 0,54
4 5,0 7,1 40 71 0,71
5 6,3 8,9 50 89 0,89
6 7,5 10,7 60 107 1,07
7 8,8 12,5 70 125 1,25
8 10,0 14,3 80 143 1,43
9 11,3 16,1 90 161 1,61
10 12,5 17,8 100 178 1,78

Español (ES)
20
5. Comprobación de la densidad
relativa del electrolito
Este procedimiento permite determinar la densidad
relativa del electrolito que se introduce en la celda
electrolítica. Consulte las instrucciones de instala-
ción y funcionamiento del sistema Selcoperm.
5.1 Procedimiento de prueba de la
densidad relativa
1. Enjuague una probeta limpia y seca (fig. 1,
pos. 1) con electrolito tomado de la válvula de
muestreo de electrolito.
2. Llene la probeta con una muestra tomada de la
válvula de muestreo de electrolito.
3. Introduzca el hidrómetro (fig. 1, pos. 3) en la pro-
beta.
4. Anote la lectura del hidrómetro.
6. Comprobación de la temperatura de
la solución de NaClO
1. Tome una muestra a través de la válvula de
muestreo de solución de NaClO del sistema
Selcoperm.
2. Introduzca el termómetro (fig. 1, pos. 11) en la
muestra y anote la lectura.
– La temperatura no debe ser superior a 40 °C.
7. Piezas de repuesto
8. Eliminación
La eliminación de este producto o partes de él debe
realizarse de forma respetuosa con el medio
ambiente:
1. Utilice el servicio local, público o privado,
de recogida de residuos.
2. Si esto no es posible, contacte con la compañía o
servicio técnico Grundfos más cercano.
La muestra de análisis usada se puede arrojar al
desagüe acompañada de agua corriente. Si no ha
recibido uso, el reactivo caducado debe eliminarse
de acuerdo con la normativa local.
Consulte también la información disponible en
www.grundfos.com/product-recycling en relación con
el final de la vida útil del producto.
Descripción Referencia
Hidrómetro 98504212
Termómetro 98708063
Varilla agitadora 95727771
Punta dispensadora (5 uds.) 99619798
Kit de prueba de dureza total 98948745
Paquete de 100 tabletas de
acidificante GP y 100 tabletas de
cloro HR 98144705
Paquete de 30 ml de valorante
(solución de tiosulfato de sodio
2N (Na
2S2O3)) y punta
dispensadora
99619819
Table of contents
Languages: