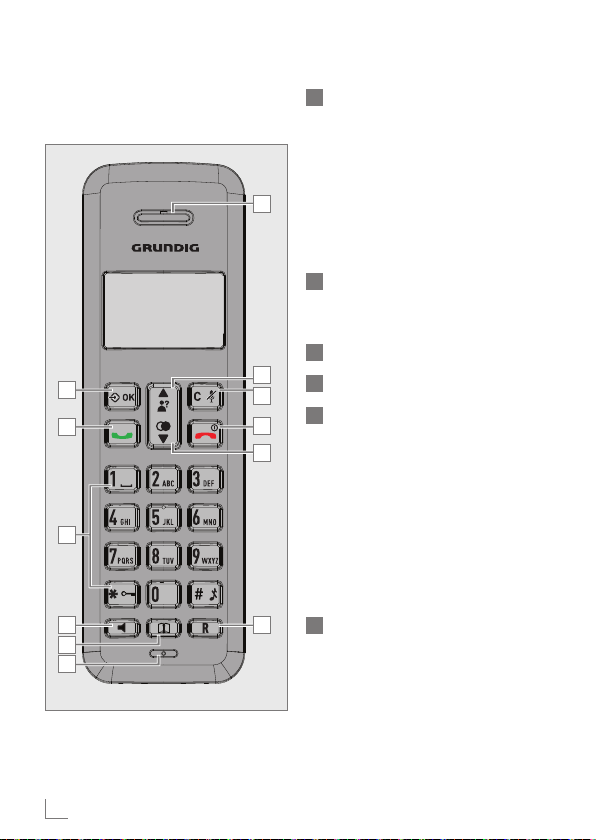
Grundig 01M-8926982600-5220-03 User manual

GDT 310
EN - TR
User Manual
Dect Phone
01M-8926982600-5220-03
01M-8926981600-5220-03

ENGLISH
2
CONTENTS___________________________________________________
3 IMPORTANT SAFETY
INSTRUCTIONS
5 INSTALLING YOUR PHONE
5 Package contents
5 Connecting the base station
5 Installing and charging the batteries
6 GETTING TO KNOW YOUR
PHONE
6 Base Station Overview
10 Display Icons and Symbols
12 Text and Digit Entry Table
12 Character Set
13 USING YOUR PHONE
13 Make a Call
13 Answer a Call
13 End a Call
13 Adjust Earpiece and Handsfree
Volume
14 Mute a Call
14 Set the Silent Mode
14 Turn on the Keypad Lock
14 Redial the last number
15 Find the Handset
15 Make an Internal Call
17 PRIVATE PHONEBOOK
17 Add a New Phonebook Entry
17 Search a Phonebook Entry
17 View a Phonebook Entry
17 Edit a Phonebook Entry
18 Delete a Phonebook Entry
18 Delete the Entire Private Phone-
book
18 Check the Phonebook Usage
19 CALLER DISPLAY
19 View the Call List
19 Store a Call List Number into the
Phonebook
19 Delete an entry in the Call List
20 Delete the entire list of the Call List
20 View the Details of the Call List
Entry
21 VOICE MAIL
21 Access Voice Mail Messages
21 Delete VMWI Entries
23 PHONE SETTINGS
23 Date and Time Settings
24 Alarm Settings
24 Handset Settings
26 Base Settings
28 Registration
28 Reset Your Phone
29 DEFAULT SETTINGS
30 TECHNICAL FEATURES
33 TROUBLESHOOTING

ENGLISH 3
When using your telephone equipment,
basic safety precautions should always
be followed to reduce the risk of fire,
electric shock and injury, including the
following:
1 Read and understand all the instruc-
tions.
2 Follow all warnings and instructions
marked on the product.
3 Unplug this product from the wall
outlet before cleaning. Do not use
liquid cleaners or aerosol cleaners.
Use a damp cloth for cleaning.
4 Do not use this product near water
(for example, near a bath tub,
kitchen sink, swimming pool).
5 Do not overload wall outlets and
extension cords as this can result in
the risk of fire or electric shock.
6 Unplug this product from the wall
outlet and refer after sales service
under the following conditions:
█When the power supply cord or
plug is damaged or frayed.
█If the product does not operate
normally by following the operat-
ing instructions.
█If the product has been dropped
and the cabinet has been dam-
aged.
█If the product exhibits a distinct
change in performance.
7 Avoid using a telephone (other than
a cordless type) during an electrical
storm. There may be a remote risk
of electric shock from lightning.
8 Do not use the telephone to report a
gas leak in the vicinity of the leak.
9 Use only the supplied NiMH
(Nickel Metal Hydride) batteries!
The operation periods for the hand-
sets are only applicable with the
default battery capacities
10 The use of other battery types or
non-rechargeable batteries/primary
cells can be dangerous. These may
cause interference and/or unit dam-
ages. The manufacturer will not be
held liable for damage arising from
such non-compliance.
11 Do not use third party charging
bays . The batteries may be dam-
aged.
12 Please note the correct polarity
while inserting the batteries.
13 Do not immerse batteries in water,
do not place in fire.
14 Do not use third party power
adapter.
15 The appliance is only to be used
with the adapter unit provided with
the appliance.
Please read the entire
user manual carefully
before operate this
device. Use only power adaptor and
battery provided.
IMPORTANT SAFETY INSTRUCTIONS _________

ENGLISH
4
IMPORTANT SAFETY INSTRUCTIONS _________
█For PLUGGABLE EQUIPMENT,
the socket-outlet (power adaptor)
shall be installed near the equip-
ment and shall be easily acces-
sible.
CAUTION: Disconnect the tele-
phone line from the equipment be-
fore open the battery door.
CAUTION: Risk of explosion if bat-
tery is replaced by incorrect type.
Disposed of used batteries accord-
ing to the instruction.
Avoids to use battery in following con-
ditions:
█High or low extreme temperature
during use, storage or transporta-
tion.
█Replacement of a battery with an
incorrect type that can defeat a
safeguard.
█Disposal of a battery into fire or
a hot oven, or mechanically crush-
ing or cutting of a battery, that
can result in an explosion.
█Leaving a battery in an extremely
high temperature surrounding
environment that can result in an
explosion or the leakage of flam-
mable liquid or gas.
█Extremely high temperature and/
or extremely low air pressure that
can result in an explosion or the
leakage of flammable liquid or
gas.
█The applied nameplate is located
at the bottom or near of the prod-
uct.
█Equipment is only suitable for
mounting at heights < 2 meter.
CAUTION: To maintain the compli-
ance with the RF exposure require-
ment, the Base Unit shall be installed
and used such that parts of user’s
body other than hands are main-
tained at a distance of 20 cm or
more.

ENGLISH 5
Installing and charging the
batteries
1 Slide open the battery compartment
cover.
2 Place the 2 batteries as indicated.
Respect polarity.
3 Slide the battery compartment cover
back.
4 Put the handset on the base and
charge for 14 hours first time. A beep
indicates that the handset is properly
placed on the base or charger.
Note:
█Use only the power pack pro-
vided for the base station.
█Use only NiMH rechargeable
batteries.
INSTALLING YOUR PHONE_________________________
Package contents
The package contains the following
items:
█1 Handset
█1 Base station
█1 AC power adapter
█1 Telephone line cord
█2 rechargeable batteries
█1 User manual
The maximum range between the base
station and the handset is approxi-
mately 300 meters. Depending on the
surrounding conditions as well as spa-
tial and structural factors, the range
may be reduced. The range indoors is
normally less than outdoors.
Connecting the base station
1 Plug the power supply »« & line
cord »« into the base station.
2 Plug the power supply & line cord
into the wall socket.
3 Always use the cables provided in
the box.

ENGLISH
6
GETTING TO KNOW YOUR PHONE______
A
B
Base Station Overview
APAGE
Press the Page »« on the base
station to page your handset. It will
ring for approximately 60 seconds.
BCHARGING CRADLE

ENGLISH 7
A
G
H
I
J
K
L
B
C
D
E
F
ALEFT SOFT KEY (MENU/OK)
In idle mode: Press to access the
main menu
In sub-menu mode: Press to confirm
the selection.
During a call: Press to access Inter-
com/ Phonebook/ Redial List/ Call
List.
BTALK ON
In idle / predialing mode: Press to
make a call.
In Redial list / Call List / Phonebook
entry: Press to make a call to the
selected entry in the list.
During ringing: Press to answer a
call.
CALPHANUMERIC KEYPAD,
* (STAR), # (HASH)
Press to insert a digit / character / *
/ #.
1 key in idle mode: Press and hold
to access the voice mail (for EU ver-
sion.
* key in idle mode: Press and hold
to enable or disable the keypad
lock.
* key during a call (in Pulse mode):
Press to switch to tone mode.
# key in Idle mode: Press and hold
to turn on / off the ringer.
0 key in idle / predialing / number
editing mode: Press and hold to insert
a pause.
# key in Call List mode: Press to re-
view caller’s number if applicable.
GETTING TO KNOW YOUR PHONE______
Overview of the Handset
(for Speakerphone model)

ENGLISH
8
DSPEAKERPHONE
During a call: Press to turn on / off
the speakerphone.
In Idle mode / predialing mode /
Redial list / Call List / Phonebook
entry: Press to make a call with
speakerphone.
During ringing: Press to answer a
call with speakerphone.
EPHONEBOOK
In idle mode: Press to access the
phonebook list.
FMICROPHONE
GEARPIECE
HUP
In idle mode: Press to access the call list
In menu mode: Press to scroll up the
menu items.
In Phonebook list / Redial list / Call
List: Press to scroll up the list.
During a call: Press to increase the
volume.
In ringing: Press to increase the ringer
volume.
IRIGHT SOFT KEY (CLEAR/
BACK/MUTE/INTERCOM)
In main menu mode: Press to go
back to idle screen.
In sub-menu mode: Press to go back
to previous level.
In sub-menu mode: Press and hold
to go back to idle screen.
A
G
H
I
J
K
L
B
C
D
E
F
GETTING TO KNOW YOUR PHONE______

ENGLISH 9
A
G
H
I
J
K
L
B
C
D
E
F
GETTING TO KNOW YOUR PHONE______
In editing / predialing mode: Press
to clear a character / digit.
In editing / predialing mode: Press
and hold to delete all the charac-
ters / digits.
During a call: Press to mute / un-
mute the microphone.
In idle mode: Press to intercom an-
other handset.
JTALK OFF
During a call: Press to end a call
and go back to idle screen.
In menu / editing mode: Press to go
back to previous menu.
In menu / editing mode: Press and
hold to go back to idle screen.
In idle mode: Press and hold to
power off the handset.
In idle mode (when the handset
is powered off): Press and hold to
power on the handset.
KDOWN
In idle mode: Press to access the
redial list.
In menu mode: Press to scroll down
the menu items.
In Phonebook list / Redial list / Call
List: Press to scroll down the list.
During a call: Press to decrease the
volume.
In ringing: Press to decrease the
ringer volume.
LFLASH
In idle / predialing mode: Press to
insert a flash.
During a call: Press to dial a flash.

ENGLISH
10
Display Icons and Symbols
Scroll up / down the menu items
/ Phonebook list / Redial list /
Call List
Steady when the handset is in
range of the base. Flash when out
of range of the base or not regis-
tered to the base.
Steady when an intercom is in
progress. Flash when there is an
incoming internal call.
Indicate a call is in progress.
Indicate that handsfree is being
used. (for speakerphone model
only)
Indicate that the ringer is switched
off.
Steady when an alarm is set. Flash
when the alarm time set before
reaches.
Indicate that the keypad is locked.
Indicate when the battery is fully
charged. Whole icon flashes when
the battery performs initial charg-
ing. Internal block icon flashes
when the battery is in final charg-
ing stage.
Indicate when the battery needs
charging. Flash when low battery
power level is detected.
Indicate when more characters are
existed before the text currently
displayed.
Indicate when more characters
are existed after the text currently
displayed.
Press to select more menu options
if applicable
Press to confirm the current selec-
tion if applicable.
Press to conduct Intercom call
when idle
Press to go back to previous menu
level or cancel the current action if
applicable
Press to clear a character or stop
the alarm if applicable, press to
mute / unmute during a call.
GETTING TO KNOW YOUR PHONE______

ENGLISH 11
GETTING TO KNOW YOUR PHONE______
Menu Structure
In idle mode, press »« will firstly access the Call List menu. Refer to the follow-
ing for the menu structure.
UP /
DOWN
Key Press Main Menu Sub Menu
MENU
CALL LIST Review Call List
Under a selected Call List entry:
ADD TO PB
DELETE
DELETE ALL
DETAILS
PHONEBOOK Review phonebook list
Under a phonebook entry:
ADD
VIEW
EDIT
DELETE
DELETE ALL
BS SETTINGS PB STATUS BS RINGER (Optional)
RING VOLUME (Optional)
DELETE HS
DIAL MODE
FLASH TIME
CHANGE PIN
HS SETTINGS ALARM
RING SETUP
TONE SETUP
LANGUAGE
RENAME HS
HS DISPLAY
AUTO ANSWER
DATE & TIME
REGISTRATION PIN?
DEFAULT PIN?

ENGLISH
12
Text and Digit Entry Table
The following tables show you where
each letter and punctuation character
can be found. Respective character
table will be used when correspond-
ing menu language is selected. This
will be helpful when storing a name
in the phonebook and renaming your
handset.
In editing mode, a cursor is displayed
to indicate the current text entry posi-
tion. It is positioned at the right of the
last character entered.
Writing Tips:
1 Once a character is selected, the
cursor will move to the next position
after a short pause.
2 You can move the cursor within the
text by »« to amend the text
entry.
3 Press »« to delete the last character.
4 Press and hold »« to delete the
entire text string.
Character Set
Key Alphanumeric Editing
(For phonebook name editing and renaming handset)
Number Editing
(For phone number
editing, date/time
editing)
Key
press 1st 2nd 3rd 4th 5th 6th 7th 8th 9th 10th
1 space - 1 1
2 A B C 2 2
3 D E F 3 3
4 G H I 4 4
5 J K L 5 5
6 M N O 6 6
7 P Q R S 7 7
8 T U V 8 8
9 W X Y Z 9 9
0 0 0, P (Pause)
* * ? / \ ( ) *
# # , - . & #
GETTING TO KNOW YOUR PHONE______

ENGLISH 13
USING YOUR PHONE _________________________________
Make a Call
Preparatory Dialing
Enter the phone number and press »«
or »« to dial the number. Press »«
to clear the entry.
Direct Dialing
Press »« or »« to take the line and
enter the phone number.
Call from the phonebook
Press »« to access the phonebook
and press »« to select the desired
phonebook entry. Press »« or »«
to dial out to the selected phonebook
entry. Alternatively, press »« to ac-
cess the phonebook to get the desired
phonebook entry.
Call from the Call List
Press »« to access the Call List and
press »« to select the desired Call
List entry. Press »« or »« to dial out
to the selected Call List entry. Alterna-
tively, press »« to access the Call
List from the main menu.
Call from the redial list
Press »« to access the redial list and
press »« to select the desired redial
number. Press »« or »« to dial out
to the selected redial number.
Call timer
Your handset automatically times the
duration of every call. The call timer will
display a few seconds after the call has
made. It is shown in hours, minutes and
seconds format (HH:MM:SS).
Answer a Call
If the handset is not on the charging
cradle:
When the phone rings, press »« / »«
to answer a call.
If the handset is on the charging cradle
or the base station and if AUTO AN-
SWER is set to ON:
When the phone rings, pick up the
handset to answer a call.
End a Call
During a call connection, press »« to
end the call.
OR
Put the handset on the base station to
end the call.
Adjust Earpiece and
Handsfree Volume
There are 5 levels (VOLUME 1 to VOL-
UME 5) to choose from for each of ear-
piece and handsfree volume.
During a call:
Press »« to select volume 1-5. The
current setting is shown. When you end
the call, the setting will remain at the
last selected level.

ENGLISH
14
USING YOUR PHONE _________________________________
Mute a Call
You can talk to someone nearby without
letting the caller hear you during a call.
During a call:
Press »« to mute the microphone and
“MUTED” will display on the LCD. Your
caller cannot hear you. Press again to
unmute the microphone.
Set the Silent Mode
In idle mode, press and hold »« to
turn off the handset ringer. The “RINGER
OFF” icon is displayed on the LCD.
In silent mode, press and hold »«
to turn on the handset ringer. The
“RINGER OFF” icon will disappear.
Turn on the Keypad Lock
In idle mode, press and hold »«
to turn on the keypad lock. The »«
“KEYPAD LOCK” icon is displayed on
the LCD.
In keypad lock mode, press and hold
»« to turn off the keypad lock. The
»« “KEYPAD LOCK” icon will disap-
pear.
Redial the last number
You can redial up to 5 of the last num-
bers called. If you have stored a name
in the phonebook to go with the num-
ber, the name will be displayed instead.
The most recent last number will display
at the top of the redial list.
Redial a Number from the Re-
dial List
1 In idle mode, press »« to access
the redial list.
Remarks: If redial entry with name,
press »« to view the number.
2 Press »« to browse the redial list.
3 Press »«/ »« to dial to the se-
lected redial number.
Note:
█If there are no numbers in the
redial list, the display shows
“EMPTY”.
Store a Redial Number into the
Phonebook
1 Follow Steps 1 and 2 in section Re-
dial a Number from the Redial List
2 Press »« and »« to select
ADD TO PB.
3 Press »« to enter the name.
4 Press »« to store the redial num-
ber into the phonebook.
5 Press »« to select phonebook
melody.
6 Press »« to browse the melody
list. The respective melody will be
played when browsing the melody
list.
7 Press »« to confirm.

ENGLISH 15
USING YOUR PHONE _________________________________
Delete a Redial Number
1 Follow Steps 1 and 2 in section Re-
dial a Number from the Redial List
2 Press »« and »« to select
DELETE.
3 Press »« to confirm.
Delete the Entire Redial List
1 Follow Steps 1 and 2 in section Re-
dial a Number from the Redial List
2 Press »«and »« to select DE-
LETE ALL.
3 Press »« to confirm.
4 Press »« to confirm again.
Find the Handset
You can locate the handset by pressing
»« on the base station. All the hand-
sets registered to the base will produce
the paging tone and “PAGING” is dis-
played on the LCD. You can stop the
paging by pressing »«/ »« / »«
/ »« on any handset or »« on the
base again.
Note:
█If there is an incoming call during
paging, the phone will ring with
the incoming call instead of pag-
ing.
Make an Internal Call
This feature is only applicable when
there are at least two registered hand-
sets. It allows you to make internal calls,
transfer external calls from one handset
to another handset and make confer-
ence calls. If the called handset is not
answered within 60 seconds, the called
handset will stop ringing and the calling
handset will return to standby mode.
Note:
█If only one handset is registered
to the base station, press »«
will display “NOT POSSIBLE”
Intercom Another Handset
1 In idle mode, press »« and the
registered handsets will display ex-
cept the calling handset.
2 Enter the desired handset number to
intercom with.
3 The called handset rings and press
»«on the called handset to estab-
lish the internal call.
Note:
If two handsets are registered to the
base station, press »« will connect
to another handset immediately.
Call All Handsets
1 In idle mode, press »« and the
registered handsets will display.
2 Press » KEY 9 « to ring to all regis-
tered handsets.

ENGLISH
16
Transfer an External Call to an-
other handset
During an external call:
1 Press »« and »« to select
INTERCOM.
2 Press »« to select the desired
handset to intercom with.
3 The external call is put on hold au-
tomatically and the called handset
rings.
4 Press »«on the called handset to
establish an internal call.
5 Press »« on the calling handset or
put the calling handset on the charg-
ing cradle to end the current call with
the external party.
6 The external call is transferred to the
called handset.
Make a 3-way Conference Call
The conference call feature allows one
external call to be shared with two
handsets (in intercom). The three parties
can share the conversation and no net-
work subscription is required.
During an external call:
1 Follow Steps 1 to 4 in section Trans-
fer an External Call to another hand-
set
2 Press and hold »« on the calling
handset to establish the conference
call.
Nate:
Any handset hangs up during a
conference call will leave the other
handset still in connection with the
external call.
USING YOUR PHONE _________________________________

ENGLISH 17
PRIVATE PHONEBOOK _______________________________
Your phone can store up to 20 private
phonebook entries with names and
numbers. Each phonebook entry can
have a maximum of 20 digits for the
phone number and 12 characters for
the name. You can also select different
ringtones for your phonebook entries.
Phonebook entries are stored alpha-
betically by name.
Add a New Phonebook
Entry
In idle:
1 Press »« to access the phonebook.
OR
Press »« and »« to select
PHONEBOOK main menu item
and then press <OK> to access the
phonebook.
2 Press »« to select ADD.
3 Press »« to enter the name.
4 Press »« to enter the number.
5 Press »« and »« to select
the desired ringtone for your phone-
book entry.
6 Press »« to store the phonebook
entry.
Search a Phonebook Entry
In idle:
1 Press »« to access the phonebook.
2 Enter the first character of the name
by multi-tap.
View a Phonebook Entry
In idle:
1 Press »« to access the phonebook.
2 Press »« to select the desired
phonebook entry.
3 Press »« and »« to select
VIEW.
4 Press »« and »« to review
the name, number and melody of the
selected phonebook entry.
Note:
█If number is more than 12 digits,
press »« or »« to view the
remaining digits.
Edit a Phonebook Entry
In idle:
1 Press »« to access the phonebook.
2 Press »« to select the desired
phonebook entry.
3 Press »« and »« to select
EDIT.
4 Press »« and the current con-
tents of the selected phonebook
entry displays.
5 Edit the name and press »«.
6 Edit the number and press »«.
7 Press »« to select the ringtone
and press »« to confirm.

ENGLISH
18
Delete a Phonebook Entry
In idle:
1 Press »« to access the phonebook.
2 Press »« to select the desired
phonebook entry.
3 Press »« and »« to select
DELETE.
4 Press »« to confirm.
Delete the Entire Private
Phonebook
1 Press »« to access the phonebook.
2 Press »« and »« to select
DELETE ALL.
3 Press »« to confirm.
4 Press »« to re-confirm.
Check the Phonebook
Usage
You can check how many phonebook
entries have been occupied in your
phone and how many phonebook en-
tries are available for you to store in the
phonebook.
1 Press »« to access the phonebook.
2 Press »« and »« to select PB
STATUS.
3 Press »« to confirm.
PRIVATE PHONEBOOK _______________________________

ENGLISH 19
CALLER DISPLAY___________________________________________
This feature is available if you have
subscribed the Caller Line Identifica-
tion service with your network service
provider. Your phone can store up to
10 received calls with date/time infor-
mation in the Call List. The number will
be shown on the LCD when the phone
is ringing. If the number matches with
one of the entries in your Private Phone-
book, the caller’s name stored in the
private phonebook will be displayed
alternatively with the number. The hand-
set will ring with the melody associated
with that phonebook entry.
If the caller number is disabled to send
caller information, “WITHHELD” will
display.
If the caller number is not provided,
“OUT OF AREA” will display.
In standby, if three unanswered calls
are received, “3 NEW CALLS” will
be displayed.
View the Call List
All received calls are saved in Call List
with the latest call putting at the top of
the list. When the call list is full, the old-
est call will be replaced by a new call.
The unanswered call which has not
been read is marked with a »*« at the
centre of the bottom line of the display.
1 Press »« to access the call list.
OR
Press »« and »« to select
CALL LIST.
2 Press »« to select the desired
entry.
3 Press »« to view the caller’s num-
ber if applicable.
Store a Call List Number
into the Phonebook
1 Follow Steps 1 and 2 in Section
View the Call List
2 Press »« and »« to select
ADD TO PB.
3 Press »« to enter the name.
4 Press »« and the selected call
list number is displayed.
5 Edit the number if necessary.
6 Press »« and »« to select
the melody.
7 Press »« to confirm.
Delete an entry in the Call
List
1 Follow Steps 1 and 2 in Section
View the Call List
2 Press »« and »« to select
DELETE.
3 Press »« to confirm.

ENGLISH
20
Delete the entire list of the
Call List
1 Follow Steps 1 and 2 in Section
View the Call List.
2 Press »« and »« to select
DELETE ALL.
3 Press »« to confirm.
4 Press »« to re-confirm.
View the Details of the Call
List Entry
1 Follow Steps 1 and 2 in Section
View the Call List
2 Press »« and »« to select
DETAILS.
3 Press »« to display the date and
time of the selected call list entry.
4 Press »« to go back to previous
screen.
CALLER DISPLAY___________________________________________
This manual suits for next models
2
Table of contents
Languages:
Other Grundig Cordless Telephone manuals

Grundig
Grundig Selio User manual

Grundig
Grundig D350 User manual

Grundig
Grundig D1110 User manual

Grundig
Grundig SEEN A User manual

Grundig
Grundig GDT 1000 User manual

Grundig
Grundig ELYA User manual

Grundig
Grundig ELYA User manual

Grundig
Grundig 01M-8926982600-0121-03 User manual

Grundig
Grundig GDT 310 User manual

Grundig
Grundig Selio ECO User manual