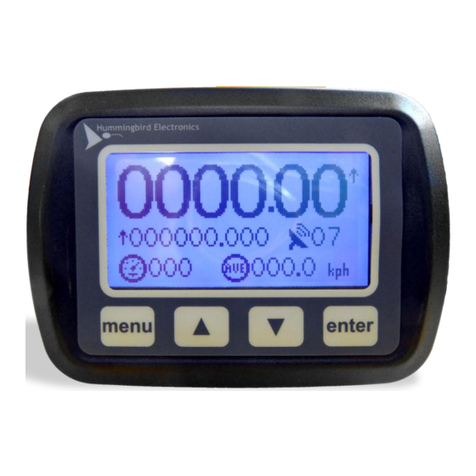
GSR Laser Tools HMGT3000 User manual

GPS Trip Meter -Active
HMGT3000
The GPS Trip Meter - ACTIVE is used to measure distance accurately with
GPS
and
Glonass.
It is easy to operate with a full-colour touchscreen and can display 2 independant trips
simultaneously.
Ideal for Councils and Rally Drivers.
GPS TRIP METER - ACTIVE
OPTIONAL ACCESSORIES:
- Bulkhead Mount GPS Antenna
- Stubby GPS Antenna
THE KIT CONTAINS:
1.4.3” Display screen
2.
Power
and
reset switch
3.Magnetic
mount
GPS Antenna
Ram mount suction systems4.

TECHNICAL SPECIFICATIONS:
PART NUMBER HMGT3000
MOUNTING SYSTEM RAM MOUNT SUCTION SYSTEM
INPUT VOLTAGE 4.4VDC - 32VDC
USB POWER COMPLIANT
POWER CONSUMPTION 1.4W; 120MA AT 12V
DIMENSIONS (DISPLAY UNIT)
MAGNETIC MOUNT GPS ANTENNA
ANTENNA CABLE LENGTH
POWER & RESET SWITCH CABLE LENGTH
130MM(WIDTH) X 94MM(HEIGHT) X 21MM(DEPTH)
40MM(WIDTH) X 15MM(HEIGHT) X 49MM(LENGTH)
5M
1.5M
GPS RECEIVER GPS/GLONASS/GALLILEO/BEIDOU, 72 CHANNEL
POSITION ACCURACY 2.5M CEP
DISTANCE RESOLUTION 1M
DISTANCE UPDATE RATE 10HZ
MINIMUM SPEED 2KM/H
SATELLITE AQUISITION TIME 30 SECONDS
OPERATING TEMPERATURE -40 TO 85 DEGREES CELSIUS
GPS TRIP METER - ACTIVE POWERFUL PERFORMANCE
The GPS Trip Meter - Active requires no costly installation; simply plug into your power socket
and start measuring.
The trip meter updates three-dimensional distance measurements ten times a second.
The full colour touchscreen allows for easy operation of the trip functions. Simply press the up
down arrow next to each trip to change direction or press the run button to pause a trip. A full
numerical keypad allows for quick update of start distances.
The trip meter is fully customisable via the integrated menu allowing for function such as pause
to be tailored to the users particular application.
An external reset switch is provided and can be configured to reset a trip or pause with a press
and hold then activating a reset.
Current and average speed are displayed and an over-speed alert can be configured to activate
the internal buzzer. The internal buzzer can also be configured to beep when the trips are in
count down mode such as when the vehicle is reversing.
The unit is multi voltage and can work in 12V and 24V vehicles.

1. Mount the GPS antenna on the dashboard or the sun visor as shown in the below image.
For best results the antenna must have an unobstructed view of the sky.In vehicles where
the windscreen is vertical the antenna can be placed on the roof using the magnetic
mount.Placing the antenna under a metal roof will not work.
2. Screw the GPS antenna into the back of the unit.
3. Plug the supplied power cable into the back of the unit.
4. Plug the USB cable into the vehicle’s USB power supply.If the vehicle does not have a
USB power supply use a USB/cigarette lighter adaptor (12/24V).
5. Using the supplied suction mount,mount the unit in an easy to view position on the
dashboard or windscreen.The unit must not obstruct the driver’s view of the road.If permanent
mounting is required,please enquire about the optional RAM mounting system that allows for
permanent mounting on a surface or handlebars.
6. Power the unit,wait for the satellite indicator to go green and you are ready to measure
distance.
Typical antenna placement on the dashboard
INSTALLATION INSTRUCTIONS:
l
l
- Included Accessories

OPERATION:
Press to change
between run and
pause mode
Press a trip to enter
an initial value
Press to change
between up and
down count
Press the menu
button to enter
the menu
Press the up and
down buttons to set
all trips to count up
or down
The enter button has the
same function
as the external reset
switch
KEYPAD OPERATION

OPERATION:
NAVIGATING THE MENU
To access the main menu,press the menu key on the bottom left of the unit.The user can
navigate using the keypad or the touchscreen.
Keypad
Up and down buttons are used to scroll through menu items or increase & decrease values.The
enter button is used to confrm or select an option, and the menu button is used to go back one
level or cancel.
Touchscreen
Swipe top to bottom to scroll down,swipe bottom to top to scroll up,and touch to confrm or
select an option.
Entering Values
When entering values,such as distances or the password, the keypad or touchscreen may be
used.To enter a value using the keypad,you press Up or Down to change the current character/
digit,Enter to progress to the next character/digit or Menu to go back one space.
Pressing the screen enables an on-screen keypad/keyboard,which has the following three
Function keys:
MENU ITEM DESCRIPTION:
Trip Configuration
The Trip Configuration menu allows the user to configure either of the trips.
Reset to 000.000
This option will reset the value of the selected trip to 0, or to the value set with the Set Reset
Value option, below.
Load Value into Trip
This option allows the user to enter a value for the selected trip.
Set Reset Value
This option allows the user to change the reset value. When the selected trip is reset, either
through this menu or through another function, it will be set to this value.
Trip Enabled
This option sets whether or not a trip is enabled and counting.
Trip Paused
This option sets whether or not a trip is paused. Exactly what happens when a trip is paused is
configured in the Pause Settings menu.
Trip Runs
This option allows the user to choose whether the selected trip runs forwards or backwards.
Cancel
Backspace
Enter

display
Calibrate
This option allows the Trip Meter to be calibrated to match (inaccurate) track notes.
Backward-counting Trip Warning
Setting the option causes the internal buzzer to sound when any of the trips are set to count
backwards.
time. night at scheme high-contrast the to change automatically
will it case which in Auto, to set be can It scheme. colour high-contrast a enables option This
Display
Night
driving.
night for display the dim to when detect automatically to device the allows option this Setting
Dim
Auto
(1-10).
display
the
of
brightness
the
set
to
user
the
allows
option
This
Brightness
display.
main
the
on
shown
Speed,
Average
the
calculate
to
used
is
trip
which
selects
This
Trip on Based Speed Average
threshold.
over-speed
the
set
to
unit
the
Allows
Limit Speed
below. set limit the of excess in speed
detects
Meter
Trip
the
when
sound
to
buzzer
internal
the
causes
warning
overspeed
the
Enabling
Warning Overspeed
SUBMENU:
WARNING
OVERSPEED
miles. nautical or
miles kilometres, Meter: Trip the on shown are distances how select to user the allows option This
Unit
Measurement
SETTINGS: SYSTEM
main
the
on
shown
value
the
freezing
while
background,
the
in
count
to
continue
will
trip
paused
a
set,
is
option
this
When
Background in Count Trips Paused
value.
reset
the
to
trip selected the set will seconds 3 for switch external the holding yes, to set is option this When
Hold
on
Reset
delay.
second
3
a
after
unpause
automatically
will
trip
paused
a
yes,
to
set
is
option
this
When
3s after Unpause Auto
SETTINGS:
PAUSE
below).Settings,Pause(SeePauseorabove)see
Value,
Reset
the
to
value
trip
the
(Sets
Reset
(Disabled),
Nothing
–
pressed
is
switch
external
the
when
trip
each
to
happens
what
set
to
user
the
allows
Function
B
Trip
and
Function
A
Trip FunctionTrip
below.
selected
are
Functions
Trip
what ofregardlessanything,triggeringfromswitchexternalthepreventsoptionthisin“No”Selecting
Enabled
Switch
External
switch.
external
the
of
configuration
allows
menu
This SWITCH:EXTERNAL
OPERATION:

OPERATION:
PASSWORD SUBMENU:
Password
Enabling the password prompts the user to enter a new password.
Change Password
Allows the user to enter a different password,once it has been enabled.
TIME SETTINGS SUBMENU:
Daylight Saving Time
When set to on,this option will advance the time forward by one hour.
Time zone
Allows the user to select the time zone.
Reset to Defaults
Selecting this option will reset all settings to default values.
GPS INFORMATION:
Displays GPS data:Latitude and longitude,speed and position accuracy,and satellite information.
SHOW STATISTICS:
Displays data for selected trip (distance,average speed, max. speed and time measured).
Pressing up and down buttons switches the selected trip displayed.
GSR Laser Tools
Unit 7 / 7 Prindiville Drive - Wangara WA 6065
Ph: 08 9409 4058
[email protected] - www.gsrlasertools.com.au
Table of contents
Other GSR Laser Tools Measuring Instrument manuals


