GT Racing GT890MF User manual

READ THIS MANUAL
Do not use this product until you read and understand the
instructions in this manual.
KEEP THIS MANUAL FOR FUTURE REFERENCE.
This manual is intended for installation and use.The pattern
should be subject to the product you receive.
E-mail: [email protected]
www.gtracing.com
ASSEMBLY INSTRUCTIONS
Version 22.06.02

Combinej1andj2with(2pcs)screws. Insertthecasters.Installthegaslift
andinsertthegasliftcover.
Details of accessories Please check and ensure all the things are in the package.
Please contact us for help if something is not included.
Check Various Accessories
Chair Installtion Please keep the original box in case you might
need to return or replace the product.
Instructions Before Using
BACK SEAT
ARMREST BASE LUMBAR PILLOW GAS LIFT
CONNECTOR DUST COVER FOOTREST FOOTREST RAIL
MECHANISM GAS LIFT COVER HEADREST ANGLE ADJUSTOR
CASTER WRENCH
RUBBER RING
CAP
NOTE: Accessories
are in the back pocket.
*Note:AccessoriesW1+W2+W3are
placedinthebackpocket.Pleasecheck
whethertheyareallavailablebeforeuse.
PleasechargeW1beforeuse.Also,for
safeuse,pleasereadthismanualand
useitcorrectly.
BLUETOOTH RECEIVER SPEAKER EXTENSION
CABLE
CHARGING CABLE

Installthemechanism、armrestsand
footrestrails.
DO NOT tighten all the screws completely
until they are fixed in the correct position.
Placetheseatonthegaslift.
DO NOT tighten all the screws completely
until they are fixed in the correct position.
Install&ontheseatandback.
Theninstall&ontheback.
Firstinstall&ontheseat.
PutM5*8screwsthroughtheholesof&
andtightenthem,andthenputthecapson.
Install&withM5*8screws,andthen
putthecapson.

Attachtheheadrestandlumbarpillow. Installthefootrestonthefootrest
rails.
After installing the footrest,
put the rubber rings �into
the metal grooves.
Tilt angle adjustor
Lift the tilt angle adjustor to
recline and release it to any
desired position. Lean on back
when resetting back to its
normal position to prevent
hurts from excessive rebound
strength of the chair.
Lift up the button on the side of the armrest to adjust
the height, raise or lower to the desired position.
A: Check where the noise comes from.
・Disassemble the mechanism, and then reinstall it with the screws tightened;
・Tighten the 8 screws of the angle adjustor and connector.
Q: Why do I hear a creaking sound after using this chair for a period of time?
Frequently Asked Questions:

Pull upward on lever to
achieve height adjustment.
Bluetooth Receiver User Manual
This chair can play audio through Bluetooth function.
Contents
.
When hearing a click, the cables
are properly connected in place. Note: Please ensure that all audio jacks in the AREA 1
and AREA 2 are properly connected in place, otherwise
one side of the bluetooth speakers may not sound.
AREA 1 AREA 2
Multi-function
Button
LED Indicator
Audio Jack
Audio Jack
Type-C
Charging Port
Bluetooth Receiver
areplacedinthebackpocket.
Charging Cable
Bluetooth Speakers
Speaker Extension
Cable

Charge the Bluetooth receiver with Type-C charging cable or battery charger (Not included)
for about 90 min, and it will be fully charged. The LED indicator light ② flashes blue ●when
BASICOPERATION
⑴.Charging
charging, and 4 blue lights ● ● ● ● are always on when fully charged . (There are 4 blue lights
in total, and one blue light represents 25% battery.)
*Note: This Bluetooth receiver cannot be used when it is charging.
4. If the connection is broken, voice will prompt “Disconnected".
5. If there is no connection, the Bluetooth receiver will automatically turn off after 5 min.
6. After connection, the blue light ●will light up. After a period of time, it will enter the energy
-saving mode and only one blue light ●will be on for a long time.
⑵.PairandConnect
Connecting to smartphones and other devices:
1. Long press the multi-function button ① for 2s to turn on the Bluetooth receiver . The LED
indicator light flashes red and blue ●●, and the voice will prompt “POWER ON".
2. Activate the Bluetooth function on your phone and search for Bluetooth devices. Pair your
phone to “GTRACING".
3. After successful pairing, voice will prompt “Connected".
⑶.InstructionsofMulti-functionButton
1). Power On — Long press the multi-function button ① for 2s to turn on the Bluetooth receiver
and the voice will prompt “POWER ON".
LED Indicator
Type-C
Charging Port
(Not included)
Type-C Charging Cable
Audio Jack
Bluetooth Speakers
Aduio Cable

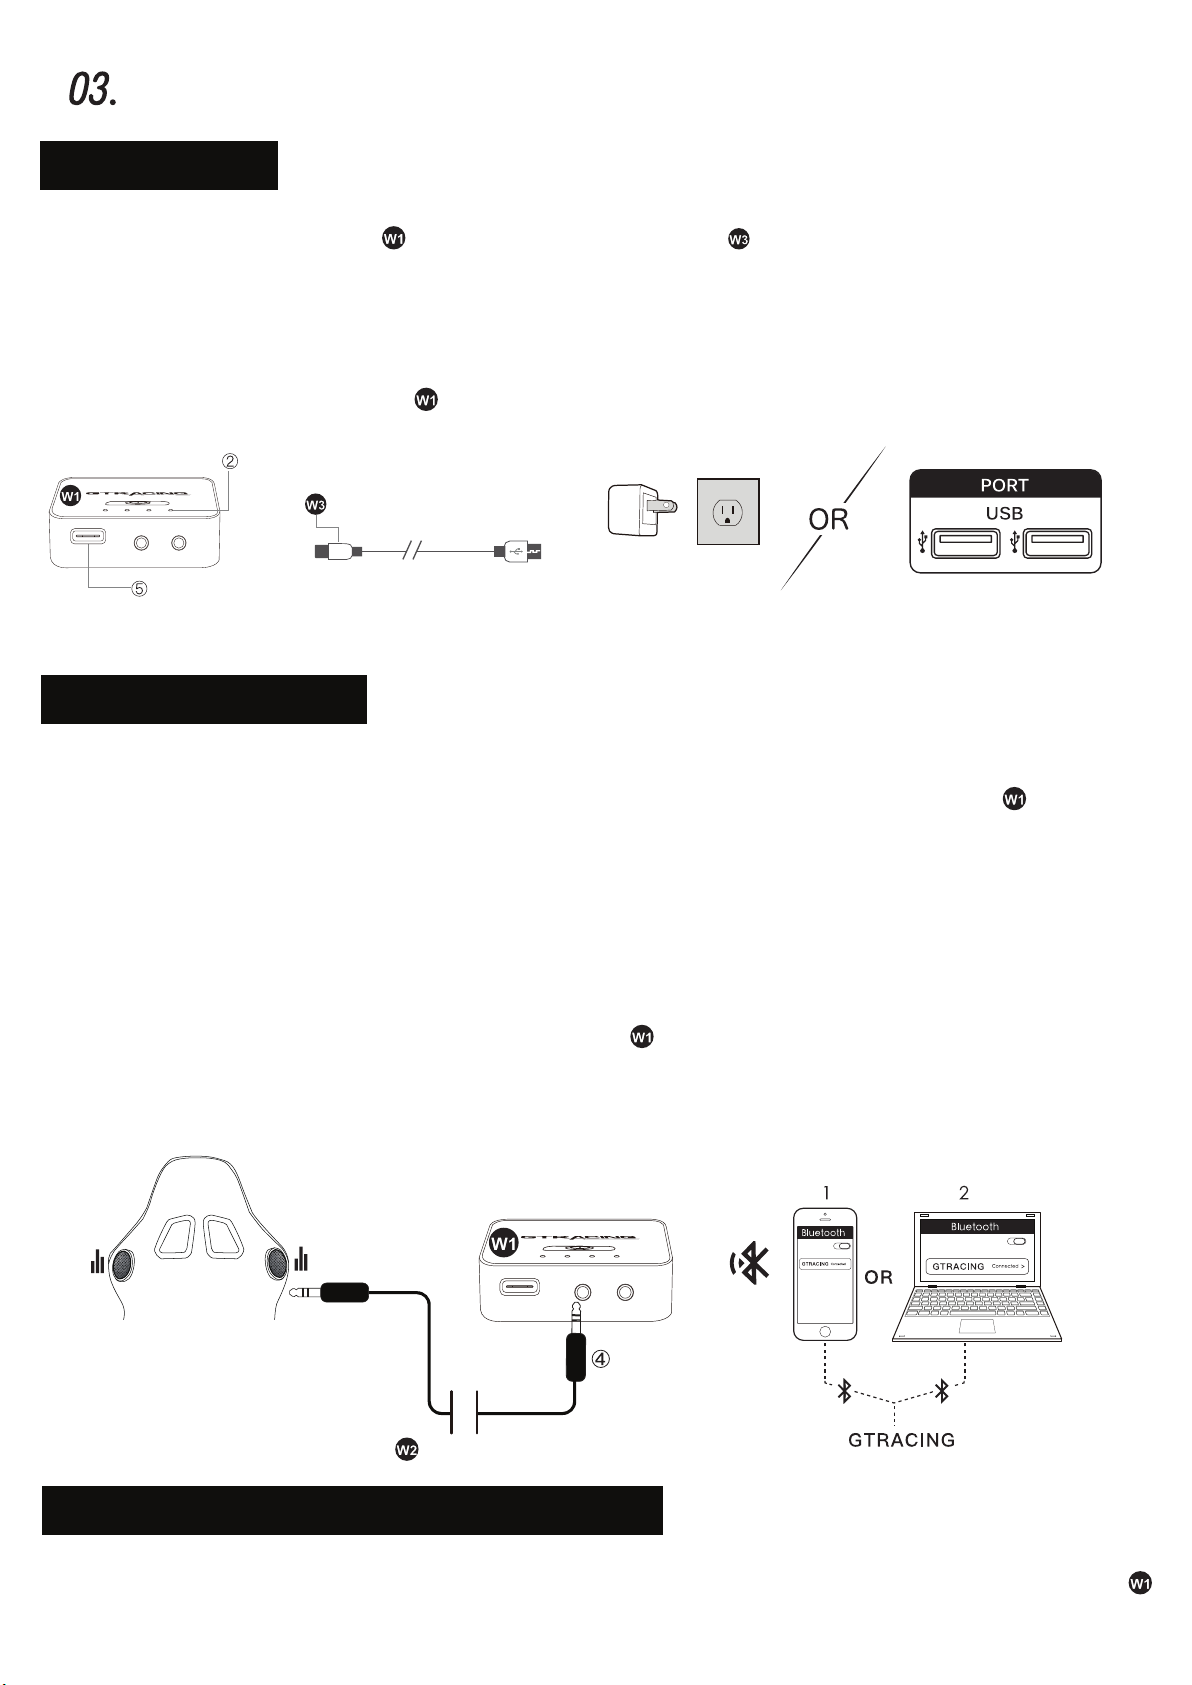
3). Connect Bluetooth Reciver to the Bluetooth speakers, now you can enjoy music wirelessly.
2). Power Off — Long press the multi-function button ① again for 5s to turn off the Bluetooth
receiver and the voice will prompt “POWER OFF".
3.1). The music automatically pauses when you dial a phone number or receive an incoming call.
3.2). This Bluetooth music receiver doesn’t have a microphone, so you need to switch the call to
the mobile phone. The music will automatically play when the call is ended.
4). Play Music — Short press multi-function button once to play music.
Pause Music — Short press multi-function button once when playing music to pause.
5). Click the multi-function button ① to check the remaining battery.
⑷.BluetoothReceiverIndicatorReference
[ Left 1 light: flashing red and blue ●● ]— Bluetooth pairing
[ Left 1 light: blue light always on ● ] — Bluetooth connected
[ Left 1 light: flashing blue ● ]— Charging
Power Input
Output Voltage
Battery Capacity
Charging Time
Working Frequency
Working Time
Wireless Streaming Range Distance
Support Mobile System
USB 5V
3.8V
1000mAh
90 min
2.402 ~ 2.483ghz
7-8 H
10~15m(No occlusion)
Android / iOS
⑸.TechniqueSpecification
GAINACOMPLETEINTERCONNECTEDEXPERIENCE
No Bluetooth transmission function
in your device?We recommend
Compatible with 「Nintendo Switch, Windows7/8/10/11, PlayStation4/5」 and other devices
to enjoy games, music and movies,“GT Lynck” can be used in a high-quality wireless
sound environment. Want to own this product? Please check the “GT Lynck” product
information in GTRACING store.
「USB Bluetooth Transmitter “GT Lynck”」!

DearCustomer,
Thankyouforchoosingus.
Hasbeenimplementingitsbrandanddesignconcept"BECOOLBEFREE",GTRACINGis dedicated
toenrichinggamingandshoppingexperienceforcustomers.
For safe use, please read this manual before installation, and keep it for after use. Pleasefeelfreeto
emailusifyouhaveanyconcernsaboutourproducts.We‛llreplywithin24hours.
Thefollowingarethethingsyouneedtopayattentiontosothatwecanprovideyouwithservices
whenyouencounterproblemsduringthe installationanduseoftheproduct:
• Whentheproductisdamagedduetocourierproblems,pleasecontactourcustomerservicein time
forverifcation.
• Wewillrectify the issueassoonaspossible;
• Wegivea365-dayqualityassurance;
• Weprovidea7-dayno-reasonreturnservice( Notethatthereturned productwillnotaffectthe
secondarysales).
Weofferproductexplanations,installationinstructions,product maintenanceandmaintenance
methods.
Ifyoufeelsatisfied withourproductandservice,
• Please setourstoreasyourfavorites;
• Please recommendourproductstoyourfriends;
• Please and leaveusyourpurchaseexperienceinourstoreorproductpage.
Feedbackorreviewsfrom you will greatly helpusofferbetterservicestoplayersaroundthe
world.
Bestregards!
* ATTENTION! During installation, DO NOT tighten all the screws completely until all the
screws are fixed in the correct position.
E-mail: [email protected]
www.gtracing.com
Table of contents
Other GT Racing Indoor Furnishing manuals
Popular Indoor Furnishing manuals by other brands

Politorno
Politorno LUXOR Assembly instructions

Kettler
Kettler Palma 0193315-2100 Assembly instructions

Donco
Donco PRINCETON STAIR BUNK 2204 Assembly instructions

Otto
Otto COPENHAGEN SOLID TIMBER 1500MM DESK... Assembly instructions

Sunnydaze Decor
Sunnydaze Decor BWD-825 manual

MAISONS DU MONDE
MAISONS DU MONDE BAYA BUSINESS 209151 manual