Guardian Angel GA-251 User manual

Guardian Angel
GA-251
Wireless Security System
User's Manual
Marasst.book Page 1 Thursday, June 19, 2003 6:05 PM

Marasst.book Page 2 Thursday, June 19, 2003 6:05 PM

Guardian Angel
GA-251
Wireless Security System
User's Manual
Marasst.book Page 1 Thursday, June 19, 2003 6:05 PM

Copyright
Copyright © 2003 Marasst Corporation. All rights reserved.
Trademarks
All trademarks and registered trademarks are the property of their
respective owners.
Precautions
When using the Guardian Angel, refer to the following instructions:
• Read and follow all instructions and warnings provided.
• Save these instructions for future use.
• When servicing or replacement parts are required, ensure work is
done by a qualified technician.
• Do not use this unit near water or in a wet or damp environment.
Any electrical equipment is hazardous if handled improperly. Ensure
that you follow the preceding safety instructions to avoid harm to your-
self and damage to the unit.
Marasst.book Page 2 Thursday, June 19, 2003 6:05 PM

FEDERAL COMMUNICATIONS COMMISSION
INTERFERENCE STATEMENT
This equipment has been tested and found to comply with the limits for a
class B digital device, pursuant t Part 15 of the FCC Rules. These limits
are designed to provide reasonable protection against harmful interfer-
ence in a residential installation. This equipment generates, uses and can
radiate radio frequency energy and, if not installed and used in accord-
ance with and instructions, may cause harmful interference to radio
communications. However, there is no guarantee that interference will
not occur in a particular installation. If this equipment does cause harm-
ful interference to radio or television reception, which can be determined
by turning the equipment off and on, the user is encouraged to try to cor-
rect the interference try one or more off the following measures:
• Reorient or relocate the receiving antenna.
• Increase the separation between the equipment and receiver.
• Connect the equipment into an outlet on a circuit different from
that to which the receiver is connected.
• Consult the dealer or an experienced radio/TV technician for help.
Caution:
To assure continued FCC compliance:
Any changes or modifications not expressly by the grantee of this device
could void the user’s authority to operate the equipment.
Marasst.book Page 3 Thursday, June 19, 2003 6:05 PM

Table of Contents
Introduction
Features ................................................................................................................... 1
Unpacking ................................................................................................................ 2
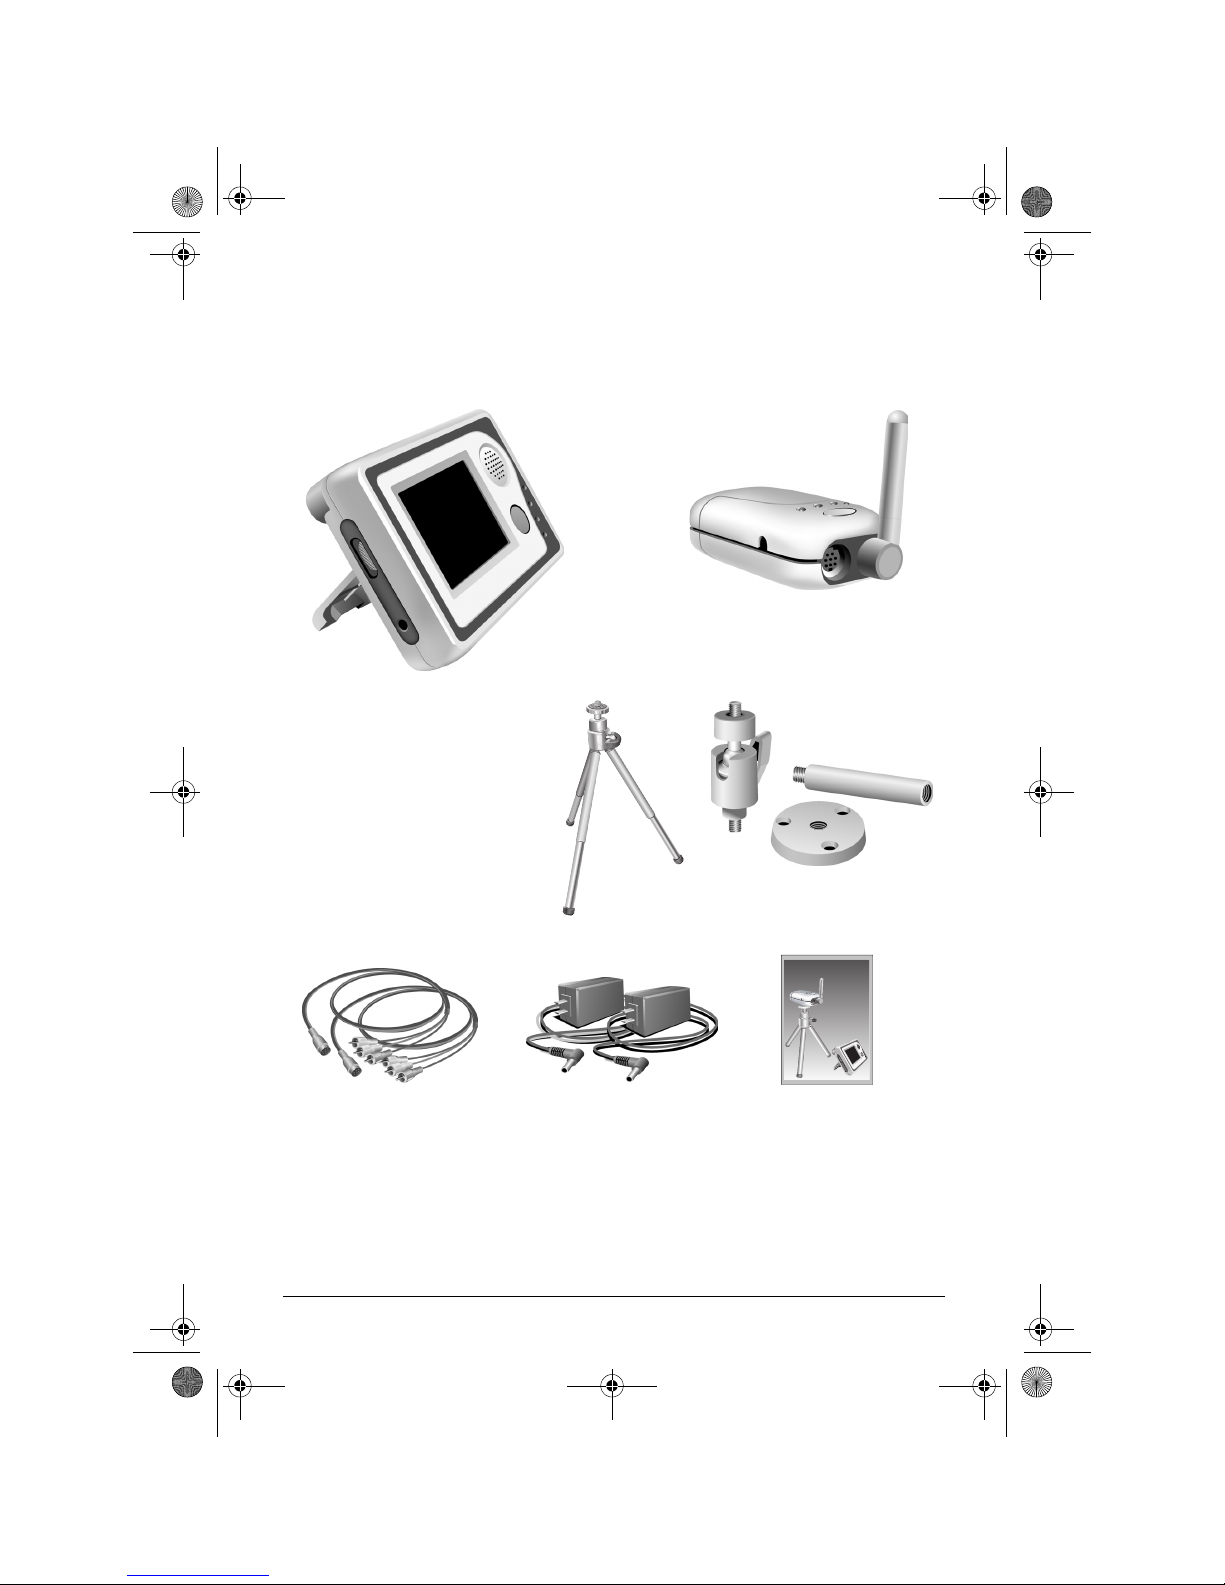
Components ............................................................................................................. 3
Setting Up the Guardian Angel
Setting Up the Camera/Transmitter ....................................................................... 5
Setting Up the Tripod ................................................................................6
Attaching the Camera to the Tripod ................................................................... 6
Positioning the Tripod ........................................................................................ 6
Setting Up the Fixed Mounting Bracket ....................................................8
Assembling the Fixed Mounting Bracket ............................................................ 8
Attaching the Camera to the Angle Bracket ....................................................... 9
Attaching the Mounting Bracket to a Fixed Surface ........................................... 9
Setting Up the Video Monitor/Receiver ...................................................11
Using the Batteries and Adapters ........................................................................ 12
Turning the Power On .............................................................................12
Using the Rechargeable Batteries ..........................................................13
Recharging the Batteries ........................................................................ 14
Using the Power Adapters ......................................................................15
Plugging In the Power Adapters ....................................................................... 15
Using the Guardian Angel
Using the Guardian Angel as a Wireless Audio/Video Security System .......... 16
Setting Channels .....................................................................................16
Setting Channels for Single Camera Use ......................................................... 16
Setting Channels for Multiple Camera Use ...................................................... 17
Adjusting the Focus ................................................................................18
Adjusting the Volume ..............................................................................19
Connecting to a Television, VCR or External Monitor .............................20
Using the Guardian Angel as a Wireless Audio/Video Center .......................... 22
Making Connections ...............................................................................22
Connecting the Transmitter .............................................................................. 22
Connecting the Receiver .................................................................................. 23
Turning On the Power (A/V Center Mode) ..............................................24
Setting Up Channels for A/V Center Use ................................................25
Recording on a VCR ...............................................................................25
Adjusting Reception Quality ....................................................................25
Specifications ........................................................................................................ 26
Troubleshooting .................................................................................................... 26
Marasst.book Page 1 Thursday, June 19, 2003 6:05 PM

Marasst.book Page 2 Thursday, June 19, 2003 6:05 PM

1
Introduction
Thank you for selecting the Guardian Angel. This highly configurable
wireless audio/visual monitoring system allows you to set up a monitor-
ing network quickly and easily without the need to install wires and
cables.
Included in this wireless system are a full-color CMOS camera/transmit-
ter and a portable hand-held receiver with a color TFT LCD display.
Both units can be powered by the built-in rechargeable lithium-ion
batteries or by the included power adapters, which also serve as battery
rechargers.
Standard RF transmission protocols, built-in rechargeable batteries,
selectable operating channels and standard A/V input and output ports
provide a wide range of applications.
In addition to video and audio monitoring capabilities, the Guardian
Angel can also function as a wireless audio/visual or home theatre hub,
linking VCRs, DVD players, televisions and stereos. Users can watch
TV or DVD movies on the handheld receiver or on a television screen in
a different room or area of the building.
The Guardian Angel supports up to four separate transmitters operating
on separate channels that you can switch between using a single hand-
held receiver.
Features
• Wireless audio and video monitoring for office security
• Connects to standard audio/video input and output ports of devices
including VCRs, DVD players, televisions and personal computers
• Lightweight receiver is equipped with a 2.5-inch color TFT LCD
screen and built-in speaker
• 2.4 GHz signal avoids interference from 900 MHz cordless phones
• Adjustable antenna transmits up to 300 feet (FCC - USA)
• Four-channel capability allows a single receiver to receive signals
from up to four different transmitters
Marasst.book Page 1 Thursday, June 19, 2003 6:05 PM

2
Unpacking
Contact your dealer immediately if any of the following components are
missing.
Video Monitor/Receiver
Audio/Video Cables AC Power Adapters User’s Manual
User Manual
Fixed Mounting Bracket
(components)
Your Guardian Angel
includes either a tripod
or a fixed mounting bracket
(must be assembled).
Tripod
Camera/Transmitter
Marasst.book Page 2 Thursday, June 19, 2003 6:05 PM

3
Components
Transmitter
Antenna
Channel Selector
Focus Ring
On/Off Switch
Power Adapter/
A/V Output Port
Microphone
Channel Indicator LEDs
Tripod
Recharger Port
Camera mount
Angle bracket
Adjustable leg
Angle screw
Wall Mount Bracket
Angle Bracket
Stem
Base Mount
Marasst.book Page 3 Thursday, June 19, 2003 6:05 PM

4
Receiver
Antenna
TFT LCD Screen
Speaker
Channel Selector
Channel
Power Switch
Volume Control
Power Adapter/Recharger Jack
A/V Output Port
A/V Output
Indicator LEDs
Port Cover
Marasst.book Page 4 Thursday, June 19, 2003 6:05 PM

5
Setting Up the Guardian Angel
Setting Up the Camera/Transmitter
This chapter takes you through the steps required to set up the Guardian
Angel. Depending on the model you purchased, your Guardian Angel
will come equipped with either a fixed mounting bracket or a tripod. For
instructions on setting up the tripod, see the next section, “Attaching the
Camera to the Tripod” on page 6. For instructions on setting up the fixed
mounting bracket, see “Assembling the Fixed Mounting Bracket” on
page 8.
Tripod Fixed Mounting
Bracket Components
Your Guardian Angel
includes either a tripod
or a fixed mounting bracket
(must be assembled)
Marasst.book Page 5 Thursday, June 19, 2003 6:05 PM

6
Setting Up the Tripod
Attaching the Camera to the Tripod
1. Hold the camera firmly to avoid dropping it.
2. Screw the threaded top of the assembled angle bracket clockwise
into the hole on the underside of the camera body.
Positioning the Tripod
The camera tripod is equipped with adjustable legs to allow positioning
of the camera at a range of heights. Each of the three legs is individually
adjustable to allow compensation for uneven surfaces. The camera
mount angle bracket at the top of the tripod can be adjusted to a suitable
angle by loosening the angle bracket screw, setting the angle, and then
tightening the screw.
Angle bracket
screw
Adjustable leg
Marasst.book Page 6 Thursday, June 19, 2003 6:05 PM

7
Take the following points into consideration when planning a location
for your camera:
• The camera should be positioned so that the view of the area to be
monitored is unobstructed.
• The line of sight between the camera and the video monitor should
be as clear as possible. Reducing the number of doors, walls and
windows between the camera and the video monitor improves recep-
tion quality.
• Decide if you want to power the camera using the included power
adapter, or using the built-in rechargeable battery. If you operate the
camera with the power adapter you must ensure that there is a power
outlet nearby.
When positioning the camera:
1. Make sure the camera is securely attached to the tripod.
2. Position the tripod in the desired location, adjusting the legs and
angle as necessary.
3. Test the reception of the video monitor/receiver in locations where
you plan to use the receiver. See the section “Adjusting Reception
Quality” on page 25 for information on improving wireless trans-
mission quality.
Marasst.book Page 7 Thursday, June 19, 2003 6:05 PM

8
Setting Up the Fixed Mounting Bracket
Assembling the Fixed Mounting Bracket
The fixed mounting bracket included consists of three parts:
• Angle bracket
•Stem
• Base mount
Follow these steps to assemble the fixed mounting bracket:
1. Screw the threaded end of the stem clockwise into the base mount.
2. Screw the threaded end of the angle bracket clockwise into the top
of the stem.
Marasst.book Page 8 Thursday, June 19, 2003 6:05 PM

9
Attaching the Camera to the Angle Bracket
1. Hold the camera firmly to avoid dropping it.
2. Screw the threaded top of the assembled angle bracket clockwise
into the hole on the underside of the camera body.
Attaching the Mounting Bracket to a Fixed Surface
You may choose to attach the camera mount to a fixed surface such as a
wall or ceiling; however, the following points should be taken into
consideration when planning a location.
• The camera should be positioned so that the view of the area to be
monitored is unobstructed.
• The line of sight between the camera and the video monitor should
be as clear as possible. Reducing the number of doors, walls and
windows between the camera and the video monitor improves recep-
tion quality.
• Decide if you want to power the camera using the included power
adapter, or using the built-in rechargeable battery. If you operate the
camera with the power adapter you must ensure that there is a power
outlet nearby.
Marasst.book Page 9 Thursday, June 19, 2003 6:05 PM

10
To mount the camera to a fixed surface:
1. Make sure the mounting assembly components are screwed
together firmly.
2. Hold the base of the mount against the fixed surface and point the
camera at the area to be monitored.
3. Have another person test reception of the video monitor/receiver in
locations where you plan to use the receiver. See the section
“Adjusting Reception Quality” on page 25 for information on
improving wireless transmission quality. Determine the optimum
camera placement before proceeding to the next step.
4. Using a sharpened pencil, mark the location of the three mounting
bracket holes on the fixed surface (e.g. wall).
5. Drill three holes at the locations you marked.
6. Push the wall plugs into the holes.
7. Use a Phillips screwdriver to screw the base mount to the fixed
surface.
8. Attach the camera to the angle bracket and make final adjustments
to the camera angle. Tighten the angle bracket thumb screw as
shown below.
Angle bracket thumb screw
Marasst.book Page 10 Thursday, June 19, 2003 6:05 PM

11
Setting Up the Video Monitor/Receiver
The video monitor is designed for portability and convenience. It can be
held in your hand and carried around, stored in a pocket, or placed at a
comfortable viewing angle on a flat surface.
A/V Output Port Cover
Marasst.book Page 11 Thursday, June 19, 2003 6:05 PM

12
Using the Batteries and Adapters
Turning the Power On
Both the camera/transmitter and the video monitor/receiver can be
powered using the included power adapters, or using the built-in
rechargeable batteries.
To turn the transmitter power on, slide the power switch in the direction
of the arrow illustrated below:
The video camera/receiver power switch has three settings as illustrated:
On Receiver
Off Power Switch
Off
Audio/Visual Mode
Audio Mode
Marasst.book Page 12 Thursday, June 19, 2003 6:05 PM

13
Using the Rechargeable Batteries
The rechargeable batteries included with the Guardian Angel provide
convenient, cable-free power to both the transmitter and receiver.
Normal operating times are as follows:
Operating time is maximized when the receiver is set to receive audio
only. The receiver can also be plugged into an electrical outlet using the
power adapter as explained in the following section.
When the batteries no longer contain enough charge to power the
receiver or transmitter they will automatically shut down. There is no
audible or visual warning prior to shutdown.
Caution:
• Incorrectly replacing the batteries may result in explosion.
• Replace batteries with the same or equivalent type of battery.
Never force the pins of a power adapter into an electric outlet. Purchase
a plug adapter if necessary.
Component Audio Only Audio and Video
Camera/Transmitter 6 hours 6 hours
Video Monitor/Receiver 6 hours 3.5 hours
Marasst.book Page 13 Thursday, June 19, 2003 6:05 PM
Table of contents
Other Guardian Angel Security System manuals