Guide Gear 1A-MT113 User manual

READ & SAVE THESE INSTRUCTIONS
Tenderizer and Jerky Cutter
Owner’s Manual
WARNING: Read carefully and understand all ASSEMBLY AND OPERATION
INSTRUCTIONS before operating. Failure to follow the safety rules and other basic safety
precautions may result in serious personal injury.
Item # 1A-MT113

2
Congratulations on your Guide Gear™ purchase.
Take your game to the next level with field-tested
Guide Gear™ products for a confident,
competitive edge that
strikes the perfect balance between performance and value.
For future reference, please complete the owner’s record below:
Serial Number/Lot Date Code: ________________________________
Purchase Date: ____________________________________________
Save the receipt, warranty, and this manual. It is important that you read
the entire manual to become familiar with this product before you begin
using it.
This tenderizer and jerky cutter is designed for certain applications only.
The Sportsman’s Guide and Northern Tool and Equipment are not
responsible for issues arising from modification or improper use of this
product such as an application for which it was not designed. We
strongly recommend that this product not be modified and/or used for
any application other than that for which it was designed.
DO NOT RETURN TO THE STORE.
For help with assembly, service, or missing/defective parts,
Please call our toll-free number:
1-800-545-9633
Or email:
M-F 8:00 AM - 6:00 PM CST
Saturday 8:00 AM - 4:00 PM CST
.

3
Table of Contents
Intended Use ........................................................................................................................................ 4!
Technical Specifications .................................................................................................................... 4!
Important Safety Information ............................................................................................................. 4!
Specific Operation Warnings ............................................................................................................. 6!
Main Parts of Tenderizer and Jerky Cutter ....................................................................................... 7!
Assembly Instructions ........................................................................................................................ 8!
Tenderizing Instructions ..................................................................................................................... 9!
Jerky Cutting Instructions .................................................................................................................. 9!
Disassembly and Cleaning Instructions ......................................................................................... 10!
Replacement Parts ............................................................................................................................ 10!
Limited Warranty ............................................................................................................................... 11!

4
Intended Use
We've all got a meat mallet. And we've all ruined a steak trying to get that perfect cube pattern. Well,
our Guide Gear® Tenderizer and Jerky Cutter eliminates the guesswork and inconsistency. All you
need to do it feed your cut through while giving the handle a turn. And if you want it cubed, simply turn
it 90 degrees and pass it through again! This tenderizer and jerky cutter is intended to break down
fibers of tough cuts of meat including venison, beef and boneless pork chops. The 2-in-1 product also
slices the tenderized meats into the perfect thickness for homemade jerky. It is for household use
only.
Technical Specifications
Property
Specification
Construction
Cast Aluminum
Weight
11 Pounds
Dimensions
17” x 13” x 9.5”
Maximum Meat Width
4”
Maximum Meat Thickness
4/5”
Crank
Cast Iron & Plastic Hand Crank
Cover
Metal
Mounting
C Clamps secures to Tabletop
Power
Hand Crank
Blade
2 Tenderizer Rollers & 2 Jerky Cutter Roller Blades
Important Safety Information
WARNING
• Read and understand all instructions. Failure to follow all instructions may result in serious injury
or property damage.
• The warnings, cautions, and instructions in this manual cannot cover all possible conditions or
situations that could occur. Exercise common sense and caution when using this tenderizer and
jerky cutter. Always be aware of the environment and ensure that the tenderizer and jerky cutter is
used in a safe and responsible manner.
• Do not allow persons to operate or assemble the tenderizer and jerky cutter until they have read
this manual and have developed a thorough understanding of how it works.
• Do not modify this tenderizer and jerky cutter in any way. Unauthorized modification may impair
the function and/or safety and could affect the life of the product. There are specific applications
for which the product was designed.
• Use the right tenderizer and jerky cutter for the job. DO NOT attempt to force small equipment to
do the work of larger industrial equipment. There are certain applications for which this tenderizer
and jerky cutter was designed. This tenderizer and jerky cutter will be safer and do a better job at
the capacity for which it was intended. DO NOT use this tenderizer and jerky cutter for a purpose
for which it was not intended.
• Industrial or commercial applications must follow OSHA requirements.

5
WARNING
WORK AREA SAFETY
• Inspect the work area before each use. Keep work area clean, dry, free of clutter, and well-lit.
Cluttered, wet, or dark work areas can result in injury. Using the product in confined work areas
may put you dangerously close to cutting tools and rotating parts.
• Keep children and bystanders away from the work area while operating the tenderizer and jerky
cutter. Do not allow children to handle the product.
WARNING
PERSONAL SAFETY
• Stay alert, watch what you are doing, and use common sense when operating the tenderizer and
jerky cutter. Do not use the tenderizer and jerky cutter while you are tired or under the influence of
drugs, alcohol, or medication. A moment of inattention while operating the tenderizer and jerky
cutter may result in serious personal injury.
• Dress properly. Do not wear loose clothing, dangling objects, or jewelry. Keep your hair, clothing
and gloves away from moving parts. Loose clothes, jewelry, or long hair can be caught in moving
parts. Roll up sleeves and remove jewelry.
• Wear the proper personal protective equipment when necessary. Use ANSI Z87.1 compliant safety
goggles (not safety glasses) with side shields, or when needed, a face shield. This applies to all
persons in the work area.
• Do not overreach. Keep proper footing and balance at all times.
CAUTION
PRODUCT USE AND CARE
• Do not force the tenderizer and jerky cutter. Te nder iz er an d je r ky c ut ter s are safer and do a better
job when used in the manner for which they are designed. Plan your work, and use the correct
product for the job.
• Check for damaged parts before each use. Carefully check that the product will operate properly
and perform its intended function. Replace damaged or worn parts immediately. Never operate the
product with a damaged part.
• Store the product when it is not in use. Store it in a dry, secure place out of the reach of children.
Inspect the tenderizer and jerky cutter for good working condition prior to storage and before re-
use.
• Use only accessories that are recommended by the manufacturer for use with your product.
Accessories that may be suitable for one tenderizer and jerky cutter may create a risk of injury
when used with another tenderizer and jerky cutter.

6
Specific Operation Warnings
WARNING
• Caution sharp blades! Wear cut-resistant gloves (sold separately) when handling blades.
• Do not operate unit without cover in place. The toothed rollers can pull fingers and hand into
rollers and cause serious injury. Avoid contact with moving parts. Never reach into the
tenderizer/cuber/jerky slicer. Failure to do so could cause severe injury. Always use tongs.
• Don’t press or push meat into the chute with your fingers or any other object. Doing so may cause
personal injury and/or damage to the unit.
• Never use fingers to scrape away food from the unit. Severe injury may result. Do not put tongs or
other utensils into the blades.
• Keep out of reach of children and never leave children unattended around the tenderizer and
cuber.
• The maximum thickness of the meat should not exceed 4/5".
• Never put the tenderizer and jerky cutter near a hot burner, in an oven, or in a dishwasher.
Ten de ri ze r a nd j e rk y cu tte r parts are not dishwasher safe.
• Place the tenderizer and jerky cutter on a firm and stable surface away from the edge of the
worktop. Never use the tenderizer and jerky cutter unless it is fully upright, mounted and
completely assembled.
• Never use abrasive cleaning agents or abrasive cloths when cleaning the unit.
• Use the tenderizer and jerky cutter to tenderize only designated meats. Do not attempt to process
frozen food, bones, cardboard, plastic, etc.
• Clean tenderizer and jerky cutter according to instructions.

7
Main Parts of Tenderizer and Jerky Cutter
Part Number
Description
1
Chute
2
Stainless Steel Comb
3
Housing Thumbscrew (2)
4
Nylon Bushing
5
Shaft Clip (2)
6
Screw for Legs (4)
7
Lower Housing
8
Leg
9
C-Clamp
10
Screw for Chute and Base (6)
11
Allen Wrench for Leg Screws
12
Allen Wrench for Chute & Base Screws
13
Stainless Steel Tongs
14
Base
15
Leg
16
Handle
17
Handle Thumbscrews
18
Stainless Steel Blade Rack
19
Top Housing
20
Stainless Steel Comb
21
Allen Wrench for Blade Screws

8
Assembly Instructions
1. Connect the legs to the base using the
provided allen wrench and screws. !
2. Using an allen wrench and the screws, attach
the legs to the lower housing (Figure 1). !
3. Install the chute to the top housing using an
allen wrench and the screws. !
4. Insert the blade rack assembly into the lower
housing, guiding the drive shaft into the
bearing journals. Make sure the teeth of the
blade racks are properly meshed together. !
5. Position the top housing onto the lower
housing and line up the screw holes. !
6. Secure the top housing to the lower housing
using the housing thumbscrews. DO NOT
OVERTIGHTEN! !
7. Insert the Combs into the top housing (Figure
2). !
8. Caution sharp blades! Wear cut-resistant
gloves (sold separately) when handling blades.
9. Install handle onto the blade rack shaft.
Secure the handle to blade rack shaft with the
handle thumbscrew.!

9
Tenderizing Instructions
1. Thoroughly hand wash all parts before first and every use in warm soapy water.
2. Place the meat tenderizer and jerky cutter on a flat stable surface.
3. Attach c-clamps to surface by tightening adjusting screw. Do not over tighten.
4. Before tenderizing, apply a vegetable oil based cooking spray on 2 rollers.
5. Cut meat to size which will allow it to be fed into the opening of the cover. Do not attempt to
force meat into the opening. Remove gristle. It’s best to use cold meat.
6. Feed meat that is sized not more than 4” in width and 4/5” in thickness into tenderizer. Turn
hand crank in clockwise motion while feeding meat. Meat will pass right through. Insert only
one piece at a time to prevent jamming.
7. To cube, turn the meat 90 degrees and pass it through again. You will see a nice cube
pattern. It may be necessary to pass the meat through the cuber/tenderizer several times
to obtain the desired results. You may pass the meat through at different angles if a
different result is desired.
8. If a piece of meat is too short to reach the blades, use the provided tongs to guide the meat
to the blades.
9. CAUTION! DO NOT press or push the meat into the chute with your fingers or any other
object. Doing so may cause personal injury and/or damage to the unit. DO NOT push the
tongs or other utensils into the blades.
10. Clean the unit before and after each use.
Jerky Cutting Instructions
1. Thoroughly hand wash all parts before first and every use in warm soapy water.
2. To change the unit from tenderizer to jerky cutter, first remove the handle from the blade
rack shaft by loosening the thumbscrew.
3. Remove the two combs from the top housing that keep the meat from getting stuck in the
unit.
4. Unscrew the two screws on the chute/top housing using an allen wrench. Lift off the top
housing.
5. Remove the tenderizing blade rack assembly from the lower housing and install the jerky
cutting blade rack assembly, guiding the drive shaft into the bearing journals. Make sure the
teeth of the blade racks are properly meshed together. !
6. Position the top housing onto the lower housing and line up the screw holes. !
7. Secure the top housing to the lower housing using the housing thumbscrews. DO NOT
OVERTIGHTEN! !
8. Insert the Combs into the top housing (Figure 2). !
9. Caution sharp blades! Wear cut-resistant gloves (sold separately) when handling blades.
10. Install handle onto the blade rack shaft. Secure the handle to blade rack shaft with the
handle thumbscrew
11. Place jerky cutter on a flat stable surface.
12. Attach c-clamps to surface by tightening adjusting screw. Do not over tighten.
13. You may want to tenderize the meat first before slicing it into jerky.
14. Before slicing, apply a vegetable oil based cooking spray on the slicing rollers.

10
15. Cut meat to size which will allow it to be fed into the opening of the cover. Do not attempt to
force meat into the opening. Remove gristle. It’s best to use cold meat.
16. Feed meat that is sized not more than 4” in width and 4/5” in thickness into jerky slicer.
Turn hand crank in clockwise motion while feeding meat. Meat will pass right through.
Insert only one piece at a time to prevent jamming.
17. If a piece of meat is too short to reach the blades, use the provided tongs to guide the meat
to the blades.
18. CAUTION! DO NOT press or push the meat into the chute with your fingers or any other
object. Doing so may cause personal injury and/or damage to the unit. DO NOT push the
tongs or other utensils into the blades.
19. Clean the unit before and after each use.
Disassembly and Cleaning Instructions
1. Caution sharp blades! Wear cut-resistant gloves (sold separately) when handling blades.
2. The tenderizer and jerky cutter should be cleaned before and after every use as perishable
food scraps could accumulate on the tenderizer and jerky cutter.
3. Do not use steel wool or abrasives to clean any part of meat tenderizer and jerky cutter.
4. Do not wash any part of this tenderizer and jerky cutter in a dishwasher.
5. Unclamp unit from table or bench.
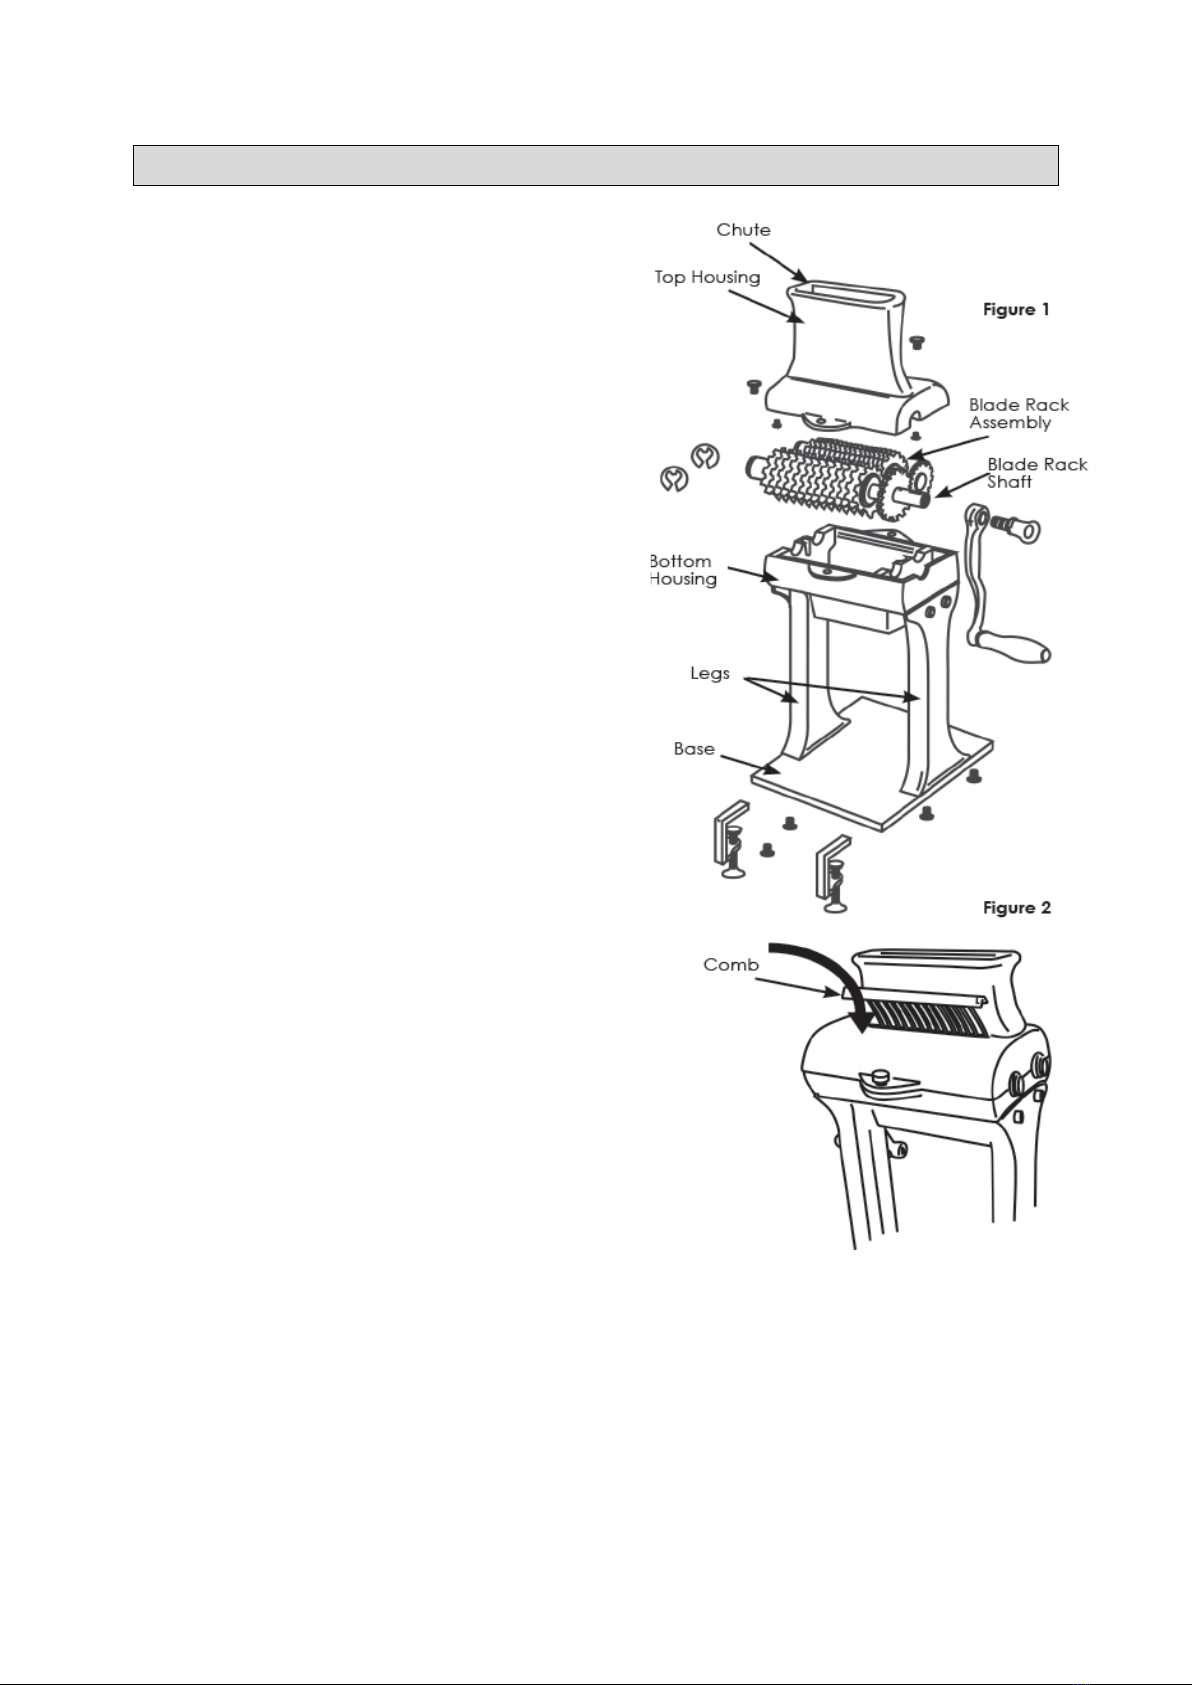
6. Remove the handle thumbscrew from the handle. Remove handle from the blade rack shaft
by unscrewing the handle thumbscrew.
7. Remove the combs from the top housing by lifting up on combs.
8. Remove the two thumbscrews from the top housing.
9. Remove the top housing. WARNING! This will expose the cutting blades. Tak e c ar e wh en
handling the blade assembly.
10. Using the provided allen wrench, remove the chute from the top housing.
11. Carefully lift the blade rack assembly from the lower housing.
12. Disassemble the lower housing from the legs. Disassemble the legs from the base.
13. All parts should be hand washed in hot soapy water. Because these parts come in contact
with food, they should be sanitized properly. A long bristle brush is recommended for
cleaning the blade rack assemblies. Take extra care when handling the blade racks.
14. Clean all crevices and remove any ruminants of meat. Rinse thoroughly and dry all parts
completely with a clean towel, do not allow to air dry.
15. Spray all parts with a vegetable based cooking spray to prevent oxidizing and corrosion.
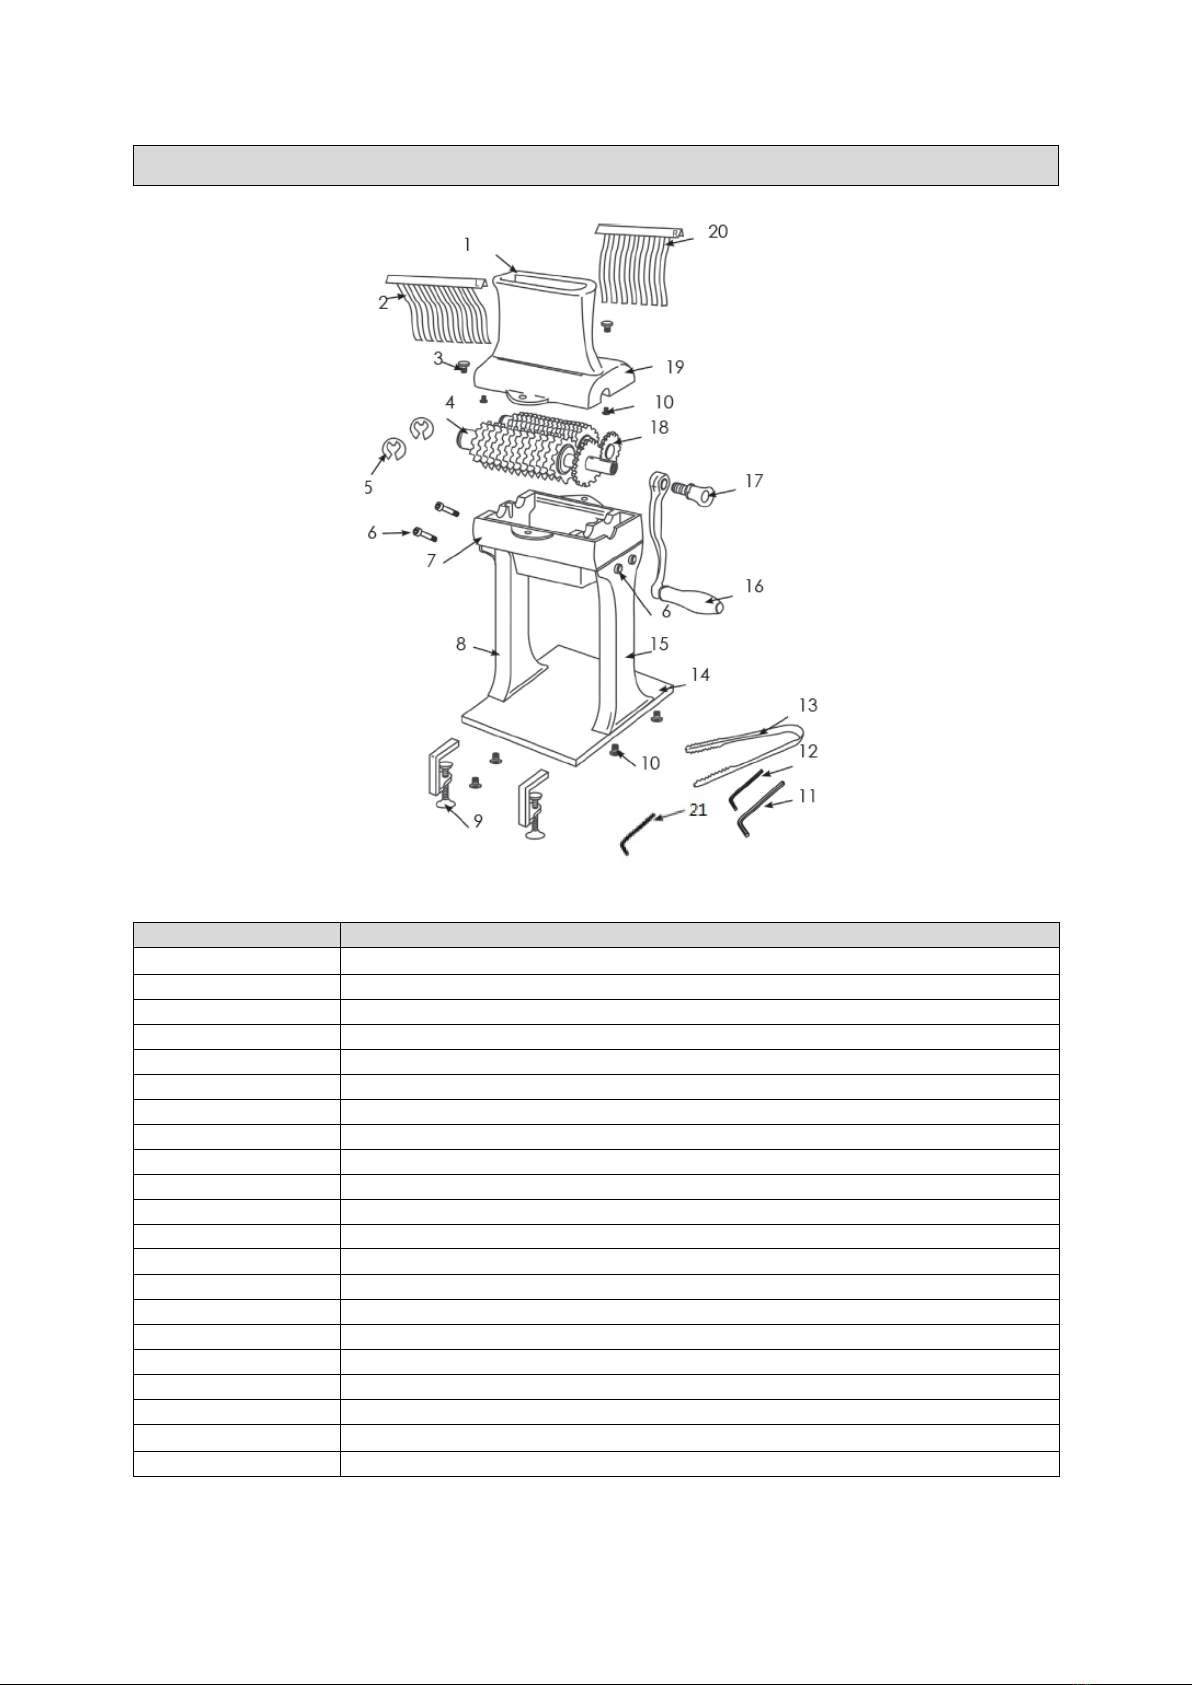
Replacement Parts
• For replacement parts and technical questions, please call Customer Service at 1-800-545-9633
or email at [email protected]om.
• Not all product components are available for replacement. The illustrations provided are a
convenient reference to the location and position of parts in the assembly sequence.
• When ordering parts, the following information will be required: item description, item model
number, item serial number/item lot date code, and the replacement part reference number.
• The distributor reserves the rights to make design changes and improvements to product lines
and manuals without notice.

11
Limited Warranty
The Sportsman’s Guide and Northern Tool and Equipment Company, Inc. ("We'' or ''Us'') warrants to
the original purchaser only ("You" or ''Your'') that the Guide Gear product purchased will be free from
material defects in both materials and workmanship, normal wear and tear excepted, for a period of
one year from date of purchase. The foregoing warranty is valid only if the installation and use of the
product is strictly in accordance with product instructions. There are no other warranties, express or
implied, including the warranty of merchantability or fitness for a particular purpose. If the product
does not comply with this limited warranty, Your sole and exclusive remedy is that We will, at our sole
option and within a commercially reasonable time, either replace the product or product component
without charge to You or refund the purchase price (less shipping). This limited warranty is not
transferable.
Limitations on the Warranty
This limited warranty does not cover: (a) normal wear and tear; (b) damage through abuse, neglect,
misuse, or as a result of any accident or in any other manner; (c) damage from misapplication,
overloading, or improper installation; (d) improper maintenance and repair; and (e) product alteration
in any manner by anyone other than Us, with the sole exception of alterations made pursuant to
product instructions and in a workmanlike manner.
Obligations of Purchaser
You must retain Your product purchase receipt to verify date of purchase and that You are the original
purchaser. To make a warranty claim, contact Us at 1-800-545-9633, identify the product by make
and model number, and follow the claim instructions that will be provided. The product and the
purchase receipt must be provided to Us in order to process Your warranty claim. Any returned
product that is replaced or refunded by Us becomes our property. You will be responsible for return
shipping costs or costs related to Your return visit to a retail store.
Remedy Limits
Product replacement or a refund of the purchase price is Your sole remedy under this limited warranty
or any other warranty related to the product. We shall not be liable for: service or labor charges or
damage to Your property incurred in removing or replacing the product; any damages, including,
without limitation, damages to tangible personal property or personal injury, related to Your improper
use, installation, or maintenance of the product or product component; or any indirect, incidental or
consequential damages of any kind for any reason.
Assumption of Risk
You acknowledge and agree that any use of the product for any purpose other than the specified
use(s) stated in the product instructions is at Your own risk.
Governing Law
This limited warranty gives You specific legal rights, and You also may have other rights which vary
from state to state. Some states do not allow limitations or exclusions on implied warranties or
incidental or consequential damages, so the above limitations may not apply to You. This limited
warranty is governed by the laws of the State of Minnesota, without regard to rules pertaining to
conflicts of law. The state courts located in Dakota County, Minnesota shall have exclusive jurisdiction
for any disputes relating to this warranty.

12
Distributed by:
The Sportsman’s Guide
And
Northern Tool & Equipment Company, Inc.
Burnsville, Minnesota 55306
www.sportsmansguide.com www.northerntool.com
Made in COUNTRY OF ORIGIN
Table of contents
Other Guide Gear Kitchen Appliance manuals