Guitammer BK-SK User manual


Page 1
Safety Information
WARNING!
Read these instructions.
Keep these instructions.
Heed all warnings.
Follow all instructions.
Unplug the amplier from the audio source and power
outlet before cleaning the amplier with a dry cloth.
Place the amplier in a stable location so they will not fall
causing damage to the electronics or bodily harm.
Do not use the apparatus near water, and do not im-
merse it in any liquid or pour any liquid on it.
Do not block or push objects into the vents on the Butt-
Kicker transducer or amplier because of re or electric
shock hazards, and provide sufcient space around the
ButtKicker transducer and amplier for proper ventila-
tion.
Do not install near any heat sources such as radiators,
heat registers, stoves or other apparatus that produce
heat.
Do not defeat the safety purpose of the polarized plug.
A polarized plug as two blades with one wider than the
other. The wide blade is provided for your safety. If the
provided plug does not t into your outlet, consult an
electrician for replacement of the obsolete outlet.
Operate the amplier only from the audio line out jack of
a computer, gaming console or other audio device.
Protect the power cord from being walked on or pinched
particularly at plugs, convenience receptacles, and the
point where they exit from the amplier.
Only use attachments/accessories specied by the
manufacturer.
For added protection during lightning storms, unplug
the amplier from the electrical outlet and turn off the
amplier.
Unplug the amplier when unused for long periods of
time.
Servicing is required when the amplier has been dam-
aged in any way, such as liquid has been spilled or ob-
jects have fallen into the amplier, the amplier has been
exposed to rain or moisture, does not operate normally,
or has been dropped.
Refer all servicing to qualied service personnel.
The audio output should only be disconnected from the
amplier when the amplier power is turned off.
The amplier should be operated only on the voltage
indicated on the amplier. If you are unsure about the
power supply in your home, consult your dealer or local
power company.
Copyright Information
© 2017 Copyright The Guitammer Company.
Reproduction, adaptation or translation without
prior written permission is prohibited, except as
allowed under the copyright laws.
The information contained in this document is
subject to change without notice.
Edition .02, 03/2017
ButtKicker is a registered trademark of The Guitammer
Company.


Page 3
Quick Setup Steps
Mount the ButtKicker mini Concert. (See page 4)
Connect an audio signal to the amplier. (See pages 5-6)
Connect the amplier to the ButtKicker mini Concert with the
included speaker wire. (See page 8)
Place the rubber isolators under your simulation rig/cockpit or chair.
(See page 8)
Adjust the amplier frequency settings. (See page 9)

ButtKicker mini Concert Setup
The ButtKicker mini Concert features a multi-directional mounting bracket which allows you
to directly mount it to almost any surface.
1. MOUNT THE BUTTKICKER MINI CONCERT
For most small simulation rigs or cockpits, mounting the ButtKicker mini Concert
to part of the frame/chassis is the best solution because it will transfer the effect
throughout the rig.
For medium to large simulation rigs or cockpits (or certain small ones), mount the
ButtKicker mini Concert directly to the chair or seat in order to feel it the most.
Note: Mounting the ButtKicker mini Concert horizontally will not negatively affect the
product, but perception of the effect is greater when mounted vertically.
2. MOUNTING HARDWARE (NOT INCLUDED)
Use up to 1/4” diameter screws, at least 3/4” long.
For example: the mounting holes are about 1/2” deep, so a 3/4” screw will extend
about 1/4”.
Use wood screws for wood surfaces and sheet screws for metal or other surfaces.
Note: Use a hand screwdriver to tighten the last few
threads of each screw to ensure they don’t strip out.
Screws that aren’t completely tightened may cause a
rattling sound.
Page 4

Page 5
Power Amplier Setup
1. AMPLIFIER AUDIO CONNECTION
2.a PC AUDIO HOOKUP ................................... pg. 5
2.b CONSOLE AUDIO HOOKUP .......................... pg. 6
2.a PC Audio Hookup
1. Connect the Audio Source
For On-board Audio, Stereo or 4-Channel Sound Cards:
Insert the mini “Y” adapter into the “Line Out” (usually green).
For 5.1 - 7.1 or Greater Sound Cards:
Insert the mini “Y” adapter into the Sub/Center
output (usually orange).
2. Connect the mini end of the 5’ mini-to-RCA
cable to one leg of the “Y” adapter.
3. Connect either the red or the black into
the RCA “Line Level Input” on the back
of the amplier. Leave the other end
disconnected.
4. Connect the regular signal cable for your speaker system to the other leg of the
mini “Y” adapter.

Page 6
Option 1
Audio Source is Direct from Game Console
Use this option if your console is equipped with,
and you are using, analog outputs to your A/V
processor or TV. (See Fig. 1)
A. Connect the female end of the included RCA “Y”
adapter to the end of the red or white RCA cable
coming from the output on your console.
B. Connect one male leg of the “Y” adapter to the
red/white RCA audio input on your TV.
C. Connect the other leg of the RCA “Y” adapter to
the 5’ female-to-male cable. Connect the male
end of that cable into the “Line Level Input” on the
back of the amplier.
D. If your console is connected via HDMI to a TV
and you are using the TV speakers for sound;
most console allow dual audio output via HDMI
and Optical (refer to console manual for details).
Connect the ButtKicker Gamer2 power amplier
to the console Optical Output using an Optical to
Analog RCA Converter (available through most
electronics retailers).
Option 2
Audio Source is TV
Use this option if your game console is plugged
directly into your TV and you are using your
TV’s speakers or speakers connected to the
output of your TV. (See Fig. 2)
A. Plug one leg of the included RCA “Y” adapter into
the red or white RCA output on your TV.
B. Do not connect anything to the female jack of the
RCA “Y” adapter.
C. Connect the female end of the included 5’ RCA
cable to the remaining leg of the RCA “Y” adapter
and the male end into the “Line Level Input” on
the back of the amplier.
Option 3
Audio Source is A/V Processor Using RCA
Use this option if the audio output from your
game console is running to an A/V processor
equipped with RCA audio pre-out. (See Fig. 3)
A. “Sub-Out” is the ideal connection: connect one leg
of the included RCA “Y” adapter into the output.
Red/white stereo output can also be used.
B. Connect your subwoofer or speaker to the female
jack of the RCA “Y” adapter.
C. Connect the female end of the included 5’ RCA
cable to the remaining leg of the RCA “Y” adapter
and the male end into the “Line Level Input” on
the back of the amplier.
Option 4
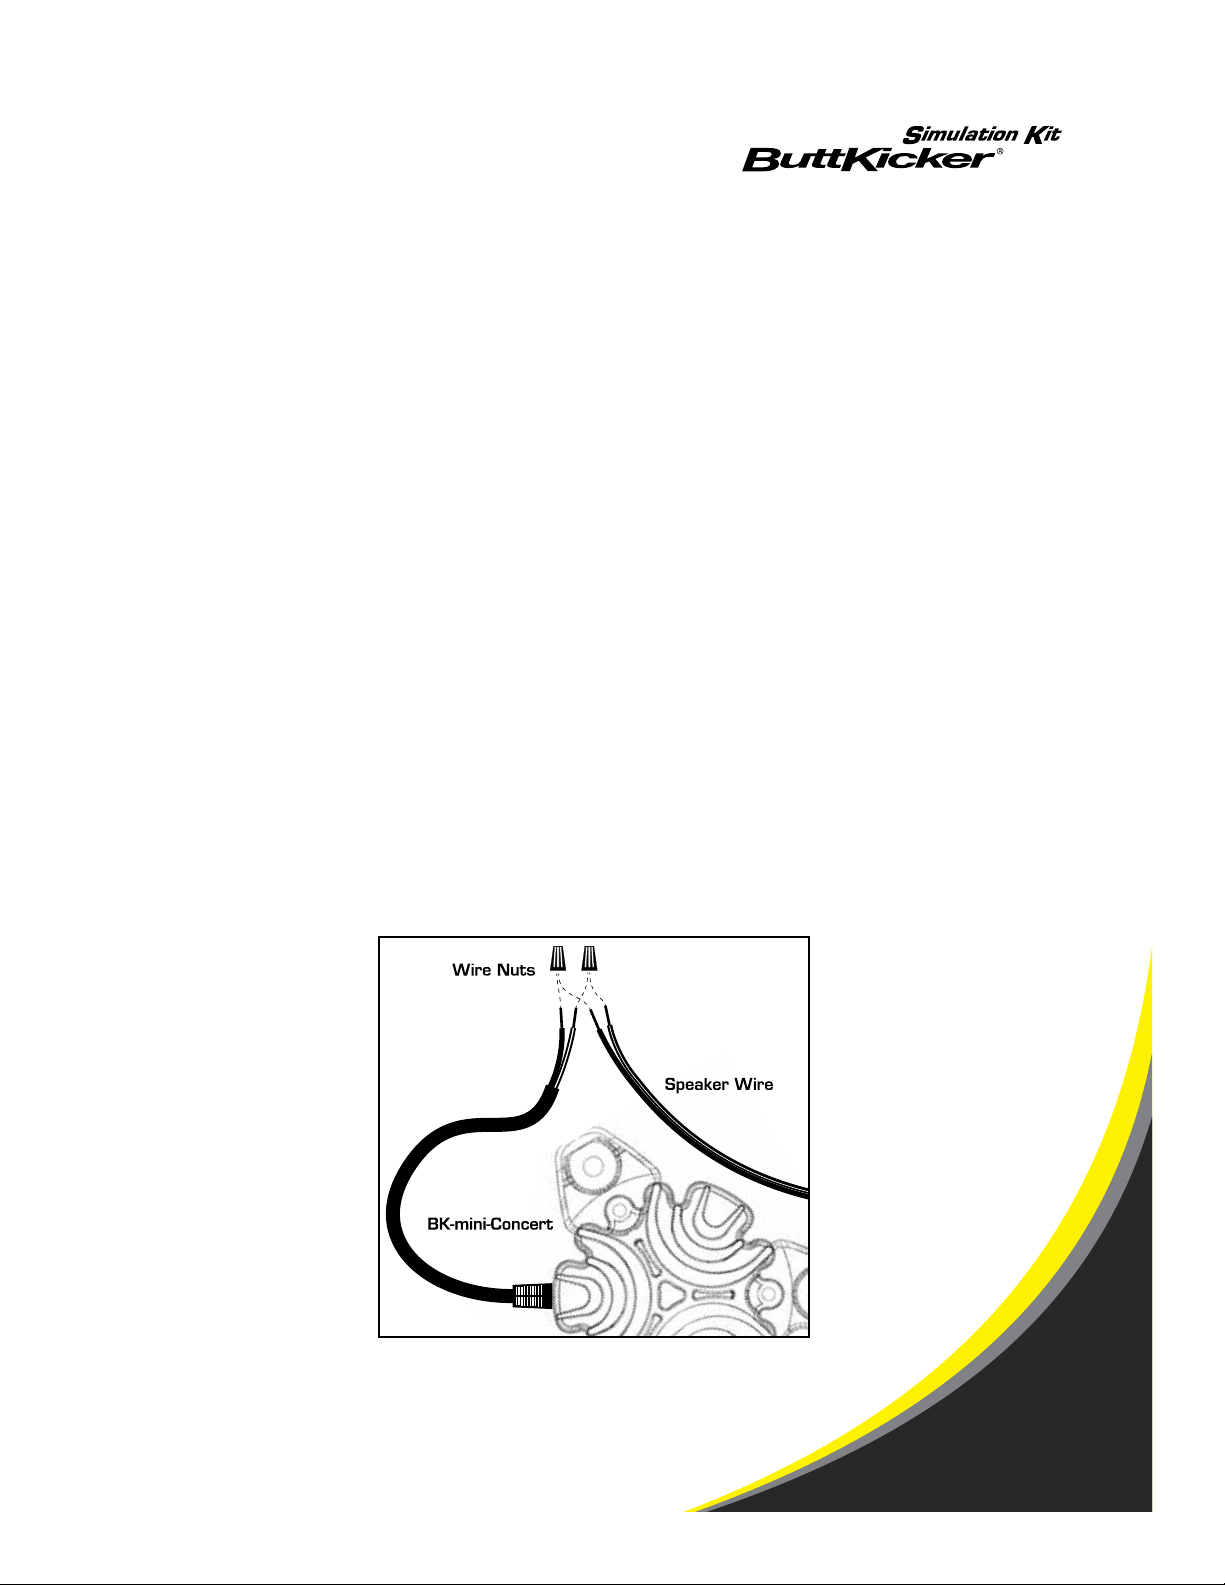
Bare Speaker Wire from Sub or A/V Processor
Use this option if none of the above options ap-
ply and if you have a subwoofer or A/V Proces-
sor with a bare speaker wire connection.* (See
Fig. 4)
A. Connect the Speaker Level Interface Adapter
(available separately) to the bare speaker wire
inputs on your subwoofer (or outputs on your
A/V processor) along with the normal speaker
wire carrying the audio signal.
B. Connect one male leg of the included RCA “Y”
adapter to the end of the SLIA (Speaker Level
Interface Adapter).
- Do not connect anything to the female jack of
the RCA “Y” adapter.
C. Connect the female end of the included 5’ RCA
cable to the remaining leg of the RCA “Y” adapter
and the male end into the “Line Level Input” on
the back of the amplier.
Power Amplier Setup (Continued)
2.b Console Audio Hookup
There are four basic methods for connecting audio to the ButtKicker Power Amplier from a
gaming console. Illustrations are provided on the next page.
* Bare speaker wire connections require the Speaker Level Interface
Adapter (BK-SLIA) which is sold separately. Contact support for details.

Page 7
Option 2 - Fig.2
Option 4 - Fig.4
Option 1 - Fig.1
Option 3 - Fig.3
Power Amplier Setup (Illustrations)
A
B
C
A
B
C
A
B
C
A
B
C

Page 8
Final Setup Steps
1. CONNECT THE BUTTKICKER MINI CONCERT TO THE BKA-130-C POWER
AMPLIFIER
1. Connect the 10’ speaker wire to the bare speaker wire ends of the ButtKicker
mini Concert. (See Fig. 5). Wire nuts (not included) will assist in making this
connection.
2. You can use the included cable ties to strap the speaker wire down to part of
the frame of your sim rig/cockpit.
3. Connect the other end of the 10’ speaker wire to the 5-way binding post
outputs on the back of the amplier (“Class 2 Wiring, Speaker Level Output”).
Note: To keep strain from pulling the wires out of the wire nuts, cable tie each set of wires together
about 1 inch away from the wire nuts.
2. RUBBER ISOLATORS
The included RI-4 rubber isolators help ‘oat’ your rig/cockpit off the oor, dramatically
increasing the efciency and perceived strength of the ButtKicker system.
1. Set as many rubber isolators as needed under the frame of your sim rig/
cockpit.
Fig.5

Page 9
Tweaking & Optimizing
1. OPTIMIZING YOUR SIMULATION RIG/COCKPIT
Efciency
Place the included rubber isolators under your sim rig/cockpit to increase the efciency and
strength of the system. See “Rubber Isolators” under “Final Setup Steps” for more information.
Portability
If you need to be able to move your sim rig/cockpit when it’s not in use, consider nding a
stationary position away from the rig/cockpit to place the amplier. When you need to move the
rig, chair or cockpit, simply disconnect the speaker wire from the back of the amplier. Use the
included cable ties to strap the speaker wire down to the frame of the rig/cockpit.
2. SETTING THE AMPLIFIER FREQUENCY CONTROLS
For Flight and Racing Simulations
Engine sounds utilize a wide range of low frequency sound. Therefore, it is ideal to either turn off
the “High Cutoff Frequency” control by disengaging the “High On/Off” button, or keep it between
70-110hz by engaging the button and turning the knob between “70” and “110.”
For First-Person Shooters, Action Movies and Other Video Games
Action video game and movie soundtracks sometimes have music which is as loud, or louder
than the sound effects, which can cause the ButtKicker mini Concert to react stronger to the
music than the action. The result is “ambient” rumble that doesn’t seem to correlate with what
is seen. To minimize the ButtKicker mini Concert’s response to the music soundtrack in a movie
or game, complete the following steps:
1. If gaming, turn the music soundtrack volume down in your in-game audio
settings.
2. Engage the “High Cutoff Frequency” control on the power amplier and turn the
High Cutoff knob down between 90hz and 40hz.

Page 10
Frequently Asked Questions
)QEverything is hooked up but I’m not getting any output from the ButtKicker mini
Concert. What do I do?
)ɶHere are a few things to check. Make sure that:
All connections are tight.
Audio software is installed and functioning.
Your computer’s sound card is turned up and the bass setting is set high enough.
)QI’m feeling the music and sound effects more than the car or plane’s engine in
my simulator. How can I change this?
)ɶThe ButtKicker mini Concert is reacting to the low frequency audio that has been mixed by
the game studio. Higher quality audio mixing will result in a better ButtKicker experience.
Turn on the high cut switch and dial the “High Cutoff Frequency” knob down to a lower
frequency. The extra shaking may also be eliminated by turning off or lowering the
background music or effects from the in-game settings menu.
)QMy sim rig/cockpit is rattling. How can I x this problem?
)ɶUse foam, cardboard or a rubber band to secure any loose parts.
)QI hear a knocking or banging noise coming from the ButtKicker mini Concert -
what should I do?
)ɶThat is the internal piston hitting the inside of the housing. Although this will not immediately
harm the unit, you should turn the volume down on the amplier to avoid “overdriving.”
)QSometimes when I press the power button on the remote control, the BKA-
130-C power amplier doesn’t seem to respond - why?
)ɶIf the BKA-130-C power amplier is in STANDBY mode (orange light), pressing the power
button will rst switch it to the OFF mode. Simply press the power button again to turn the
amplier ON and wait a few moments for the circuits to receive power.
)QThe ButtKicker mini Concert suddenly stopped working, and then it started
again 10 or 15 minutes later - what happened?
)ɶThe ButtKicker mini Concert is equipped with thermal protection which will disengage the
transducer from the power amplier before it reaches a potentially hazardous operating
temperature. After cooling, it will begin operation as normal.

The Guitammer Company
1-888-676-2828 / 614-898-9370
8:30 AM - 5:30 PM EST (M-F)
E-mail us at:
support@guitammer.com
Visit us on the web, at:
www.thebuttkicker.com
If you have questions or need technical support,
please contact The Guitammer Company, not
the store where you purchased the product.
Warranty Information
This Guitammer Company product is warranted against defects in materials and workmanship
for a period of one (1) year from the date of purchase by the original end-user. Items returned
for repair under warranty will be repaired or replaced at the sole discretion of The Guitammer
Company without charge for materials or labor, providing such items are returned for inspection,
transportation prepaid, to The Guitammer Company or an authorized service center. All repaired
or replaced items will be returned freight collect. Warranties do not apply to products that have
been subjected to abuse, accident, modications, improper handling or installation, or repairs made
by anyone other than The Guitammer Company or an authorized service center. The Guitammer
Company shall be the nal authority in the determination of all warranty service claims.
RETURNS & EXCHANGES:
FIRST STEP - Contact us for technical support. (See contact info on back cover)
SECOND STEP - Obtain an authorized RMA number (if the rst step does not solve your problem).
Products may be returned for credit or exchanged only with prior Guitammer authorization (an
RMA number). Returned products may be subject to a 25% restocking charge. Returned products
must be returned via prepaid freight and insured for their full value, in the original factory packaging
or other appropriate, protectively padded packaging with all original attachments, paperwork and
accessories.
Products returned without prior Guitammer authorization (an RMA number) will be refused upon
arrival and returned to the sender at the sender’s expense.
Table of contents
Other Guitammer Transducer manuals
Popular Transducer manuals by other brands

Airmar
Airmar TRIDUCER P39 Owner's guide & installation instructions

Veris
Veris EP3 Series installation guide

SonoSite
SonoSite TEExp user guide

novotechnik
novotechnik TLM 102 Series Instructions for use

Theta Digital
Theta Digital 30P operating manual

Raymarine
Raymarine REALVISION 3D installation instructions

COPAL ELECTRONICS
COPAL ELECTRONICS PA-870 Series quick start guide

Ashcroft
Ashcroft GC55 Installation and maintenance instructions

Humminbird
Humminbird transducer Assembly & operating instructions

ZIEHL
ZIEHL STWA4MH operating manual

HBM
HBM P8AP operating manual

Airmar
Airmar TRIDUCER B744V Owner's guide & installation instructions