Gymax SP36559 User manual

MAGNETIC ELLIPTICAL STEPPERS
USER'S MANUAL
SP36559
TIPS:
Your suggestions and comments for Costway are really important to us!
We sincerely solicit you to go back to our shop and leave a good rating in just a
simple click. It would be quite encouraging if you could kindly do so like below:
February 24, 2018
Great product so far. Fast delivery, easy setup, and working without any issues.
Great products so far
With your inspiring rating, Costway will be more consistent to offer you
EASY SHOPPING EXPERIENCE, GOOD PRODUCTS and EFFICIENT SERVICE!
UNITED STATES
CANADA UNITED KINGDOM
GERMANY
FRANCE
ITALY
SPAIN
JAPAN
RUSSIA
AUSTRALIA
US office:Fontana
UK office:Ipswich

TABLE OF CONTENTS
1. IMPORTANTSAFETYINSTRUCTIONS 1
2. EXPLODED DIAGRAM 3
4TSILSTRAP.3
4. ASSEMBLY INSTRUCTION 5
8.5
9
COMPUTER OPERATION
6.EXERCISE GUI DE
1. IMPORTANT SAFETY INSTRUCTIONS
WARNING - Readall instructions before using this machine.
It is important your machine receives regular maintenance to prolong its useful life. Failing to
regularly maintain your machine may void your warranty.
Please keep this manual with you at all times
a. It is important to read this entire manual before assembling and using the equipment. Safe and effective
use can only be achieved if the equipment is assembled, maintained and used properly.
Please note: It is your responsibility to ensure that all users of the equipment are informed of all
warnings and precautions.
b. Before starting any exercise program you should consult your doctor to determine if you have any
medical or physical conditions that could put your health and safety at risk, or prevent you from using
the equipment properly. Your doctor’s advice is essential if you are taking medication that affects your
heart rate, blood pressure or cholesterol level.
c. Be aware of your body’s signals. Incorrect or excessive exercise can damage your health. Stop
exercising if you experience any of the following symptoms: pain, tightness in your chest, irregular
heartbeat, and extreme shortness of breath, lightheadedness, dizziness or feelings of nausea. If you do
experience any of these symptoms, you should consult your doctor before continuing with your exercise
program.
d. Keep children and pets away from the equipment. This equipment is designed for adult use only.
e. Use the equipment on a solid, flatlevel surface with a protective cover for your floor or carpet. To
ensure safety, the equipment should have at least 0.5 meters of free space all around it.
f. Before using the equipment, check that the nuts and bolts are securely tightened. If you hear any
unusual noises coming from the equipment duringuse and assemble, stop immediately. Do not use the
equipment until the problem has been rectified.
1

g. Wear suitable clothing while using the equipment. Avoid wearing loose clothing that may get caught in
the equipment or that may restrict or prevent movement.
h. This equipment is designed for indoor and family use only.
i. Care must be taken when lifting or moving the equipment so as not to injure yourback.
j. Always keep this instruction manual and assembly tools at hand for quick reference.
k. The equipment is not suitable for therapeutic use.
l. There are many functions of the computer, which value will show when using the equipment according
the amount of exercise, here warmly remind you that the value of heart pulse just give you some
reference.
2
2. EXPLODED DIAGRAM
1
2
17
14
15
16
18
19
20
22
31
31
32
32
34
34
35
35
36
37
38
39
40
41
43
42
44
44
45
45
46
46
50
51 56
7
30
32
31
31
33
33
32
47
47
52
48
52 53
54
55
21
9
26
26
59
9
11
8
25
27
28
29
6
7
6
5
24
12
13
21
49
57
58
4
22
23
3
30
42
47
57
5
9
11
9
11
9
11
8
8
8
9
12
25
26 27
28
29 25
25
26
12
9
10
3

4
3. PARTS LIST
PART#
PART NAME QTY
Main Frame
11
21
31
41
52
62
72
84
910
11 4
12 6
13 1
14 1
15 1
16 1
17 1
18 1
19 1
20 1
21 2
Rear Stabilizer
Tension Knob
Tension Cable
M8-53CARRIGE BOLT
Right Crank
D8GASKET
Left Cover
Left Pedal Cap
M8 CUP NUT
Nut M8
Right Cover
Right Pedal Cap
BUTTON HEAD BOLTS M8-10
Rubber Cover
Left Crank
D8 Washer 02
Left Pedal Arm
2
1
1
24
23
22
Computer
Sensor wire
END CAP
Right Pedal Arm
2
4
4
4
2
2
30
29
28
27
26
25
PLASTIC SLEEVE 6Φ
Wheel Bearing
Bolt, Button Head M5-40
Wheel
Washer D6
Square Plug
PART#
PART NAME QTY
Bearing 01
4
4
2
2
2
1
1
1
1
1
6
2
40
39
38
37
36
34
33
32
31
35
C Ring 16Φ
Crank Cap
Belt 01
Pedal Arm Bushing
Axle 01
C Ring 17Φ
Belt 02
Spring Washer
Belt Wheel 01
Flanged Bolt 8 20-M
Belt Wheel 02
1
Flywheel
44 2
2
45
6
46 Bolt, Flat Head M6-8
7
47 Nut M10
7
48 Washer M10
41
42
43
Axle 02
1
2
1
49
FIXING BOLT SETS 6M
Foam
2
Bearing 02
53 ldle wheel Bearing 1
1
54 ldle wheel Plastic apc
1
55 Brake Brace Sets
9
56
Screw, Round Head M4-15
4
57
Self-tapping screwsM5-20
50
51
52
58 Flywheel Spacer 1
Flywheel locating Spacer 02
Flywheel locating Spacer 01
Outer Hexagon Bolt M8-45
4
Spring washer D8
10
Base Board 1
59
STEP 1:
4. ASSEMBLY INSTRUCTIONS
Attach the REAR STABILIZER(2) to the MAIN FRAME(1) with (5)
6 and (7).
,
()
M8-53CARRIGE BOLT
D8GASKET M8 CUP NUT
5
7
2
1
6
5

Attach the BASE BOARD(59) to the MAIN FRAME(1) with the WASHER(9) and
BUTTON HEAD BOLTS(12).
STEP 2:
6
12
1
9
59
10
Spring Washer D8 (10) and
Repeat on the other side.
NOTE: The LEFT and RIGHT PEDAL CAPS(15, 16) have a raised lip on three sides.
Attach the LEFT and RIGHT PEDAL CAPS(15, 16) to the LEFT and RIGHT PEDAL
ARMS(13, 14) so that the side without the raised lip is on the outside.
STEP 3:
7
11
9
8
13
15
Attach the LEFT PEDAL CAP(15) to the LEFT PEDAL ARM(13) with two pieces of Outer
Hexagon Bolt M8-45 (8), D8 Washer (9) and Nut M8 (11).

8
5. COMPUTER OPERATION
SPEED
:
,
.
W ,
HOW TO INSTALL AND REPLACE BATTERY:
LR44
Battery
Ultimate disposal of battery should be handled according to all state and federal laws and
regulations.
1. Remove the COMPUTER(23) from the MAIN FRAME(1).
2. Slide out the old battery from the Battery Cover.
3. Install a new button cell battery and assembly the COMPUTER(23)
back to the MAIN FRAME(1).
Place the COMPUTER(23) up-side down as shown in the illustration.
9
6. EXERCISE GUIDE
SITTING WORKOUT
Refer to the illustrations below. Seated workouts are effective for toning legs and hips, and for improving
circulation and mobility. When sitting, your feet will face the opposite direction on the pedals than when
standing. This will put your feet, ankles, and hips at the proper workout angles. To adjust the METER(23)
to face you, fnd the all gaps on either side of the meter case, grasp the top of the meter and pull
the top of the METER(23)from the casing being careful not to disconnect or damage the SENSOR
WIRE(24). Turn the meter 180 degrees, and push it back into position.
Place the
Sit in the chair and pedal the with your feet.
CAUTION: Do not stand up on the in this workout position.
STANDING WORKOUT
Using the while standing exercises your core and other muscles. If you
have good balance and are familiar with the elliptical, you may use the while
standing. Always mount and dismount the elliptical from the lowest foot pedal (as shown below). Stand on
the foot pedals with the front of your shoes close to the front edge of the pedal cap. For more stability, place
a chair next to the and place your hand on the chair back while stepping onto
the pedals. Move your highest foot forward and follow the natural path of the machine. If necessary, use a
wall or table to help maintain your balance while using the Start on a load
level that is comfortable until you are familiar with the machine. Once you are familiar with the elliptical and
comfortable with the resistance, adjust the load level as described below to achieve the workout desired.
CORRECT INCORRECT
MAGNETIC ELLIPTICAL STEPPER

10
11
MAINTENANCE
1.
Special attention should be given to the following:
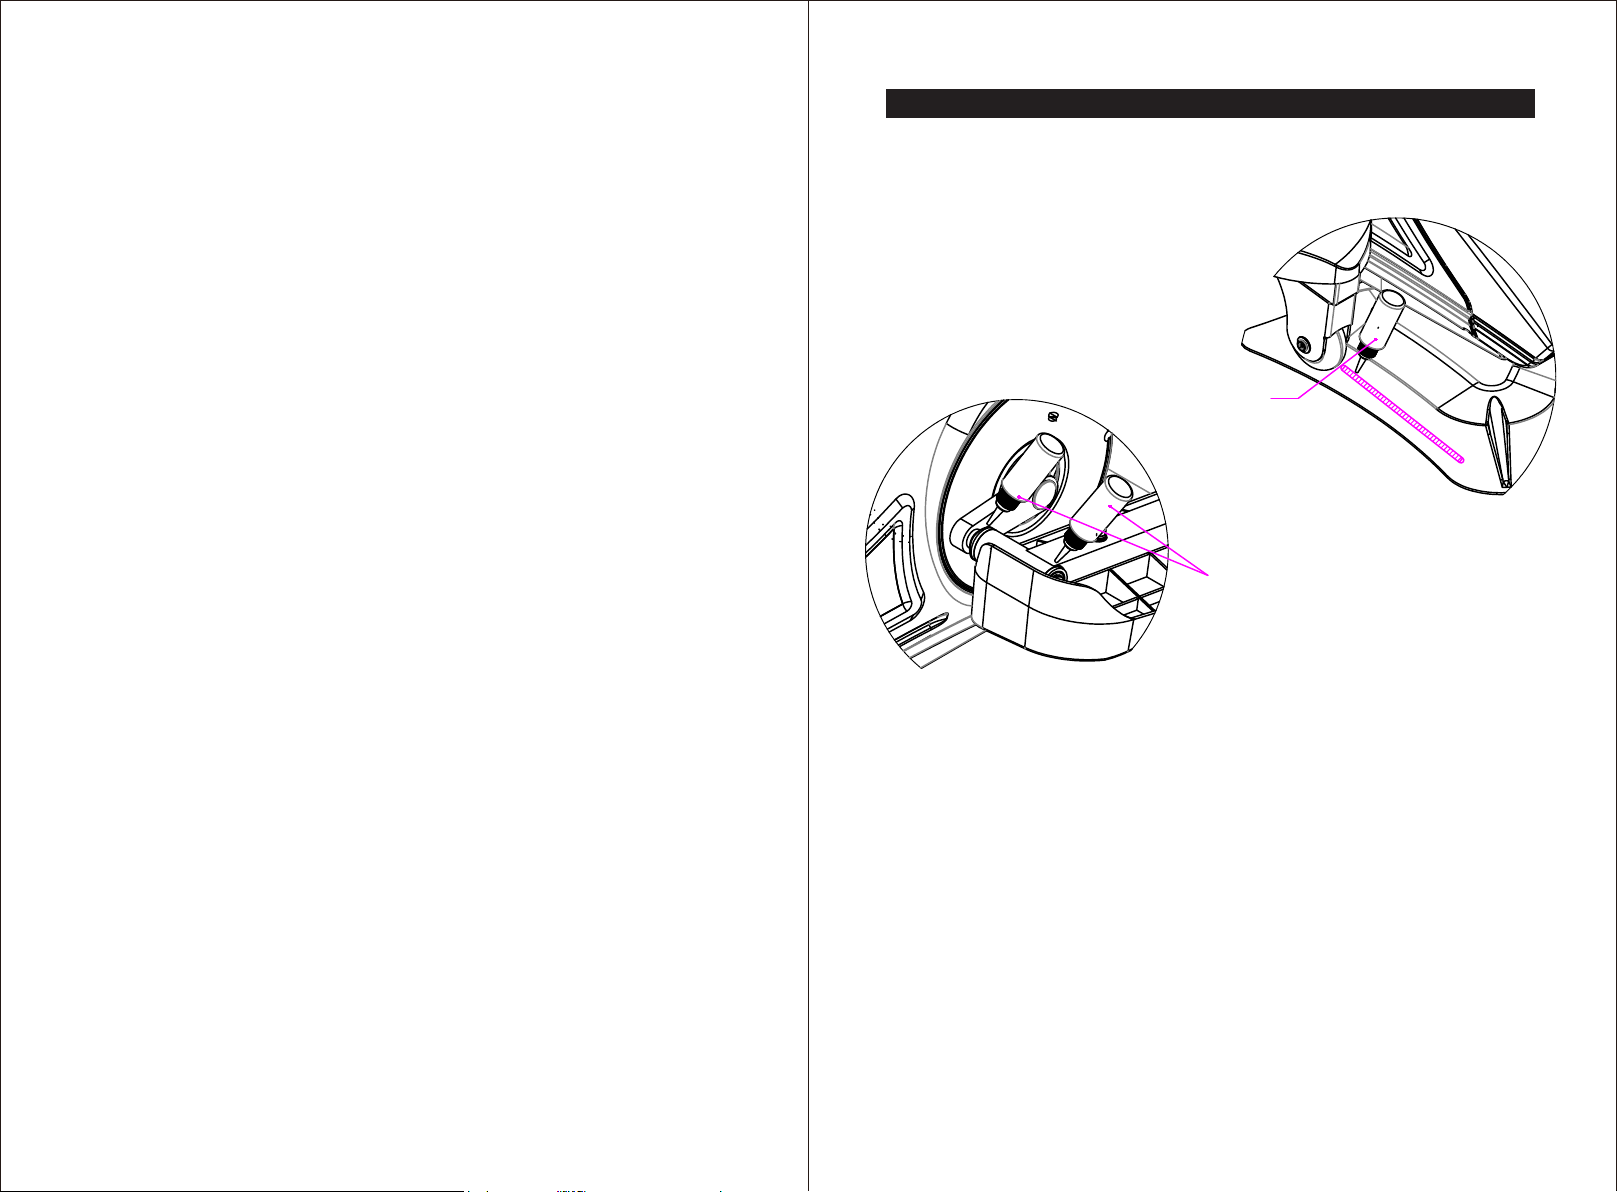
Lubricating Oil
A. Apply the Lubricating Oil on Base Board along Wheel moving paths.
Can effectively reduce friction between Wheels and Base Board.
Lubricating Oil
2. To store the MAGNETIC ELLIPTICAL STEPPER simply keep it in a clean dry place.
3. Keep your MAGNETIC ELLIPTICAL STEPPER clean by wiping it off with an absorbent cloth after use.
B. Turn over the Pedal Cap (15,16), apply the Lubricating Oil to
gap between Pedal Arm (13,14) and Pedal Arm Bushing (32).
Pedaling the pedals and let the Lubricating Oil sink in.
LOAD LEVEL ADJUSTMENT
The load level of can be changed at any
time during your workout. Adjusting your load level will allow you to
increase or decrease your intensity level.
FORWARD AND REVERSE
The can be used in forward and reverse directions to vary the muscles that
you work. This will help you to stay motivated and achieve the best results. To change directions, simply
slow the pedals down until they stop, then pedal in the opposite direction.
MAGNETIC ELLIPTICAL STEPPER
To increase the load, turn the TENSION KNOB(3) counterclockwise.
To decrease the load, turn the TENSION KNOB(3) clockwise.
NOTE:
Please DO NOT increase or decrease any more when it’s difficult to turn the TENSION KNOB(3).
Place the in the area where it will be used. It is recommended that the
be placed on an equipment mat. The is
approximately 75 CM long x 52 CM wide x 34 CM tall. (These dimensions may vary up to one
Make sure that adequate space is available for access to, passage around and emergency dismount
from the A minimum of 50CM on at least one side and 50CM either
behind or in front of the is required for safe operation.
MAGNETIC ELLIPTICAL STEPPER MAGNETIC ELLIPTICAL STEPPER
MAGNETIC ELLIPTICAL STEPPER
MAGNETIC ELLIPTICAL STEPPER.
MAGNETIC ELLIPTICAL STEPPER
centimeter.)
LEVELING: Adjust the location of to ensure
sits on the oor without rocking.
MOVING:
MAGNETIC ELLIPTICAL STEPPER MAGNETIC ELLIPTICAL STEPPER
MAGNETIC ELLIPTICAL STEPPER.
Grasp the Handlebar on the front of MAGNETIC ELLIPTICAL STEPPER to move the machine.
Do not use the PEDAL ARMS(13,14) to move the
The PEDAL ARMS(13,14) will move and may pinch your hand or fingers.

Training Zone Exercise
After warming up, increase the intensity to your desired exercise program. Be sure to maintain
your intensity for maximum performance. Breathe regularly and deeply as you exercise-never
hold your breath.Cool Down Finish each workout with a light jog or walk for at least 1 minute.
Then complete 5 to 10 minutes ofstretching to cool down.This will increase the flexibility of your
muscles and will help prevent post-exercise problems.
Workout Guidelines
TARGET ZONE
THIS IS HOWYOUR PULSE SHOULD BEHAVE DURING GENERALFITNESS
EXERCISE.REMEMBER TO WARM UP AND COOLDOWN FORAFEW MINUTES.
The most important factor here is the amount of effort you put in.The harder and longer you work,
the more calories you will burn. Effectively this is the same as if you were training to improve your
fitness, the difference is the goal.
12
PLEASE NOTE: Before beginning any exercise program, consult your physician. This is important
especially if you are over the age of 45 or individuals with pre-existing health problems.
The pulse sensors are not medical devices. Various factors, including the user’s movement, may
affect the accuracy of heart rate readings. The pulse sensors are intended only as an exercise aid in
determining heart rate trends in general.
Exercising is great way to control your weight, improving your fitness and reduce the effect of aging
and stress.The key to success is to make exercise a regular and enjoyable part of your everyday life.
The condition of your heart and lungs and how efficient they are in delivering oxygen via your blood
to your muscles is an important factor to your fitness. Your muscles use this oxygen to provideenough
energy fordaily activity. This is called aerobic activity. When you are fit, your heart will not have to
work so hard. It willpump a lot fewer times per minute, reducing the wear and tear of your heart.
So as you can see, thefitter you are, the healthier and greater you will feel.
Start each workout with 5 to 10 minutes of stretching and some light exercises.Aproper warm-up
increasesyour body temperature, heart rate and circulation in preparation for exercise. Ease into
your exercise.
Warm-up
13
Table of contents