hadewe Hyperios4 CHROME User manual

Manual
Hyperios4CHROME
Art. No 0584
FB 04-293 Rev. 0
Date: 26.01.2018

2
Directory
Foreword 3
Safety instructions 4
Cleaning and disinfection 7
Getting to know the unit 8
Before Use 9
Area of application 9
Operation 9
Application 11
Operation steps 11
Work positioning 12
Infilling the spray liquid 13
Insert the bur 14
Adjusting the speed 14
Memory buttons m1, m2 14
Spray 14
Drying / changing tool 14
Foot switch 15
Maintenance & Care 16
Washer 16
Water filter 16
Cleaning function 17
Cleaning the chuck 17
Maintenance overview 17
Handling Instructions 18
Troubleshooting 19
Technical Details 20
EMC 23

3
Foreword
The Hyperios4CHROME foot care unit was produced according to strict quality criteria
and uses the latest technology in its design. The images in this manual may vary slight-
ly from the product you have bought as we are constantly developing our products.
This user manual includes a detailed description and explanation of how to use the
Hyperios4CHROME unit. If you have any questions or suggestions, you can contact us
by telephone or email.
This user manual belongs with the Hyperios4CHROME unit. Keep it somewhere safe. If
you give this product to someone else, please include this document as it includes
important information on how to correctly use the product.
Short description of functions
The Hyperios4CHROME is a medical device for the treatment of callus and nails. The
hand piece is compatible with rotating tools such as diamond polishers, steel cutters
and ceramic cutters. These can reach at speeds up to 40,000 rpm and therefore pro-
vide an efficient way of removing tissue. The direction of rotation can be changed by
pressing a button. The integrated spray function emerges reliably bundles emerging
dusts. The speed of the bur and the amount of spray function can be adjusted by the
membrane keypad. The amount of spray liquid is adjusted via knob.

4
Safety Instructions
The equipment should only be used by trained operators, who
know the function of the unit well.
The installation of the working area has to correspond to the
relevant regulations. Set up the unit in such a way, that the
louvers are not covered and the extracted air can escape well.
To avoid the risk of an electric shock, this device might only be
connected to a power supply with protective conductor.
If you pull the power plug, it will stop the connection to the
mains power supply. Set up the unit so that the power plug is
always accessible. The power switch should also always be
easily accessible.
Only switch on the unit if the hand piece rests secured in the
hand piece holder, or if you hold it safely in your hand.
Prevent the permeation of liquids into the control unit. The
electronic elements could be damaged. Clean the outside of the
box only with a damped cloth. Be sure you unplug the unit
before.
Only when pulling the mains cable, you can ensure that the
device will be completely disconnected from mains. Check the
mains cable regularly for damages and in case of such let it
change or repair from an authorized service center.
Prevent your hair from wrapping itself around moving parts. If
applicable, wear a hair net.
When working with materials which might create dust or
moisture use a drilling unit with suction- or spray technique.
Wear a nose and mouth protection. Always follow the safety
instructions provided by the manufacturer of the materials being
formed.

5
Safety Instructions
For safety reasons you must always wear disposable gloves
and protective glasses when operating this unit. In addition, a
face mask conforming to EN 14683 type IIR or EN 149 FFP 2
must also be worn.
If water leaks from the unit, then a disturbance is present. The
unit has to be separated from the socket and cannot be used
any longer.
Ensure the patient’s foot and the hand piece (e.g. material) are
held firmly in place during operation.To avoid injury, work on the
foot of the patient with extreme caution, and light pressure.
Only use distilled water plus a sterilizing additive, e.g. hadewe
AquaHy (art. no. 8555). If you use other brands, pay attention to
their manuals if you can use them for this purpose. Never use
tap water or alcoholic fluid, or other burnable liquids. In case,
you are working with an alcoholic fluid, or other burnable liquids,
there is always the danger of fire or explosion hazards. Never
refill the tank directly over the unit to avoid in case you
accidently spill water, this will flow into the unit.
Change the spray liquid everyday. Always add disinfection
additive to the distilled water. Rinse the tank daily and fill it with
fresh water everyday.
To ensure that the bur/tool sits firmly in the chuck, do not work
with tools which:
•have an oily shaft
•are worn
•are bent.

6
Safety Instructions
Before using the equipment, assure that:
•the tool can be pushed far enough into the chuck
(Test this with a dipstick and clean if necessary.)
•the inserted tool will not can while clamping it
•the tool stuck properly in the chuck the tool is approved for
using it at the max. speed (see manufacturer’s instructions)
•the tool is absolutely dry.
Switch off the unit immediately if
•the bur comes off during the treatment itself.
•the motor blocks during the treatment.
Empty the unit if it is not in use for a longer period of time, e.g.
before vacations. Clean out the tank. Set the spray function on
maximum. Now start the spray function, and the water will spray
for approx. 3 min. The fluid will be blown out of the complete
spray system and hand piece.
Always follow the operating instructions. Do not carry out any
repairs, modifications or maintenance work yourself. This is only
to be accomplished by an authorized specialist. The mains
cable may also only be changed by the manufacturer or an
authorized specialist. Maintenance records may be supplied to
repair workshops and trained technicians upon request. Never
remove the housing, while the equipment is plugged in as some
components are live. A spare parts list may be supplied to
qualified persons (repair workshops). No responsibility can be
accepted for unauthorized or improper tampering with the unit,
which nullifies the guarantee and any other liabilities.

7
Safety Instructions
Cleaning and disinfection
The device is designed to be compatible with rotating instruments
which do not penetrate the skin or mucosal or inadvertently may still
cause injuries. For this application please adhere to the cleaning and
disinfection instructions provided below. After every treatment please carry out
these steps:
•Remove the rotating tool (e.g. bur) first. To do so, pay attention to the
instructions of its manufacturer.
•Remove clothing remains through wiping off easily the unit with a
moistened paper cloth. Afterwards clean all surfaces with a disinfec-
tion cloth (e.g. Mikrozid AF cloths of Schülke and Mayr).

8
Gerät kennen lernen
Getting to know the unit
1 spray regulator knob
2 turn OFF / ON spray
3 speed down
4 speed up
5 pilot lamp: shines during anticlockwise operation
6 changeover switch for clockwise or anticlockwise operation
7 turn off hand piece & spray / turn on airflow
8 pilot lamp: change the washer (page 16)
9 confirms changing the washer
10 hand piece light ON / OFF
11 memory button m1 for speed
12 memory button m2 for speed
13 pilot lamp: shines in standby-mode
14 ON / OFF switch (standby)
1 2 3 4 5 6 7
8 9 10 11 12 13 14

9
Before Use
Please read through the instructions
carefully before using the unit and
carefully note the safety advice.
Always keep this manual accessible
to any users of the drill.
Area of application
This device should only be used by
people who have completed a foot
care qualification. Before use the
operator should familiarize with the
device by reading this manual or
being instructed by another.
The device must only be used in
closed spaces. It may be used in
hospitals, in a commercial environ-
ment or in homes. The device is not
intended for use in operating rooms.
The control unit can be set up in a
cabinet, or can be used as a porta-
ble unit (e.g. in a carry case). It is
suitable for the following scopes:
•Foot care: Milling, trimming and
polishing. Attention: The spray
must be in operation during foot
care.
•Manicure: Grinding, milling and
polishing works.
The devise is determined of
operating rotating instruments,
which will not penetrate the
skin or murcous membrane if
used appropriate, but could
evoke damages accidently.
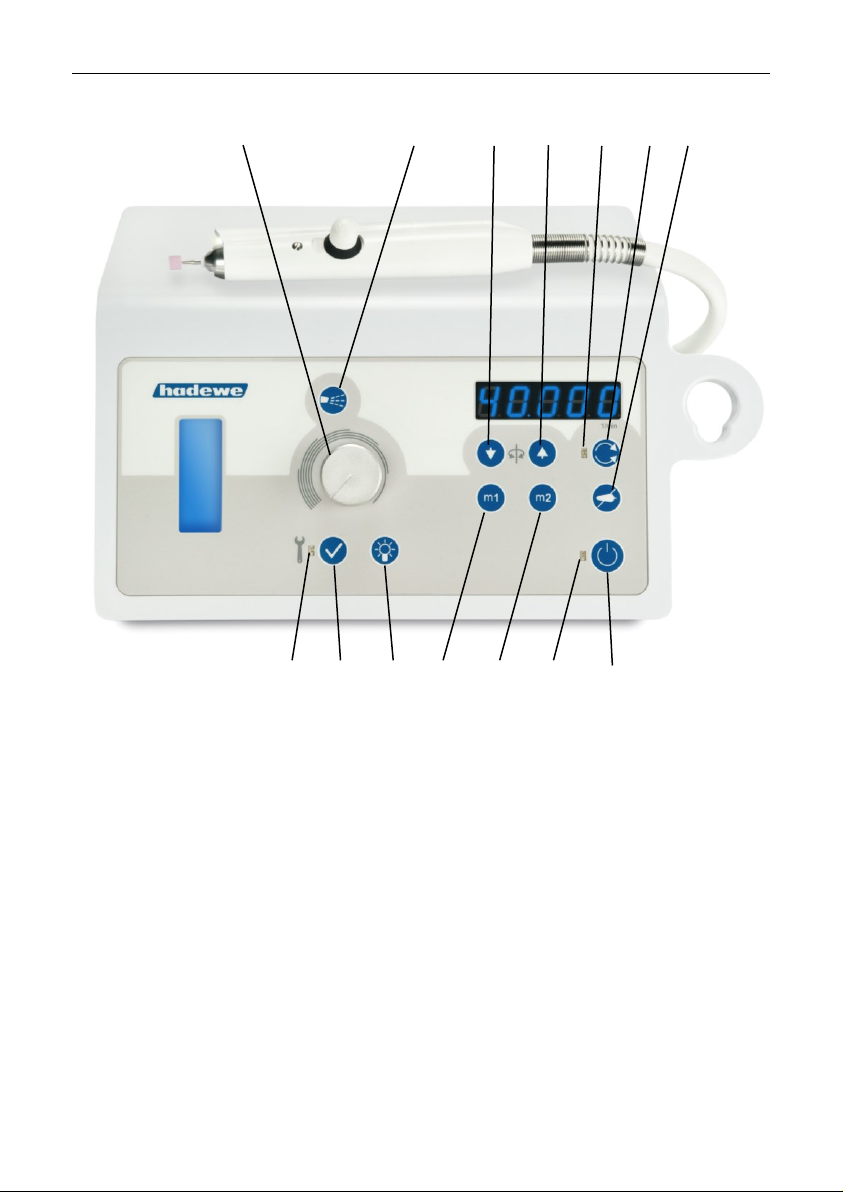
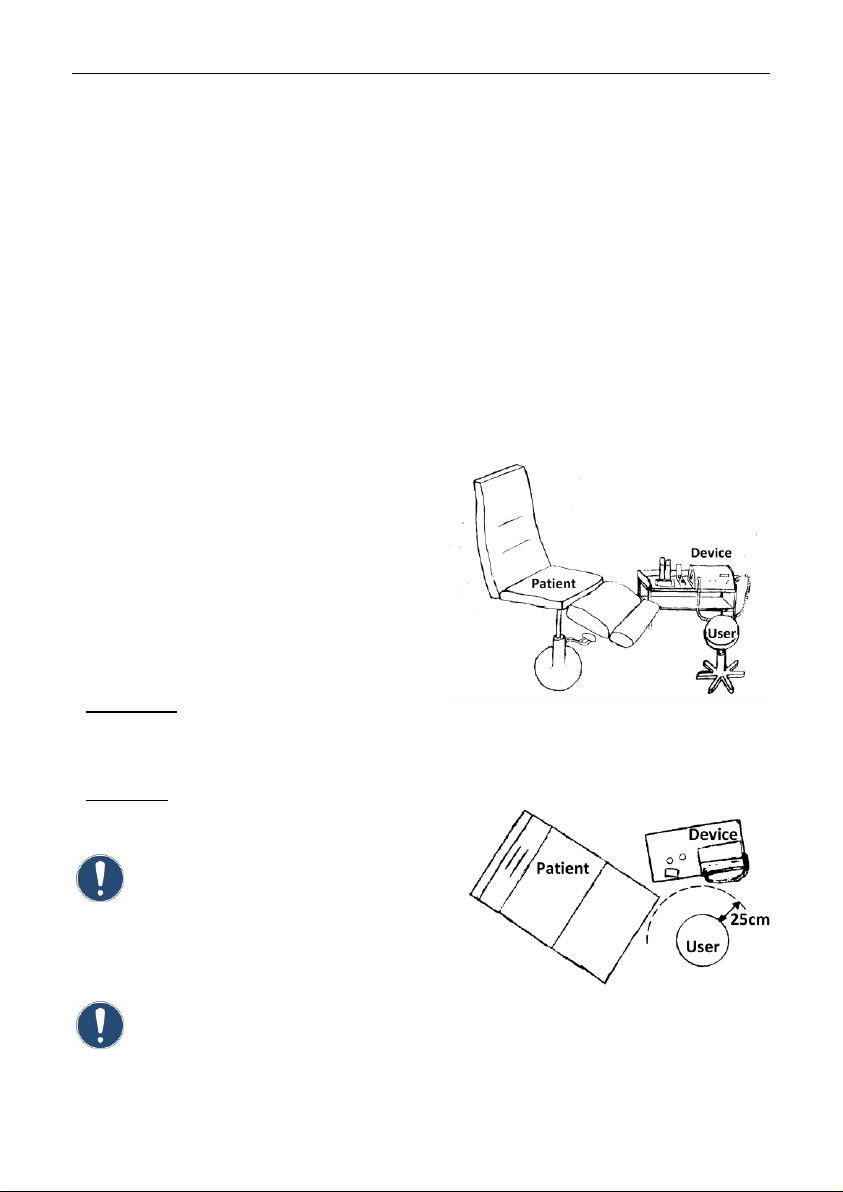
Caution: In the area of pedicure
you have to work with spray
techniques.
Operation
The working area must conform to
the conditions described. Set up the
unit in such a way, that the air slits
are not blocked and the extracted
air can escape well. To guarantee
unhindered air flow there must a
gap of at least 12 cm to the right of
the device. Position the device so
that the operating buttons are easy
to reach and the outlet of the hose
is a maximum distance of 60 cm
from the patient's foot. The unit
should be 30 –90 cm from the floor.
Image: Example of positioning of foot care unit
in treatment room.
Image: Bird's eye view of work area

10
Before Use
If you have a foot switch, insert its
plug into the port on the right of the
device which displays this symbol
.
Make sure, that the tank is filled
with spray liquid. Ensure that the
tool is fixed.
On the back of the device you will
find the main power switch. Press
this switch to turn the unit on.
Take up the hand piece. To use the
hand piece and spray function
press the button (14) on the front of
the unit.

11
Application
Operation steps
In the following section the order in
which you should use the device is
described. Additionally, the individ-
ual steps will be explained in detail.
Read the complete manual before
use.
After connecting the device to the
power press the standby button (14)
to make it start rotating. Use the (3)
and (4) buttons to select a rotation
speed. Manufacturers often provide
recommendations for optimal rota-
tion speeds. However, it is im-
portant that you never exceed the
maximum recommended rotation
speed.
You can now choose a rotation
direction using the button (6). The
most commonly used direction is
clockwise. Most milling instrument
(steel instruments with steel cutters)
are optimized for clockwise use.
The rotation direction is irrelevant
for diamond cutters and high-grade
corundum sanders in terms of effi-
ciency. Working anti-clockwise can
be beneficial if, for example, the
dust obscures your field of vision
when working clockwise.
Now, you can turn on the spray by
pushing button (2). By using the
adjusting knob (1), you can set the
amount of the spray liquid.
After setting the speed and the
spray amount, you can start with
working.
If you want to take a break or finish
the job, press the standby button
(14). The hand piece motor and
spray will turn off. The hand piece
can now be placed in its holder on
the right of the unit. Alternatively,
you can switch the device to
standby by pressing and holding the
button on the hand piece or by
pressing the button on the foot
switch.
We recommend you disconnect the
device from the mains power supply
if is not going to be used for a while.
This will save electricity. The mains
plug must also be removed when it
comes to retiring the device.

12
Application
Work positioning
The following images are examples
of how to work on various parts of
the foot. Always make sure that the
foot is firmly gripped and that you
can work freely and without strain.

13
Application
Infilling the spray liquid
Switch off the device. Pull out the
spray tank on its handle. Hold the
cover of the tank in hand and un-
screw the tank. Now fill it with dis-
tilled water and anti-germ liquid,
e.g. AquaHy (art. no. 8555).
Do not exceed the maximum
level when filling the tank.
Now turn the tank cover back on the
tank. While screwing back the cover
on the tank, make sure that is
closed correct. Otherwise there will
no pressure be build up. Put the
tank back in the housing. Switch on
the power switch in the rear of the
unit.
Attention: Never use tap
water (danger of calcifica-
tion). Also, do not use explo-
sive or combustible liquids,
e.g. alcohol. Note: Never refill
the tank directly over the unit
to avoid in case you acci-
dently spill water, this will
flow into the unit.
The water filter (art. no. 3479)
has to be fully under water,
otherwise no water will be
sucked in.
Please only use distilled water
together with disinfectant
Aquahy. Other admixtures
could be unsuitable and cause
damages at your device. Par-
ticularly alcohol-based spray
fluids often attack hoses and
make them porous.

14
Application
Insert the bur
Insert the bur until it stops. The
hand piece is equipped with a
chuck which can hold all burs with a
diameter of 2.35 mm (confirm to
ISO 104).
Only change the tool if the
hand piece is turned off.
Adjusting the speed
Put the hand piece back in the hand
piece holder or keep it in your hand.
Switch on the unit with switch (8).
Now you can adjust the requested
speed with the switch (3) and (4).
Choose the direction with switch
(6).
Memory buttons m1, m2
Frequently used speed levels can
be saved. Therefore, two memory
buttons are available. At first,
choose your speed level and then
save it by pushing button m1 for 4
seconds. To recall the above speed
level simply press button m1 again.
Further speeds can be saved with
m2.
Spray
Turn on the spray function while
pushing switch (2). Now the spray
system will be filled automatically
and a strong spray stream will be
blowed out of the hand piece for the
first 15 sec. Then you can adjust
the requested spray stream while
turning knob (1).
When turning off the unit or the
spray function, the spray liquid is
pumped back completely into the
tank from the hoses. With this pro-
cess, a bubbling can be heard in
the tank.
Drying / changing tool
Press key (7) and the hand piece
and spray will be turned off. Now
only air will come out of the top of
the hand piece, which you can use
to dry the spot of the recent treat-
ment. When you push button (7)
again, the spray and hand piece are
working again.
This function can also be used
to change your tools while the
hand piece is not running.

15
Application
Foot switch
Commencement of foot switch
Only use the original hadewe foot
switch (art. no. 0970) to avoid dam-
ages. Insert the plug of the foot
switch into the socket with this
symbol .
Function of the foot switch
Press foot switch long time:
Switch device ON / OFF
Press foot switch short time:
While the spray is on, and you push
the switch once, the spray stream
will stop. If you push it a second
time, the hand piece will stop. Push-
ing the switch a third time, both
functions will start to work again.
When working with a foot switch,
take care that you only use instru-
ments that are approved for use at
the maximum speed of the device.

16
Maintenance & Care
Washer
The top of the hand piece is
equipped with a white washer (art.
no. 4571). This washer has to be
replaced by a new one every 50
operation hours, unless exchang-
ing it, water could enter the hand
piece and cause of damages of
the internal parts. The LED (8)
will light if a change of the wash-
er is necessary.
Exchanging the washer
Remove the washer with tool (art.
no. 6475).
Put on the tool between the
LEDs. If you set the tool on
the LED, they may break.
Push the new washer in the top.
Now press button (9) to make the
LED (8) go out.
Water Filter
Even smallest parts of dirt could
block the nozzle, which sits in the
top. Avoiding such blockages, there
is a water filter installed in the cap
of the tank. We recommend to
change this every time, when it is
covered with some dirt, at least
twice a year. Still make sure, no
parts of dirt enter the tank and rinse
it quite regularly.
Changing the water filter
Take off the cap of the tank. Hold
the metal piece (A) in one hand and
screw off the water filter (B).
Now you can screw on the new
filter.

17
Maintenance & Care
Cleaning function
Use the cleaning function if the
nozzle is blocked. Turn the unit off
using button 14 (Standby). Remove
the water filter at first. (For its in-
structions see paragraph above.)
Fill the tank with distilled water.
Close the tank and put it back into
the unit.
Adjust the amount of spray (button
(1) on maximum. Now press button
(2) and hold it, until in the display
shows “CLEAN”. If requested, you
could cancel the process by push-
ing button (14). The complete
cleaning process will last three
minutes.
During the cleaning process, the
water will be washed out of the
whole spray system. Parts of dirt
are rinsed into the tank. Do not use
this water again, but clean the tank
immediately after realizing a block-
age in the nozzle. Otherwise the dirt
parts might stick together.
Clean the water filter carefully and
put it back in the adapter. Refill the
tank with new water.
Use the cleaning function
only if the nozzle is blocked.
Do not use the function if the
unit works properly.
Cleaning the chuck
Cleaning the chuck is not intended
for Hyperios4CHROME.
Maintenance overview
What has to be
done?
How often?
Done by
whom?
changing washer
4571
monthly by user
changing filter
3497
every 6 months
Maintenance by
repair workshop
(changing worn
parts; checking
motor brushes,
housing; cleaning;
check leakage
current)
every 500 hours
of operation by
repair workshop

18
Handling Instructions
Always deposit the hand
piece with the top down-
wards. Therefore, you can
avoid liquid from entering the hand
piece.
Never put the hand piece
into any kind of liquid, and
never oil or grease the hand
piece. Clean its surface with a
damped cloth. Pay attention, that no
moisture or liquid enters the hand
piece. Never use spray disinfection.
Never put any wet burs or
instruments into the hand
piece. Its moisture could
damage the interior parts of the
hand piece.
Any materials used by
hadewe prevent a formation
of rust. In cases in which a
rust infestation was found within the
hand piece, thorough inspections
and examinations always have
proved that the rust had a foreign
origin (which was usually caused by
the tools used in these circum-
stances).
Even in high-grade steel
instruments of well-known
manufacturers, formation of
rust can appear, e.g. through wrong
treatment with chemical cleaning
and disinfection liquids. This extra-
neous rust affects internal parts of
the hand piece in form of rust bloom
and causes pitting. Therefore, when
you not working with the hand
piece, always remove the bur/tool
from it.
Always make sure that you
do not let the hand piece fall
down or exposes it to any
shocks. The ball bearings and the
motor could be damaged by this.
Only work with tools, which
are flawless.
Do not work with tools which
- are bent or
- are out of balance
- whose shaft is worn out or
- are rusty.
Working with faulty tools will
cause a stronger vibration of
the hand piece. A damage of
the ball bearings, clamping tech-
nique or motor could be the conse-
quence.
Working with high pressure
will not improve the outcome
of your work, since the mo-
tor will even be slowed down. A
second disadvantage is the strong-
er impact on the ball bearings and
the motor, which will shorten their
life span in the long run.
Always working with maxi-
mum speed might have a
similar effect. Please make
sure that the speed setting you use
is according to the work you are
doing and the instruments you are
working with.

19
Troubleshooting
Hand piece vibrates, is very noisy
and/ or becomes warm in the front
part.
Use of bent burs/tools. Use a dif-
ferent bur/tool to test this. The
bur/tool itself can be tested with the
hadewe Bur Shaft Tester (art. no.
4990) to see if it is bent.
Maximum allowed speed of the tool
was exceeded, which caused a
stronger vibration. Pay attention
to the tool (e.g. bur, capper and in-
strument) manufacturers handling
details.
Bur/tool can be inserted only with
difficulty, or not at all.
Use of bent burs/tools. Use a dif-
ferent bur/ tool to test this. The
bur/tool itself can be tested with the
hadewe Bur Shaft Tester (art. no.
4990) to see if it is bent.
It does not spray.
Pressure cannot be set up in the
tank, because the lid is not tightened
well.
There are parts of dirt in the spray
system. Cleaning the spray sys-
tem according to the instructions in
the manual.
The blue water filter (art. no. 3497)
in the tank is blocked Change the
water filter.
Unit does not work at all.
Check, if the main switch of the unit
is turned on at the side of the unit.
Footswitch is used constantly or
faulty. Pull out the socket of the
foot switch to see if this is the cause.
Pull out the mains plug to reset the
device.
After lengthy use unit does not
spray. Netzstecker ziehen, um das Gerät zu resetten
Unit is overheated. Slots of the
unit should not be covered or
blocked. Let cool down the unit for a
while.
The unit shows different sound
levels at different sites of use.
The sound level varies according to
the surroundings of the unit. If you
set up the unit directly in front of a
wall, the sound is reflected stronger,
as if it would, while standing further
away from a wall.
The motor of the hand piece stutters
(e.g. 1 sec.) while switching it on.
Very seldom this error might occur.
It would not damage the motor at all.
Spray stream stutters.
There is air in the spray system. Af-
ter 5 min running, this effect will dis-
appear.
Acceleration of the spray stream
Note: To reduce the starting time of
the spray, turn the spray regulator
on Max. After the spray started, ad-
just the stream to the requested
amount of water.
Fluid leaks out of the unit.
Please be aware of the maximum
filling level of the tank: Do not ex-
ceed the maximum level when filling
the tank.
Maintenance lights
Change the water sealing according
to the instruction on page 16.

20
Technical Details
0584 Hyperios4CHROME
Total weight: 3,5 kg
Dimension: W245xH133xD190mm
Power supply: 230V~, 50-60Hz
Rated current: 0,5A
fuse primary:
F1/F2: 500 mA delay action fuse
fuse Sec. Thermo fuse
Protection class I
Accuracy of speed display: ±10%
Hand piece:
Type B applied part
Diameter: 17-21 mm
Length: 116mm
Speed: 7000-40000 rpm
When power supply: 100V - 115V
F1/F2: 1000 mA delay action fuse
Rated current: 0,6A
Operating time
The device is designed for extend-
ed usage.
Ambient conditions
The device is intended for use in dry,
closed rooms.
Operation:
Temp.: +10 °C to +26 °C
Rel. humidity: 25% to 75%
(not condensed)
Air pressure: 700 hPa to 1060 hPa
Storage:
Temp: -5°C to +55°C
Rel. humidity: 10% to 95%
(not condensed)
Air pressure: 500 hPa to 1060 hPa
Transport (up to 4 weeks):
Temp: -5°C to +55°C
Rel. humidity: 10% to 95%
(not condensed)
Air pressure: 500 hPa to 1060 hPa
Declaration of conformity
We declare under our own responsibil-
ity, that the device 0584 is consistent
with the following guideline:
93/42/EEC Medical Device Directive
hadewe GmbH –Grambartstraße 10 –
30165 Hannover –Germany
Table of contents
Other hadewe Medical Equipment manuals