HAGENUK Classico User manual

1
User Manual
and
SafetyPrecautions
Cordless DECT - telephone
with caller ID 10/04hj
Classico / Duo

2
Turn handset ON / OFF ON: EOFF: Ehold for 2 s
Turn keypad lock ON / OFF ON: Ehold 1 s OFF: Ehold 1 s
Make an external call nior in
Make an internal call INT hold 3 s, down
Redial a number /, select entry, i
Store telephone number to Menu, OK, n, OK, n, OK
the phonebook
Copy telephone number from
call log to phonebook
Dialing from the phonebook
Calling from call log
Speaker phone ON / OFF ON: 2x iOFF: 1x i
Function input at the keypad
)Bsimult. until the name ap-
pears , n, OK
Bselect entry, i
)select entry, i
Set the handset volume i
Set the speaker phone volume i2x,
Transfer call to another handset INT hold 3 s, hang up when
the other user answers
Quick reference for the handset

3
Table of Contents
Quick reference for the handset............................................................... 2
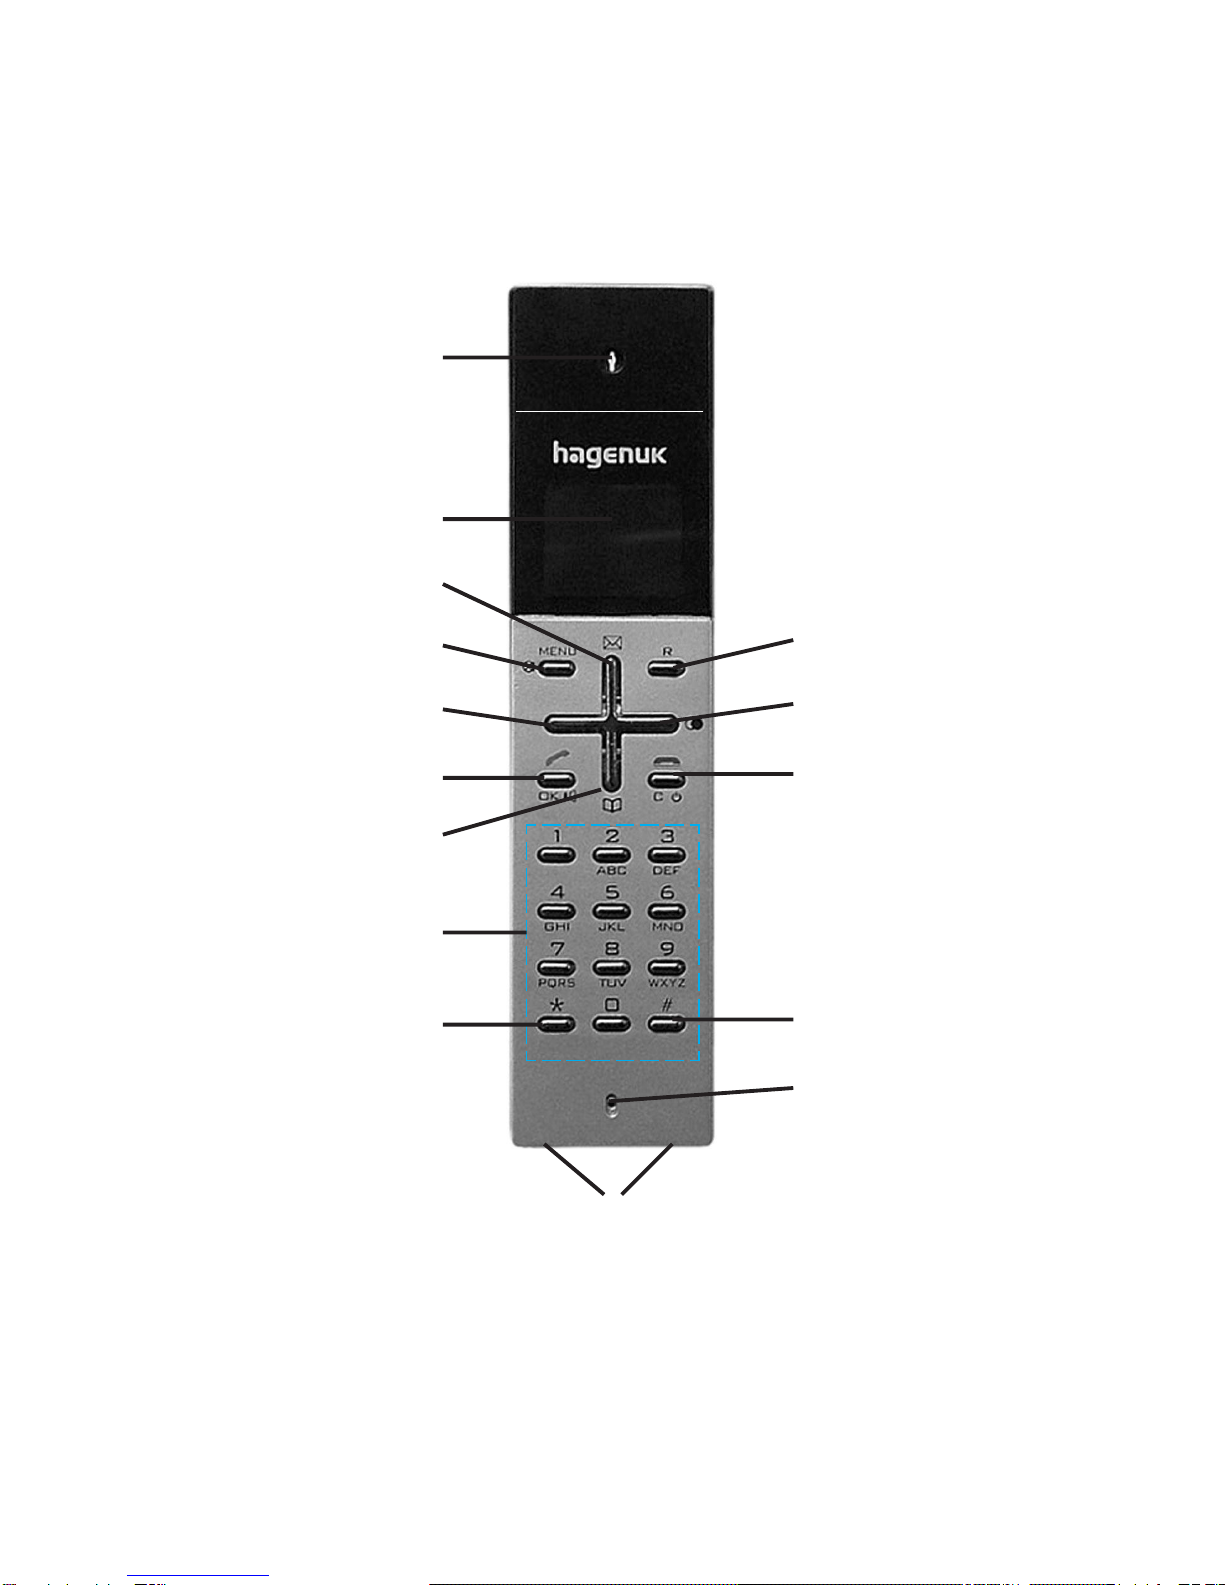
Handset diagram ....................................................................................... 6
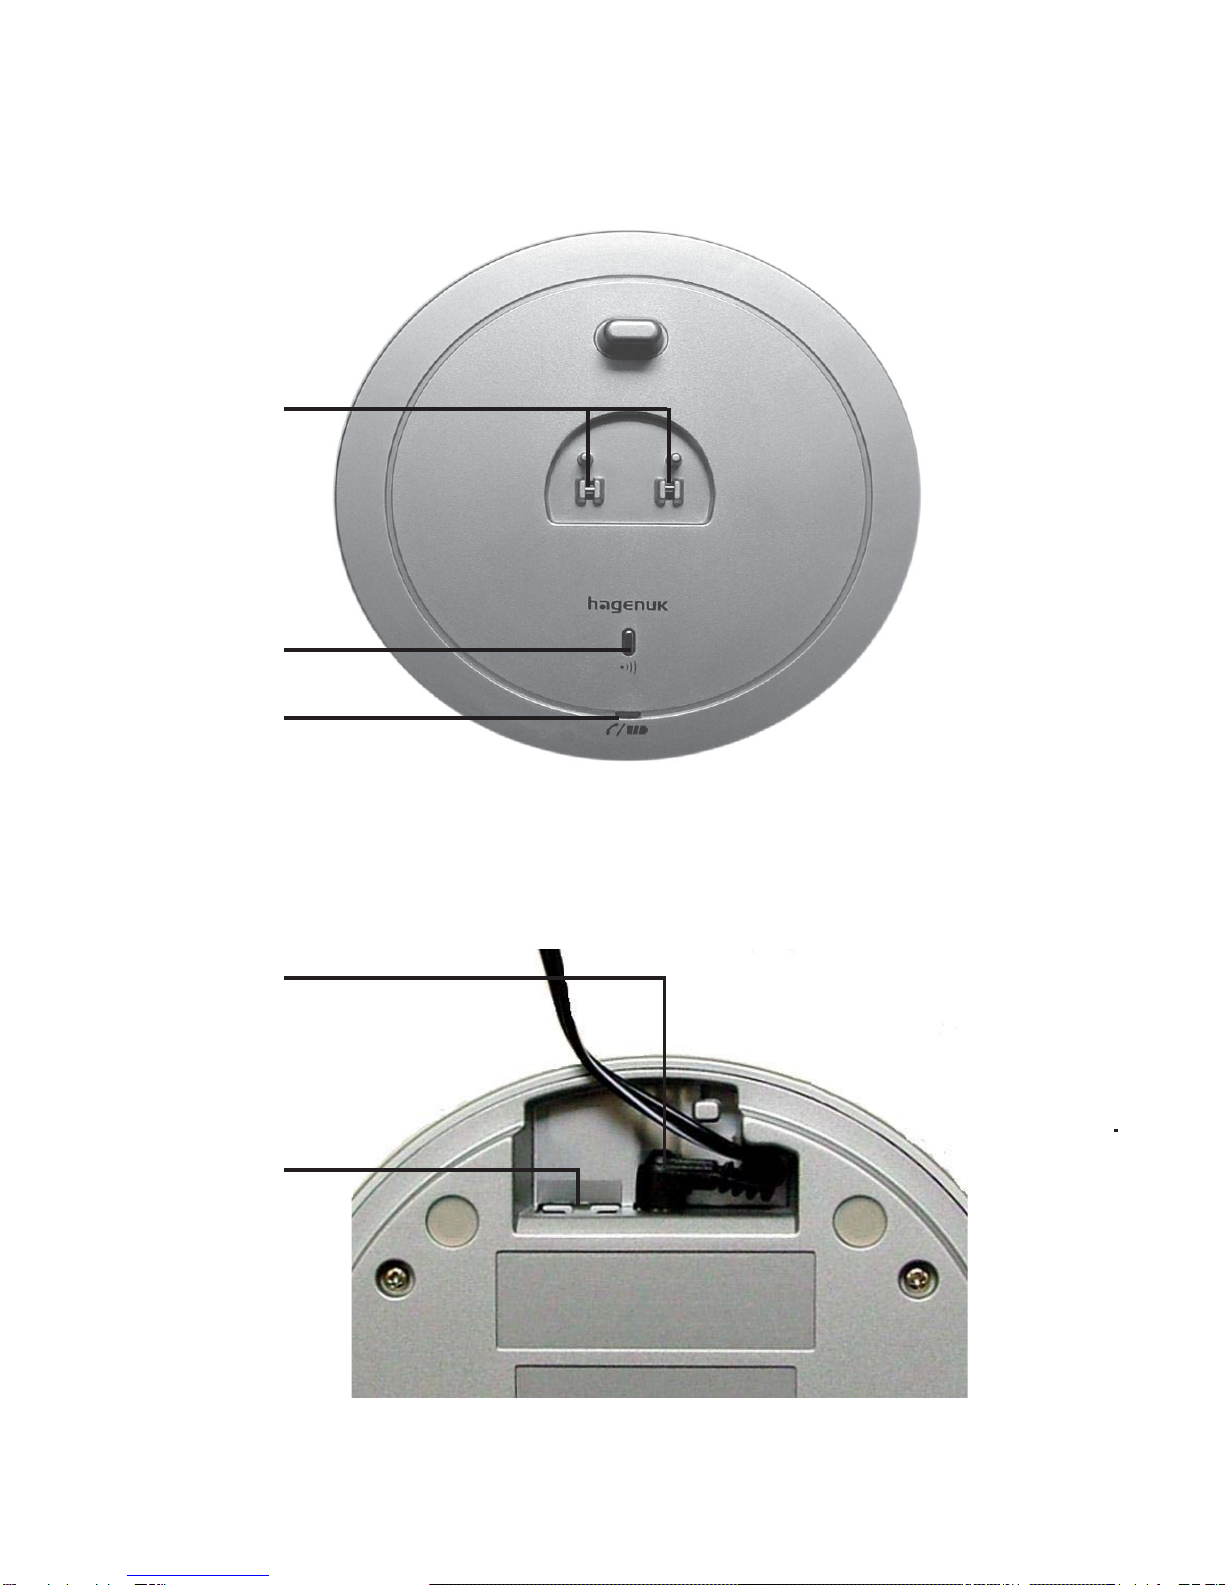
Base station overview ............................................................................... 7
Legend........................................................................................................ 8
Default settings.......................................................................................... 8
Menu structure........................................................................................... 9
Congratulations ....................................................................................... 11
Safety precautions................................................................................... 11
Contents of the package ......................................................................... 12
Features ..................................................................................................12
Maintenance ...........................................................................................13
Recycling................................................................................................. 13
LC - Display (LCD) (symbols line) ........................................................14
INSTALLING THE TELEPHONE....................................15
Installing and connecting the base station ............................................ 15
Setting up the handset ............................................................................ 15
Replacement of the batteries.................................................................. 16
Out of range ............................................................................................. 17
Registering the handset with the base .................................................. 17
Registering the handset to the Classico base....................................... 17
Registering the handset with another DECT - base
(compatible with GAP) ........................................................................ 18
De-registering the handset ..................................................................... 18
HANDSET SETTING ......................................................19
Turning the handset on and off .............................................................. 19
Automatic return to standby ................................................................... 19
Keypad locking ........................................................................................ 19
Setting the handset's ringer volume ...................................................... 20
Choosing the handset's ringer melody.................................................. 20
Setting the handset's volume ................................................................. 20
Turning keypad beeps on and off ........................................................... 21
Turning battery low beep on and off ...................................................... 21
Choosing the language ........................................................................... 22
Turning automatic answer on and off .................................................... 22
Returning the handset's setting to the default ...................................... 23
Modifying the personal code (PIN) of the handset............................ 23
Baby mode ..............................................................................................24

4
Modifying the name of the handset..................................................... 25
BASE SETTING..............................................................26
Ringer volume at the base ....................................................................26
Ringer melody at the base ....................................................................27
Setting the date and the time................................................................27
Returning the base's settings to the defaults ....................................28
Changing the dialing mode................................................................... 28
Setting the Flash-time............................................................................ 29
Modifying the PIN-code of the base.....................................................30
MAKING CALLS.............................................................31
Answering an external call...................................................................... 31
Answering an internal call ...................................................................... 31
Speaker phone calling............................................................................. 31
Setting the volume for speaker phone calling....................................... 32
Calling Outside ........................................................................................ 32
Making intercom calls ............................................................................. 32
Dialing preparation .................................................................................. 33
Redial........................................................................................................ 33
Dialing a number from the phonebook .................................................. 34
CALL CONTROL ............................................................34
Call timer .................................................................................................. 34
Total call duration .................................................................................... 34
Last call duration..................................................................................... 35
Reset call duration................................................................................... 35
Setting the call limitation ........................................................................ 35
Setting number barring ........................................................................... 36
Freeing barred numbers ......................................................................... 36
Saving emergency numbers ................................................................... 37
Transfer of a communication to another handset................................. 37
EXTERNAL COMFORT FUNCTIONS............................38
Waiting call and toggling ........................................................................ 38
Consultation and toggling....................................................................... 38
Conference call with three people.......................................................... 39

5
INTERNAL COMFORT FUNCTIONS .............................40
Waiting call during an internal call....................................................... 40
Consultation and toggling .................................................................... 40
Conference call with three people.......................................................40
Paging the handsets.............................................................................. 41
Reading the call duration ...................................................................... 41
Turning the microphone off (Mute) .....................................................41
PHONEBOOK.................................................................42
Add phonebook entry.............................................................................. 42
Dialing from the phonebook ................................................................... 42
Editing numbers in the phonebook........................................................ 43
Deleting numbers from the phonebook ................................................. 43
Deleting the whole phonebook............................................................... 44
CID LIST (CALLER LOG)...............................................44
Opening the CID list ................................................................................ 45
Dialing from the CID-list.......................................................................... 45
Editing numbers in the CID-list .............................................................. 46
Copying a number from the CID-list to the phonebook........................ 46
APPENDICES.................................................................47
Troubleshooting....................................................................................... 47
Warranty ................................................................................................... 48
Technical data .......................................................................................... 49
INDEX .............................................................................50

6
Handset diagram
1
2
3
410
511
612
7
8
913
14
15
INT
INT

7
Base station overview
Classico base station, connections on the bottom of the base
17
18
19
$
16
20

8
1Loudspeaker
2Display
3Open caller log, scroll menu up
4MENU - key, turn off microphone (Mute)
5Scroll menu left
6Talk key / speaker phone / OK - key
7Open phonebook; scroll menu down
8Alphanumeric keypad
9Star key
10 Flash - key
11 Redial; scroll menu right
12 End the call; handset ON / OFF; clear
13 # - key (pound key); internal connection
14 Microphone
15 Charging contacts handset
16 Charging contacts base
17 Paging key
18 LED indicating communication
19 Power supply unit jack
20 Telephone jack
1 handset at the basis registered
2 handsets at the base registered (DUO - model)
Dialing mode tone dialing
Ringer volume 3 (handset and base)
Ringer melody 3 (handset and base)
Handset volume (level) 2
Speaker phone volume (level) 3
Keypadbeeps ON
Battery low beep ON
Auto Talk OFF
SYSTEM PIN handset and base 0000
Baby mode OFF
Rechargeablebatteries enclosed, not installed
Default settings (depending on your country's version)
Legend

9
MENU Structure
MENU
PHONEBOOK-
KEYPAD
LOCK
PHONEBOOK-
ADD
ENTRY
SELECTION
PHONEBOOK-
KEYPAD
LOCKED
INTERNAL
CALL
SETTING
PHONEBOOK
EDIT
ENTRY
PHONEBOOK
DELETE
ENTRY
PHONEBOOK
DELETE ALL
ENTER NAME
_
ENTER
NUMBER
_
EDIT NAME
_
EDIT
NUMBER
_
DELETE? DELETED
ENTER
H/S PIN
_
PHONEBOOK
ALL
DELETED
INT CALL
HANDSET _ INT CALL
TO ALL
HANDSET
SETTING ACOUSTIC
SETTING
LANGUAGE
AUTOMATIC
ANSWER
DEFAULT
SETTING
REGISTER
BASE
SETTING
CHANGE PIN
BABY MODE
BABY CALL
NUMBER
HANDSET
NAME
NEXT
PAGE
RINGER
VOLUME
RINGER
MELODY
EARPIECE
VOLUME
KEY BEEP
BATTERY
LOW TONE
SET
KEY BEEP
SELECT
VOLUME
SELECT
MELODY
SELECT
VOLUME
LEVEL
0-3
MELODY
1-6
LEVEL
1-3
SELECT
LANGUAGE
SET AUTO
ANSWER
CONFIRM
DEFAULT
SETTING?
DEFAULT
SETTING
DONE
REGISTER
IN PROGRESS
ENTER
BASE PIN
_
ENTER
NEW PIN
_
CONFIRM
NEW PIN
_
ENTER NAME
_
ENTER BABY
NUMBER
SET
BABY MODE ON
OFF
STORED
STORED
SET BATT
LOW TONE
ON
OFF
ON
OFF
ON
OFF

10
BASE
SETTING
ACOUSTIC
SETTING
RINGER
VOLUME
RINGER
MELODY
SELECT
VOLUME
SELECT
MELDOY
LEVEL
0-3
MELODY
1-6
TIME & DAY
SETTING SET TIME SET DAY
DEFAULT
SETTING CONFIRM
DEFAULT
SETTING?
DEFAULT
SETTING
DONE
LINE SET
TONE -
300MS
DIALING SET DIAL
MODE
FLASH SET FLASH
TIME
80 MS
100 MS
300 MS
DEREGISTER DEREGISTERHANDSET _
CHANGE PIN ENTER
NEW PIN
_
CONFIRM
NEW PIN
_
CALL
CONTROL CALL TIMER TOTAL CALL
DURATION
LAST CALL
DURATION
RESET CALL
DURATION
CALL LIMIT SELECT H/S CALL LIMIT
HANDSET _ GLOBAL/NATIONAL/INTERNAL
CALL
BARRING SELECT H/S BARRING
MODE SET BARR
MODE
EMERGENCY
NUMBER
BARRING
NUMBER
ON
OFF
SELECT
BARRING NO
BARR NUM _
BARR NUM _
(1-3)
_
EMERGENCY
NUMBER
SOS NUM _
ENTER
SOS NUM 1
_
SOS NUM _
(1-4)
MODE TONE
PULSE
TIME
TOTAL CALL
LAST CALL
CONFIRM
RESET?
DONE

11
Congratulations
Thanks for purchasing this DECT - telephone!
In order to be able using your phone in full comfort, we advise to read this
manual completely, so you will be familiar with its possibilities.
Do not place the set in the proximity of heat sources and don't
expose is to direct sun rays, dust or vibrations.
Fit only the recommended rechargeable battery!
Insert the rechargeable batteries ensuring correct polarity.
Do not use any other type of battery or a non-rechargeable
battery, as this could damage health and cause personal
injury.
Do not place the base station in a moist room, such as
bathroom or shower. The ideal temperature range is between
+5° and +35° C and the humidity between 25 % and 85 %.
Do not use the phone in environment subject to explosion
hazard e.g. auto paint booths.
Read these instructions carefully, and make sure that they
accompany the Classico, when you give it to others to use.
The operation of medical appliances may be affected. Be
aware of the technical conditions within the particular
environment (e.g. doctor's practice).
Dispose of the battery and phone in accordance with
environmental regulations!
Safety precautions

12
• 1 base station
• 1 charger with power supply (only DUO)
• 1 or 2 handsets (depending on the set)
• 2-4 rechargeable batteries (depending on the set)
• 1 power supply
• 1 telephone line-cord/plug depending on your country's version
• 1 user manual
Features
DECT - telephone according with the GAP - standard
Speaker phone, mute, pause, intercom
Up to four handsets can be registered with one base station
Caller ID (CLIP) with a maximum of 20 telephone numbers in the log
Alphanumeric DOT-matrix-display with blue backlight,
3 text lines and one line for the symbols
Block dialing
Re-dialing the last 10 numbers dialed
Phonebook with a maximum of 50 different telephone numbers
(max. 32 digits and 20 letters)
Keypad locking
Tone or pulse dialing
Announcement of calls on the handset, 6 ringer melodies at choice
Volume of the handset ringer selectable in three levels,
or turned OFF
Up to eight hours of autonomy in communication
Up to 130 hours of autonomy in standby
Contents of the package
Important instruction:
This user manual serves as an information. Its contents is no part of the
contract.All technical data refer only to the normal values. Described
execution and options can be different, depending on the local
requirements of your country. We reserve the right to technical
modifications.

13
Indoors range up to 50 m, outdoors up to 300 m.
Handset paging
Volume of the handset adaptable in three levels
Volume for speaker phone calling adaptable in three levels
Transferring external - internal - internal
Conference call external - internal - internal
Baby mode
Display of the call duration
Base Classico
Ringer adaptable in three levels or turned OFF
Ringer melody adaptable, 6 melodies at choice
Statusdisplay
Memory for maximum four emergency numbers
Flash time adaptable 80 / 100 / 300 ms
Maintenance
Clean the base station and the handset with a moist cloth or with an
antistatic cloth. Never use dry cloth! There is a danger of statical
charge!
Recycling
When your telephone is taken out of service, dispose the batteries and
the appliance in an environmentally friendly way!

14
LC - Display (LCD) (symbols line)
1Antenna ON: communication is possible
flashing: out of range, no communication
between handset and base
2 Internal ON: internal communication busy
flashing: internal communication is started
3 Speaker phone ON: handset in mode speaker phone
4 Connection ON: communication busy
flashing: incoming communication
5 Caller log ON: calls in the caller log
flashing: new calls in the caller log
6 Phonebook ON: menu phonebook open
7 Charging status
1 2 3 4 5 6 7
During charging of the handset batteries on the base or on the charger, the
symbols below alternate on the right utmost position of the symbols line.
battery 100% charged
battery 66% charged
battery 33% charged
flashing: battery low
´´ ´´

15
INSTALLING THE TELEPHONE
Connect the base station at a central place in the home.Avoid a position
close to a television set or radio transmitters, monitors or PC's. Please
consider that reception and range are highly dependant from the
architectural data. In a free space, the range is 300 m maximum, inside
buildings this range can be reduced to 50 m.
At the first installation, the batteries should be charged for at least 14 hours,
before using the telephone set.
1. Connect the small plug at the power supply cable in the power jack (19)
on the bottom of the base.
2. Plug in the power supply into the wall outlet (230 V). Plug in the power
supply of the charger (230V, only DUO set) into the wall outlet.
3. Connect the small plug of the telephone cable to the jack (20) on the
bottom of the base.
4. Plug in the telephone cord into the telephone jack.
Setting up the handset
1. The screen is protected with a synthetic film, remove it.
2. Open the battery compartment by turning the lid until the arrows on the
lid and on the handset match.
3. Place the batteries in the battery compartment, check the polarity!
4. Close the battery compartment, place the lid back with the arrows
matching, and turn the lid to the right.
5. Place the handset on the base station to charge the batteries
completely. The charging indication appears.
6. The handset is automatically registered with the base station.
Installing and connecting the base station
When you purchase another cable in a retail store, take care to buy
one with correctly connected wires!

16
Replacement of the batteries
1. Open the lid of the battery compartment (fig.1)
2. Remove the used batteries (fig.2)
3. Place new batteries in the battery compartment. Check the
polarity!
4. Close the battery compartment (fig.1)
fig. 1 fig.2 fig.3
Dispose of the used batteries in respect with the environment.
Do not throw them in the normal wastebasket!
Batteries are dangerous, chemical waste.
opening and closing the batteries placing the
batterycompartment removed batteries
Match the arrows on lid
handset by turning
the lid

17
Out of range
1. When the handset is mover too far away from the base, the symbol
"antenna" starts flashing.
2. Return to a position closer to the base station.
3. As soon as the antenna symbol remains constantly on the screen,
the contact between basis and handset is reestablished.
Registering the handset with the base
It is possible to register up to 4 handsets with one base. The handset can
also be registered with another DECT - base, on condition that it is
compatible with the GAP¨- system.
Registering the handset to the Classico base
1. Press the MENU key.
2. Press the scroll down key (7) three times.
3. On the screen appears "SETTING", press the OK key.
4. On the screen appears "HANDSET SETTING", press the OK key.
5. On the screen appears "ACOUSTIC SETTING", press the scroll down
key four times.
6. On the screen appears "REGISTER", confirm with the OK key.
7. On the screen appears "ENTER BASE PIN _".
8. Input the base's PIN - code (0000 at delivery), press the OK key to
confirm. On the screen flashes "REGISTER IN PROGRESS".
9. Press the key "Paging" (17) and hold it for about 6 seconds, until a
signal tone is heard.
10. On the screen appears "REGISTERED" and the symbol "antenna"
stops flashing. When the error code "NOT REGISTERED" is shown,
the procedure must be repeated, on the screen reappears
"REGISTER", and you can start over again.

18
Registering the handset with another DECT - base
(compatible with GAP)
1. The handset is in mode standby (no dialing tone)
2. Read the instruction manual of your base, to know how to bring it in the
mode "REGISTER".
3. Continue as described on page 17 (registering the handset).
De-registering the handset
A handset can be de-registered from a base, e.g. in case a defective
handset is to be replaced by another one.
1. Press the key "MENU".
2. Press the scroll down key (7) three times. On the screen appears
"SETTING".
3. Press the OK key and then once on scroll down menu (7). On the
screen appears "BASE SETTING", press the OK key again.
4. Press the scroll down key (7) four times. On the screen appears
"DEREGISTER", confirm with the OK key.
5. On the screen appears "HANDSET _". Select the number of the
handset that must be de-registered with the scroll down and up keys.
6. Confirm your choice with the OK key, on the screen appears "DE-
REGISTER DONE".

19
HANDSET SETTING
Turning the handset on and off
Turn on the handset by pressing the key E(12).
The first time the handset is turned ON, the following image comes up on
the display screen.
00 : 00 SUN
HANDSET 1
•1st line for symbols, symbol antenna and battery status
•2nd line for the hour and the day of the week
•3rd line for the telephone number
•4th line for displaying the name and number of the handset
To turn OFF the handset, hold the key Efor approximately 2 sec.
Automatic return to standby
When, during setting or programming, no key is activated for 20 sec, the
handset returns to stand by mode.
It also returns to stand by, as soon as it is put on the base or on the charger.
Keypad locking
There are two ways to activate the keypad lock.
1. Hold the key Eduring approximately 1 sec, on the screen appears
"KEYPAD LOCKED".
2. Press the key "MENU" and then once on the key scroll menu down (7).
On the screen appears "KEYPAD LOCK". Confirm with the OK key, the
keypad is being locked. On the screen remains the text "KEYPAD
LOCKED". When in this status, each activation of a key (except key 12)
results in an error beep.
To cancel the keypad lock, just hold the key Eduring approximately 1 sec.

20
Setting the handset's ringer volume
The ringer volume can be set in three levels (1-3) and it can also be
switched off (level 0).
The default setting is level 3.
1. Press the key MENU, and then three times on the scroll down key. On
the screen appears "SETTING". Confirm with OK, on the screen
appears "HANDSET SETTING". By pressing once more on the OK key,
you arrive in the menu "ACOUSTIC SETTING".
2. Press OK, on the screen appears "RINGER VOLUME". Confirm with
OK, the melody actually set is heard with the set volume.
3. With the scroll down key, the setting can be changed (LEVEL 0-3), at
each change, the ringer is heard with the set volume.
4. To store your choice, press OK.Aconfirmation beep is heard and the
setting is stored.
Choosing the handset's ringer melody
You have the choice from six different melodies for the ringer.
The default setting is melody 3.
1. Press the key MENU, and then three times on the scroll down key. On
the screen appears "SETTING". Confirm with OK, on the screen
appears "HANDSET SETTING". By pressing once more on OK, you
arrive in the menu "ACOUSTIC SETTING".
2. Press OK and then scroll down, on the screen appears "RINGER
MELODY". Confirm with OK, the melody actually set is heard with the
set volume.
3. With the scroll down key, you can change the setting (MELODY 1-6), at
each modification, you hear the melody with the set volume.
4. To store your choice, press OK.Aconfirmation beep is heard and the
setting is stored.
Setting the handset's volume
The volume of the earpiece can be set in three different levels.
The default setting is level 2.
1. Press the key MENU, and then three times on the scroll down key. On
the screen appears "SETTING". Confirm with OK, on the screen
This manual suits for next models
1
Table of contents
Other HAGENUK Cordless Telephone manuals