HAGENUK HomeHandy Pico User manual

HomeHandy Pìco
Operating instructions
GAP

The HomeHandy Pìco at a glance
Ear piece
Display
Keys for
Menu operation
Menu/ON
-OFF/Signal key
Keypad
Speed dialling/Internal/
Number redial key
Microphone
© Hagenuk / HMC - Rd / 16.01.97
The handset
Charging recess
for the handset
Terminal for
telephone Mains
connection
The base station - The enhanced-feature handset for DECT base
stations and systems with GAP
- Digital transmission in accordance with the
DECT standard
- Speed dialling memory for 21 phone numbers
- Adjustable handset volume
- Choice of standard NiCad or NiMH batteries
of various capacities
(size AA / ”Mignon”)
The technology at a glance

1Table of contents
Table of contents
1 Getting acquainted with and connecting
the HomeHandy Pìco...................................................................3
1.1 Introduction…....................................................................................................3
1.2 Getting started....................................................................................................4
1.3 Charging and handling of the batteries.......................................................5
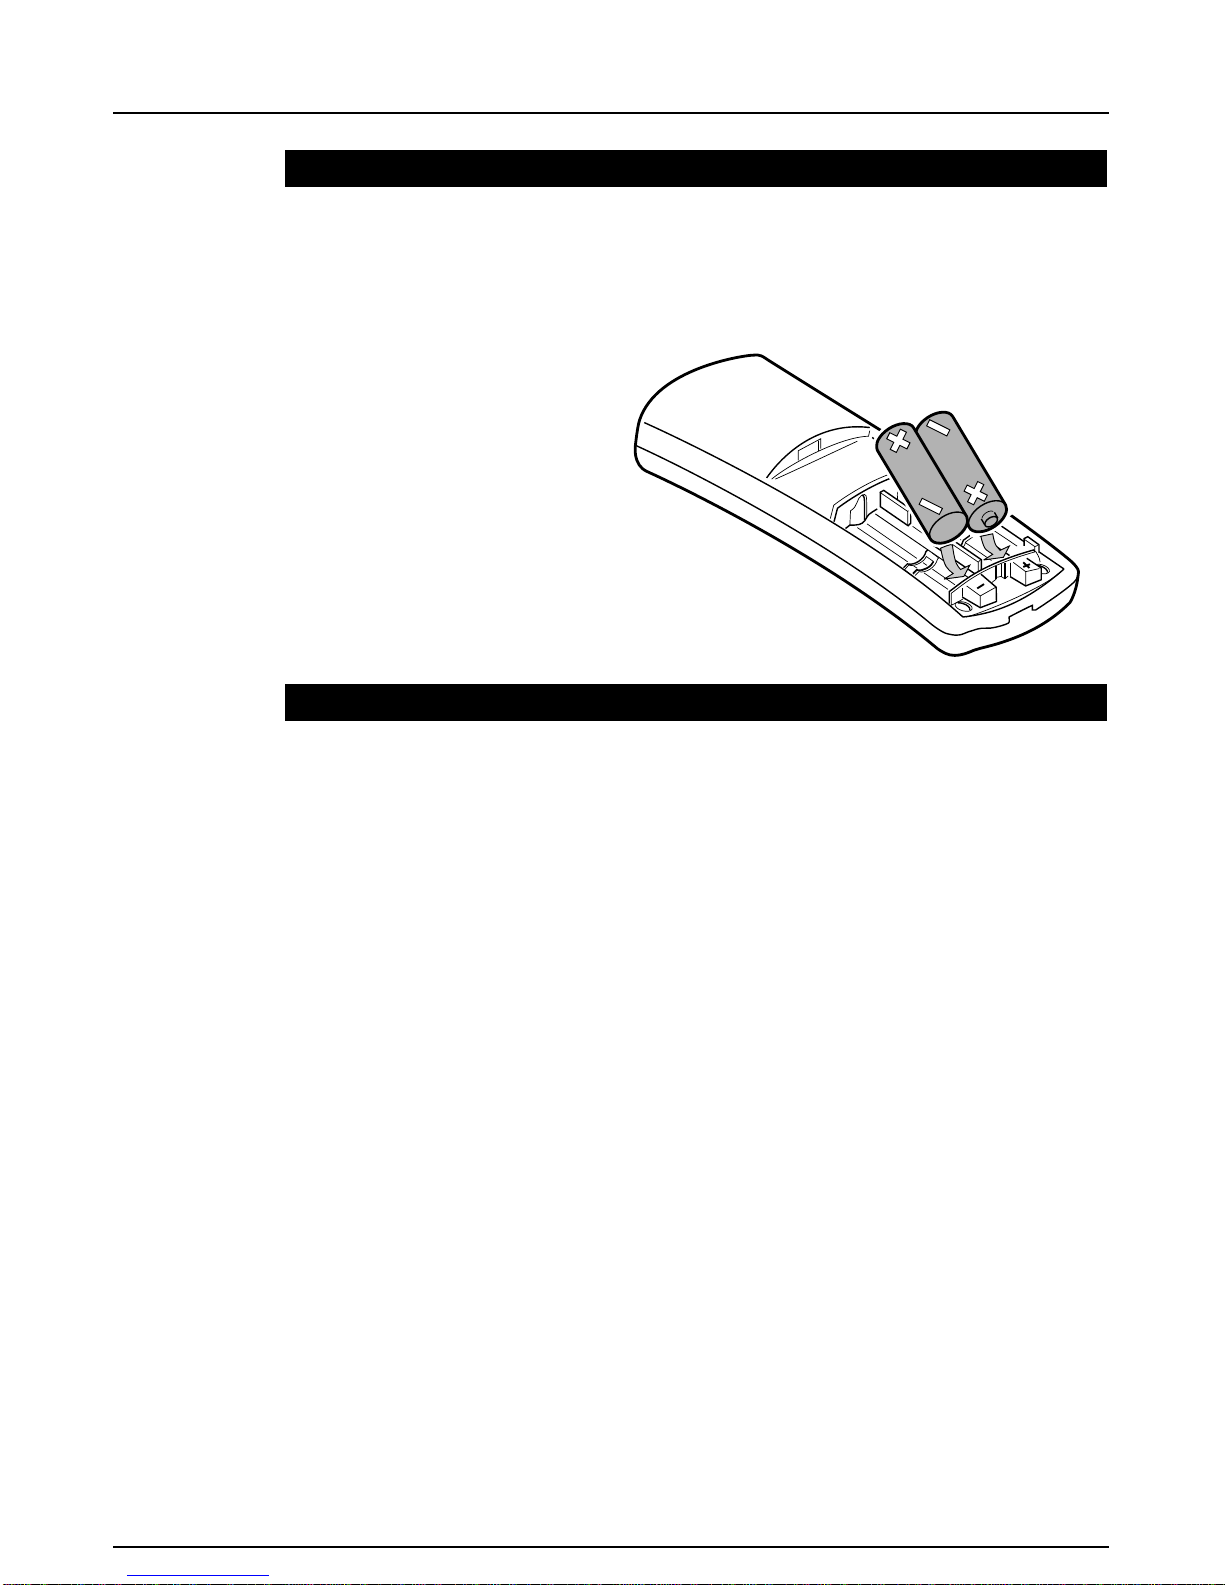
1.4 Inserting/replacing batteries...........................................................................6
1.5 Settings upon delivery......................................................................................6
2 Operating overview......................................................................7
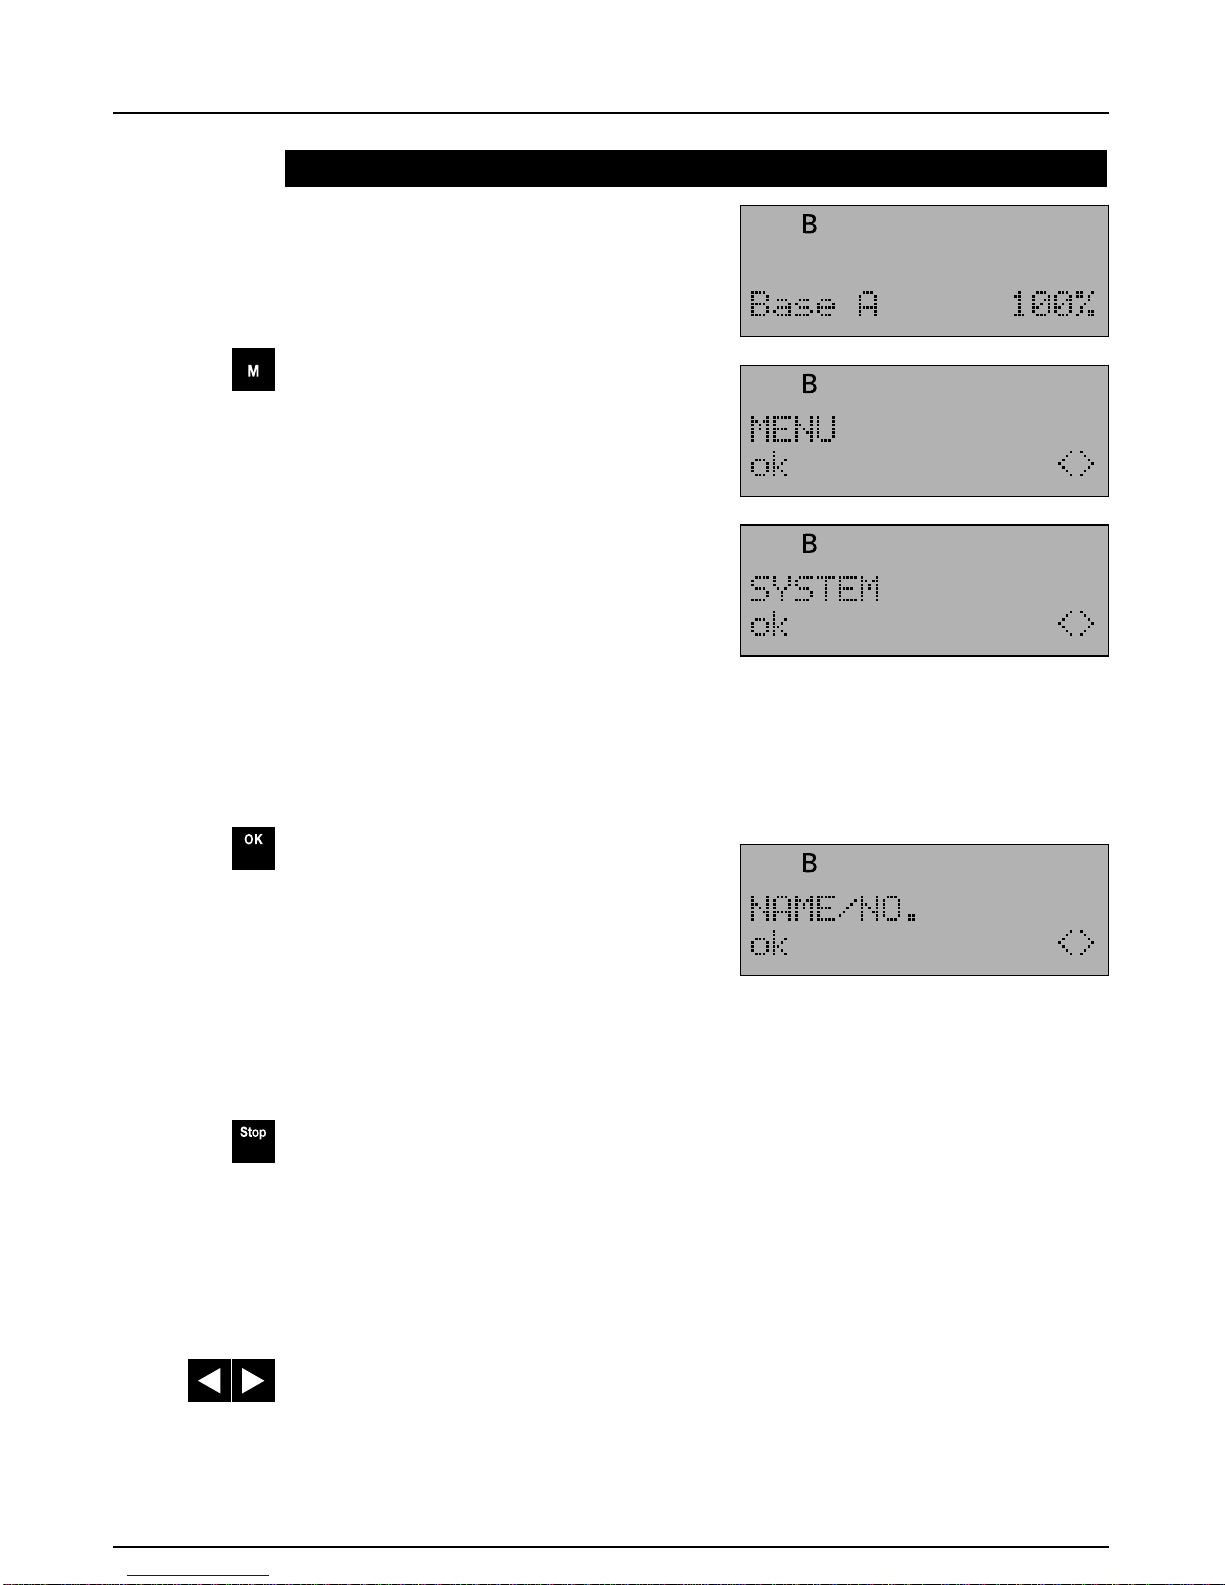
2.1 Operating overview...........................................................................................7
2.2 Operator guidance............................................................................................8
2.3 Entering names and text..................................................................................9
2.4 Displays - standby mode...............................................................................11
2.5 Displays - ready-to-dial mode.....................................................................11
2.6 Displays - standby mode: dial preparation...............................................12
3 Basic functions: phoning..........................................................13
3.1 Switching on and dialling (external call)...................................................13
3.2 En-bloc dialling (external call).....................................................................13
3.3 Switching on and dialling (internal call)....................................................14
3.4 Terminating the call (internal and external calls)....................................14
3.5 Taking a call (incoming calls).......................................................................14
4 Further functions ........................................................................15
4.1 Number redial - history function.................................................................15
4.2 Speed dialling - general.................................................................................16
4.3 Storing names and phone numbers...........................................................16
4.4 SOS number......................................................................................................17
4.5 Deleting the speed dialling memory...........................................................18
4.6 Speed dialling ..................................................................................................19
4.7 SOS number (emergency phone number) - making an
emergency call.................................................................................................20
4.8 Muting................................................................................................................20
4.9 Switching on/off of the handset..................................................................21
4.10 Temporary switching off of the handset....................................................21
4.11 Activating the keyboard lock........................................................................21
4.12 Deactivating the keyboard lock...................................................................21
4.13 Activating the handset lock/changing the PIN.......................................22
4.14 Phoning with active handset lock...............................................................22
4.15 Deactivating the handset lock.....................................................................23
4.16 Call duration display.......................................................................................23
4.17 Temporary (intermittent) changeover of the signalling method.........23
4.18 Changing the PIN(personal identification number) of the base........24

2Table of contents
Table of contents (cont.)
5 Settings/programming..............................................................25
5.1 Activating/deactivating the key click.........................................................25
5.2 Setting the ringer............................................................................................25
5.3 Increasing the handset volume...................................................................26
5.4 Resetting the handset volume to the standard volume........................26
6 Operating several handsets /
several base stations ...............................................................27
6.1 Measuring the field strength........................................................................27
6.2 Selecting a base station ...............................................................................27
6.3 Logging a handset into a base station......................................................28
6.4 Logging in an additional handset (Multilink)..........................................29
6.5 Logging off a handset (Multilink)...............................................................29
6.6 Consultation hold / extending calls to another handset
(Multilink)..........................................................................................................30
7 Operation on a telephone system ..........................................31
7.1 Setting the signalling method and the dial pauses................................31
7.2 Extending a call/consultation hold within a telephone system...........31
8 Using other makes of handset................................................32
8.1 General information........................................................................................32
Pictograms on the display...............................................................33
Cleaning and care / Technical data...............................................34
Faults and remedies..........................................................................35
Index .....................................................................................................36
Approval and CE label.......................................................................37
Overview of menu items...................................................................40

31 Getting acquainted with and connecting the HomeHandy Pìco
1.1 Introduction
The HomeHandy Pìco is a cordless telephone in line with the DECT-GAP
standard.
It consists of a handset and a base station in which a charging facility for
the batteries is integrated. Additional charging facilities (chargers) are
available as an accessory.
The speech in the handset and the base station is encrypted by the requi-
rements stipulated in the DECT standard; this provides you with an effec-
tive protection against the tapping of radiophony traffic by third parties
using wide-band receivers (scanners). It does not impair the speech qua-
lity.
Unpleasant secondary noise can be caused in conjunction with hearing
aids.
A call cannot be made with the HomeHandy Pico during a power
failure as the power supply to the base station is then interrupted.
The HomeHandy Pìco operates according to the GAP standard, i.e.
other handsets which also comply with the GAP standard can be logged
into the Hagenuk base. Likewise, this handset can be logged into other
”GAP” bases.
For information on the log-in procedure, please refer to the instructions of
the respective manufacturer.
Your HomeHandy Pìco has a personal identification number (PIN). On
delivery, it is set to ”0 0 0 0”. If you wish to prevent certain settings
(number of logged-in handsets etc.) from being altered by unauthorised
persons, then this PIN must be changed. However, please do not forget
to make a note of this PIN as the unit can only be reset by a service tech-
nician should you forget the PIN.
Notes
Attention

41 Getting acquainted with and connecting the HomeHandy Pìco
1.2 Getting started
The following points should be observed when selecting the location for
the HomeHandy Pìco base station:
• Do not set it up in close proximity to CD players, video recorders,
television sets, computers and microwave ovens. Furthermore, the base
station has to be located clear off satellite receivers and answering
machines unless these are specifically designed to be DECT-resistant.
•Avoid setting it up in very smoky or dusty conditions. Direct sunlight, damp
or locations subject to high humidity are also best avoided, as are locations
close to sources of heat.
• Try to locate the base station in the centre of the area from which calls are
to be made; in a multi-storey building, the optimal position is to be found
near to the staircase.
Use a non-slip mat for the base station and charger (accessory) so that
the plastic feet are not attacked by the varnish coat of the furniture leaving
unpleasant marks on the surface.
The base station has to be connected to the telephone network and
mains supply before the HomeHandy Pico can be used. Establish the
connections as illustrated in the sketch.
The connection sockets (2 x western) are located on the underside of the
base station; they are marked with the corresponding symbols.
Selecting the
location
Connecting
the base
station
Terminal for telephone
Socket
Base station
Terminal for
telephone
Terminal for
power pack

51 Getting acquainted with and connecting the HomeHandy Pìco
1.3 Charging and handling of the batteries
Charging the batteries
In the case of brand new units or when putting a unit into operation after
a longer storage period, the batteries have to be charged first. This is
done by placing the handset in the charge unit.
Different types of batteries can be used to operate the handset (e.g. 650
mAh NiCad, 700 mAh NiCad, 1200 mAh NiMH etc.); however, it is
essential that two identical batteries are used!
The batteries are charged for up to 14 hours during initial charging; this
is not done constantly, but by means of pulse charges.
The batteries are charged quicker during normal operation (i.e. when
the handset is placed in the base station after the ”Batt. Empty” signal.
The batteries’ charge level decreases during operation; the display indi-
cates these changes in different steps (100, 80, 70, 60 etc.).
When the batteries are replaced, the capacity is not displayed
instantaneously. Even if the batteries are charged , theirs is an unknown
charge state.
The display shows the following:
The ”normal” display showing the percentage only appears after a few
hours.
If you cut off the electricity in the house for several hours (e.g. during a
holiday or longer installation work), then you should remove the batteries
to avoid excessive discharging.
Battery handling
Thanks to optimised charging based on the calculated consumption, no
particular procedure is necessary to ensure long battery life.
Nevertheless, batteries are subject to deterioration over time, their capaci-
ty and the respective operating times diminish.
Defective batteries should be taken to a collecting point for batteries;
they should never be thrown away together with domestic
rubbish!

61 Getting acquainted with and connecting the HomeHandy Pìco
1.4 Inserting/replacing batteries
Remove the cover on the battery compartment by applying moderate
pressure to the upper edge where the catch is located. Remove the old
batteries if necessary. Insert new batteries as illustrated.
Push the cover back on; make sure the catch engages.
The batteries to be
inserted must be of
the same type and
capacity!
1.5 Settings upon delivery
The HomeHandy Pìco is delivered with the following settings:
Handset
• No phone numbers stored
• Ringer melody level 2
• Ringer volume level 5
• Normal handset volume
• Keypad lock inactive
• Key click switched on
• PIN 0 0 0 0 / lock inactive
• Logged in
Base station
• DTMF dialling
• Short Flash / 90 ms (AUS version only)
• PIN 0 0 0 0
• No dialling pause

Incomplete programming procedures or check displays are aborted 30
seconds after the last key depression (without a change having
been stored); this is signalled by the negative confirmation tone.
Positive confirmation tone - completion of successful program-
ming procedures
- when logging in additional handsets
(refer to 6.2 and 6.3)
Negative confirmation tone - maloperation
- Battery almost empty (remaining
talk time approx. 3 min.)
- all radio channels busy
Trunk call sequence
- An external call comes in
Internal call
Internal busy tone
Internal dialling tone
When there is an incoming
external call during an
internal connection
72 Operating overview
2.1 Operating overview
The keypad consists of 22 keys:
• numerical keys to and the special keys and
• the ”special” keys for:
Number redial Menu key
Internal (int. connection) Selection key
Signal key (consultation hold) STOP key
Switch on/off (hook) Cursor control
Speed dialling memory
The keypad
Time-Out
Confirmation
tones
0,6 s
Ringer tones
Camp-on
tone (in the
handset)2.1
1,0 1,0
4 s
0,5
0,5
0,5
0,5
0,5
0,5
0,5
0,3 0,3 0,3 0,3 0,3 3,5 s
0,1 0,1
5 s 5 s
0,1 s 0,1 s 0,1 s 0,1 s 0,1 s 0,1 s 0,1 s
0,5
0,5
0,5 3,5 s 0,5
0,5
0,5

82 Operating overview
Your new telephone eases operation
by means of helpful display prompts.
Menu key
The menu is activated/quit via the
menu key.
Which menu items are offered is
status-dependent (refer to ”Over-
view of menu items”).
The current state of the handset is
indicated on the first line of the dis-
play by means of pictograms (see
pictograms on display). The func-
tions that are currently available are
offered in plain text on the first text
line. The second text line indicates
the corresponding options for these
functions by means of texts and
abbreviations. You have the follo-
wing options:
First option: OK key
Confirm selection by pressing the
OK key. You can now, for example,
program a speed dialling memory or
change one which has already been
programmed.
The OK key is generally used to
confirm a selection or store an
input.
Second option: Stop key
Terminate menu operation by
pressing the stop key. Operations
can be terminated or inputs aborted
at any time by pressing the stop
key. You then go back to the res-
pective previous menu level or to the
standby mode.
Third option: Arrow keys
The arrow keys can be used to
”browse” forward (right) or back-
ward (left) in the menu to select a
menu item or, for example, an entry.
2.2 Operator guidance

92 Operating overview
The input of characters is possible,
when ”A-Z” appears on the second
line.
An input is made via the numerical keys. Several characters are alloca-
ted to each number and can be found above the keys.
Select character:
• One key depression = first character
• Two key depressions = second character etc.
• The last character is followed by the number of the key, then again by
the first character etc.
Character has been selected:
• Press the key for the next character.
If a character on the same key is to be selected again:
• Press the right arrow key and select the character again.
One depression of key ”2”
Two depressions of key ”2”
Three depressions of key ”2”
Four depressions of key ”2”
Five depressions of key ”2”
Representation of character ”A”
Representation of character ”B”
Representation of character ”C”
Representation of character ”2”
Representation of character ”A”
2.3 Entering names and text
Example: Select characters (characters ABC – number 2)
Names can comprise up to 13 characters.
Letters, numbers and various
punctuation marks (
key ”1”; key ”0” )
are available as characters.

10 2 Operating overview
Numerical key 2 once for ”A”
Numerical key 6 twice for ”N”
When a character assigned to the
same key is to be selected again,
press right arrow key to move the
cursor one space forward and pro-
ceed as usual.
Numerical key 6 twice for ”N”
Numerical key 3 twice for ”E”
Deleting characters: press left
arrow key.
Press right arrow key. Cursor
moves one position to the right:
Select next character. A blank
is generated by pressing the
arrow key again.
Example: Enter name (”ANNE“)

112 Operating overview
2.4 Displays: standby mode
The ”standby mode” is defined as
follows:
The handset is ready for use.
There is no radio link to the base
station. No call is signalled.
The selected base (A, B ...) and the
current battery capacity are displayed on the second line. Battery capacity
is stated in increments of 20% or 10%.
If the handset detects a battery
charge of 0%, the display reads
”NO POWER” accompanied by an
alert tone; it is no longer possible
to set up a connection.
However, if a radio link exists at this
moment, there is a residual operating time of approx. 3 minutes.
A short alert tone is given when
the handset is placed in the base
station. Charging is commenced and
”POWER” appears on the display as
the batteries did not have the full
capacity.
A message is shown on the display
if the field strength is insuffi-
cient, i.e. the handset is outside
the range of the base or it is not
logged into any base.
2.5 Displays: ready-to-dial mode
The ”ready-to-dial” mode is defined as follows:
The handset has been switched on via the ON/OFF key; a radio link
exists to the base station.
The telephone is ready to dial a phone number. Various options are shown
on the second line of the display. You can then, for example, dial a phone
number from the number redial memory () or from a speed dial-
ling memory ().

12 2 Operating overview
2.6 Displays - standby mode: dial preparation
The ”dial preparation” state is defined as follows: the handset is in
standby mode; there is no radio link to the base.
A phone number can now be entered
via the keypad (up to 24 digits); a
phone number which has been stored
in the number redial memory
(refer to chapter 4.1 „Number redial -
history function“) or in a speed dial-
ling memory (refer to chapter 4.6
„Speed dialling“)can be retrieved by
pressing the respective key and is
then indicated on the display.
Corrections can also be made sub-
sequently by supplementing digits or
deleting the number from the end by
means of the left arrow key and
replacing it with the correct digits.
A radio link is automatically establis-
hed by pressing the ON/OFF key
and the number is dialled.

13
3.2 En-bloc dialling (external call)
Enter the phone number.
Press the ON/OFF key.
Make the call.
A phone number that has been
dialled is stored in the number redial
memory after switching off the hand-
set.
3 Basic functions: phoning
The handset is in standby
mode:
Press the ”ON/OFF” key.
Enter the phone number, every
digit entered is dialled immediately.
Make the call.
The call duration is displayed after
the first minute has elapsed (exter-
nal calls only).
Metering of the call duration
begins 10 seconds after the last
key depression.
3.1 Switching on and dialling (external call)
The phone number can be entered when the handset is in standby
mode; the radio link is established by then pressing the ”ON/OFF” key
and the number is dialled ”en-bloc”.
Display of the call duration in
minutes/seconds after the first
minute has elapsed.

14 3 Basic functions: phoning
Press the ON/OFF key
or
Place the handset in the base sta-
tion.
3.4 Terminating a call (internal and external calls)
3.5 Taking a call (incoming calls)
When you receive a call:
You hear the ringer; the following messages appear on the display:
Examples:
• External call
• Call from another handset (No.3)
from the same base.
Taking the call
• by lifting the handset from the base
station (automatic connection)
or
• by pressing the ON/OFF key.
3.3 Switching on and dialling (internal call)
If several handsets (up to 8) are operated on one base station, free inter-
nal calls can be made between two handsets. The call duration is not dis-
played.
The handset is in a charge unit
The handset is in a charge unit when there is an incoming call. It only has to
removed from there, the connection is automatically made and the call can
proceed.
The
ON-OFF key does not function for three seconds to prevent inadvertent
termination of the call.
Alternative
The handset is in standby
mode:
Press the ”INT” key.
Internal number of handset is
shown in display.
Enter the number of the handset to
be called. Make the call.

154 Further functions
4.1 Number redial - history function
Phone numbers which are to be dialled again do not have to be repeated-
ly entered manually. The number can be dialled automatically at the press
of a button using the number redial function.
The number redial function automatically recovers the last 5 phone
numbers dialled = history function.
These phone numbers can be viewed on the display and one of them can
be activated to be dialled again.
The last phone number dialled deletes the oldest entry in the number
redial memory.
The handset is in standby or
ready-to-dial mode:
One depression of the number
redial key:
The last phone number dialled is
displayed.
Corrections or suffixes are possible
(also refer to ”General information
concerning operation: displays
when phoning”).
Two depressions of the number
redial key:
The penultimate phone number
dialled is displayed etc.
Standby mode:
The number is dialled after pres-
sing the ON/OFF key
or
Ready-to-dial mode:
The number is dialled by pressing
the OK key.
In the case of phone numbers with more than 15 digits, only the last 15
digits are displayed. It is possible to correct or supplement the number as
if dialling manually (as described in chapter 2.6).
The phone numbers in the number redial memory are retained even
when replacing the batteries.

16 4 Further functions
4.2 Speed dialling - general
The handset has 21 memories for entering phone numbers and names.
Entries are chosen by ”browsing” with the arrow keys or by entering the
respective memory location number (01…21).
As a special feature, you have the option of giving your handset its own
name (up to 13 characters) which is shown on the top line of the display
when it is in standby mode. This name
must be stored in speed dialling location
”21”.
4.3 Storing names and phone numbers
Press menu key.
Press OK key.
Select ”NAME/NO”.
Press OK key.
Press OK key.
Select memory location:
The first memory location is dis-
played. An empty memory location
or one which is to be overwritten
can now be chosen by entering a
two digit memory location
number or with the aid of the
arrow keys. If the memory locati-
on is not occupied, then ”
------”
appears on the top text line of the
display.
Press OK key.
or

174 Further functions
Enter name; for further details, refer to
chapter 2.3 ”Entering names and
text.“
Terminate input of the name by pres-
sing the OK key.
or
( )
Note:
Enter phone number.
Press the number redial key.
The left arrow key can be
used to make corrections.
Press OK key.
Choose the next memory locati-
on or exit this mode by pressing
the menu key.
If a dial pause is to be programmed, this is done by pressing the speed
dialling key at the appropriate point.
Press the number redial key
to store the phone number last
dialled.
4.4 SOS - emergency phone number
Your new telephone has three special speed dialling memories for emer-
gency phone numbers, two of which are called ”Police” and ”Fire Dept”
respectively. The emergency phone numbers applicable in your area
should be stored here (e.g. 999). The third emergency phone number can
be set individually by you, for example, the name and number of your GP.
The emergency phone numbers can be called at any time and in any state
of the handset via simple key combinations (refer to chapter 4.8 ”Making
an emergency call”).
Emergency phone numbers are stored as follows:
Press menu key.
Select ”NAME/NO.”.
Press OK key.

18 4 Further functions
4.5 Deleting the speed dialling memory
or
Press menu key.
Press OK key.
Select ”NAME/NO.”.
Press OK key.
Select ”DEL. NAME/NO.”.
Press OK key.
Selection of memory location:
The memory location can be sel-
ected with the aid of the arrow
keys or by entering the two digit
number.
Press OK key.
Memory location is deleted.
Select ”PROG. SOS-NO.”
Press OK key.
Now select either one of the fixed
numbers (Fire Dept., Police) or the
number (Name) to be designated
individually.
Confirm by pressing OK key.
Now enter the name for the indivi-
dual number.
Confirm by pressing OK key.
Enter the phone number.
Corrections can be made at any
time by using the left arrow key.
Press OK key.
()
Other manuals for HomeHandy Pico
1
Table of contents
Other HAGENUK Cordless Telephone manuals