manuals.online logo
Brands
  1. Home
  2. •
  3. Brands
  4. •
  5. hager
  6. •
  7. Radio
  8. •
  9. hager kallysta WK350 User manual

hager kallysta WK350 User manual

1
6W 5121-01.a
WK350, WK352, WK353
kallysta
6W 5121-01.a
§Radio touch
Op ration
Operation is exclusively does by touch control
surfaces.
Op rator control conc pt
The 6 symbolic operating elements arranged in
the upper and lower display represent fixed push-
buttons for frequent operating procedures.
6Switch-on/switch-off
7Return to the superordinate operating level
8Scroll down/decrease value
9Decrease volume
:Increase volume
;Scroll up/increase value
<Touch Display with variable display/control
panels
On the display, either a 3 to 5 lines menu is
displayed.
OLonger lines of text are displayed
continuously with a one-second delay.
Structur of th d vic
1Frame kallysta
2Radio touch cover WK663x
3Speakers cover WK664x
4Speakers insert
5Radio touch insert.
Function
The radio receives F stations and plays them
back by attached speakers.
Additional functions :
- Capacitive touch display.
- anual and automatic station search.
- 8 storage places.
- Display of receiving frequency and RDS
information.
- Display of time and date in standby mode.
- Automatic setting of time and date with RDS
reception.
- Awake with radio station or acoustic signal.
- Timer with acoustic signal after defined time
(also during radio reception).
- Sleep- ode with automatic switch off.
- Display brightness adjustable in 8 steps and
10 times.
- AUX-IN for external audio sources e.g.
docking station or P3-Player on multimedia
socket outlet.
Prop r us :
- Only suitable for use in indoors.
- Flush-mounting in conform wall
box.
24hrs
Min
00
Hrs
[07]
FM radio
Timer
AUX IN
Setup
WK352 t WK353
Scope of delivery : Radio and speakers with
design parts and fixing screws.
2 6W 5121-01.a
Switching on th radio
The radio is in standby mode, the time and
date are displayed.
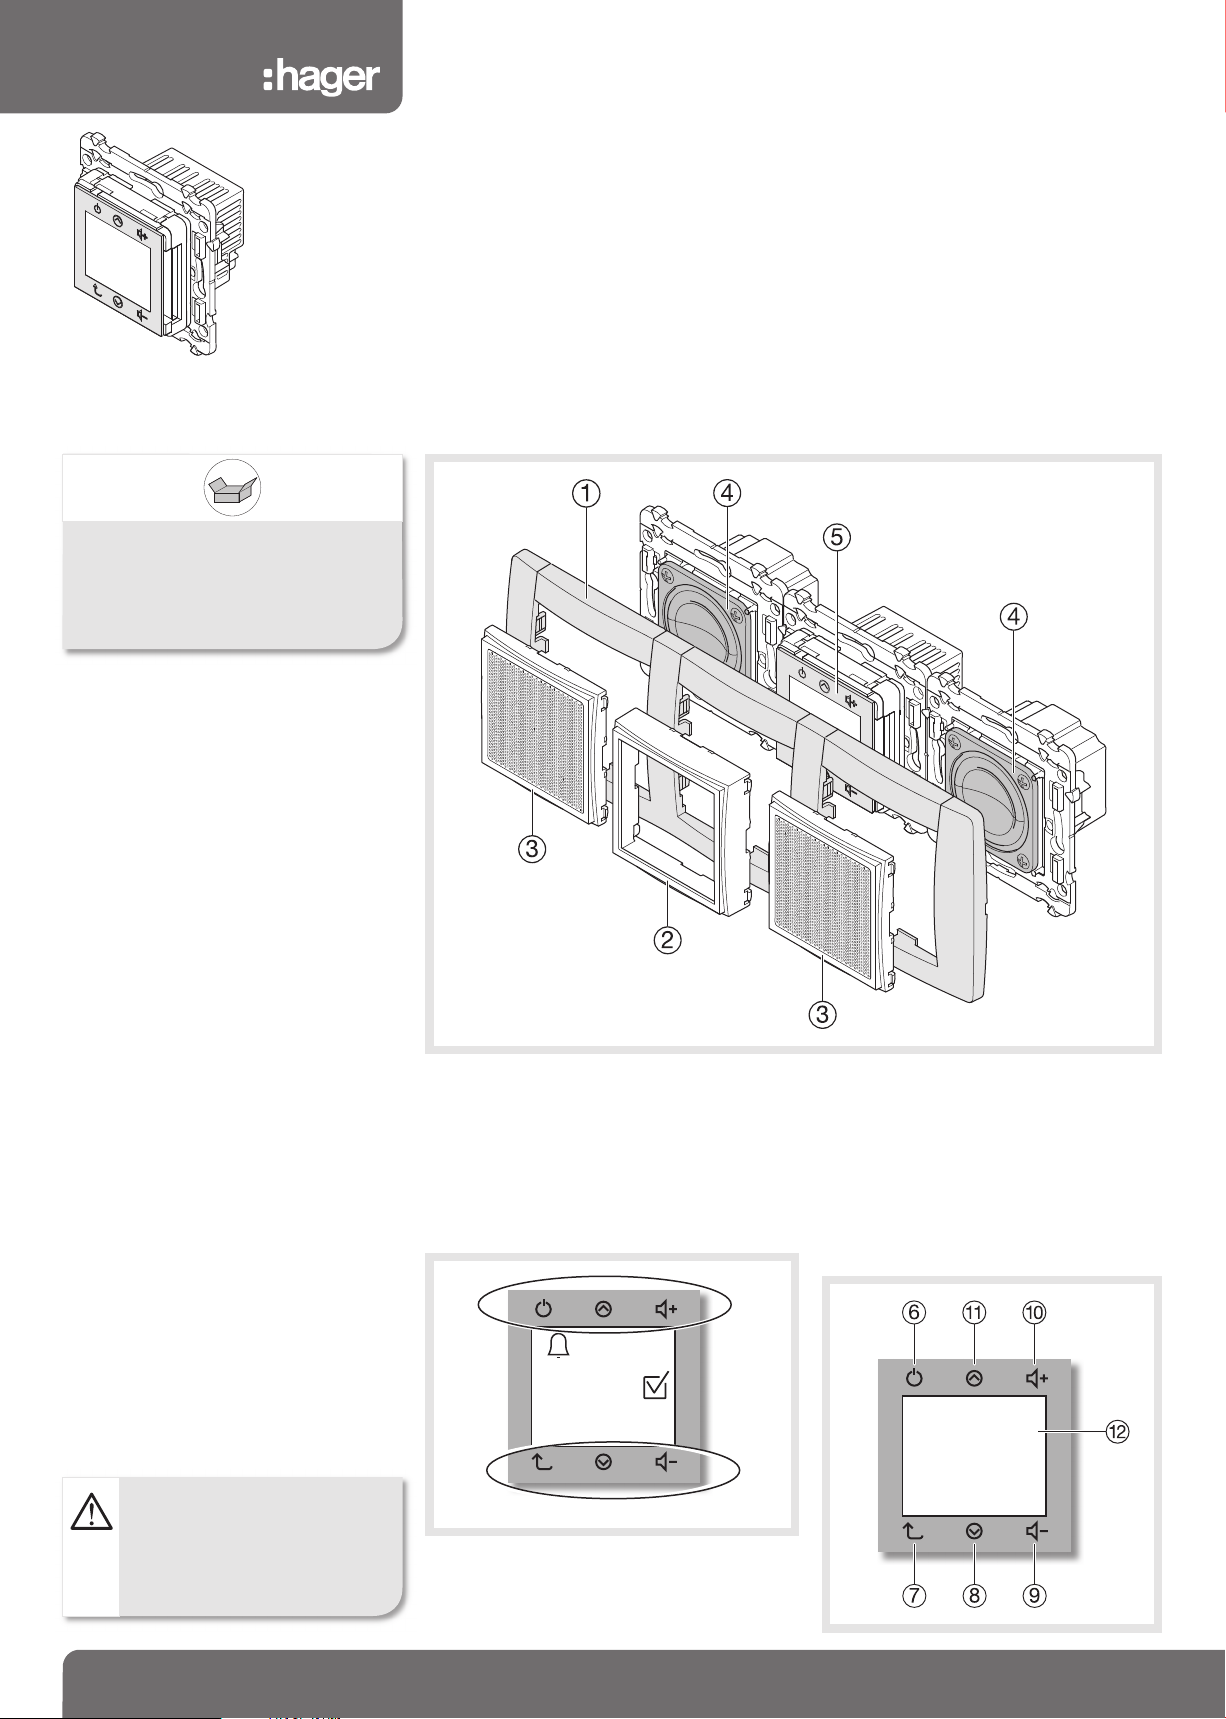
• Touch display or push-button .
The radio plays back the station that was
last set.
ODetails such as station type, station name,
transmitter frequency, song name, storage
place and reproduction mode are displayed
with RDS reception.
S l cting a m nu
The radio is switched on.
• Press button until main menu.
• Press button / of the display.
The active display in the middle control panel
- displayed in bold - changes.
• Touch the active display with the desired
menu.
A new menu will open.
OIt might be necessary to make a further
selection in the menu before the settings
are possible.
Adjusting volum
The radio is switched on.
• Press the button / .
The sound will be played back louder/quieter.
ODuring setting of volume pressing on
mute sound.
• Reactivate sound by double pressing on
or .
OPressing the volume bar at the bottom in
the middle or at the top - when adjusting
the volume - adjusts the volume to 30, 60
or 100%.
S tting th tim and dat manually
The radio is switched on.
• Press button until main menu.
• Select control panel Tim r with the buttons
/ and press.
• Select Tim /Dat with / and press.
• Select Manual with / and press.
• With / select the date format EU /US
and apply with another control panel e.g.
y ar.
• With / select the year and accept
with month.
• With / select the month and apply
with day.
• With / select the day and apply
with hours.
• With / select the hours and apply
with min.
• With / select the minutes and with
save all settings.
S tting FM stations with automatic s arch
The radio is switched on.
• Press button until main menu.
• Select control panel FM radio with / and
press.
• Select control panel Automatic Scan with /
and press.
The first station found will be played back and
displayed.
• With continue the automatic search without
saving
or
• Save the station (see Saving station).
S tting FM stations with manual s arch
The radio is switched on.
• Press button until main menu.
• Select control panel FM Radio with /
and press.
• Select control panel Manual S k with /
and press.
• Set the reception frequency with /
increase/decrease in 0.1 Hz increments until a
station is received noise-free.
• With continue the manual search without
saving
or
• Save the station (see Saving station).
Saving a station
The station searched for is played back.
• Press the tuning indicator in the control panel.
• Press Sav .
• Select N w Station with /
and press to save
or
• Select saved radio station with / and
press.
Calling up a sav d station
The radio is switched on.
• Press button until main menu.
• Select control panel FM Radio with /
and press.
• With / select the saved station and press.
OIf a storage place is called up, it is possible
with / to skip to the next or previous
storage place.
D l ting a station
• Press button until main menu.
• Select station to delete with / and press.
• Press again the station.
• Select D l t with / and press.
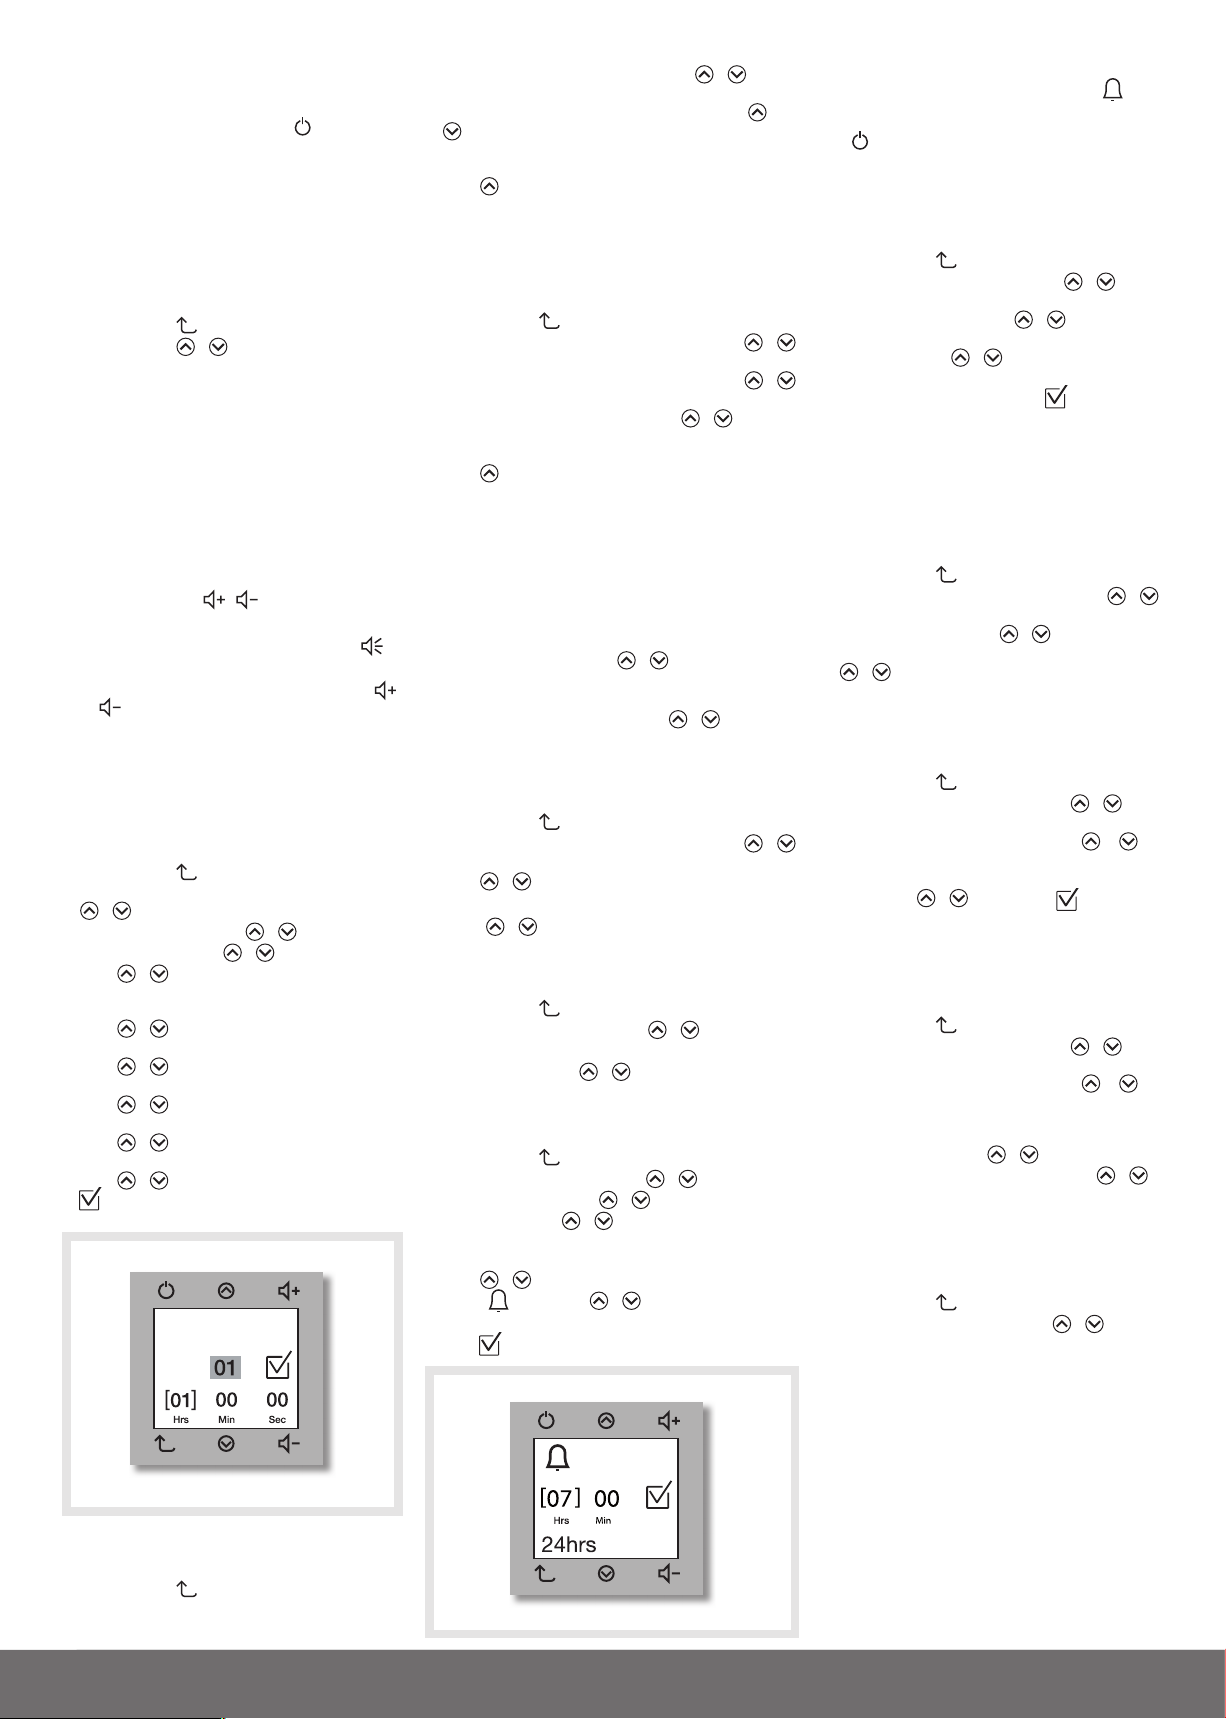
S tting th wak up
The radio is switched on.
• Press button until main menu.
• Select menu Tim r with the / and press.
• Select Wak Up with / and press.
• Select On withc / and press.
• Switch over the display 24/AM/PM if necessary.
• Press the time to be set (hours or minutes).
With / , set the tim .
• Press and with / , select a radio
station or electronic wake up signal and press.
• With apply the settings.
OIf the Wake Up is activated and the radio is
switched off, the Wake Up symbol will
be displayed.
OWake Up procedures can be ended with
or delayed by 5 minutes respectively
(Snooz ) by pressing another control
panel.
S tting up countdown
The radio is switched on.
• Press button until main menu.
• Select control panel Tim r with / and
press.
• Select Countdown with / and press.
• Press the time to be set (hours, minutes or
seconds). With / , set the time
displayed in brackets.
• Accept the time setting with and activate
the countdown.
OOnce the time has elapsed - also during
radio reception - an acoustic signal will
sound.
OThe Sl p Mod function can be set
accordingly.
S tting th languag
• Press button until main menu.
• Select control panel S tup with /
and press.
• Select Languag with / and press.
• Select the corresponding language with
/ and press.
OR s t to D faults and Sound functions
can be set accordingly.
S tting background display color
• Press button until main menu.
• Select control panel S tup with / and
press.
• Select control panel Display with /
and press.
• Define background display color (white or
black) with / and press .
OThe change of background display color is
taken into account and the menu of setting
backlight displays.
S tting backlight
• Press button until main menu.
• Select control panel S tup with / and
press.
• Select control panel Display with /
and press.
• Define operation and time of backlight :
On - 60 mn - 45 mn - 20 mn - 10 mn - 5 mn -
60 sec - 30 sec with / and press.
• Define luminosity : 0 to 100 % with /
and press.
OThe R s t to D faults and Sound
functions can be set accordingly.
S tting to xt rnal audio d vic
• Press button until main menu.
• Set control panel AUX In with / and
press.
3 6W 5121-01.a
Information for l ctricians
Installation and l ctrical conn ctions
Conn ctions on th radio ins rt
=Speakers (L, R))
>External audio devices AUX IN
?Antenna
@Lead 230 V쓒
Conn cting radio to l ad
The lead is protected by means of a circuit
breaker (max 16 A).
• Connect lead 230 V쓒to the terminals
L and N.
Conn cting sp ak rs and auxiliary quipm nt
OConnect at least one speaker for using
the radio.
• Attach the speaker to the terminals
(brown), (blue).
• Connect additional extension units if necessary.
OIn stereo mode with 2 speakers, it is possible to
change to mono mode manually via the control
panel with the tuning indicator.
OUse shielded cables for interference-free signal
transmission. Attach the shield to the
terminal according to the terminal labelling.
OIn combinations or in the immediate vicinity of
electronic devices (e.g. ballasts) the radio
reception can be disturbed. Before installation
at the assembly location, put the radio into
operation and test it for interferences. In case of
interferences, increase the distance to the
source of interference.
OWhen using a wire as an external aerial, make
sure that the aerial does not come into contact
with 230 V or is insulated.
Ass mbling th d vic s
The inserts are connected.
• Place the inserts 45into the wall box in the
correct position and fasten with the screws
provided.
• Position the frame kallysta 1over the inserts
and attach radio touch 2and speakers covers
3.
• Guide the contact pins on the radio cover
carefully.
ORadio Touch and speakers must also be
assembled separately from one another
with 3 frame 1gang or in combinations.
Commissioning th radio
The radio is assembled.
• Switch on operating voltage.
The display shows Ent r Tim /Dat .
• Press control panel Ent r Tim /Dat .
The control panels Tim S tup Manual S k and
Automatic appear.
• Press Automatic.
• The time and date are set automatically as soon
as a station with RDS reception is saved (see
S tting FM station with automatic search).
OIf no RDS signal is received Manual must be
selected (see S tting tim and dat manually).
OWhen using 2 speakers, it is necessary to
activate both speakers under S tup,Sound.
OWhen using an antenna, it is necessary to
activate the antenna under S tup,FM Ant nna.
Sp cification
Radio touch
Operating voltage : 230 V~, 50/60 Hz
Rated current : 0,2 A
Power consumption at rated output power :
7 W
Stand-by : 1,3 W
usic rated output power
(Sinus) per channel: 1,5 W
Speaker impedance : 4 … 8 Ω / channel
Input impedance AUX IN: 10 kΩ
Frequency range : 87,5 … 108 Hz
Operating temperature : 5 … 40 °C
Isolation class : II
Protection class : IP21
Schock resistance : IK03
Connection terminals : screw terminals
Lead connection : 1 to 2,5 mm²
Speaker/AUX connection : 0,5 to 1 mm²
Cable length :
- Speakers : max. 20 m
- AUX-IN : max. 3 m
- Extension units : max. 50 m
Installation depth : 33 mm
Sp ak r
Speaker impedance : 8 Ω
Sinus output/music output : 4/8 W
Frequency range : 170 Hz … 20 kHz
Prefabricated cable length approx. :
env. 30 cm
Acc ssori s
Loudspeaker WK351
Ceiling speaker WUZ671
Ceiling speaker 2" WUZ672
Troubl shooting
Poor FM radio r c ption
Caus : Internal F antenna is not sufficient
for reception.
• Attach an additional antenna.
Caus : Stereo playback is selected.
• Switch to ono.
Poor audio signal wh n using with xt rnal
audio d vic
Caus : An insufficiently shielded cable was
used for the connection.
• Replace the connecting cable for the
external audio device.
Caus : Shield of the cable is not connected
correctly to the terminal of the AUX IN
connection.
• Check the connection of the shield and
rectify if necessary.
LN
N
L
L
NL
R
Analog audio source
N
L
N
L
LR
If the speakers are connected to the
operating voltage in a shared cable,
this can reach the speaker cables.
Electric shock is possible if the
speaker cables are touched.
An l ctric shock can l ad to
d ath.
Hager 08.2012
6W 5121-01.a
www.hager.com
4
OCOM 114159
.
Th d vic is at th nd of its
s rvic abl lif n v r throw it
away in th hous hold wast
und r any circumstanc s.
When used as intended, this device
complies with the requirements of the RTTE
Directive (1999/5/EC).
A complete declaration of conformity can be
found on the Internet at www.hager.com

This manual suits for next models

2

Other hager Radio manuals

hager OnAir User manual

hager

hager OnAir User manual

hager TRC270 User manual

hager

hager TRC270 User manual

hager TR351 User manual

hager

hager TR351 User manual

Popular Radio manuals by other brands

RELM RP3600 Series Field Programming Manual

RELM

RELM RP3600 Series Field Programming Manual

Perstel DR601 user manual

Perstel

Perstel DR601 user manual

Motorola APX8500 installation manual

Motorola

Motorola APX8500 installation manual

Roberts R9905 user guide

Roberts

Roberts R9905 user guide

Sencor SPT 233 user manual

Sencor

Sencor SPT 233 user manual

PRESIDENT Lincoln II + owner's manual

PRESIDENT

PRESIDENT Lincoln II + owner's manual

Hytera MD78X manual

Hytera

Hytera MD78X manual

Realistic PRO-2006 owner's manual

Realistic

Realistic PRO-2006 owner's manual

Motorola XPR 3000 Series Quick reference guide

Motorola

Motorola XPR 3000 Series Quick reference guide

Albrecht DR50 user manual

Albrecht

Albrecht DR50 user manual

Roadstar HRA-1300DAB+ instruction manual

Roadstar

Roadstar HRA-1300DAB+ instruction manual

Freecom MusicPal datasheet

Freecom

Freecom MusicPal datasheet

RCA Prodigi RDR1520 Series quick start guide

RCA

RCA Prodigi RDR1520 Series quick start guide

Denver DAB-28 instruction manual

Denver

Denver DAB-28 instruction manual

Manta MA405 user manual

Manta

Manta MA405 user manual

Panasonic RF-2800LBS technical information

Panasonic

Panasonic RF-2800LBS technical information

Makita DMR057 instruction manual

Makita

Makita DMR057 instruction manual

Makita XRM06X instruction manual

Makita

Makita XRM06X instruction manual

manuals.online logo
manuals.online logoBrands
  • About & Mission
  • Contact us
  • Privacy Policy
  • Terms and Conditions

Copyright 2025 Manuals.Online. All Rights Reserved.