6
R+
_
C
T
D
M
A
N
U
A
L
M
E
N
U
O
K
6.
Information for programming:
http://www.hagleitner.com/en/downloads/aroma-diffuser/
Setting the time
8. Settings
Timer active
9.
7. Programming timer
INSTRUCTION MANUAL
View of LCD:
Function of key:
Wechsel zwischen CLOCK und PROGRAM Modus
Wechsel zwischen OFF/AUTO OFF/ON/AUTO ON Modus
Bestätigung der Einstellungen
Start der Countdown Funktion
Reset aller Einstellungen
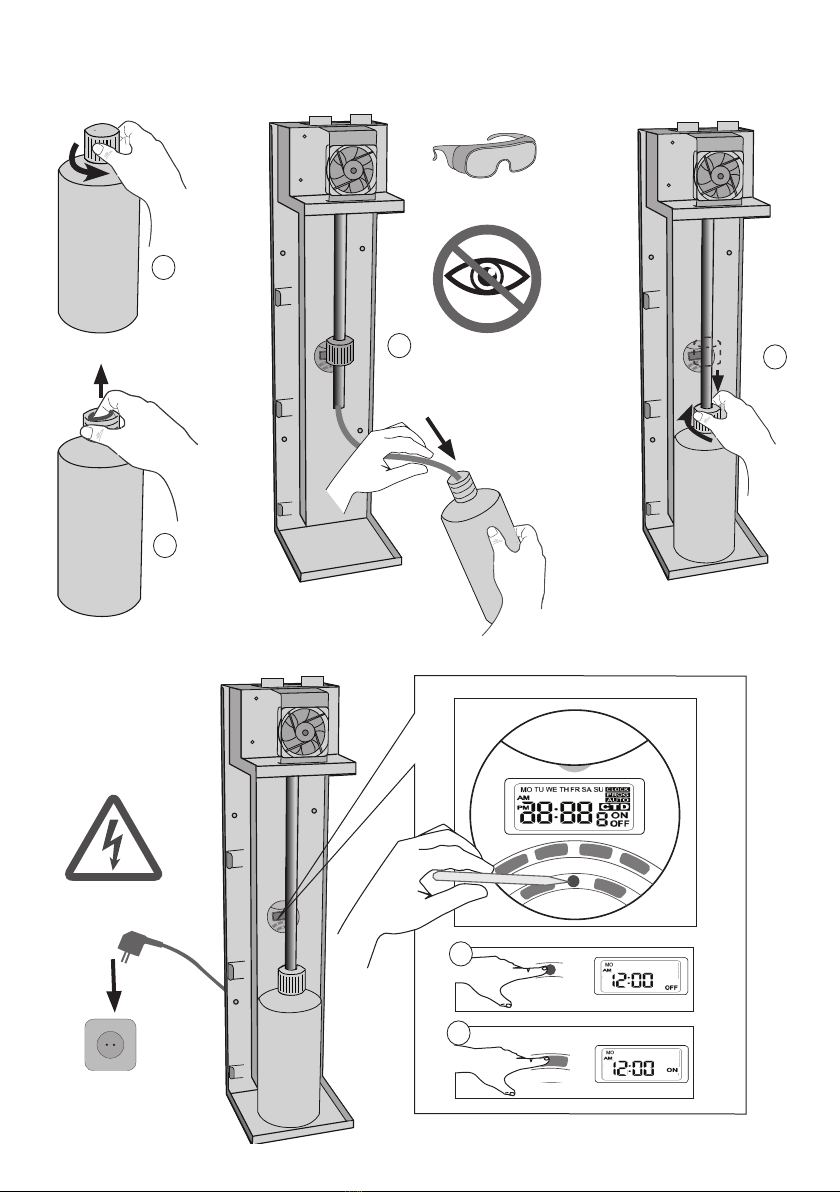
* For the first use please press the RESET button key !
Specifications of the timer:
+ It is provided with a buffer battery
+ Daily and weekly programmable
+ In a week the timer can be programmed for 16 different start-up and start-off (8 start-up and 8 start-off).
1. Setting the clock
1.1 Press MENU key at clock display, will display on upper right corner.
1.2 Press OK key, MO will flash and start to set current time, use +/- key to adjust right
weekday
or weekend.
1.3 Press OK key to confirm and hour will flash, use +/- to adjust hour. Make sure AM/PM
is
correctly set.
1.4 Press OK key to confirm and minute now flashes, use +/- key to adjust minute.
1.5 Press OK key to confirm.
2. Setting the programs
2.1 Press MENU key at clock display till is shown on the screen. Up to 9 programs
can
be set for each day of the week.
2.2 Press MENU key till the screen shows, 1ON display on the LCD.
2.3 Press OK key to start setting. MO, TU till SU will flash, at this stage, use +/- key to
adjust
day or days you want.Weekday only or. weekend only is also possible.
2.4 Press OK key to confirm and hour will be flashing, use +/- to adjust hour, check if AM /
PM is set correctly.
2.5 Press OK key to confirm and minute will flash, use +/- to adjust minute.
2.6 Press OK key to confirm and PROG 1ON is now correctly set.
2.7 Press MENU key and the screen will show 1OFF .
2.8 Press OK key to start setting PROG 1OFF . Follow the steps 4.3 to 4.6.
2.9 To have more programs set, repeat the above steps.
2.10 When finish programs setting. press MENU key to quit or hold MENU key for 2 or more
seconds at any stage to go back to clock display format. If no key is pushed within 1
minute, the clock will be displayed.
2.11 To edit a particular program, locate it using MENU key and press OK key to edit it.
2.12 To remove a particular program, locate it using MENU key, then press OK key and set
the day to -:-- using +/- key.
3. Operating modes of the timer
Press MANUAL key at clock display to select desired operating mode of the timer:
+ OFF: output is cut off and the programs are deactivated.
+ ON: output is constantly and the programs are deactivated.
AUTO OFF/AUTO ON: the timer runs in accordance with the programs previously set. The code of the
ongoing program is shown in the screen . OFF indicates that there is no output and ON indicates that
there is output in the outlet.
INSTRUCTION MANUAL
View of LCD:
Function of key:
Wechsel zwischen CLOCK und PROGRAM Modus
Wechsel zwischen OFF/AUTO OFF/ON/AUTO ON Modus
Bestätigung der Einstellungen
Start der Countdown Funktion
Reset aller Einstellungen
* For the first use please press the RESET button key !
Specifications of the timer:
+ It is provided with a buffer battery
+ Daily and weekly programmable
+ In a week the timer can be programmed for 16 different start-up and start-off (8 start-up and 8 start-off).
1. Setting the clock
1.1 Press MENU key at clock display, will display on upper right corner.
1.2 Press OK key, MO will flash and start to set current time, use +/- key to adjust right
weekday
or weekend.
1.3 Press OK key to confirm and hour will flash, use +/- to adjust hour. Make sure AM/PM
is
correctly set.
1.4 Press OK key to confirm and minute now flashes, use +/- key to adjust minute.
1.5 Press OK key to confirm.
2. Setting the programs
2.1 Press MENU key at clock display till is shown on the screen. Up to 9 programs
can
be set for each day of the week.
2.2 Press MENU key till the screen shows, 1ON display on the LCD.
2.3 Press OK key to start setting. MO, TU till SU will flash, at this stage, use +/- key to
adjust
day or days you want.Weekday only or. weekend only is also possible.
2.4 Press OK key to confirm and hour will be flashing, use +/- to adjust hour, check if AM /
PM is set correctly.
2.5 Press OK key to confirm and minute will flash, use +/- to adjust minute.
2.6 Press OK key to confirm and PROG 1ON is now correctly set.
2.7 Press MENU key and the screen will show 1OFF .
2.8 Press OK key to start setting PROG 1OFF . Follow the steps 4.3 to 4.6.
2.9 To have more programs set, repeat the above steps.
2.10 When finish programs setting. press MENU key to quit or hold MENU key for 2 or more
seconds at any stage to go back to clock display format. If no key is pushed within 1
minute, the clock will be displayed.
2.11 To edit a particular program, locate it using MENU key and press OK key to edit it.
2.12 To remove a particular program, locate it using MENU key, then press OK key and set
the day to -:-- using +/- key.
3. Operating modes of the timer
Press MANUAL key at clock display to select desired operating mode of the timer:
+ OFF: output is cut off and the programs are deactivated.
+ ON: output is constantly and the programs are deactivated.
AUTO OFF/AUTO ON: the timer runs in accorda nce with the programs previously set. The code of the
ongoing program is shown in the screen . OFF indicates that there is no output and ON indicates that
there is output in the outlet.
=CLOCK
INSTRUCTION MANUAL
View of LCD:
Function of key:
Wechsel zwischen CLOCK und PROGRAM Modus
Wechsel zwischen OFF/AUTO OFF/ON/AUTO ON Modus
Bestätigung der Einstellungen
Start der Countdown Funktion
Reset aller Einstellungen
* For the first use please press the RESET button key !
Specifications of the timer:
+ It is provided with a buffer battery
+ Daily and weekly programmable
+ In a week the timer can be programmed for 16 different start-up and start-off (8 start-up and 8 start-off).
1. Setting the clock
1.1 Press MENU key at clock display, will display on upper right corner.
1.2 Press OK key, MO will flash and start to set current time, use +/- key to adjust right
weekday
or weekend.
1.3 Press OK key to confirm and hour will flash, use +/- to adjust hour. Make sure AM/PM
is
correctly set.
1.4 Press OK key to confirm and minute now flashes, use +/- key to adjust minute.
1.5 Press OK key to confirm.
2. Setting the programs
2.1 Press MENU key at clock display till is shown on the screen. Up to 9 programs
can
be set for each day of the week.
2.2 Press MENU key till the screen shows, 1ON display on the LCD.
2.3 Press OK key to start setting. MO, TU till SU will flash, at this stage, use +/- key to
adjust
day or days you want.Weekday only or. weekend only is also possible.
2.4 Press OK key to confirm and hour will be flashing, use +/- to adjust hour, check if AM /
PM is set correctly.
2.5 Press OK key to confirm and minute will flash, use +/- to adjust minute.
2.6 Press OK key to confirm and PROG 1ON is now correctly set.
2.7 Press MENU key and the screen will show 1OFF .
2.8 Press OK key to start setting PROG 1OFF . Follow the steps 4.3 to 4.6.
2.9 To have more programs set, repeat the above steps.
2.10 When finish programs setting. press MENU key to quit or hold MENU key for 2 or more
seconds at any stage to go back to clock display format. If no key is pushed within 1
minute, the clock will be displayed.
2.11 To edit a particular program, locate it using MENU key and press OK key to edit it.
2.12 To remove a particular program, locate it using MENU key, then press OK key and set
the day to -:-- using +/- key.
3. Operating modes of the timer
Press MANUAL key at clock display to select desired operating mode of the timer:
+ OFF: output is cut off and the programs are deactivated.
+ ON: output is constantly and the programs are deactivated.
AUTO OFF/AUTO ON: the timer runs in accordance with the programs previously set. The code of the
ongoing program is shown in the screen . OFF indicates that there is no output and ON indicates that
there is output in the outlet.
INSTRUCTION MANUAL
View of LCD:
Function of key:
Wechsel zwischen CLOCK und PROGRAM Modus
Wechsel zwischen OFF/AUTO OFF/ON/AUTO ON Modus
Bestätigung der Einstellungen
Start der Countdown Funktion
Reset aller Einstellungen
* For the first use please press the RESET button key !
Specifications of the timer:
+ It is provided with a buffer battery
+ Daily and weekly programmable
+ In a week the timer can be programmed for 16 different start-up and start-off (8 start-up and 8 start-off).
1. Setting the clock
1.1 Press MENU key at clock display, will display on upper right corner.
1.2 Press OK key, MO will flash and start to set current time, use +/- key to adjust right
weekday
or weekend.
1.3 Press OK key to confirm and hour will flash, use +/- to adjust hour. Make sure AM/PM
is
correctly set.
1.4 Press OK key to confirm and minute now flashes, use +/- key to adjust minute.
1.5 Press OK key to confirm.
2. Setting the programs
2.1 Press MENU key at clock display till is shown on the screen. Up to 9 programs
can
be set for each day of the week.
2.2 Press MENU key till the screen shows, 1ON display on the LCD.
2.3 Press OK key to start setting. MO, TU till SU will flash, at this stage, use +/- key to
adjust
day or days you want.Weekday only or. weekend only is also possible.
2.4 Press OK key to confirm and hour will be flashing, use +/- to adjust hour, check if AM /
PM is set correctly.
2.5 Press OK key to confirm and minute will flash, use +/- to adjust minute.
2.6 Press OK key to confirm and PROG 1ON is now correctly set.
2.7 Press MENU key and the screen will show 1OFF .
2.8 Press OK key to start setting PROG 1OFF . Follow the steps 4.3 to 4.6.
2.9 To have more programs set, repeat the above steps.
2.10 When finish programs setting. press MENU key to quit or hold MENU key for 2 or more
seconds at any stage to go back to clock display format. If no key is pushed within 1
minute, the clock will be displayed.
2.11 To edit a particular program, locate it using MENU key and press OK key to edit it.
2.12 To remove a particular program, locate it using MENU key, then press OK key and set
the day to -:-- using +/- key.
3. Operating modes of the timer
Press MANUAL key at clock display to select desired operating mode of the timer:
+ OFF: output is cut off and the programs are deactivated.
+ ON: output is constantly and the programs are deactivated.
AUTO OFF/AUTO ON: the timer runs in accordance with the programs previously set. The code of the
ongoing program is shown in the screen . OFF indicates that there is no output and ON indicates that
there is output in the outlet.
=
INSTRUCTION MANUAL
View of LCD:
Function of key:
Wechsel zwischen CLOCK und PROGRAM Modus
Wechsel zwischen OFF/AUTO OFF/ON/AUTO ON Modus
Bestätigung der Einstellungen
Start der Countdown Funktion
Reset aller Einstellungen
* For the first use please press the RESET button key !
Specifications of the timer:
+ It is provided with a buffer battery
+ Daily and weekly programmable
+ In a week the timer can be programmed for 16 different start-up and start-off (8 start-up and 8 start-off).
1. Setting the clock
1.1 Press MENU key at clock display, will display on upper right corner.
1.2 Press OK key, MO will flash and start to set current time, use +/- key to adjust right
weekday
or weekend.
1.3 Press OK key to confirm and hour will flash, use +/- to adjust hour. Make sure AM/PM
is
correctly set.
1.4 Press OK key to confirm and minute now flashes, use +/- key to adjust minute.
1.5 Press OK key to confirm.
2. Setting the programs
2.1 Press MENU key at clock display till is shown on the screen. Up to 9 programs
can
be set for each day of the week.
2.2 Press MENU key till the screen shows, 1ON display on the LCD.
2.3 Press OK key to start setting. MO, TU till SU will flash, at this stage, use +/- key to
adjust
day or days you want.Weekday only or. weekend only is also possible.
2.4 Press OK key to confirm and hour will be flashing, use +/- to adjust hour, check if AM /
PM is set correctly.
2.5 Press OK key to confirm and minute will flash, use +/- to adjust minute.
2.6 Press OK key to confirm and PROG 1ON is now correctly set.
2.7 Press MENU key and the screen will show 1OFF .
2.8 Press OK key to start setting PROG 1OFF . Follow the steps 4.3 to 4.6.
2.9 To have more programs set, repeat the above steps.
2.10 When finish programs setting. press MENU key to quit or hold MENU key for 2 or more
seconds at any stage to go back to clock display format. If no key is pushed within 1
minute, the clock will be displayed.
2.11 To edit a particular program, locate it using MENU key and press OK key to edit it.
2.12 To remove a particular program, locate it using MENU key, then press OK key and set
the day to -:-- using +/- key.
3. Operating modes of the timer
Press MANUAL key at clock display to select desired operating mode of the timer:
+ OFF: output is cut off and the programs are deactivated.
+ ON: output is constantly and the programs are deactivated.
AUTO OFF/AUTO ON: the timer runs in accordance with the programs previously set. The code of the
ongoing program is shown in the screen . OFF indicates that there is no output and ON indicates that
there is output in the outlet.
=PROG
INSTRUCTION MANUAL
View of LCD:
Function of key:
Wechsel zwischen CLOCK und PROGRAM Modus
Wechsel zwischen OFF/AUTO OFF/ON/AUTO ON Modus
Bestätigung der Einstellungen
Start der Countdown Funktion
Reset aller Einstellungen
* For the first use please press the RESET button key !
Specifications of the timer:
+ It is provided with a buffer battery
+ Daily and weekly programmable
+ In a week the timer can be programmed for 16 different start-up and start-off (8 start-up and 8 start-off).
1. Setting the clock
1.1 Press MENU key at clock display, will display on upper right corner.
1.2 Press OK key, MO will flash and start to set current time, use +/- key to adjust right
weekday
or weekend.
1.3 Press OK key to confirm and hour will flash, use +/- to adjust hour. Make sure AM/PM
is
correctly set.
1.4 Press OK key to confirm and minute now flashes, use +/- key to adjust minute.
1.5 Press OK key to confirm.
2. Setting the programs
2.1 Press MENU key at clock display till is shown on the screen. Up to 9 programs
can
be set for each day of the week.
2.2 Press MENU key till the screen shows, 1ON display on the LCD.
2.3 Press OK key to start setting. MO, TU till SU will flash, at this stage, use +/- key to
adjust
day or days you want.Weekday only or. weekend only is also possible.
2.4 Press OK key to confirm and hour will be flashing, use +/- to adjust hour, check if AM /
PM is set correctly.
2.5 Press OK key to confirm and minute will flash, use +/- to adjust minute.
2.6 Press OK key to confirm and PROG 1ON is now correctly set.
2.7 Press MENU key and the screen will show 1OFF .
2.8 Press OK key to start setting PROG 1OFF . Follow the steps 4.3 to 4.6.
2.9 To have more programs set, repeat the above steps.
2.10 When finish programs setting. press MENU key to quit or hold MENU key for 2 or more
seconds at any stage to go back to clock display format. If no key is pushed within 1
minute, the clock will be displayed.
2.11 To edit a particular program, locate it using MENU key and press OK key to edit it.
2.12 To remove a particular program, locate it using MENU key, then press OK key and set
the day to -:-- using +/- key.
3. Operating modes of the timer
Press MANUAL key at clock display to select desired operating mode of the timer:
+ OFF: output is cut off and the programs are deactivated.
+ ON: output is constantly and the programs are deactivated.
AUTO OFF/AUTO ON: the timer runs in accordance with the programs previously set. The code of the
ongoing program is shown in the screen . OFF indicates that there is no output and ON indicates that
there is output in the outlet.
=AUTO
COLOR
locked
change
color
(3x)
wait
10 sec.
INTENSITY
locked
change
intensity
(3x)
3x wait
10 sec.
OFF
1
2
3
456
7
8
9
10
OFF
3x