HAGOR WH Turn M User manual

HAGOR Products GmbH | Oberbecksener Straße 97 | D-32547 Bad Oeynhausen | Telefon: +49(0)57 31-7 55 07-0 | Mail: hagor@hagor.de
Installationsanleitung
WH Turn M | Art.-Nr.: 5760
DE Installationsanleitung
ES Guía de instalación
GB Installation manual
FR Guide d‘installation
SE Installationsanvisning
TR Yükleme Rehberi
RU инструкция по установке
NL Installatievoorschrift
CN 安装指南

HAGOR Products GmbH | Oberbecksener Straße 97 | D-32547 Bad Oeynhausen | Telefon: +49(0)57 31-7 55 07-0 | Mail: hagor@hagor.de
DE
GB
Achtung!
Technische Geräte stellen einen beträchtlichen Wert dar. Sie sollten daher bei
der Installation vorsichtig mit den Komponenten umgehen und diese bei Bedarf
schützen.
Auch sollte, falls nötig, der Installtionsbereich abgesichert werden. Herabfallen-
de Teile können zu Verletzungen und Materialschäden führen.
Die im Lieferumfang enthaltenen Materialien sind unter Umständen nicht für die
speziellen Gegebenheiten am Installationsort geeignet. Bitte prüfen Sie dies
vorab und ersetzen Sie diese bei Bedarf durch geeignete Materialien.
Falls Sie Bezüglich der Installation des Produkts unsicher sind oder noch Fra-
gen haben wenden Sie sich an uns oder anderes ausgebildetes Fachpersonal.
Caution!
Technical devices are of considerable value. You should therefore handle the
components carefully during installation and protect them if necessary.
If necessary, the installation area should also be secured. Falling parts can cause
injuries and material damage.
The materials included in the scope of delivery may not be suitable for the spe-
cial conditions at the installation site. Please check this in advance and replace it
with suitable materials if necessary.
If you are unsure about the installation of the product or have any questions,
please contact us or other trained specialists.
HAGOR Products GmbH | Oberbecksener Straße 97 | D-32547 Bad Oeynhausen | Telefon: +49(0)57 31-7 55 07-0 | Mail: hagor@hagor.de
BITTE UNBEDINGT BEACHTEN! | PLEASE NOTE!
MONTAGE ZU ZWEIT DURCHFÜHREN. | ASSEMBLY BY TWO PERSONS.
HAGOR Products GmbH | Oberbecksener Straße 97 | D-32547 Bad Oeynhausen | Telefon: +49(0)57 31-7 55 07-0 | Mail: hagor@hagor.de
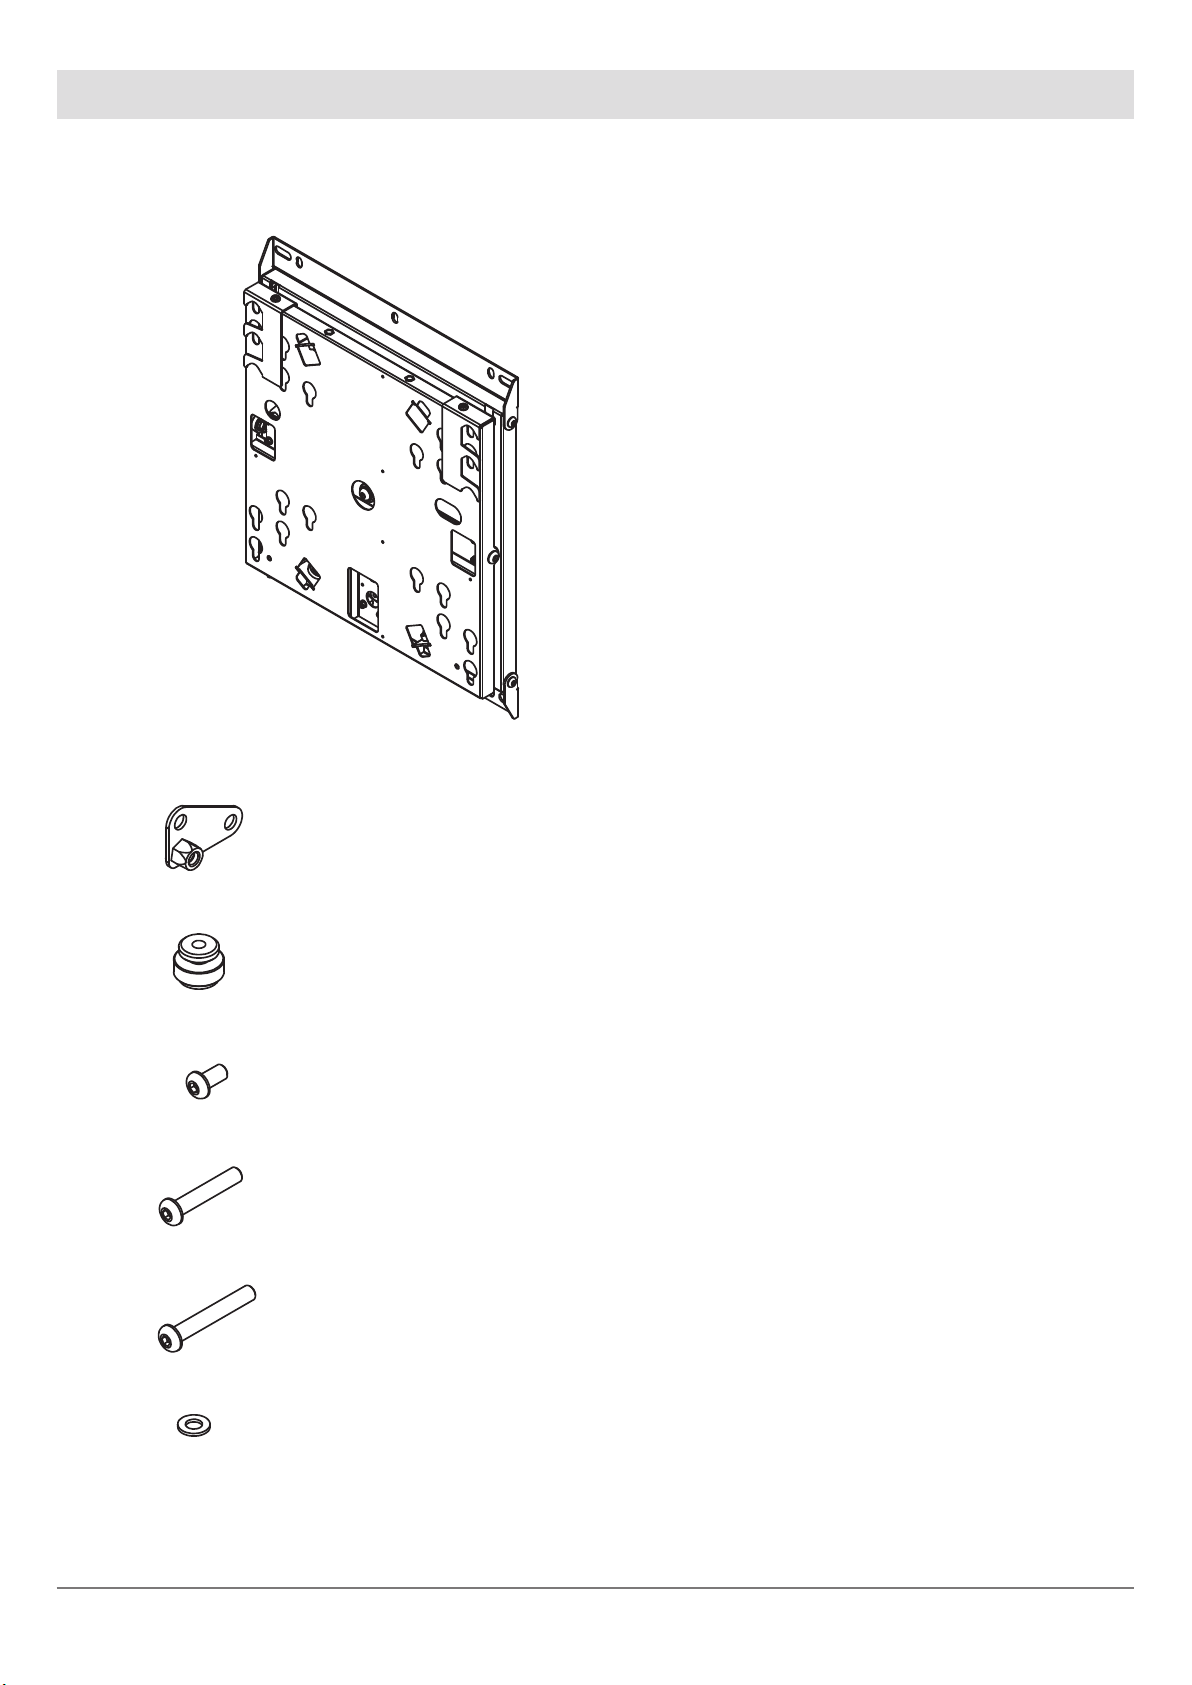
Lieferumfang | Scope of delivery
A | Halterung | Bracket | 1x
B | Kipplatten | Tilt plates | 2x
C | Einhängebolzen | Suspension bolts | 4x
D | M8x16 | 2x
E | M8x45 | 4x
F | M8x55 | 4x
G | Untelegscheibe Ø 8 mm | Washer Ø 8 mm | 2x

HAGOR Products GmbH | Oberbecksener Straße 97 | D-32547 Bad Oeynhausen | Telefon: +49(0)57 31-7 55 07-0 | Mail: hagor@hagor.de
Montieren Sie die Halterung (A) an der Wand (siehe grau markierte Löcher) mit Montagematerialien, die für den Zweck
und die Art der Wand geeignet sind. Prüfen Sie die Festigkeit der verwendeten Dübel und Schrauben.
Bitte beachten! Die Halterung wird mit der Einstellung zur Drehung im Uhrzeigersinn ausgeliefert. Für eine Drehung
gegen den Uhrzeigersinn entfernen Sie die Schraube von Position (R) auf Position (L).
Achtung! Achten Sie darauf, dass die Ausrichtung perfekt horizontal verläuft (X).
-----------------------------------------------------------------------------------------------------------------------------------------------------------------
Mount the bracket (A) on the wall (see holes marked in gray) using mounting materials suitable for the purpose and type
of wall. Check the strength of the dowels and screws used.
Please note! The mount is shipped with the setting for clockwise rotation. For counterclockwise rotation, remove the
screw from position (R) to position (L).
Caution! Make sure that the alignment is perfectly horizontal (X).
1 Montage der Wandhalterung | Wall mount installation
Wasserwaage | Spirit level
Sicherungsschraube (S)
Lock adjustment screw (S)
(R)
(L) (A)
HAGOR Products GmbH | Oberbecksener Straße 97 | D-32547 Bad Oeynhausen | Telefon: +49(0)57 31-7 55 07-0 | Mail: hagor@hagor.de
2
/
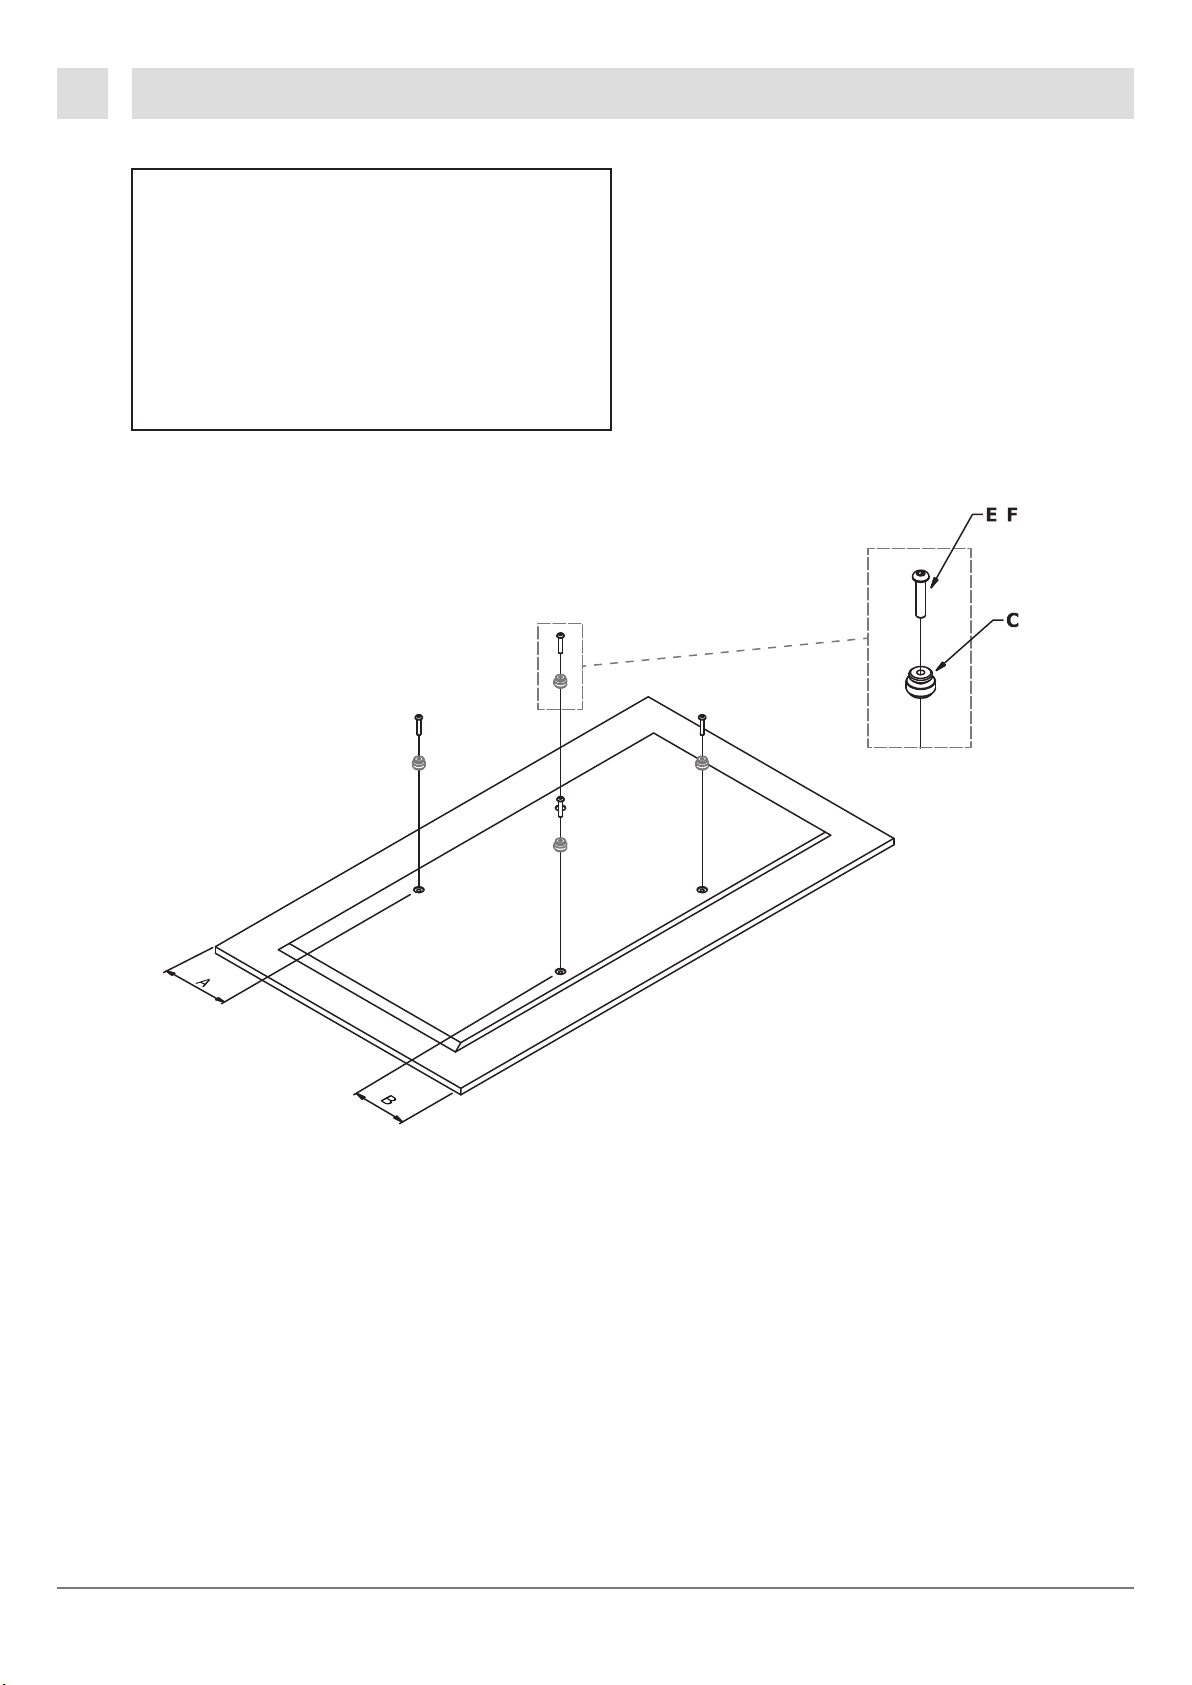
Montieren Sie auf der Rückseite des Bildschirms die Einhängebolzen (C)
und Schrauben (E oder F) wie in der Abbildung oben dargestellt.
-----------------------------------------------------------------------------------------------------------------------------------------------------------------
On the back of the screen, mount the suspension bolts (C) and screws (E or F) as shown in the gure above.
Achtung!
Die Montage ist nur mit einem zentriertem
VESA-Lochbild möglich. Bei dezentralen Loch-
bildern werden Adapter benötigt.
--------------------------------------------------------------------
Attention!
Mounting is only possible with a centered VESA
hole pattern. Adapters are required for o-center
hole patterns.
Montage der Einhängebolzen | Suspension bolts installation

HAGOR Products GmbH | Oberbecksener Straße 97 | D-32547 Bad Oeynhausen | Telefon: +49(0)57 31-7 55 07-0 | Mail: hagor@hagor.de
3
4
Demontage des Sicherungsbügels | Disassembly of the securing bracket
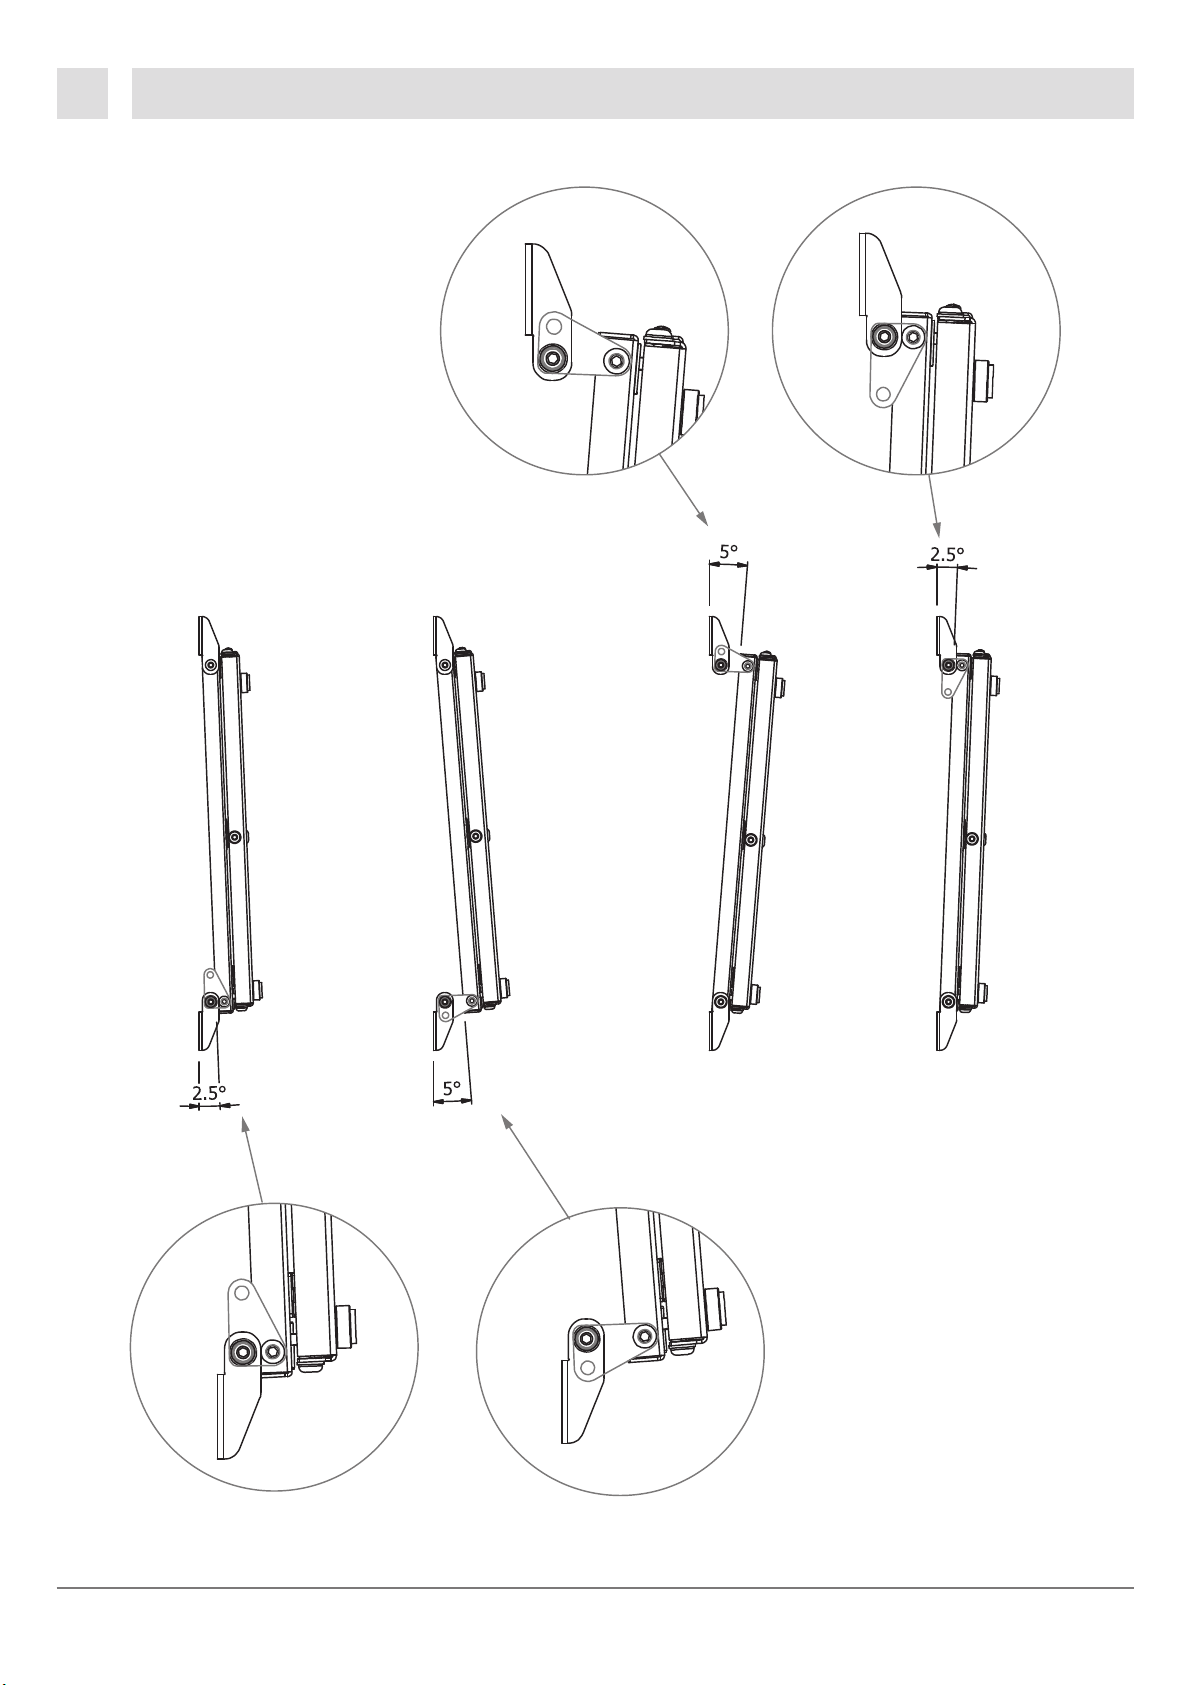
Neigungseinstellung | Tilt settings
Entfernen Sie den Sicherheitsbügel (L).
-------------------------------------------------------
Remove the safety bracket (L).
Entfernen Sie die Schrauben und die
Unterlegscheiben.
Montieren Sie die 2 Kippplatten (B).
Befestigen Sie diese mit den Schrauben
und den Unterlegscheiben.
-------------------------------------------------------
Remove the screws and the washers.
Assemble the 2 tilting plates (B).
Fix them with the screws and the washers.
HAGOR Products GmbH | Oberbecksener Straße 97 | D-32547 Bad Oeynhausen | Telefon: +49(0)57 31-7 55 07-0 | Mail: hagor@hagor.de
5 Neigungseinstellung | Tilt settings

HAGOR Products GmbH | Oberbecksener Straße 97 | D-32547 Bad Oeynhausen | Telefon: +49(0)57 31-7 55 07-0 | Mail: hagor@hagor.de
6
Hängen Sie den Bildschirm ein. Bitte beachten! Diesen Arbeitsschrittt bitte zu zweit ausführen. Stellen Sie sicher,
dass die Bolzen richtig in die Schlüssellöcher eingehängt wurden. Setzen Sie die Sicherungsbügel wieder ein und
schrauben sie diese fest.
-----------------------------------------------------------------------------------------------------------------------------------------------------------------
Hang up the screen. Please note! Please perform this work stept in pairs. Make sure that the bolts are correctly
inserted into the keyholes. Replace the securing brackets and screw them tight.
Einhängen und sichern des Bildschirms | Mount and secure the screen

HAGOR Products GmbH | Oberbecksener Straße 97 | D-32547 Bad Oeynhausen | Telefon: +49(0)57 31-7 55 07-0 | Mail: hagor@hagor.de
7
Probieren Sie die Drehung mehrmals aus und vergewissern Sie sich, dass der Bildschirm mit den Sicherungsbügeln (L)
sicher verriegelt ist. Erhöhen oder verringern Sie bei Bedarf die Federkraft durch Verstellen der Schraube (S).
-----------------------------------------------------------------------------------------------------------------------------------------------------------------
Try the rotation several times and make sure the screen is securely locked with the safety brackets (L)
If necessary, increase or decrease the force of the spring by adjusting the screw (S).
Funktionsprüfung und Justage | Function test and adjustment
Other manuals for WH Turn M
1
This manual suits for next models
1
Other HAGOR TV Mount manuals


