Serial Number:Version:00.00 Edition:2005-7
Dishwasher Model:DW12-CBE5/6
Page6/21
5.5Adjusting theDoorSprings(Fig.10B)
The doormustbeperfectlybalanced.Inthe factory, the tension ofthe springsisregulated toensurethatthe
doorisperfectlybalanced when lightwood doorpanelsaremounted on the door.Ifheavier,solidwood door
panelsareused, the doorcan be balanced bysimplyturning the twoscrews(bothscrewsmust be turned the
sameamount)located on the top part of the machine.
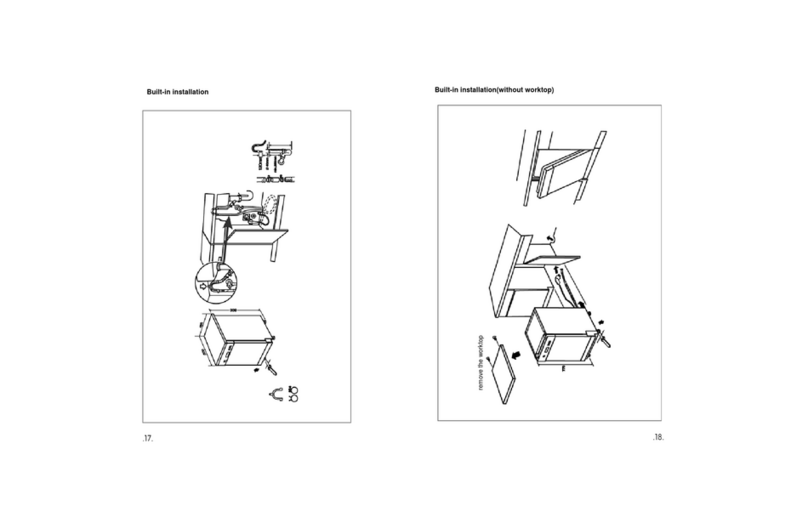
5.6Installation ofContinuousBaseMoulding
Position the washing machine inthe cut-out inthe kitchen cabinet:
1. Installthe continuousbasemoulding, following the manufacturer’sinstructions.
2.Slowlyopen the doorofthe dishwashertocheck tosee ifthe doorstrikesorrubsagainst
the basemoulding.
3.If so,restthe bottomedge ofthe panelon the basemoulding and mark the part tobe cut.
Leaveatleast3mmofthe playbetween the paneland the basemoulding toallowforthe door
torotatefreely(Fig.11)
4.Removethebasemouldingand trimitasneeded,protectingthesurfacethathasbeen cut
withapaintor
similarwood finish(Fig.11)
5. Installthe basemoulding again(Fig.12).
5.7Howtousewater-proofplastic
Firstlytakeoff the water-proofplasticfromthe stickerwiththe appliance(see
Fig.13). Secondlystick it on thebottomofthe kitchen board(see Fig.13).All
of thiscan avoidhumidityinthe kitchen.(Fig11)(Fig12)
5.8Positioning theUnitwithintheCutout(Fig.14)
Pushthe dishwasherintothecutoutopening and turnthe feettomakeit
level and toadjustforheightsothatthecrosspiece(A) forfastening itin
placelocated on the top partofthe machine (Fig.14)comesintocontact
withthe counter.Align the doorpanel mounted onthedishwasherwith
the doorson the adjacent cabinet (2).
Important:
The dishwashermustabsolutelybe fastened tothe countertop toprevent
the machine fromtipping when the loaded dishracksarepulled out.
5.9AdjustmentofBackFeet(Fig.10A)
Insertthe applianceinthe cutoutand then adjustthe heightofthe machine using the screwslocated atthe
bottomfront .Useascrewdrivertoturnthe screwsinaclockwisedirection toraisethe dishwasherand inan
anticlockwisedirection lowerit.
Notice:
If powerscrewdriversareused tomakethe adjustment, makethe final adjustment manuallywithanormal
screwdriver.
5.10Positioning theAppliance
Position the applianceinthe desired location. The backshouldrestagainstthe wall behind it,and the sides,
along theadjacentcabinetsorwall.Thedishwasherisequipped withwatersupplyanddrainhosesthatcan
be positioned on the rightorthe left tofacilitateproperinstallation.
5.11Leveling theAppliance
Oncethe applianceispositioned,adjustthe feet(screwtheminorout)tolevelthe dishwasher.Inanycase,
the applianceshouldnotbe inclined morethan 2°.Ifthe applianceislevel,itwill helpensureproper
performance.
5.12ColdWaterConnection
Connect the coldwatersupplyhosetoathreaded 3/4(gas)connectorand makesurethatitisfastened tightly
inplace(see Fig1).
Ifthe waterpipesareneworhavenot been used foran extended period oftime,let the waterrun tomakesure
thatthe waterisclearand free ofimpurities.Ifthisprecaution isnottaken,thereisariskthatthewaterinletcan
get blocked and damage the appliance.
5.13HotWaterConnection
The watersupplytotheappliancecan alsobe connected tothehouse'shotwaterline(centralised
system,heating system),aslong asit doesnot exceed atemperatureof 60º.
