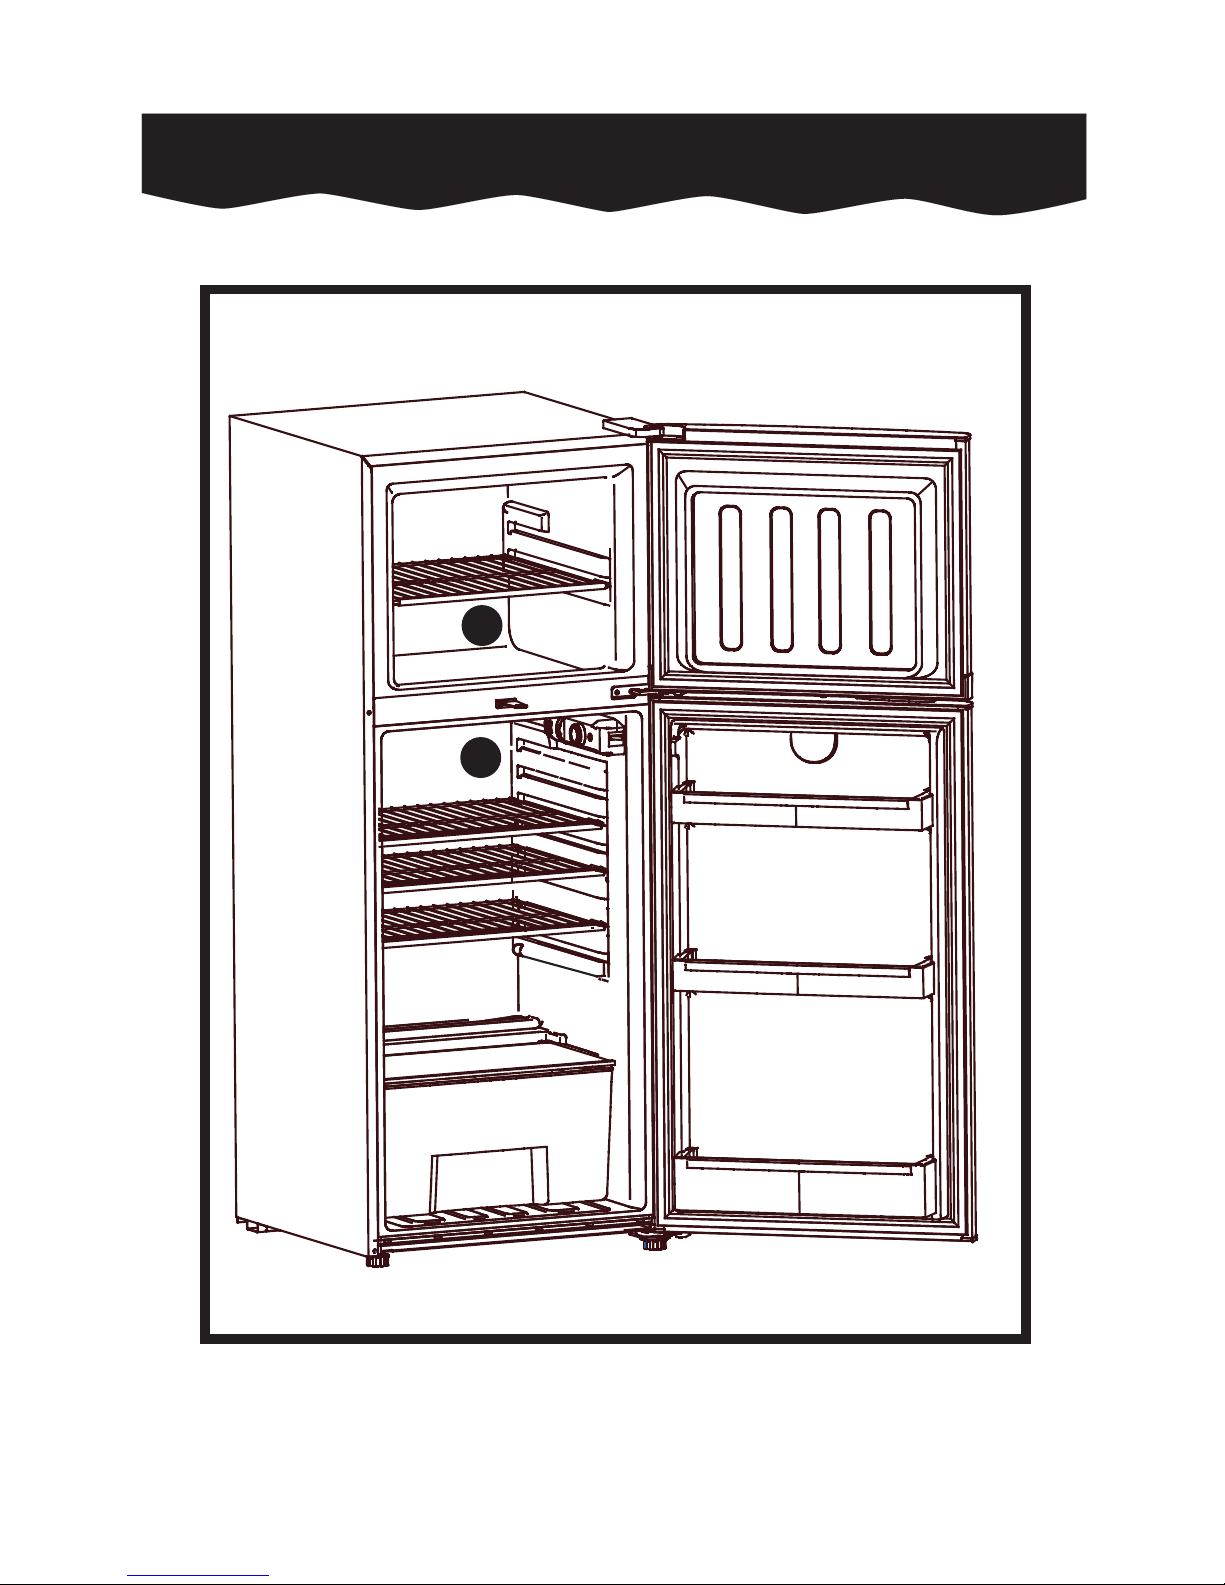
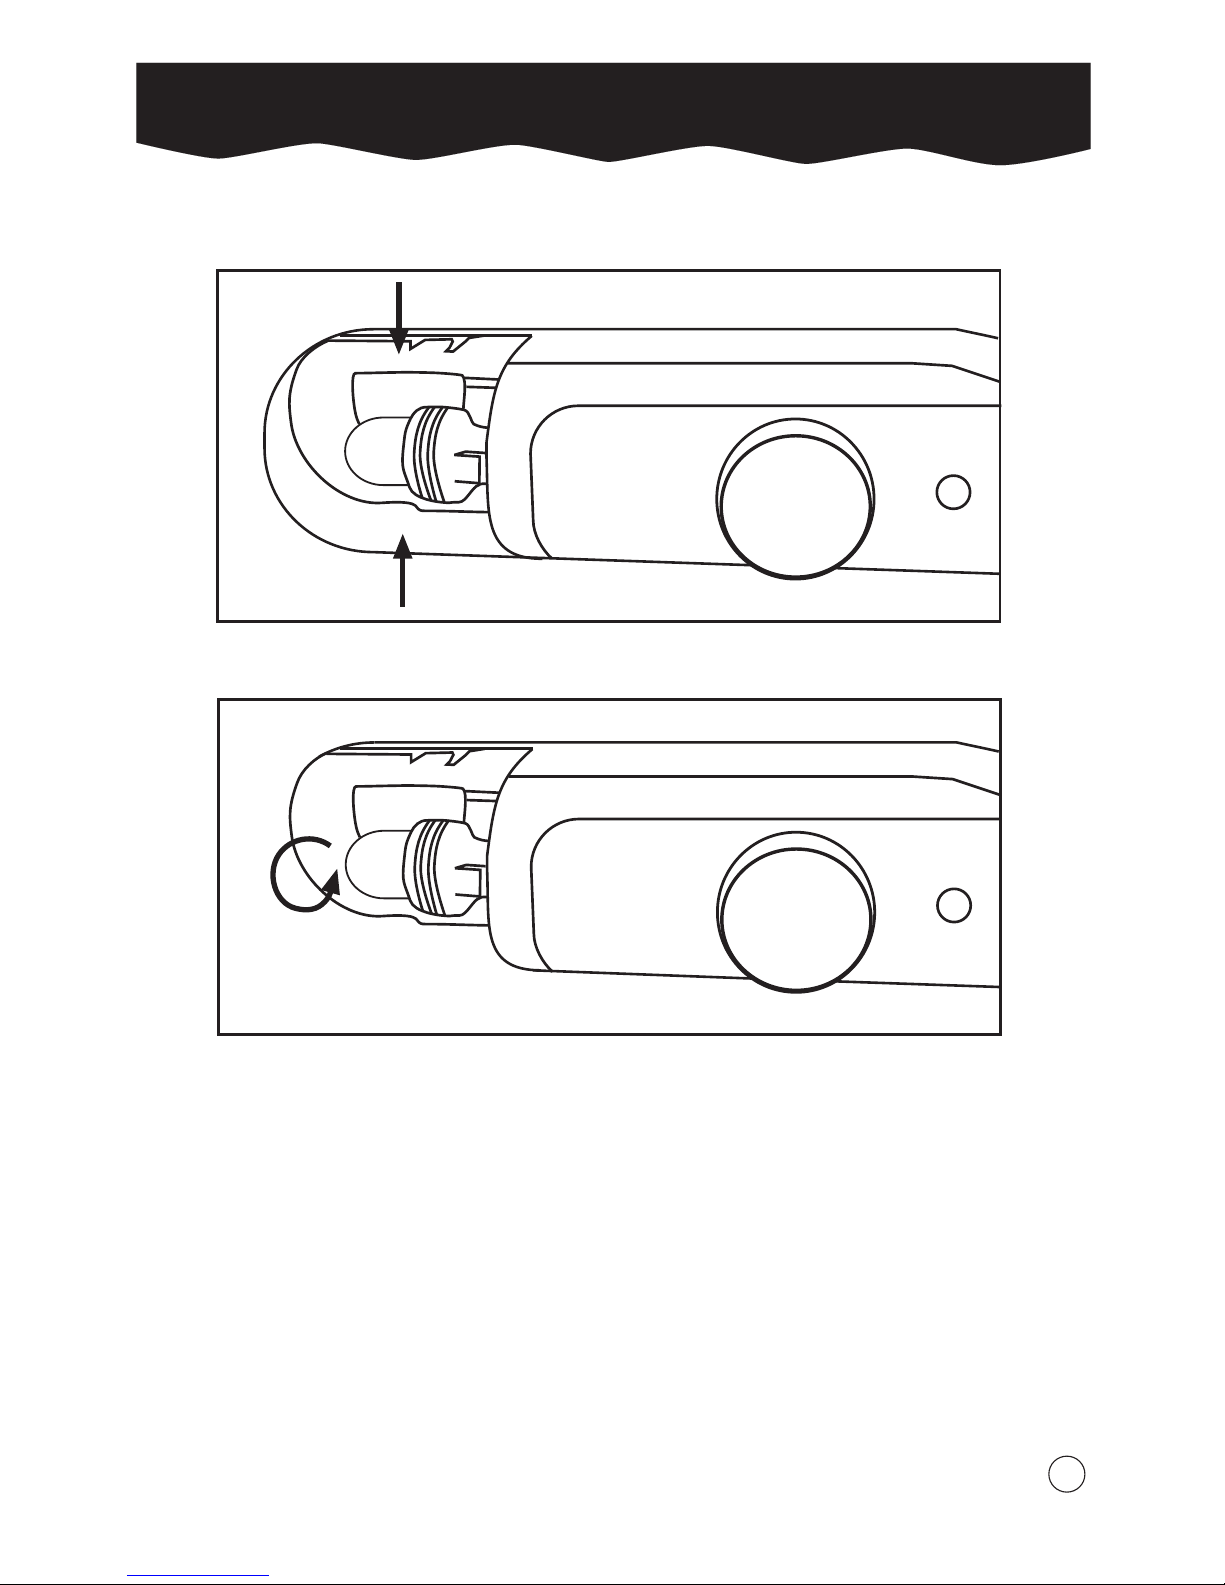
Haier HRF-200NS User manual

Refrigerator
Owner s Manual
IMPORTANT
: Congratulations for choosing a high quality refrigerator
by . Please read this owner's manual carefully
before using your new refrigerator. Now you will be cool,
with
HRF-200N(White/Silver)
HRF-250N(White/Silver)
HRF-300N(White/Silver)
HRF-350N(White/Silver)

Refrigerator Parts
⑩
①
②
③
④
⑤
⑥
⑦
⑧
⑨
A
B

Refrigerator Parts
1. Freezer compartment
2.
3.
Thermostat box / Temperature control knob
4.
Shelves
5.
Transparent vegetable shelf
6.
Vegetable bin
7.
Freezer door
8.
9.
Detachable door seal
10.
Bottle shelf
Refrigerator door
(Glass shelve is available for silver model)
1
The coldest part of the refrigerator is the freezer,
area A. In the refrigerator section, the temperature
gradually becomes less cold from area
B.
VC or deodorization

How To Install Your Refrigerator
ENSURE THAT:
This appliance must be earthed.
Do not carry the refrigerator by its door and the
piping of the condenser, as this is dangerous!
2
It is installed and levelled on a floor
capable of holding its weight when
fully loaded.
It is sited in a dry, sheltered place,
away from heat and direct sunlight.
You install your refrigerator well away
from inflammables, such as petrol,
kerosene, etc.
Leave at least 7.5cm air space on top
of the refrigerator and 2.5cm rear
space (between the back and wall).
This allows air to circulate freely and
helps stop condensation on the
cabinet.
It is only used for jobs designed for
refrigerators.
Your refrigerator is cleaned before
use.
IMPORTANT:
Your refrigerator must only be
connected to a 230 10 volts, 50Hz
A.C. power supply; failure to do so
may invalidate the guarantee.
A 13 amp, 3 pin plug and a 5 amp
fuse only must be used for this
refrigerator otherwise damage may
result. The plug should always be
wired in accordance with the
following codes:
Green and Yellow - EARTH (E)
Blue or Black - NEUTRAL (N)
Brown or Red - LIVE (L)
If you are in doubt, consult a
qualified electrician.
Switch on and turn the temperature
control knob to number 4 setting.
Allow the fridge to become properly
cold before loading with food.
WARNING
Intended use: This appliance has been designed exclusively for use in dry-interior
households.Every other use is improper and may lead to injuries,whereby the
liability of the manufacturer will cease.

Operating Instructions
TEMPERATURE CONTROL
Turn temperature control knob to
higher numbers for colder
temperatures.
To take out the ice cubes
10 2 3 4 5 6 7
OFF COLD COLDER COLDEST
For faster freezing of fresh food turn
the temperature control knob to
setting 7. Once it is frozen, reduce to
normal setting. The more fresh food
you freeze at any one time, the longer
it takes and the higher the freeze
setting required.
During extremely hot weather and
frequent door openings, you may
need to select a higher setting to
ensure that food is kept cold.
This appliance is most energy
efficient when the doors are kept
firmly closed.
Fill the ice tray 3/4 full with water and
then place it in the lower part of the
freezer.
MAKING ICE CUBES
1. Knock the ice tray lightly to loose it.
-or-
2. Hold the bottom of the ice tray in warm
water for a while.
-or-
3. Twist the ice tray to loose the ice cubes.
3
This appliance is not intended for use by
persons(including children)with reduce
physical,sensory or mental capabilities,or
lack of experience and knowledge,unless
they have been given supervision or inst-
ruction concerning use of the appliance by
a person responsible for their safety.
Chridren should be supervised to ensure
that they do not play with the appliance.
If the supply cord is damaged, it must be
replaced by the manufacturer,its service
agent or similarly qualified persons in or-
der to avoid a hazard.
CAUTION:

To Defrost Your Refrigerator
FREEZER
4
The freezer compartment should
be defrosted when ice build up
exceeds 6mm thickness.
Before defrosting the freezer
compartment, transfer any
remaining frozen food to another
freezer or wrap it in several layers
of newspaper and place it in a cold
refrigerator. Remember that any
rise in the temperature will shorten
the life of the frozen food.
Wash with a warm water solution
containing either a mild detergent
or baking soda solution (2 table
spoons/30g baking soda to 1 litre
warm water).
Unplug refrigerator from electricity
power supply.
Remove all food and ice blocks
from the freezer compartment. It is
not necessary to remove the food
from the fridge section.
Place pan of hot water inside
freezer compartment to speed
defrosting, and leave freezer door
open.
1.
2.
3.
4.
Dry the freezer with a soft sponge
and a piece of cloth.
Your refrigerator defrosts the ice
in the lower part automatically.
The water accumulates in the drain
hole (2) and is sent to the collecting
tray at the rear of the refrigerator
where it is evaporated. Clean the
drain hole (2) and the pipe hose by
pouring a small glass of luke-warm
water inside it.
Check the drain hole (2) at regular
intervals to see if it is clogged, and
if necessary, clean it. Do not fill
your refrigerator and cover up the
drain channel (1).
REFRIGERATOR
6.
7.
Turn temperature control knob to
"O" position.
CAUTION
5.
NEVER USE SHARP OR METAL
OBJECTS TO REMOVE ICE. USE
THE PLASTIC ICE SCRAPPER
PROVIDED.
②①

5
1
2
1 Press the buckle,then remove the lamp cover.
2 Twist the bulb and replace a new one.
3 We assemble it according to the reverse order.
Lamp Replacement Guidance

Food Preparation and Storage Tips
6
STORING FRESH FOOD
Leafy Vegetables Wash in cool, clean water. Drain off water but do
not dry, then place in vegetable bin.
Other Vegetables
and Fruits
Wash, dry, then place in vegetable bin.
Fresh Meat
in fridge
Wrap in aluminium foil or waxed paper and place
in fridge.
Cooked meat After cooking, cool for 1-2 hours then cover,
or wrap promptly in aluminium foil to prevent
drying and place in fridge.
Fresh Fish Always use on day of purchase or wash /
clean / dry and wrap in aluminium foil, then place
in FREEZER compartment.
Butter/Cheese For normal use, should be stored in fridge; extra
supplies should be frozen.
* For storage period, please refer to fresh food storage chart below
FRESH FOOD STORAGE CHART
Variety Meats
Steaks/Roasts
Chicken
Cured Meats
Minced Beef
Bacon
1-2 days
3-5 days
1-2 days
7-10 days
1-2 days
3-7 days
Note: for maximum freshness
store in area "B" (see page 1).
For longer storage, follow directions
for FREEZING.
STORING FROZEN FOOD
Aluminium foil and plastic wrap
will give best protection when
freezing food.
Never re-freeze food which has
thawed out.
See storage guide for normal
storage of frozen foods.

Food Preparation and Storage Tips
7
DAIRY
Butter
Cheese
Ice Cream
Margarine
Milk and Cream
3 - 6 months
6 months
1 month
3 months
3 months
FROZEN FOOD STORAGE CHART
2 - 4 months
1 week
3 - 4 months
2 months
2 - 4 months
4 - 6 months
BREAD AND PASTRY
Breads-Baked
Breads-Unbaked
Yeast Cakes, Cup Cakes
Baked Cakes, Unbaked Cakes
Pies, baked or unbaked
Dough only
FISH AND SEA FOOD
Fish
Shrimp (uncooked)
Prawns
6 - 9 months
2 - 3 months
2 - 3 months
MAIN DISHES
Cooked main dishes
Sandwiches
Soup, Sauces, Gravies
2 - 4 months
3 weeks
2 - 3 months
MEAT UNCOOKED
Beef
Pork
Lamb
Veal
Chicken
6 - 12 months
3 - 6 months
6 - 9 months
6 - 9 months
12 months
FRUITS
Citrus fruits and juices
Fruit juices
Pineapple
Other fruits
9 - 12 months
4 - 6 months
2 - 12 months
8 - 12 months
VEGETABLES
Cooked Vegetables
Raw Vegetables (Blanched):
4 - 6 months
8-12 months

Cleaning Your Refrigerator
8
IMPORTANT
BEFORE CLEANING, ALWAYS SWITCH REFRIGERATOR OFF AND REMOVE
PLUG FROM THE POWER SUPPLY.
PART
OUTSIDE
HOW TO CLEAN
* Wash using warm water and a mild detergent.
* Wipe clean and dry
* DO NOT USE ABRASIVES OR HARSH CLEANERS
* Waxing is recommended if humidity is high, to prolong
* the life of your refrigerator. Use a good qauality car
wax or appliance wax.
DO NOT USE WAX ON PLASTIC PARTS. DO NOT
USE BLEACH OR PETROL BASED PRODUCTS TO
CLEAN YOUR REFRIGERATOR
FREEZER COMPARTMENT * Wash with a warm water solution containing either
a mild detergent or baking soda solution (2 table
spoons/30g baking soda to 1 litre warm water).
* Wipe clean and dry.
FRIDGE COMPARTMENT/DOOR
LINER GASKET/VEGETABLE
BIN/SHELVES
CONDENSER COIL
* Wash using only warm water, a mild detergent and
soft cloth.
* Rinse and dry.
* Use vacuum cleaner or soft brush to clean dust and
lint from condenser coil every 2-3 months.
USEFUL HINTS:
If your refrigerator is to be out of
service for any length of time,
ensure that the interior is carefully
cleaned and dried. Leave the door
open to prevent odour and mould
growth, and disconnect the plug
from the power supply.
Hot food MUST be allowed to cool
before being placed in the fridge
or freezer compartments.
Carry out regular cleaning of the
exterior according to above
instructions. This is most important
if the refrigerator is subjected to high humidity
and heavy condensation.
BULB REPLACEMENT:
Always turn off the power supply and
remove plug before removing light cover.
SAFETY NOTE:
When disposing of an old refrigerator.
ALWAYS remove door as a safeguard
against anything being trapped inside.
DO NOT store flammable or explosive
substances in the refrigerator cabinet.
DO NOT place fizzy drinks in the freezer
compartment as the containers may burst.

Trouble Shooting Tips
Performance problems are sometimes caused by minor things which can
be corrected simply, without having to call a Service Engineer.
9
PROBLEM / SYMPTOM CHECK LIST ACTION / REMEDY
A) Refrigerator will not work
B) Compressor appears to
run constantly.
Is the mains cable
plugged in?
Is the electrical
supply turned on?
Is the temperature
control knob set to "O"
or too low?
Has the fuse blown?
Is the temperature
control knob set very
hight?
Is the door opened
frequently?
Is there sufficient air
gap between the back
of the refrigerator
and the rear wall?
Is the condenser behind
the unit free of dust or dirt?
Note: On hot days,or if room is warm,the compressor will
automatically run for longer periods.
Inspect bulb to see if
it has blown or is loose
Replace if necessary with
appliance bulb(max 15
watts)
C) Light does not work.
Having tried the above and should the unit still
fail to operate, switch off and call a Service Engineer.
1.
2.
3.
4.
1.
2.
3.
4.
Plug in and switch on.
Turn on electrical supply.
Select higher setting.
Replace with correct
size fuse.
Adjust as necessary
Reduce frequency of door
openings.
Pull refrigerator away from
the wall.
If not, clean as in previous.
table.
1.
2.
3.
4.
1.
2.
3.
4.

10
Meaning of crossed –out wheeled dustbin:
Do not dispose of electrical appliances as unsorted municipal waste, use separate
collection facilities. Contact you local government for information regarding the
collection systems available.
If electrical appliances are disposed of in landfills or dumps,
hazardous substances can leak into the groundwater and get
into the food chain, damaging your health and well-being.
When replacing old appliances with new ones, the retailer is
legally obligated to take back your old appliance for disposals
at least free of charge.
The refrigerant used in this appliance is fluorinated greenhouse gases, which can
be harmful to environment and can be responsible for the global warming if it leaks
into atmosphere.
-the maximum inlet water pressure,in pascals.
-the minimum inlet water pressure,in pascals.

MMOODDEELL
12Month's Guarntee
Gross Capacity
Voltage
Total Input Power
Refrigerant
Unit Size(WxDxH)
Net Weight
Automatic Interior Light
Lock
Adjustable Feet
Adjustable thermostat
Drain Facility
HHRRFF--225500N0N
YES
250Ltr.
130W
R134a
550 X 615 X 1430
49KG
YES
YES
YES
YES
YES
595 X 675 X 1500
HHRRFF--330000N
YES
300Ltr.
130W
R134a
56KG
YES
YES
YES
YES
YES
HHRRFF--335500N
YES
350Ltr.
130W
R134a
595 X 675 X1640
58KG
YES
YES
YES
YES
YES
Note: All capacities are gross.
reserves the right to change
specifications as part of its policy of continuos improvement
11
HHRRFF--2200N00N
YES
200Ltr.
220-240V~, 50Hz
130W
R134a
550 X 615 X 1270
46KG
YES
YES
YES
YES
YES
220-240V~, 50Hz 220-240V~, 50Hz 220-240V~, 50Hz
Deodorization/VC Deodorization/VC Deodorization/VC Deodorization/VC Deodorization/VC
Color White/Sliver White/Sliver White/Sliver White/Sliver

produce high quality refrigerators which are strong,
reliable,elegantly styled-yet practical and long lasting for the most demanding
tropical climate and conditions.
new generation refrigerators are convenient to use,
highly efficient, energy saving and are built for quiet running to withstand voltage
fluctuations.
-Free part replacement under warranty
-Free repair under warranty
Limited
45/47, Town Planning Way, llupeju Industrial Estate,
P.M.B 21132,Ikeja,Lagos, Nigeria.
Tel: 01-4973474, 01-5554768, 01-5553288-90,
Fax: 01-5553289, 01-4962076,
E-mail: [email protected]
WWW.htcool.com
HPZ
This manual suits for next models
7
Table of contents
Other Haier Refrigerator manuals

Haier
Haier HXC-106 User manual

Haier
Haier HYC-68 User manual

Haier
Haier HRF-518FR User manual

Haier
Haier HRF-370 User manual

Haier
Haier HRF-628I 6 Series User manual

Haier
Haier BCD-216 User manual

Haier
Haier HBW5719E Setup guide

Haier
Haier AFD631CX - 2 User manual

Haier
Haier HSR3918FI Series User manual

Haier
Haier HRC2736BW User manual

Haier
Haier SC-230 User manual

Haier
Haier QHE03GGM User manual

Haier
Haier HBC-150 User manual

Haier
Haier HNRQB05 User manual

Haier
Haier HRFZ-307AA User manual

Haier
Haier HDE03WNA User manual

Haier
Haier HC17SF10R User manual

Haier
Haier AFD633IX User manual

Haier
Haier HRF-588FA User manual

Haier
Haier HC33SW20RB User manual