Haldex GeminiMDx Manual

INSTALLATION/SERVICE
MANUAL
High Capacity Dual Dryer System
®

DUAL DRYER SYSTEM
INSTALLATION/SERVICE
MANUAL (L31279)
®
General
This manual has been designed to assist personnel
in satisfactory installation, maintenance and
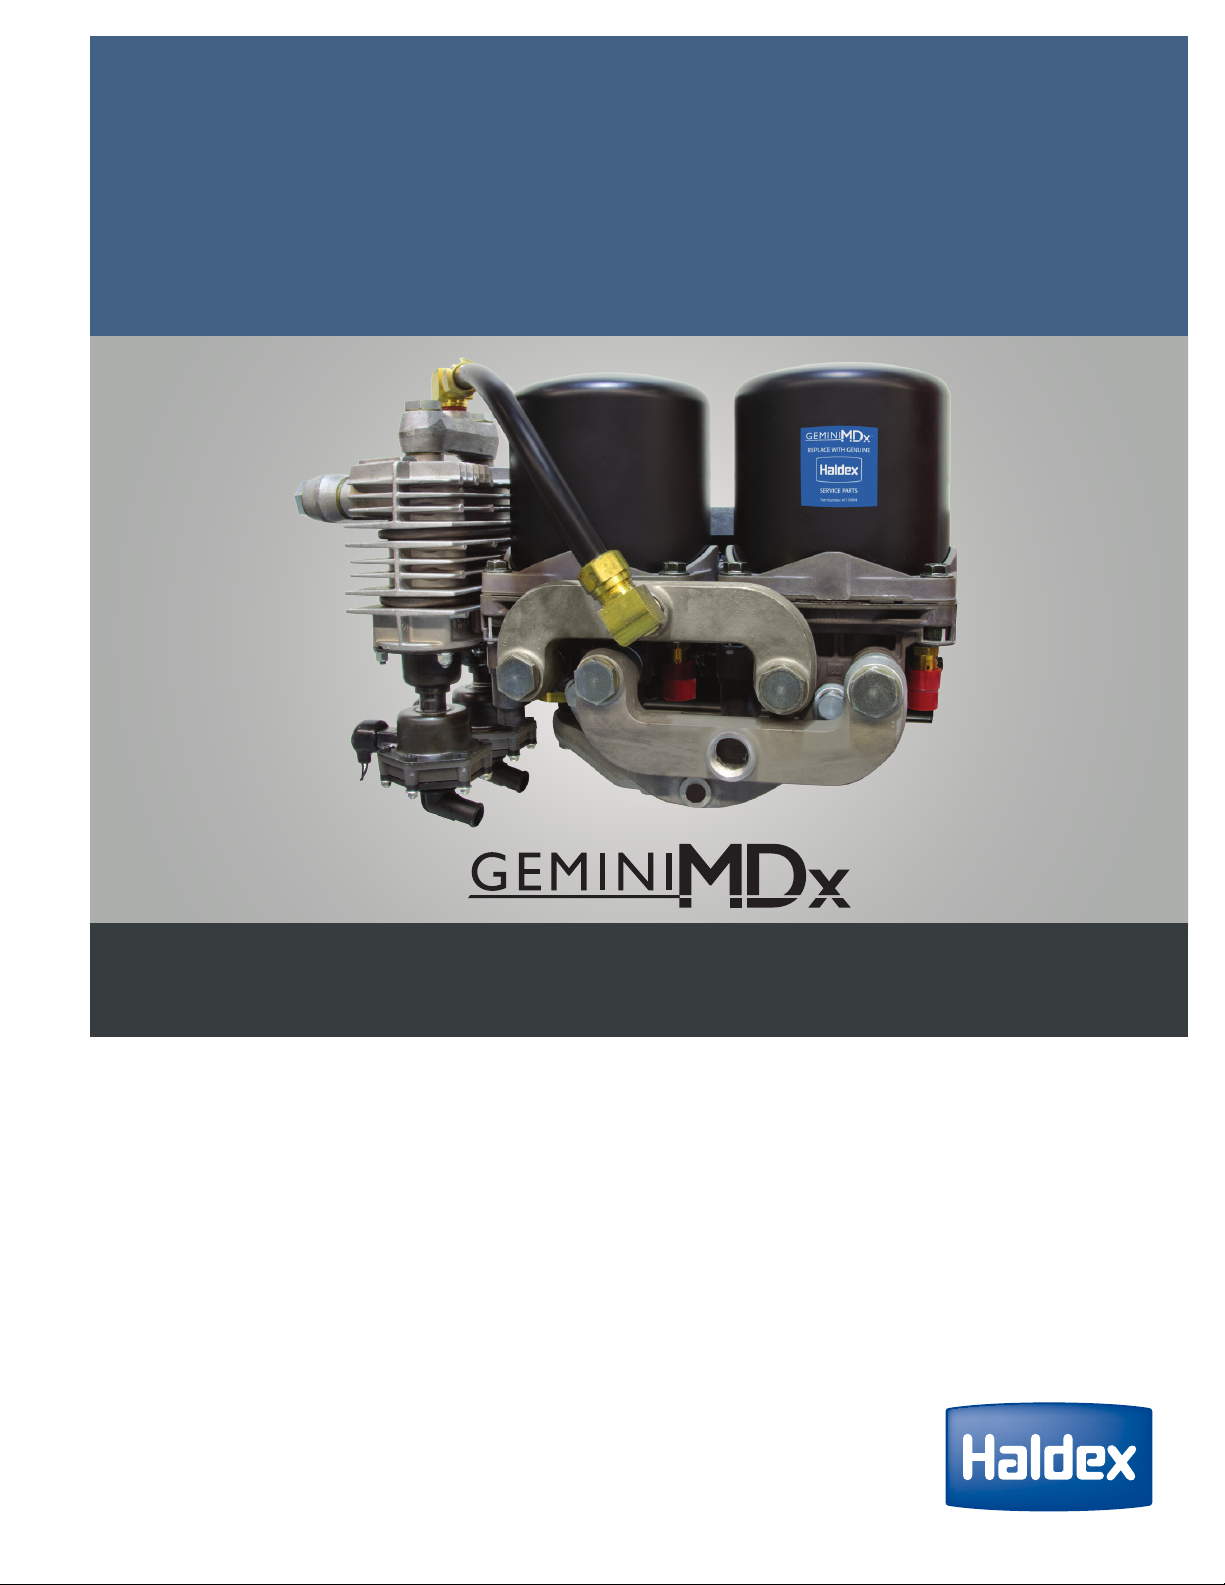
troubleshooting of the Haldex GeminiMDx High
Capacity Dual Air Dryer System. The intention
has been to provide guidance on certain aspects
of the product. It is expected that this manual
will be in possession of the appropriate person
throughout the install, maintenance and/or
troubleshooting process.
Safety and Important Precautions
• All company and vehicle manufacturer’s safety
procedures must be followed when installing
the GeminiMDx Dryer.
• Always wear proper personal protective
equipment, including approved eye glasses.
• Never work on or under a vehicle unless it is
parked on a level surface and its wheels are
blocked to prevent it from moving.
• Never work on a vehicle air brake system
when the engine is running. Where
circumstances require that the engine be in
operation, extreme caution should be used to
prevent personal injury resulting from contact
with moving, rotating, leaking, heated or
electrically charged components.
• Drain all air pressure from the air system
before beginning any installation, service or
repair.
• Never connect or disconnect a hose or
line containing pressure. Never remove a
component plug unless it is certain that all
system pressure has been depleted.
• Never exceed recommended component or
system pressures.
• Do not attempt to install, remove,
disassemble or assemble a component until all
recommended procedures have been read and
are fully understood. Use only the proper tools
and observe all precautions pertaining to the
use of those tools.
• Components with stripped threads or
damaged parts should be replaced rather
than repaired. Repairs requiring machining
or welding should not be attempted unless
specifically approved and stated by the
vehicle or component manufacturer.
• Prior to returning the vehicle to service,
make certain all components and systems are
restored to their proper operating condition.
Mounting and Installation Precautions
• The GeminiMDx uses a 4-bolt mounting
pattern. See “Dimensions and Port
Identification” on Page 8.
• If the GeminiMDx is to be bolted directly to
the frame or other support member, check
the vehicle manufacturers recommendations.
• At a minimum use grade 5, 1/2” bolts and
nuts.
• The GeminiMDx must not incline in any
direction more than 15° from vertical.
• Mount in a space to avoid excessive heat
sources (175°F maximum).
• Mount with the exhaust port oriented
downward.
• Mount in an area where it is protected from
wheel or road splash.
Replacement Parts/Retrot Components
Use appropriate spare parts documentation
when obtaining spare parts. Only use Genuine
Haldex replacement parts in the repair process.
See a complete listing on Page 15.
Questions?
If you have any questions on this product or
any of the innovative products offered by
Haldex, contact your local distributor for
complete details. Technical Service or
Troubleshooting help can be obtained by
calling Haldex Technical Services Department
at 800.643.2374, follow prompts.
Important Notices
DUAL DRYER SYSTEM
INSTALLATION/SERVICE
GUIDE (L31279)
®

DUAL DRYER SYSTEM
INSTALLATION/SERVICE
MANUAL (L31279)
®
Table of Contents
GeminiMDx Manifold Dual Dryer (high-capacity air drying system)
GeminiMDx Overview ......................................................................................................... 2
GeminiMDx Anatomy.......................................................................................................... 2
Pre-Treatment
Consep (condenser/separator) Overview ........................................................................... 3
Consep (condenser/separator) Anatomy/Function ............................................................ 3
Automatic Drain Valve (ADV) Function ............................................................................. 3
Drying
DRYest Air Dryer Overview ................................................................................................. 4
DRYest Air Dryer Anatomy.................................................................................................. 4
Cartridge Canister ............................................................................................................... 4
Air Dryer Base...................................................................................................................... 4
Valve Unit............................................................................................................................. 4
Charging Phase.................................................................................................................... 5
Unloading Phase.................................................................................................................. 5
Regeneration Phase ............................................................................................................ 5
Cut-In.................................................................................................................................... 5
System Specifications ................................................................................................................ 6
Torque Specifications................................................................................................................. 6
Plumbing Schematics
Pre-Treatment and Drying .................................................................................................. 7
Drying Only.......................................................................................................................... 7
Dimensions and Port Identification.......................................................................................... 8
Electrical Diagrams
Dual Consep 12/24V Non-Heated Without Relay ............................................................. 11
Dual Consep 12/24V Heated With Electrical Relay or Timer Relay.................................. 11
Electrical Relay.................................................................................................................... 11
Timer Relay ......................................................................................................................... 11
Air Dryer Heater ................................................................................................................. 11
Operational Check .................................................................................................................... 12
Troubleshooting........................................................................................................................ 13
Suggested Maintenance Schedule........................................................................................... 14
GeminiMDx Part Number/Description Listing ........................................................................ 15
Replacement Parts/Retrofit Components................................................................................ 15
Service Kit Components Identification.................................................................................... 16
Service Kit Contents.................................................................................................................. 17
Removal/Installation Instructions
GeminiMDx......................................................................................................................... 18
Cartridge Canister .............................................................................................................. 18
Valve Unit with Integrated Purge Valve ........................................................................... 19
12/24 VDC Heater Assembly............................................................................................... 20
Outlet Check Valve Assembly ............................................................................................ 21
Turbo-Protection Valve (TPV)............................................................................................. 21
Cyclone Insert ..................................................................................................................... 22
Glossary ..................................................................................................................................... 23
©2019 All Rights Reserved
Material may only be reproduced with the written permission of Haldex.
Section Page
The products described within this literature, including without limitation, product features, specifications, designs, availability and pricing are subject
to change by Haldex and its subsidiaries at any time without notice. This document and other information from Haldex, its subsidiaries and authorized
distributors provide product and/or system options for further investigation by users having technical expertise. It is important that you analyze all aspects
of your application and review the information concerning the product or system, in the current literature or catalog. Due to the variety of operating
conditions and applications for these products or systems, the user, through their own analysis and testing, is solely responsible for making the final
selection of the products and systems and assuring that all performance, safety and warning requirements are met.
Page 1
DUAL DRYER SYSTEM
INSTALLATION/SERVICE
GUIDE (L31279)
®

DUAL DRYER SYSTEM
INSTALLATION/SERVICE
MANUAL (L31279)
®
DUAL DRYER SYSTEM
INSTALLATION/SERVICE
GUIDE (L31279)
®
Page 2
GeminiMDx Overview
In its most basic form, the GeminiMDx dual dryer is
the connection of two DRYest Air Dryers in parallel to
treat the compressed air produced by high capacity air
compressors. The GeminiMDx is a desiccant type dryer
that removes moisture and contaminants from the
compressed air before entering the air brake system.
A variant of the GeminiMDx includes a single or
dual Consep (Condenser/Separator) to pre-treat the
compressed air before entering the air dryers and
extend the life of the air dryer’s desiccant cartridge.
GeminiMDx Anatomy
The GeminiMDx consists of the following major
components: Dryest® air dryers, inlet/outlet manifolds,
control/purge manifolds, banjo bolts, sealing washers
and one or two Consep units (optional).
Dual Conseps [1]
The two Conseps are identical. They condense and
separate contaminants from the compressed air. The
Automatic Drain Valve (ADV), will drain the condensed
liquid and separated contaminants.
Dual DRYest Air Dryers [2]
The two dryers are identical. They each contain a
desiccant cartridge, turbo protection valve, purge
valve, safety valve, outlet check valve and heater.
GeminiMDx Manifold Dual Dryer
[1] [2]
[3]
[4]
[6]
[7]
[5]
Cast Aluminum Manifolds [3,4,5]
The manifolds provide a single connection for inlet/
outlet, control and purge air line connections and
parallel flow to and from each Consep or air dryer.
Sealing Washers [6]
The sealing washers provide leak-free joints between
the banjo bolts, manifolds and air dryers.
Banjo Bolts [7]
The banjo bolts secure the manifolds to the air dryers
and are hollow with cross-drilled passages to allow air
to flow to/from the manifolds to the air dryers.

DUAL DRYER SYSTEM
INSTALLATION/SERVICE
MANUAL (L31279)
®
DUAL DRYER SYSTEM
INSTALLATION/SERVICE
GUIDE (L31279)
®
Page 3
Consep Overview
The Consep consists of a condenser/separator and a
Automatic Drain Valve (ADV). The condenser/separator
will condense and separate contaminants from the
compressed air. The drain will expel condensed liquid
and separated contaminants. When it is installed and
adequately cooled, the Consep will extend the life of
the desiccant cartridge.
Consep Anatomy/Function
The compressed air is led into the Consep at the inlet
port on the side of the Aluminum Housing [1]. The
compressed air passes between the housing wall and
the Cyclone Insert [2]. The shape of the cyclone forces
the compressed air to rotate. The centrifugal effect
which occurs when the air rotates around the cyclone
forces the water and contaminants to the housing
wall. At the base of the cyclone, the compressed air
is directed upwards through the cyclone interior and
out via the outlet port at the top of the housing.
Water and contaminants which have been condensed
and separated flow downwards through a Filter [3]
and are collected in the sump of the Automatic Drain
Valve (ADV) [4]. The liquid contaminants collected in
the ADV are drained when the Shuttle [5] is lifted via
electrical activation of the Solenoid Coil [6].
Automatic Drain Valve (ADV) Function
Pre-Treatment
When air pressure is present and NO
electrical power, the Shuttle [5] is
forced against the lower seat. The
entry to the sump is open to receive
liquid contaminants.
With electrical power, the Solenoid
Coil [6] generates a magnetic field
which pulls the shuttle against the
upper seat. This closes the entry
to the sump and drains liquid
contaminants collected in the sump.
To manually drain the ADV, push the
Red Manual Drain Button [7] to
activate drainage. This function
only works if the ignition is off
and the unit is pressurized.
[1]
[2]
[3]
[6]
[4]
[5]
WET TANK
PURGE TANK
GOVERNOR
COMPRESSOR
1/4”-18 NPTF
3/4”-18 NPTF 3/4”-18 NPTF
Pre-Treatment
OUTLET
INLET
EXHAUST
[5] [6] [7]

DUAL DRYER SYSTEM
INSTALLATION/SERVICE
MANUAL (L31279)
®
DRYest Air Dryer Overview
The Haldex DRYest is a desiccant type dryer that
effectively collects and removes moisture, oil and
contaminants before they enter the compressed air
system. The DRYest provides filtered, moisture free
air to the brake system which reduces freezing and
corrosion of the components in the air system.
Anatomy
The DRYest contains three major parts: Cartridge
Canister [1] with five stages of drying, Air Dryer Base [2]
and Valve Unit [3].
Cartridge Canister [1]
The Cartridge Canister [1] is where drying and
contaminant removal occurs in the air dryer. The
GeminiMDx Dual Dryer contains the Haldex patented
MTC+ cartridge design which has five stages of drying.
The desiccant cartridge is contained by the canister
and affixed to the dryer base with an o-ring, mounting
collar and four bolts.
Air Dryer Base [2]
The Air Dryer Base [2] connects the Cartridge Canister
[1] and the Valve Unit [3]. The base has connections
for the inlet, outlet and purge reservoirs. The base also
contains the following components:
• Safety Valve [2.1]
• Outlet Check Valve [2.2]
• Turbo-Protection Valve (TPV) [2.3]
• Heater Element [2.4]
Valve Unit [3]
The Valve Unit [3] attaches to the Air Dryer Base [2]
with six screws and contains the purge valve. The Valve
Unit [3] has a control port for external air governor
connection and includes a muffler style or drain tube
style purge outlet.
Drying
Page 4
WET TANK
PURGE TANK
GOVERNOR
COMPRESSOR
OPTIONAL
PRE-TREATMENT
[1]
[2.3]
[2.4]
[2.2]
[3]
[2.1]
[2]

DUAL DRYER SYSTEM
INSTALLATION/SERVICE
MANUAL (L31279)
®
DRYest Function
Charging Phase
Air from the compressor or pre-treatment flows into
the inlet manifold and divides to enter each air dryer.
Once the inlet air pressure is greater than the TPV
[2.3] opening pressure, the air enters each Desiccant
Cartridge [1]. The air first passes through an aluminum
Inlet Filter [1.1] in the cartridge, which traps droplets
and solid particles.
The air continues traveling through several sections of
Desiccant [1.2] [1.3] [1.4], each section with increasing
sizes of desiccant, to capture contaminants. Once the
air passes through the cartridge the remaining water
and oil molecules will be captured.
As the air exits the cartridge, it passes through an
Outlet Filter [1.5], through an Outlet Check Valve
[2.2] and finally reaches the outlet manifold where it
combines with the outlet air of the second dryer.
A small portion of air from the cartridge passes to the
purge manifold where it combines with air from the
other dryer and exits the purge manifold to fill an
external purge reservoir.
Unloading Phase
When the air brake system pressure reaches the cut-
out setting of the air governor, the output of the air
governor passes to the air compressor unloader to stop
the air compression and passes to the purge valve of
each dryer via the control manifold. The purge valve
opens to atmosphere and depressurizes the air dryer.
The turbo protection valve (TPV) will close once the
inlet air is below 35 psi. The regeneration cycle will
begin. The outlet check valve will close, preventing the
back flow from the system.
Regeneration Phase
During the unloading phase, a regeneration cycle
(desorption) will remove the contaminants. Since the
cartridge is depressurized, air from the external purge
reservoir will flow back to the dryer, pass through the
purge manifold to the desiccants, collect the captured
contaminants and drain to the atmosphere via the
purge valve and silencing unit. The regeneration
cycle or purge cycle will continue until the purge
reservoir air pressure depletes to 0 psi. This will last
approximately 30 seconds. The purge valve will remain
open until the brake system decreases to the air
governor cut-in setting.
Cut-In
As air is consumed by the brake system, the air pressure
decreases until the air governor cut-in pressure is
achieved. At cut-in pressure the air governor closes,
its output air exhausts to atmosphere, the unloader
valves of the dryer close and the compressor begins to
compress air. A new charging phase begins.
Drying (cont’d)
Page 5
Charging Phase
Unloading Phase
Control Port
Purge Port
Outlet
Port
Inlet
Port
[1.4]
[1.3]
[2.3]
[1]
[1.2]
[1.1]
[1.5]
[2.2]
Purge
Port

DUAL DRYER SYSTEM
INSTALLATION/SERVICE
MANUAL (L31279)
®
System Specications
Dual Consep and
Dual Dryer
Dual Consep
Only
Dual Dryer
Only
Weight 53 lbs.
(with mounting bracket)
11 lbs. 40 lbs.
Envelope 20”W x 15”H x 12”D 6”W x 12”H x 8”D 14”W x 13”H x 10”D
Inlet/Outlet Ports 3/4” - 14 NPT 3/4” - 14 NPT 3/4” - 14 NPT
Control Port 1/4” - 18 NPT n/a 1/4” - 18 NPT
Purge Port 1/4” - 18 NPT n/a 1/4” - 18 NPT
Max. Working Pressure 150 PSIG 150 PSIG 150 PSIG
Safety Valve 160 PSIG n/a 160 PSIG
Turbo Protection Inlet Required 35 PSI n/a 35 PSI
Ambient Temperature -40°F - +176°F -40°F - +176°F -40°F - +176°F
Maximum Inlet Air Temperature +176°F +176°F +176°F
Recommended Inlet Air Temperature +40°F - +150°F +40°F - +150° +40°F - +150°
Air Flow Capacity 70 SCFM 70 SCFM 70 SCFM
Minimum Purge Volume 600 in.3n/a 600 in.3
Compressor Unloaded Time 30 seconds n/a 30 seconds
Maximum Duty Cycle 25% n/a 25%
Automatic Drain Valve 24VDC/1.0A
12VDC/2.0A
24VDC/1.0A
12VDC/2.0A
n/a
Heater Element n/a n/a 24VDC/4.0A
12VDC/8.0A
Heater Thermostat Operating Range n/a n/a Closes 45° ± 7°F
Opens 71° ± 6°F
Heater Element Resistance n/a n/a 12VDC:1.4-1.8 W
24VDC: 5.9-6.9 W
Drain Capacity n/a 1.3cc per ADV/Operation n/a
Drain Options n/a Swivel Tube, Open Muffler, Tube
Torque Specications
Consep Mounting Bolts to Bracket .........................................6-11 ft-lbs (Tighten Bolts in Cross Pattern)
Dryer to Bracket: .....................................................................35-50 ft-lbs
Consep Inlet and Outlet Manifold M22 Banjo Bolts ...............45-55 ft-lbs
Dryer Inlet and Outlet Manifold M22 Banjo Bolts ..................45-55 ft-lbs
Dryer Control and Purge Manifold M12 Banjo Bolts...............130-150 in-lbs
ADV Mounting Nuts to Consep ...............................................80-98 in-lbs
Heater Retaining Screw...........................................................45-55 in-lbs
Turbo Protection Valve ............................................................45-55 ft-lbs
Check Valve Plug .....................................................................84-94 in-lbs
Valve Unit Bolts .......................................................................62-80 in-lbs
Cartridge Canister Bolts..........................................................32-35 ft-lbs
Page 6

DUAL DRYER SYSTEM
INSTALLATION/SERVICE
MANUAL (L31279)
®
Plumbing Schematics
Page 7
Pre-Treatment and Drying
Drying Only
WET TANK
PURGE TANK
GOVERNOR
COMPRESSOR
1/4”-18 NPTF
3/4”-14 NPTF 3/4”-14 NPTF
WET TANK
PURGE TANK
GOVERNOR
COMPRESSOR
OPTIONAL
PRE-TREATMENT
1/4”-18 NPTF
3/4”-14 NPTF

DUAL DRYER SYSTEM
INSTALLATION/SERVICE
MANUAL (L31279)
®
Page 8
Dimensions and Port Identication
Dual Consep Assembly

DUAL DRYER SYSTEM
INSTALLATION/SERVICE
MANUAL (L31279)
®
Dimensions and Port Identication
Dual Dryer Assembly
Page 9

DUAL DRYER SYSTEM
INSTALLATION/SERVICE
MANUAL (L31279)
®
Dimensions and Port Identication
Dual Consep/Dual Dryer Assembly
Page 10

DUAL DRYER SYSTEM
INSTALLATION/SERVICE
MANUAL (L31279)
®
Page 11
Electrical Diagrams
Dual Consep 12/24V Non-Heated
Without Relay
Electrical Relay (not included)
Air Dryer Heater
Dual Consep 12/24V Heated with
Electrical Relay or Timer Relay
Timer Relay (not included)
Thermostat Operation
Closes as temperature decreases to 45° ± 7° F
Opens as temperature increases to 71° ± 6° F
Normal - Connect to #87 (#87A not used)
Heated - Connect to #87A as shown (#87 not used))
The heater terminals
are non-polarized.
Connection per SAEJ2383.
Accepts Delphi Electrical
Systems P/N 12020599.
Normal - Connect to #87 as shown (#87A not used)
ON 3 Seconds/OFF 45 Seconds
Heated - Connect to #87A (#87 not used)
ON 45 Seconds/OFF 3 Seconds
12/24V
Ground
See Harness
Wiring
Options
Below
THERMOSTAT
HEATER

DUAL DRYER SYSTEM
INSTALLATION/SERVICE
MANUAL (L31279)
®
Testing The GeminiMDx
Before placing the vehicle in service, perform the
following tests:
1. Close all reservoir drain cocks.
2. Build up system air pressure to governor cut-out
and note that the GeminiMDx dryer purges with an
audible exhaust of air.
3. Check for air leaks by applying a soapy water
solution around the dryer manifolds, banjo bolts,
pipe fittings, and dryer base.
4. Actuate the service brakes to reduce system air
pressure to governor “cut-in” pressure and ensure
the compressor is in a loaded cycle. Note that the
system once again builds to full pressure and is
followed by a purge.
5. In order to check the Consep / ADV for proper
operation the compressor must be in the
compressor loaded cycle and the air governor must
be between “cut-in” and “cut-out” pressure. This
step can be performed concurrently with step 3.
a. Check the Consep for air leaks by applying a
soapy water solution around the manifolds,
banjo bolts, pipe fittings, and ADV mounting
area and drain port.
b. Observe the ADV for an audible click, either
during a brake application, timer function, or
multiplexing signal. As the ADV clicks, and
compressor loaded and governor between
“cut-in” and “cut-out”, the drain will expel a
small “puff” of air. If contaminants are present,
they will be expelled with the “puff”.
c. Perform a manual drain test by depressing the
red button on the bottom of the valve.
d. To check the ADV valve’s heating element, turn
on the vehicle’s ignition. Wait ten minutes. The
valve should be warm to the touch.
6. Operational check of air dryer heater:
a. The heater can be checked while in the air
dryer housing.
b. The air dryer temperature must be below 45°F
(thermostat closing temperature) to check the
heater resistance.
c. Set volt-ohmmeter to ohms.
d. Disconnect the electrical plug.
e. Connect the continuity tester to the heater
element terminals.
6. f. Measure the resistance
Acceptable 12VDC: 1.4-1.8 W
Acceptable 24VDC: 5.9-6.9 W
g. Replace heater if 12VDC is <1.4 W
or 24VDC is <5.9 W.
7. It is recommended that the vehicle be tested for
leakage using the following procedure to assure
the GeminiMDx will not cycle excessively.
a. Apply the parking brakes, build system pressure
to governor cut-out and allow pressure to
stabilize for at least one minute.
b. Observe the dash gauge pressures for two
minutes and note any pressure drop. Pressure
drop should not exceed 4 PSI with brakes
released and 6 PSI with brakes applied. Any
noticeable leakage must be repaired to avoid
excessive dryer cycling.
9. Charge Cycle Time: During normal, daily
operation the compressor should recover from
governor cut-in to governor cut-out in 90 seconds
or less at engine RPM’s depending on vehicle
vocation.
10. Purge Cycle Time: During normal, daily
operation the compressor must remain unloaded
for a minimum of 30 seconds between charge
cycles. This minimum purge time is required to
ensure complete regeneration of the desiccant.
Operational Check
Page 12

DUAL DRYER SYSTEM
INSTALLATION/SERVICE
MANUAL (L31279)
®
Troubleshooting
PROBLEM CAUSE REPAIR
Water in air system Contaminants in desiccant Change cartridge canister. Check
compressor for excessive oil passage.
Leaks in air system Tighten air connections, soap
connection and recheck for leaks.
Excessive compressor cycling Excessive leaks in air system Tighten air connections, soap
connection and recheck for leaks.
Defective dryer outlet check valve Clean check valve seat and replace.
Undersized compressor; duty cycle of
compressor should not exceed 25%
Reduce air demand or install greater
output compressor.
Safety valve is open Cartridge canister is plugged Excessive oil passage from compressor.
Check for worn compressor, replace if
necessary. Replace cartridge canister.
Ice block in air dryer Check heater function. Check electrical
power to heater assembly. Refer to
Operational Check Section Page 12.
Replace heater assembly, if necessary.
Excessive system pressure Repair or replace air governor.
Poor drying efficiency Air at inlet of dryer exceeds 170°F Extend length of compressor discharge
line. The 170°F dryer inlet temperature
can usually be accomplished with 12’ to
15’ of compressor discharge line.
Short life of air dryer or cartridge canister Air at inlet of dryer exceeds 170°F Extend length of compressor discharge
line. The 170°F dryer inlet temperature
can usually be accomplished with 12’ to
15’ of compressor discharge line.
Duty cycle of compressor does not allow
for sufficient time for desiccant regener-
ation
During normal operation the compressor
must remain unloaded for a minimum of
30 seconds to allow for sufficient purge.
Lengthy loading times must be avoided.
Air dryer must be “bypassed” in
applications with high air use such
as bulk unloading.
Water, oil or a mixture of both are present in air
system
Desiccant contaminated with oil Inspect, clean or replace cyclone insert in
Consep. Replace cartridge canister. Drain
all air tanks. Inspect compressor for
correct operation.
Air pressure will not “build up” Air leak from purge valve Not a serviceable item. Refer to Valve Unit
with Integrated Purge Valve Section on
Page 19. Replace valve unit assembly.
Governor not operating Check operation of governor and
replace if necessary.
Ice block in air line, Consep or dryer Check heater function. Check electrical
power to heater assembly. Refer to
Operational Check Section Page 12.
Replace heater assembly, if necessary.
Page 13

DUAL DRYER SYSTEM
INSTALLATION/SERVICE
MANUAL (L31279)
®
PROBLEM CAUSE REPAIR
Heater element inoperable Wrong voltage of element installed Verify correct element or valve is being
used. (12 VDC vs 24 VDC).
Electrical power not present at heater
element
Check for power and ground with ignition
in “RUN” position.
Heater element not functioning Perform operation check. Replace heater
element as needed.
Consep ADV inoperable Electrical power not present at ADV Check for power and ground with ignition
in “RUN” position.
Consep ADV manual drain button inoperable Debris collected around return spring Flush with a non-residual cleaner and
compressed air.
Troubleshooting (cont’d)
Suggested Maintenance Schedule
Maintenance
Interval
Maintenance
Recommended
Daily Ensure purge valve operation. Drain
air system.
Weekly Drain GeminiMDx purge tank and
air tanks.
Monthly Operational check of all
GeminiMDx functions.
Every Two Years Replace cartridge canisters.
Every Summer Ensure discharge line temperature
is <170°F
Every Winter Check heater element operation.
Refer to Operational Check Section
Page 12.
The maintenance intervals are dependent on
the operation conditions. The following is only a
suggested service interval for general installations.
One Year or 30,000 Miles, whichever
comes first
If the suggested interval is too long or too short
for the particular application, adjust accordingly
with the manufacturer’s specifications.
During maintenance, the internal parts must be
cleaned, inspected and/or replaced. Refer to Part
Service Kit(s) on the following page.
The Consep must be inspected periodically for
proper operation. The interval between inspections
is determined by the type of service. High
compressor duty cycles and high temperatures can
cause a build-up of carbon in the condenser, drain
valve and filter.
Page 14

DUAL DRYER SYSTEM
INSTALLATION/SERVICE
MANUAL (L31279)
®
GeminiMDx Part Number/Description Listing
Replacement Parts/Retrot Components
Aftermarket
Part Number
Original Equipment
Part Number
Dual Dryer Exhaust
Dual Dryer Heater,
Volts
Consep, Quantity
Consep, Volts
Consep Tube Drain
Consep
Orientation,
Notes, Etc.
Dual Dryer
Repair Kit
Consep
Repair Kit
Combo (Both Dryer
and Consep Together)
Pre-treatment
and Dryer
DA37011 N4265AC Silencer 24 112 NLeft side Consep bracket protruding DQ6103 DQ6122 DQ6120
DA37013 N4265AD Silencer 24 112 NLeft side Consep bracket inverted DQ6103 DQ6122 DQ6120
DA37021 N4265AE Silencer 24 124 NLeft side DQ6103 DQ6107 DQ6127
DA37061 N4265BC Silencer 24 224 NLeft side DQ6103 DQ6100 n/a
DA37062 N4265BD Silencer 24 224 NRight side DQ6103 DQ6100 n/a
DA37181 N4265BR Tube 24 224 YLeft side DQ6102 DQ6100 n/a
DA37068 N4265BT Silencer 24 224 NLeft side DQ6103 DQ6100 n/a
DA37251 N4265FB Silencer 12 212 NRight side DQ6105 DQ6101 n/a
DA37259 N4265FJ* Silencer 12 212 NRight side DQ6105 DQ6101 n/a
Pre-treatment
0nly
DA39100 N4265CF n/a n/a 224 NWide mount n/a DQ6100 n/a
DA39102 N4265CJ n/a n/a 224 NNarrow mount n/a DQ6100 n/a
Dryer
only
DA37000 N4265AA Silencer 24 n/a n/a n/a n/a DQ6103 n/a n/a
DA37100 N4265AB Tube 24 n/a n/a n/a n/a DQ6102 n/a n/a
DA37005 N4265DA** Silencer 24 n/a n/a n/a n/a DQ6103 n/a n/a
DA37500
N4265EB
Tube 24 n/a n/a n/a No Conseps; No TPVs [Nat. Asp. Appl.] DQ6133 n/a n/a
*Consep connector is rotated 180 degrees under the dryer; **SKF replacement
Part Number Description Notes
102494DM Y-Harness for Dual Consep Two Weather-Pack Female Connectors to One Weather-Pack Male Connector
102494DN Y-Harness for Dual Dryest Two Metri-Pack 280 Female to Two Splice Connectors
41092749 Automatic Drain Valve (ADV) for 24V Consep Complete Service Kit
41092750 Automatic Drain Valve (ADV) for 12V Consep Complete Service Kit
41176281 Relay for 24V Automatic Drain Valve (ADV) -
41176282 Relay for 12V Automatic Drain Valve (ADV) -
41178240 Drain Tube Kit for Consep or Automatic Drain Valve 3/4” Side Outlet; Replaces Bottom Cover
41183400 Timer Relay for 24V Automatic Drain Valve (ADV) -
41183401 Timer Relay for 12V Automatic Drain Valve (ADV) -
47110020 Heater Repair Kit for 12V DRYest 12V Heater, Pigtail, Splice Connectors
47110021 Heater Repair Kit for 24V DRYest 24V Heater, Pigtail, Splice Connectors
DQ6121 Purge Tank Kit for GeminiMDx Dual Dryer System 600 cubic inch purge tank; fittings; 3/8” Air Line; Drain valve
DQR0001 GeminiMDx Retrofit Kit, 12 VDC Includes: DA37259, 102494DM, 102494DN and DQ6121
Page 15

DUAL DRYER SYSTEM
INSTALLATION/SERVICE
MANUAL (L31279)
®
Page 16
Service Kit Components
34
36
33
28
2
1
3
7
9
10
11
12
13
19 14
15
16
17
18
8
4
5
6
32
23
31
22
30
21
20
24 29
25
26
27

DUAL DRYER SYSTEM
INSTALLATION/SERVICE
MANUAL (L31279)
®
Page 17
Service Kit Contents
1CANISTER, CARTRIDGE X
2BOLT, HEX HEAD SHOULDER M10 X 40 8 8 8 8 8 8 8 4
3CARTRIDGE, DESICCANT 2 2 2 2 2 2 2 1
4PIN, LOCKING 2 2 2 2 2 2 2 1
5NUT, M10 8 8 8 8 8 8 8 4
6O-RING 2 2 2 2 2 2 2 1
7PIN, LOCKING 6 6 6 6 6 6 6 3
8CAP, VALVE 1
9MOUNTING BRACKET, AIR DRYER X
10 VALVE, SAFETY 160 PSI 1
11A VALVE UNIT WITH SILENCER 2 2 2 2
11B VALVE UNIT WITH DRAIN TUBE 2 2 2
12 BOLTS, VALVE UNIT 12 12 12 12 12 12 12
13 VALVE, CHECK 2 2 2 2 2 2 2 1
14 PLUG, OUTLET CHECK VALVE 2 2 2 2 2 2 2 1
15 VALVE, TURBO PROTECTION 2 2 2 2 2 2 1
16 MANIFOLD, CONTROL/PURGE X
17 WASHER, M12 SEALING 8 8 8 8 8 8 8 8
18 BOLT, M12 BANJO 4
19A HEATER, 24 VOLT 2 2 2 2 2 1
19B HEATER, 12 VOLT 2 2 1
20 BOLT, M22 BANJO LONG 4
21 WASHER, M22 SEALING 8 8 8 8 8 8 8 8 8 8 8
22 MALE ELBOW, 90° 3/4” - 14 NPTF X 3/4” TUBE 1
23 MANIFOLD, INLET/OUTLET X
24 U-BOLT, NARROW X
25 NUT, LOCKING M6 8 8 4 4 4 4
26A ADV FOR CONSEP, 24 VOLT 2 1 1
26B ADV FOR CONSEP, 12 VOLT 2 1 1
27 O-RING, CYCLONE INSERT 2 2 1 1 1 1 1
28 INSERT, CYCLONE 2 2 1 1 1 1 1
29 O-RING, ADV 2 2 1 1 1 1 1
30 BOLT, M22 BANJO SHORT 4
31 MANIFOLD, CONSEP X
32 WASHER, M22 SEALING 8 8
33 HOUSING, CONSEP X
34 TUBE, NYLON 3/4” DIA. X 14.25” LONG 1
35 MALE ELBOW, 90° 1/2” - 14 NPTF X 3/4” TUBE (NOT SHOWN) 1
36 COLLAR, CANISTER 1
DUAL CONSEP
KIT NUMBERS
SINGLE CONSEP
KIT NUMBERS
INDIVIDUAL KITS
TWO KITS
REQUIRED PER
DUAL DRYER
DUAL DRYER
KIT NUMBERS
SINGLE CONSEP
DUAL DRYER
KIT NUMBERS
47110024
47190361
47178964
471-77484
47110022
47189189
47178223
47178199
41277322
DQ6122
DQ6107
DQ6123
DQ6127
DQ6120
DQ6106
DQ6132
DQ6133
DQ6105
DQ6103
DQ6102
DQ6101
DQ6131
DQ6100
NSS
Component Description
47171868

DUAL DRYER SYSTEM
INSTALLATION/SERVICE
MANUAL (L31279)
®
GeminiMDx
1. Ensure air pressure is at 0 PSI in air system.
2. Disconnect air lines from GeminiMDx manifolds
and Consep inlet manifold.
3. Disconnect electrical connection from the Consep
ADV.
4. Disconnect the electrical connection from both
heating elements.
5. Remove the mounting bolts from the GeminiMDx
bracket.
6. Remove the air dryer for inspection and
maintenance.
7. Reinstall / install the unit to the mounting location
using the mounting bolts. Tighten and torque the
bolts to 35-50 ft-lbs
8. Connect electrical plugs to both heating elements.
9. Connect electrical plugs to the Consep ADV.
Valve (ADV) electrical harness.
10. Reconnect air lines to the GeminiMDx manifolds
and Consep inlet manifold.
Perform Operational Checks (Page 12).
NOTE: Clean area above and around the GeminiMDx
BEFORE removing the cartridge canister.
Cartridge Canister
1. Ensure air pressure is at 0 PSI in air system.
2. Clean and remove all debris around cartridge
canister.
3. Remove four retaining bolts from retaining
collar.
4. Lift cartridge canister away from dryer base.
5. Inspect and remove any debris from dryer base.
Discard old o-rings and clean sealing surface.
6. Ensure that protection cap for safety valve housing
is not damaged. If cap is off, snap cap back into
place.
7. Flip cartridge canister upside down. Rotate
desiccant cartridge 45° and remove from canister.
8. Install desiccant cartridge into canister and rotate
45° to secure the cartridge to the canister.
Removal/Installation Instructions
Page 18
Table of contents
Other Haldex Dehumidifier manuals