Halfords Bicycle Computer User manual

wireless computer
owner’s manual
80mm x 110mm
Black

2
Contents
Package Contents .......................................3
Using Your Computer...................................
4
1.Main Unit Setup ........................................................4
1. Initiation of Main Unit
2. Basic Display Modes
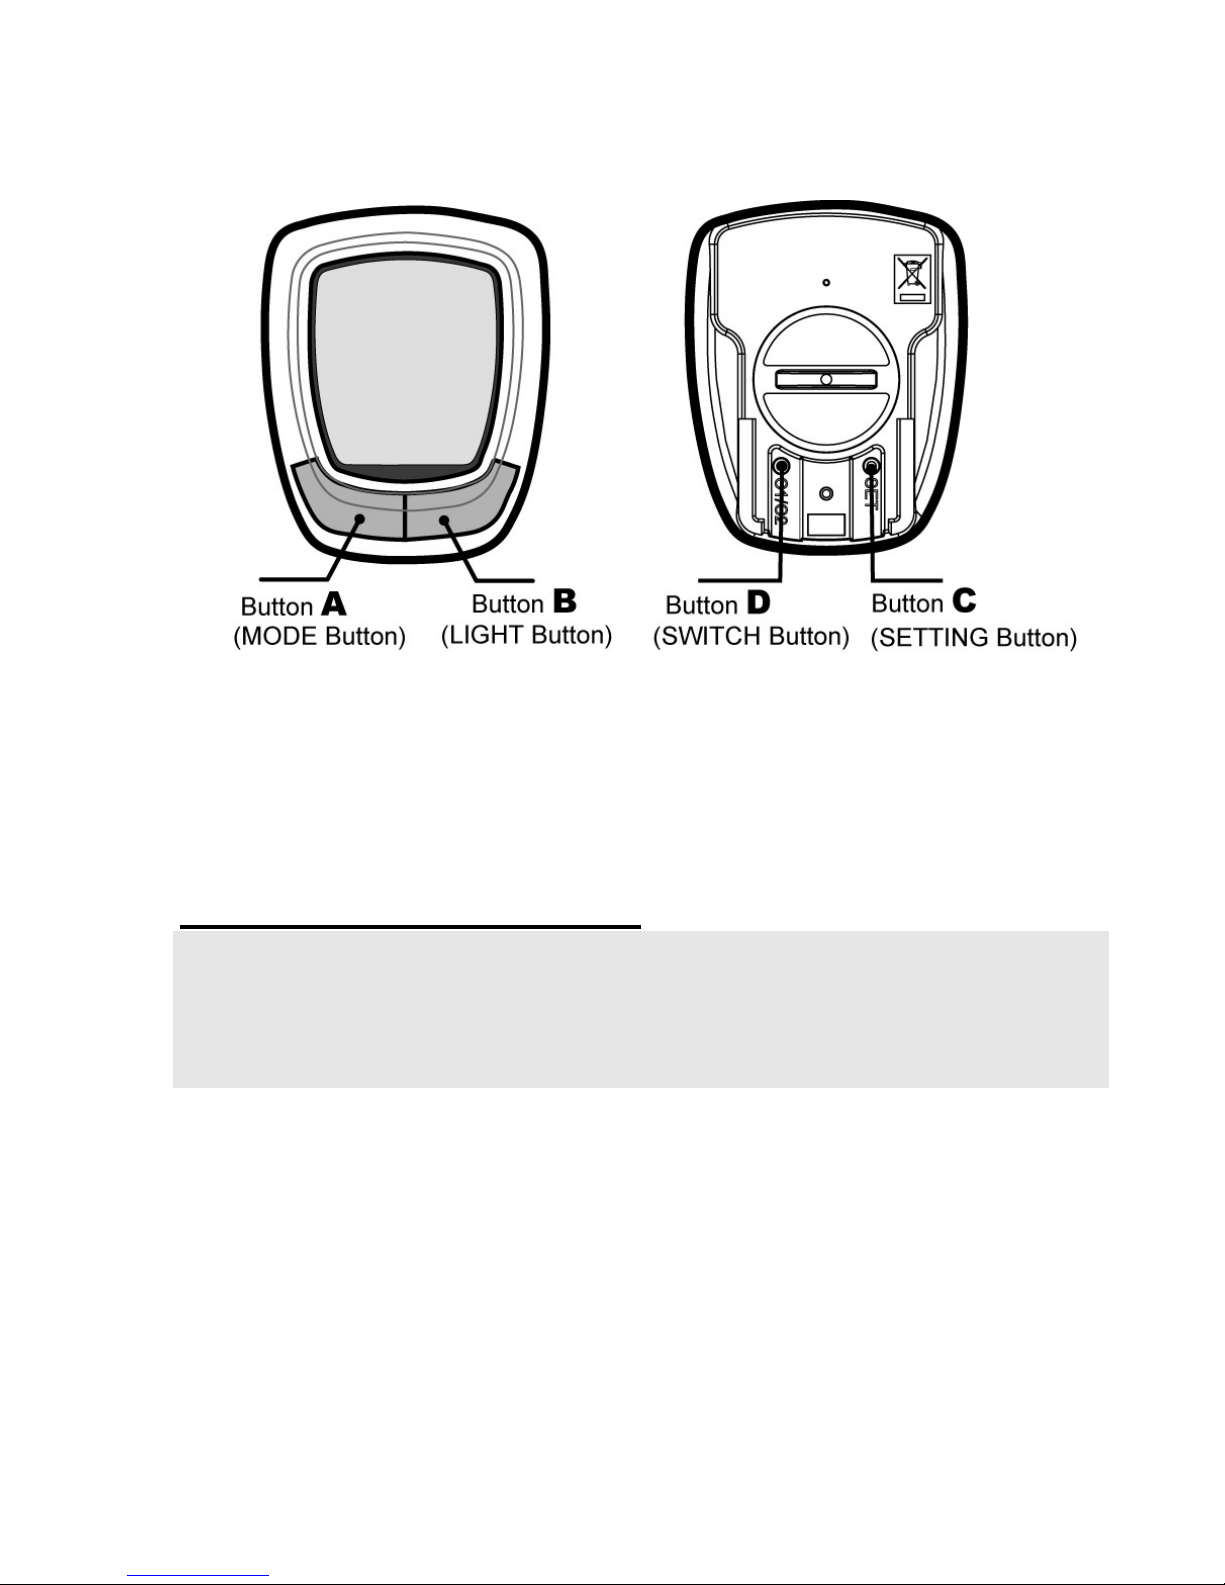
2. Overview of Button Operation...............................5
1. In Data Setting Mode
2. In General Mode
3. In Altitude Calibration Mode
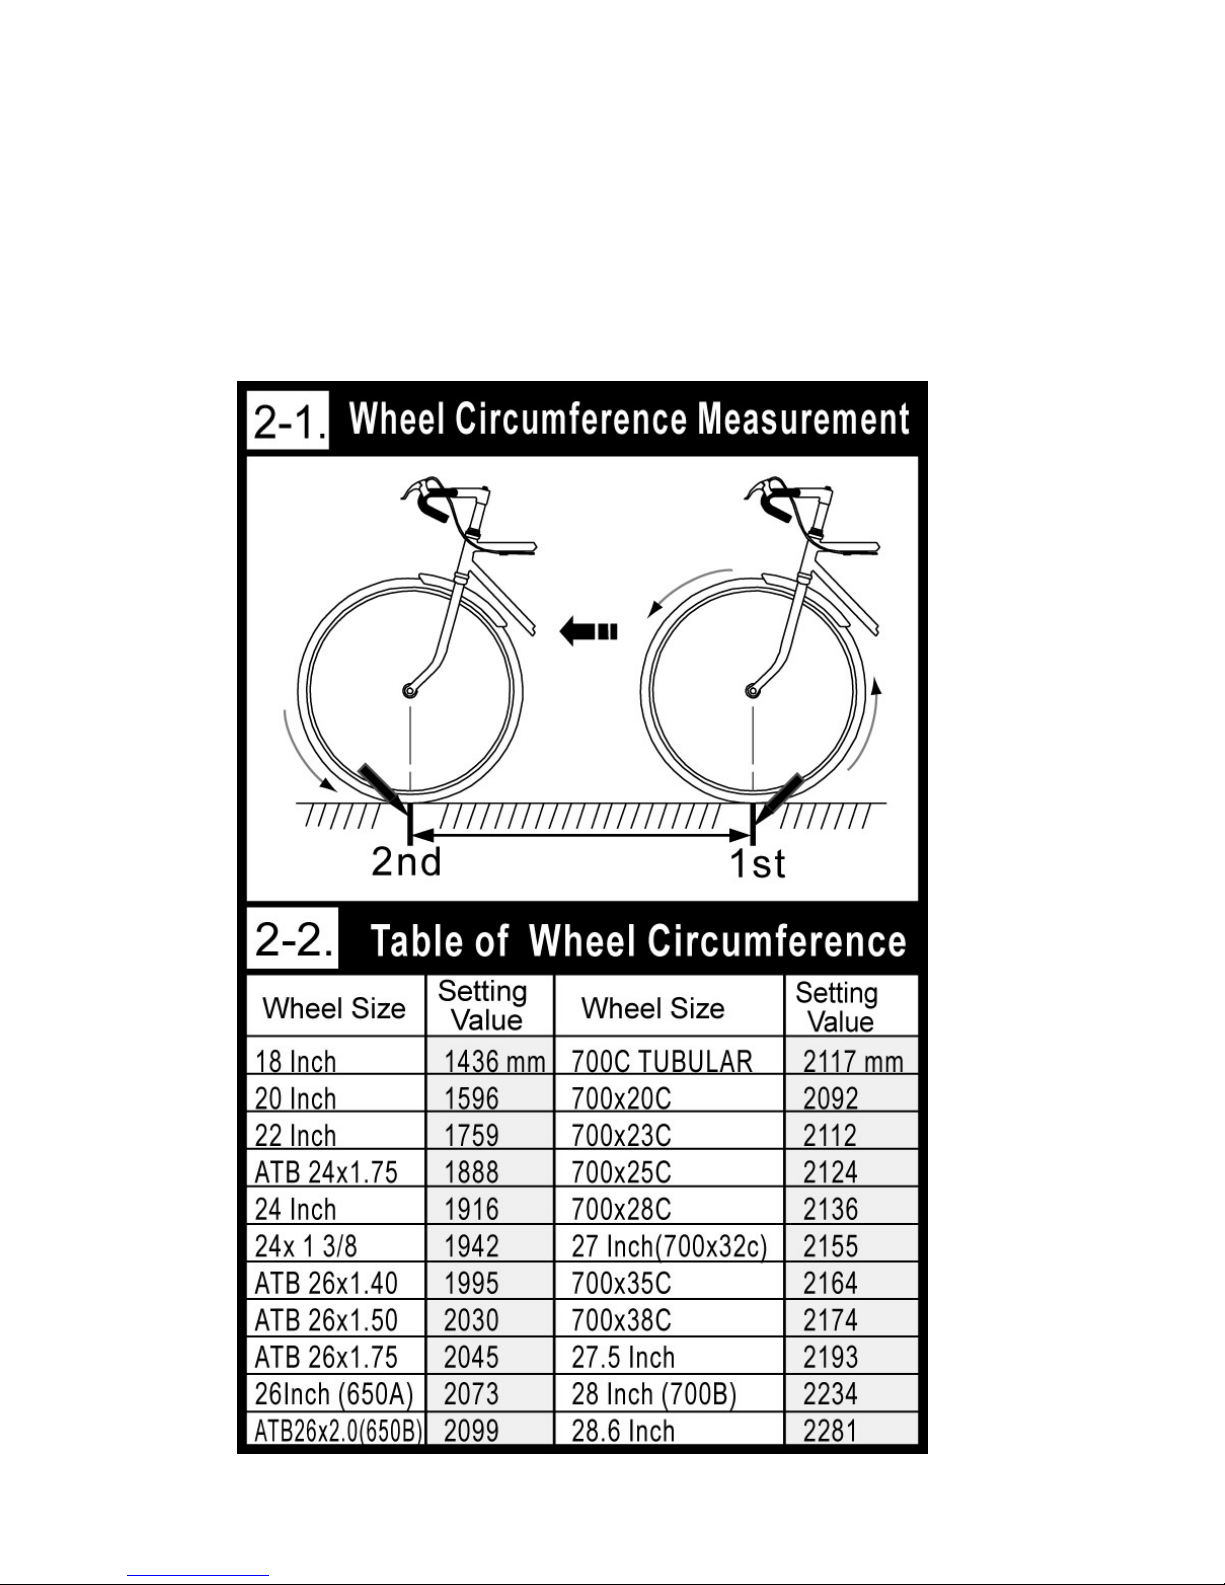
3. Wheel Circumference Measurement ..................8
4. Basic Setting & Operation ...................................10
5. General Display.....................................................14
6. Battery Replacement............................................15
7. General Mode Display ..........................................16
8. About Altitude Calibration ...................................17
9. Temperature Display ............................................18
10. Bike 1 /Bike 2 Selection......................................18
11. Data Reset............................................................19
12. EL Backlight.........................................................20
13. Sleep Mode ..........................................................20
Functions.....................................................21
Technical Specifications ............................27
General Specifications................................29
Precautions .................................................30
Trouble Shooting ........................................31

3
Package Contents
1. MAIN UNIT
Main unit
3V battery (CR2032)
2. BRACKET SET
Bracket for handlebar or stem
Bracket base
Cable ties
3. SPEED TRANSMITTER SET
Speed transmitter
3V battery (CR2032)
Transmitter rubber pad
Cable ties
Magnet set
O-ring
4. CADENCE TRANSMITTER SET
Cadence transmitter
3V battery (CR2032)
Transmitter rubber pad
Cable ties
Magnet set
O-ring
1.The installation of the accessories is on the separate sheet.
2.The accessories or parts are subject to change without prior
notice.

4
Using Your Computer
1.Main Unit Setup
1. Initiation of Main Unit:
1. Before normal operation, initiate the main unit and select units
as stated below:
1-1. Push buttons A, B, C simultaneously for 3 seconds, and
you'll see the auto-testing display.
1-2. Press any button to quit auto-testing display, and then
select units of temperature, altitude and distance.
1-3. Press the C button to quit unit selection and enter
General Mode.
2. Timing to initiate the main unit and select units is as listed
below:
2-1. The first time when you use the computer
2-2. When the display becomes irregular due to improper use
2-3. Whenever you change the battery
2. Basic Display Modes:
After initiating the computer, selecting units, you should enter
Data Setting Mode to set some basic data like wheel
circumference and clock time etc. Then go to General Mode for
normal operation.
Before riding, you should enter Altitude Calibration Mode to
calibrate the current altitude value.
The following is the General Mode Display during riding for
reference:

5
2. Overview of Button Operation
This computer includes three major display modes as shown below:
Data Setting Mode, General Mode, and Altitude Calibration Mode.
In this section, you'll learn the function of each button in each mode.
The following text lets you know how to use the buttons to operate
the computer step by step.
1. In Data Setting Mode:
Tips: 1. The buttons you'll use in Data Setting Mode: A, B, C.
2. Button for entering or quitting Data Setting Mode: C
3. Button for changing the value of a flickering digit: A
4. Button for switching to the next digit or setting: B
Button A:
1. Press the A button to change the value of a
flickering digit in a loop.
2. If you keep pushing the A button, the digit value will
automatically increase.
3.Release the A button when the required value of a
digit is displayed.
Button B:
1. Press the B button to move to the next digit in a
loop.
2. Push the B button for 1 second to move to the next
setting.

6
Button C: 1. In General Mode, press the C button to enter Data
Setting Mode.
2.In Data Setting Mode, press the C button to exit and
return to General Mode.
Button D: No function.
How do you enter Data Setting Mode after initiating the computer?
After initiating the computer by pressing the A, B, C buttons at the same
time for 3 seconds, press any button to quit auto-testing display, and
then select units. After unit selection, press the B button for 2 seconds
to enter Data Setting Mode.
2. In General Mode:
Tips:
1. The buttons you'll use in General Mode: A, B, C, D
2. Button for changing the function display: A
3. Button for resetting the trip data: A (3's)
4. Button for entering Data Setting Mode: C
5. Buttons for entering Altitude Calibration Mode: A+B (3's)
Button A:
1. Press the A button to move to the next function
display.
2. Press the A button for 3 seconds, and you will
reset the following data:
AVG SPD, MAX SPD, DST, RTM, ALT, MAX ALT,
AVG RPM, MAX RPM.
Button B: 1. Press the B button to turn on the EL backlight.
2. Press the B button for 1 second, and the
temperature will be displayed.
Button C:
Press the C button, and you'll enter Data Setting
Mode.
Buttons A+B: Push both buttons for 3 seconds, and you'll enter
Altitude Calibration Mode.
Button D:
Press the D button to switch to Bike 1 or Bike 2.

7
3. In Altitude Calibration Mode:
Tips:
1.The buttons you'll use in Altitude Calibration Mode: A, B.
2.Buttons for entering or quitting Altitude Calibration Mode: A+B (3's)
3.
Buttons for quickly resetting the current altitude to zero: A+B (1's)
Buttons A+B:
1. In General Mode, push A and B buttons for 3
seconds to enter Altitude Calibration Mode.
2. In this mode, press A and B buttons at the same
time briefly, and the current altitude value will
return to zero. It's convenient for quick setting.
3. Push A and B buttons for 3 seconds to quit this
mode and return to General Mode.
Button A:
1. Press the A button to change the plus sign to
minus, or change the minus sign to plus.
2. Press the A button to change the value of a
flickering digit during setting.
Button B: Press the B button to move to the next digit in a
loop during setting.
About Altitude Calibration:
1. If you are aware of your home altitude or basis altitude before riding,you can
directly adjust the current altitude data after you enterthis mode.
2. If you do not know your basis altitude before riding or if you do not care
about the altitude of the starting point, you may return the current
altitude value to zero in the calibration mode by pressing both A and B
buttons at the same time briefly. In this way, the rider will still enjoy the
fun of learning the accumulated altitude gains during each ride.

8
3. Wheel Circumference
Measurement
To set the wheel circumference before riding, you should
measure the wheel circumference by yourself or just refer to the
Wheel Circumference Table as shown below:

9
How do you measure the wheel circumference
yourself?
Roll the wheel until the valve stem is closest to the ground and mark
the corresponding spot on the floor as the first point. Next, roll the
wheelforward until the valve stem is closest to the ground once again.
Mark the corresponding spot on the floor as the second point.
Then measure the distance between both points, using the unit of
millimeter. The distance equals your wheel circumference.
1.The default value of wheel circumference for Bike 1 is 2155mm;
that for Bike 2 is 2050mm. Enter the correct wheel
circumference into the computer in Data Setting Mode.
2.Refer to pages 10 and 11 about basic setting to set your wheel
circumference.

10
4. Basic Setting & Operation
Tip for Data Setting :
1. Press the A button to change the value of a flickering digit.
Press the B button to move to the next digit in a loop.
2. Press and hold the B buttonfor 1 second to move to the next setting
when the current setting is finished.
3. If the computer is idle during Data Setting Mode for 20
seconds, it'll automatically return to General Mode.

11

12

13

14
5. General Display
The display of General Mode looks different in different phrases as
shown below:
1. Put the main unit onto the bracket, and the main unit will
automatically start measuring the speed and cadence.
2. The main unit will automatically enter Sleep Mode in 15
minutes once it doesn't receive any signals from the bike.
3. Only current time is displayed when the computer is in Sleep
Mode (Power-Saving Mode.)
4. Press the A or B button to wake it up, and it'll show the
previous display and resume measuring.
5. When the main unit is on the bracket, you cannot enter Data
Setting Mode or switch between Bike 1 and Bike 2.

15
6. Battery Replacement
1. When the low battery indicator is shown on the display,
replace the battery with a new one A.S.A.P.
2. The positive (+) pole of the CR2032 battery must face the
battery cap.
3.Press buttons A, B, C for 3 seconds to initiate the main unit.
Attention: When there's the low battery symbol on the screen,
we suggest that you replace the battery with a new one A.S.A.P.
Otherwise, the altitude measurement result may be incorrect,
and the new data may be lost.

16
7. General Mode Display
When you are riding with the computer, some functions will not
be displayed on the screen. These functions like T.AL, ODO,
mBAR, DST/D are displayed only when you stop riding.

17
8. About Altitude Calibration:
Tip for Quick Altitude Calibration
1. Press both A and B buttons for 1 second, and the current
altitude value will return to zero.
2. Press the A button to set the value of a digit, and press the B
button to move to the next digit.
3. Attention: Calibrate the current altitude only when
there're no speed signals.

18
9. Temperature Display
10. Bike 1 /Bike 2 Selection
Bike 1 and Bike 2 have their separate data in the computer.

19
11. Data Reset
1. Press and hold the A button for 3 seconds to reset data of DST,
RTM, MAX, AVG, ALT,MAX-ALT, MAX-RPM, AVG-RPM
2. The following data are stored in memory and cannot be reset:
Unit, Cmm1 (Circumference 1), Cmm2, ODO 1, ODO 2, T.RT1,
T.RT2, T.AL1, T.AL2.
3. Reset data for Bike 1 and data for Bike 2 respectively.

20
12. EL Backlight
13. Sleep Mode
Press the A or B button to wake it up.
Table of contents
Other Halfords Bicycle Accessories manuals

Halfords
Halfords Low 2 User manual

Halfords
Halfords Low 2 Bike Carrier User manual

Halfords
Halfords 151624 User manual

Halfords
Halfords Bike Rack User manual

Halfords
Halfords Bicycle Accessories User manual

Halfords
Halfords Bike Trailer User manual

Halfords
Halfords Deluxe Roof Mount Carrier User manual

Halfords
Halfords 151640 User manual