Halo Board accepts no liability for damage(s), injuries or any legal responsibilies incurred
directly or indirectly from the use of this product in the following condions:
1. Damage(s), injuries or any legal responsibilies incurred when users are drunk, taking
drugs, under the influence of anesthesia, dizziness, fague, nausea, and any other condions
both physical and mental that could impair your ability.
2. Damage(s), injuries or any legal responsibilies caused by subjecve intenonal
operaons.
3. Halo Board takes no responsibility for any misuse due to your failure to follow the Halo
Drone Disclaimer, Quick Start Guide, User Manual and warnings found on
www.HaloBoard.com.
4. Damage(s), injuries or any legal responsibilies caused by non-Halo Drone accessories and
parts.
5. Damage(s), injuries or any legal responsibilies caused by using third party products or
fake Halo Drone products.
6. Damage(s), injuries or any legal responsibilies caused by improper operaon or subjecve
misjudgment.
7. Damage(s), injuries or any legal responsibilies caused by mechanical failures due to
products aging.
8. Damage(s), injuries or any legal responsibilies caused by connued flying aer Low
Baery Alarm is triggered.
9. Damage(s), injuries or any legal responsibilies caused by flying the drone in abnormal
condions (such as when water, oil, sand or other unknown materials are inside the drone,
incomplete assembly, the main components have obvious faults, defect and missing
accessories).
10. Damage(s), injuries or any legal responsibilies caused by flying in the following
situaons: in magnec interference areas (such as high voltage lines, power staons, broad-
casng towers and mobile base staons), in radio interference areas, and in government
regulated no-fly zones.
11. Damage(s), injuries or any legal responsibilies caused by using the drone in bad weather,
such as rain, heavy wind, snow, hail, lightning, tornadoes and hurricanes.
12. Damage(s), injuries or any legal responsibilies caused when drone is in the following
situaons: collision, fire, explosion, floods, tsunamis, subsidence, ice trapped, avalanche,
debris flow, landslide, earthquake, etc.
13. Damage(s), injuries or any legal responsibilies caused by the misuse of the baery,
protecon circuit, Remote Controller module and baery chargers.
14. Damage(s), injuries or any legal responsibilies caused by infringement of laws, such as
any data, audio or video material recorded by the use of drone.
15. Damage(s), injuries or any legal responsibilies caused by insufficient training.
16. Damage(s), injuries or any legal responsibilies caused by flying in the areas prohibited by
laws, regulaons or related enes.
17. Other losses that are not covered by the scope of Halo Board liability and warranty.
Disclaimer:Flight Check |Halo Drone
1. Check your Halo Drone for any broken pieces or missing parts before you fly.
2. Check that the Remote Controller, Flight Baery, and your mobile device are all fully charged.
3. Make sure the Arm Lock Clips are ghtly locked and in place.
4. Make sure all four propellers are ghtly secured and do not have any dings.
5. Make sure your camera has a Micro SD card in it.
6. Make sure the AV Cable isn’t loose so as not to risk it geng caught by a prop during flight.
7. Check that the Halo Drone App has successfully connected to the drone.
8. Check Camera gimbal is working properly and is calibrated to the horizon.
9. Check to see if motors start and stop normally.
10. Calibrate your Drone and Follow Module compass following the on-screen instrucons.
11. Ensure you are NOT within a No-Fly Zone and that flight condions are suitable.
12. Be sure to observe all local laws and regulaons, and understand the risks.
It is solely your responsibility to comply with all flight regulaons.
TAKE-OFF & LANDING
1. Be sure to keep at least 10 feet of distance between you and the drone when taking off or
landing.
2. Make sure you are connected to at least 9-10 satellites before taking off. Make sure that the
icon is not blinking before take off.
FOLLOW MODE
Before using any of the follow modes, be sure you are in an open area, or set the altude seng
for your Halo Drone follow features to be higher than the surrounding objects to avoid crashes.
RETURN-TO-HOME
1. Always make sure you have enough GPS satelites linked up and that your ‘Home Point’
is correct on the map before you take off.
2. If your remote controller loses connecon with the drone, the failsafe RTH feature will kick in.
If you have failed to set a proper altude height for RTH, this may result in your drone crashing
into surrounding obstrucons as it takes a straight line path back to the ‘Home Point’.
LOW BATTERY
1. If your Halo Drone’s baery level drops too low, it will automacally acvate the Return-To-
Home feature to ensure a safe landing. If you keep flying it aer this point and the baery level
becomes crically low, the drone will just automacally decend and land wherever it is currently
located.
2. While RTH is enabled, you sll have control over the Halo Drone and can manuever it should
you need to in order to safely navigate it back home.
Warnings
14
8. Fly Safely
Halo Board encourages all fliers to have fun, but be safe and fly smart. Follow your local laws
and regulaons.
400
DO NOT FLY near or above people, near
trees, buildings, power lines, or airports.
DO NOT FLY in ‘No Fly Zones’ - For more info
visit: hp://knowbeforeyoufly.org
MONITOR YOUR ALTITUDE
Always fly under 400 feet (120 m).
DO NOT FLY in rain, snow, fog, and/or wind
speeds exceeding 20 mph.
MAINTAIN LINE OF SIGHT
Avoid flying behind buildings or obstacles
that block your view.
Always fly below
Understand basic flight guidelines for both your safety, and those around you.
Refer to the User Manual for more informaon.
For details about syncing your Remote Control or Sports Watch, or using the
Sports Watch for flight, see the User Manual.
EMERGENCY SHUT OFF:
Press the Power and ‘X’ buon at the
same me to shut power to motors
immediately. Note that if you do this
mid-flight, your drone will crash.
Auto Take-Off
Your drone will li off and hover at
an altude of 5 m (16 ).
Auto Take-Off & Auto Land
Press and hold the ‘L’ buon unl the remote vibrates a third me to iniate auto take-off.
Follow the same procedure while in flight to iniate auto land.
Return-To-Home
Your drone will go to its set ‘Home’
point, land, and stop its motors.
Return-To-Home
Your drone will go to its set ‘Home’
point, land, and stop its motors.
Start Motors:
If you are indoors or don’t have
any GPS satelite connecon, press
and hold ‘L’ to start motors.
Li Off:
Slowly push the Le Sck up
to take off.
Land:
Slowly push the Le Sck down
unl you touch ground. Hold down
fully for a few seconds unl motors
shut off.
Manual Controls:
Auto Land
Your drone will descend vercally, land,
and stop its motors.
Opons within the Halo Drone App:
Opons on the Remote Controller:
Before taking off, ensure your remote is set to P-Mode (GPS guidance)
and the Halo Drone App shows at least 10 connected satellites.
Your drone will take a straight-line path to its
‘Home’ point. Set an appropriate RTH altude
before take-off to avoid trees, buildings, etc.
Refer to your Users Manual for more details.
7. Take-Off
P-Mode
12
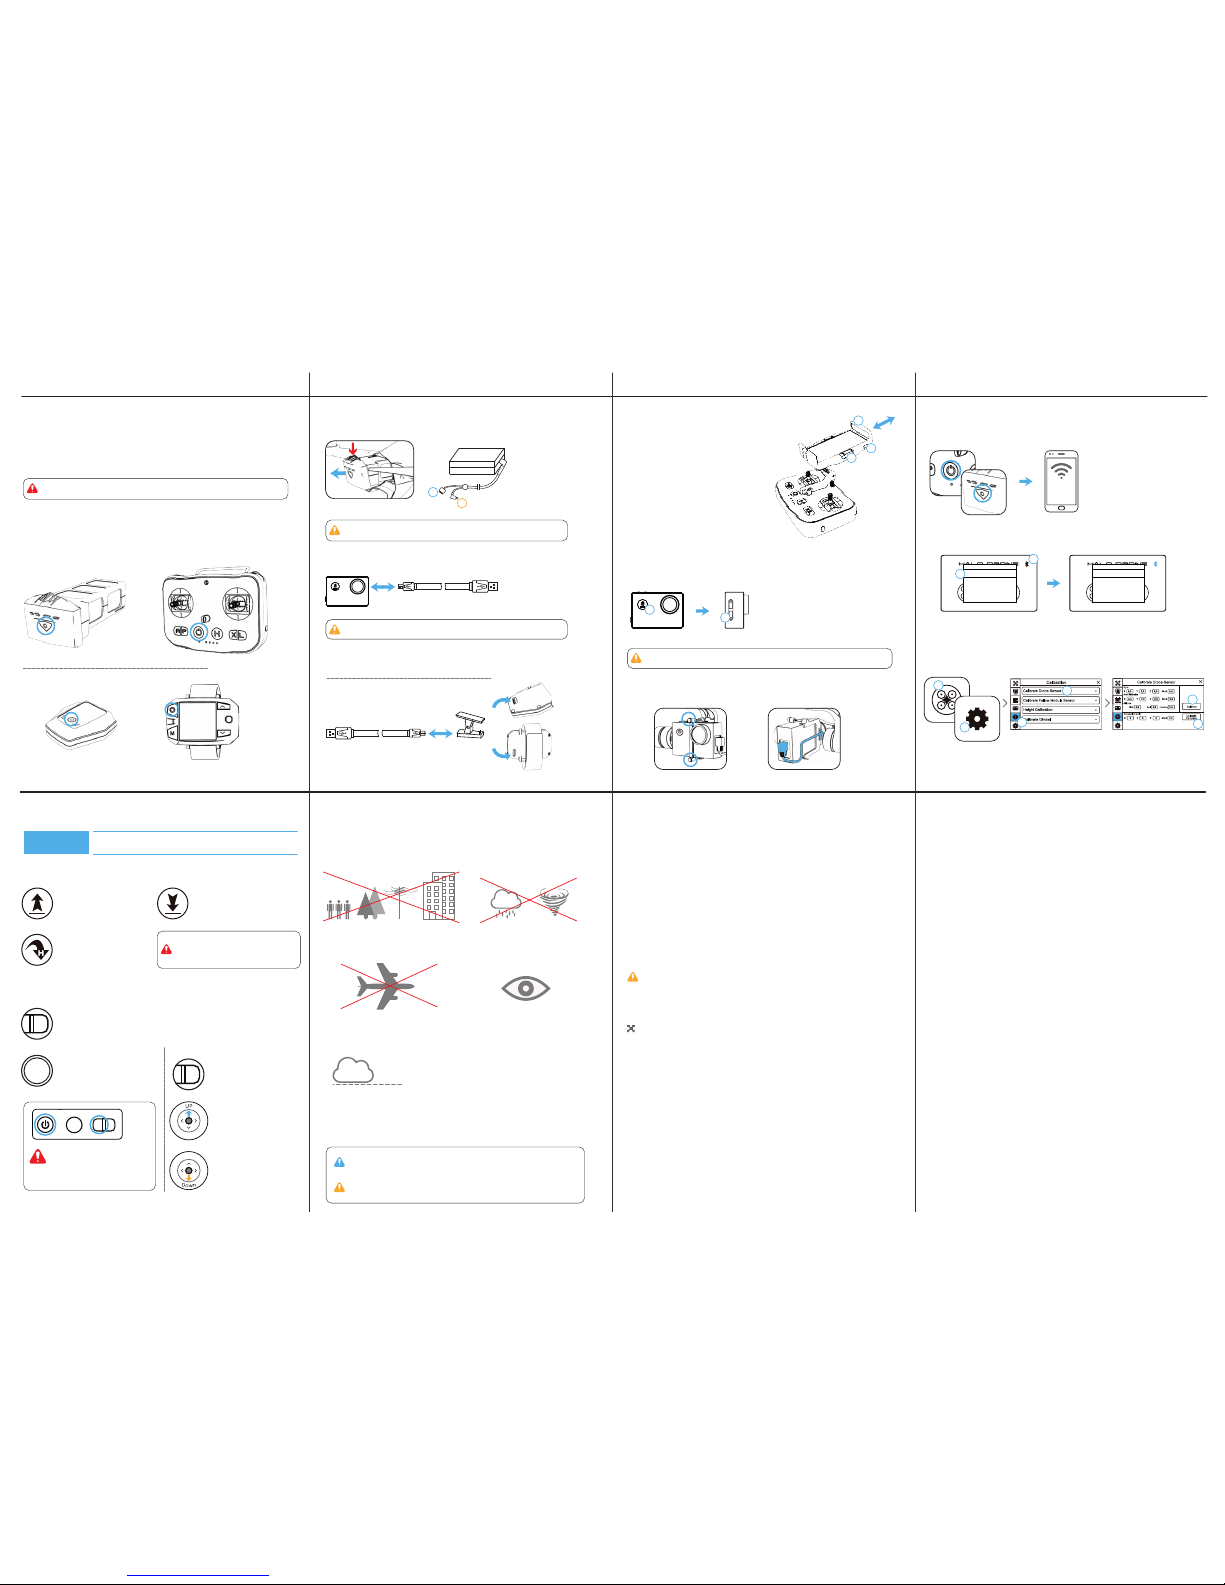
5. Calibrate the Accelerometer*
6. Calibrate the Compass*
*Follow the on-screen instrucons.
3. Select the Calibraon Tab.
4. Tap ‘Calibrate Drone Sensor’.
3
4
5
6
1. Tap the Drone icon.
2. Tap Sengs icon in
the top right corner.
1
2
3. Tap the Drone icon to enter Flight View and Calibrate the Halo Drone.
Once paired, the Bluetooth icon and
‘HALO_RC_XXXXX’ will be blue. Tap outside
the menu to return back to the home menu.
Bluetooth List
HALO_RC_XXXXXXX
1. Tap the Bluetooth Icon.
2. Select ‘HALO_RC_XXXXX’ from list.
Bluetooth List
HALO_RC_XXXXXXX
1
2
2. Launch the Halo Drone App and pair with the Remote Control.
On your mobile Wi-Fi networks,
select HALO_5G_XXXXXX (exact name
is located under your remote control),
and enter the default password:
1234567890
HALO_5G_XXX
1. Power on the Halo Drone and your Remote Controller.
6. Preparing For Flight
11
2. Connect your Camera to the Halo Drone. Make sure the screws are ghtened and the AV
Cable is connected properly.
Power off the Camera before connecng it to the Halo Drone. The Camera will be powered
on automacally when you power on your drone.
1. Press and hold the power buon to power
on the camera - if the screen remains off, you
are already in AV Out mode.
2. If the screen is on, press and hold the
“DOWN” buon for over 5 seconds and the
Camera will restart into AV Out mode.
2
1
1. To enable video transmission, make sure your Camera is set to the ‘AV Out’ mode.
5. Seng Up the Camera
1
2
3
1. Press the buon on the side to release the clamp.
2. Use the flip-out clips if you are using a smaller
device, such as a cell phone.
3. Place the mobile device into the clamp and
press down on the clamp to ghten securely in
place.
4. Seng Up the Remote Controller
10
Plug the USB into your computer
or a 1A - 5A charger.
- Halo Drone Pro Only
Check the included Camera manual for details on camera sengs and procedures.
When charging is complete, the baery and status LEDs will automacally turn off.
Do not charge Flight Baery and Remote Controller at the same me.
A. Connects to Flight Baery
B. Connects to Remote
Controller
A
B
Press down on the top tab.
Remove the baery.
3. Charging Your Baeries
Plug the USB into your computer
or a 1A - 5A charger.
9
Search for “Halo Drone” on the Apple App Store or
on Google Play and download the flight app to
your mobile device.
Press the power buon once to check the baery level.
Press the buon twice, holding it the second me to turn on/off.*
*Sports Watch Remote has to be powered off by toggling right on the joysck and selecng ‘Power Off’.
The HALO DRONE App supports Android 4.3 and higher, and iOS 8.0 and higher.
Requires a device with 5 GHz Wi-Fi connecon, and Bluetooth 4.0 or higher.
Using Your Halo Drone |Halo Drone Pro
1. Download the HALO DRONE App
2. Check Baery Levels
- Halo Drone Pro Only


 user manual")


