Hama WK300 User manual

00052212/06.08
All listed brands are trademarks of the corresponding companies. Errors and omissions excepted,
and subject to technical changes. Our general terms of delivery and payment are applied.
Hama GmbH & Co KG
D-86651 Monheim/Germany
www.hama.com
All manuals and user guides at all-guides.com
all-guides.com

NOTEBOOK
00052212
Wireless Keypad »WK300«
Numerische Tastatur
Numeric Keypad
Clavier numérique
All manuals and user guides at all-guides.com

dBedienungsanleitung
2
1.Verpackungsinhalt:
- kabellose Zifferntastatur
- USB Empfänger
- zwei AAA Batterien
- Kurzanleitung
2. Hardware Installation
2.1.Einlegen der Batterien
a. Entfernen Sie die Batteriefach-Abdeckung
und legen Sie die Batterien, wie abgebildet,
polrichtig in das Batteriefach (Abb.1).
b. Bringen Sie die Batteriefach-Abdeckung
wieder so an, dass sie fest verschlossen
ist.
2.2 Anschließen des USB Empfängers
a. Verbinden Sie den USB Empfänger mit
einem freien USB-Anschluss des PC oder
Notebooks.
b. Der USB-Empfänger wird von Windows
erkannt und in das Betriebssystem
eingebunden
c. Durch die Smart-Link Technologie ist die
Zifferntastatur sofort einsatzbereit.
Hinweis: Sollte dies nicht der Fall sein, gehen
Sie wie folgt vor:
3. Zifferntastatur und Empfänger verbinden/
Inbetriebnahme
a. Betätigen Sie die Verbindungstaste am
Empfänger, die Status-LED im Empfänger
blinkt (Abb.2). Der Empfänger ist zur
Synchronisation mit dem Keypad bereit.
b. Betätigen Sie anschließend die
Verbindungstaste (Abb.1) an der
Unterseite des Keypads mit einem spitzen
Gegenstand (z.Bsp. einem Stift).
c. Die Status-LED im Empfänger erlischt
nachdem der Synchronisationsprozess
erfolgreich abgeschlossen wurde. Das
Keypad ist nun betriebsbereit.
Sollte sich der Cursor auf dem Bildschirm
nicht bewegen bzw. keine Ziffern schreiben
lassen, wiederholen Sie die Schritte 3a-b.
4. Funktionsprobleme
Sollte die Zifferntastatur nicht erwartungsgemäß
funktionieren, stellen Sie sicher, dass folgende
Schritte genau ausgeführt wurden:
- Die Batterien sind neu und korrekt eingelegt
- Der Empfänger ist ordnungsgemäß am PC
oder Notebook angeschlossen
- Empfänger und Geräte befinden sich
innerhalb ihrer Funkreichweite (je nach
örtlichen Gegebenheiten max. 10m)
Die Konformitätserklärung nach der R&TTE-Richtlinie
99/5/EG finden Sie unter www.hama.com
Verbindungstaste
+
+–
–Verbindungstaste
Abb.1
Abb.2
All manuals and user guides at all-guides.com

3
gOperating Instruction
1. Package Contents:
- Cordless numeric keypad
- USB receiver
- Two AAA batteries
- Quick guide
2. Hardware Installation
2.1. Inserting the batteries
a. Remove the battery cover and insert the
batteries in the correction into the battery
compartment (Fig. 1), as shown in the
diagram.
b. Reattach the battery cover so that it is
securely closed.
2.2 Connecting the USB receiver
a. Connect the USB receiver to a free USB port
on the PC or notebook.
b. Windows detects the USB receiver and
installs it.
c. Smart-Link technology means that the
numeric keypad can be used immediately.
Note: If this does not happen, proceed as follows:
3. Connecting the Numeric Keypad and
Receiver/Getting Started
a. Press the connection button on the receiver;
the status LED starts to flash (Fig. 2).
The receiver is now ready to synchronise the
keypad automatically.
b. Using a pointed object (such as a pen), press
the connection button (Fig. 2) on the bottom of
the keypad.
c. The status LED in the receiver goes out
after the synchronisation process has been
completed successfully. The keypad system is
now ready for use.
If the cursor does not move on the screen or
does not allow you to write numbers, repeat
steps 3a-b.
4. Functionality Problems
If the numeric keypad does not function as
expected, ensure that you have carried out the
following steps correctly:
- The batteries are new and have been inserted
correctly
- The receiver is correctly connected to the PC
or notebook.
- The receiver and devices are within their
communication range (depending on location,
max. 10 m)
See www.hama.com for the declaration of conformity
with R&TTE Directive 99/5/EC.
connect button
Fig.2
connect button
+
+–
–
Fig.1
All manuals and user guides at all-guides.com

fMode d‘emploi
4
1. Contenu de l´emballage :
- Un pavé numérique sans fil
- Un récepteur USB
- Deux piles AAA
- Un petit manuel d´utilisation
2. Installation du hardware
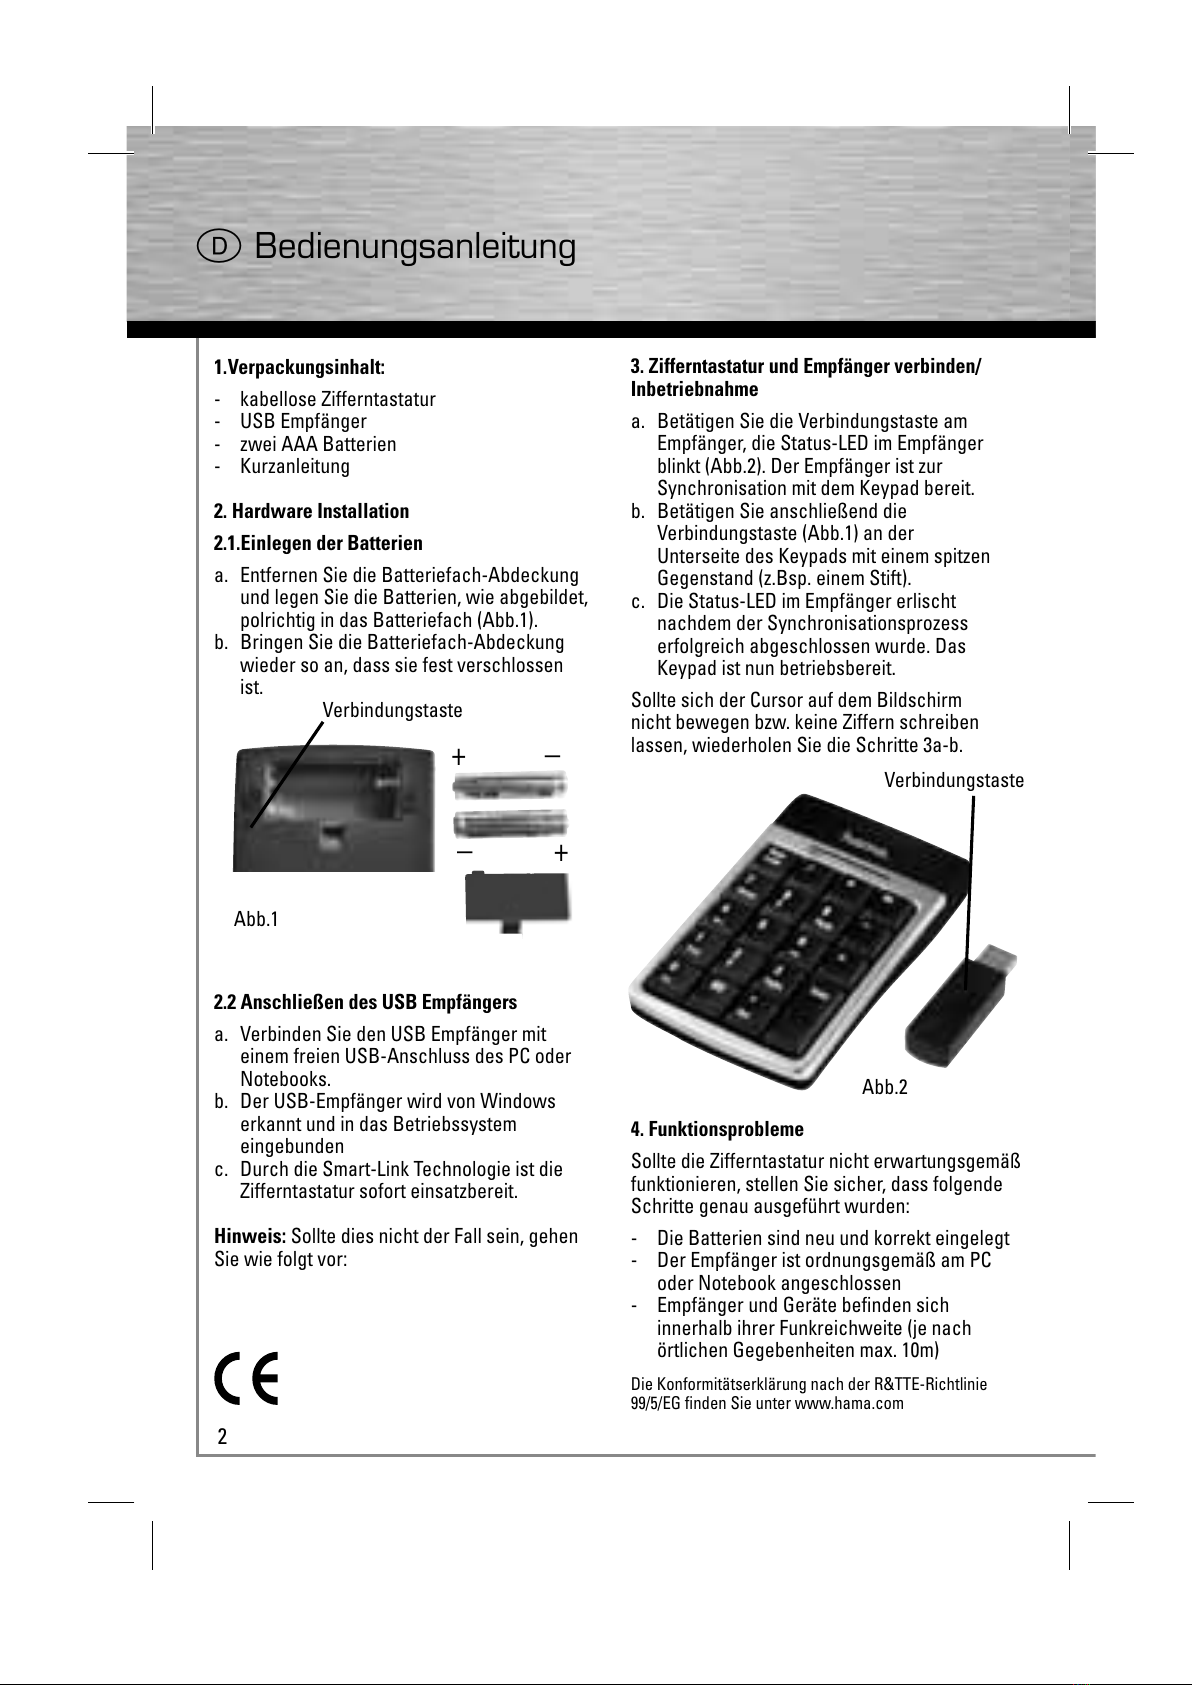
2.1. Installation des piles
a. Veuillez enlever le couvercle du
compartiment à piles et insérer les batteries,
en respectant la polarité et comme il est
indiqué dans le compartiment (illustration 1).
b. Remettez le couvercle du compartiment à
piles, de manière à ce qu´il soit bien fermé.
2.2 Raccordement du récepteur USB
a. Branchez le récepteur USB à une prise USB
disponible de votre PC ou de votre ordinateur
portable.
b. Le récepteur USB est reconnu par Windows
et intégré dans le système d´exploitation.
c. Grâce à la technologie Smart-Link le pavé
numérique est immédiatement prêt à l´emploi.
Remarque :
Si ce n´est pas le cas, veuillez procéder comme
suit :
3. Connexion du pavé numérique et du
récepteur/ Mise en marche
a. Actionnez la touche de connexion au
récepteur, la DEL indiquant le statut clignotte
au récepteur (illustration 2). Le récepteur est
prêt pour la synchronisation avec le pavé.
b. Veuillez ensuite actionner la touche de
connexion (illustration 2) au-dessous du pavé
avec un objet pointu (par exemple avec un
crayon).
c. La DEL au récepteur s´éteint une fois que le
procédé de synchronisation est terminé. Le
pavé numérique est à présent prêt à l´emploi.
Si le curseur ne se déplace pas à l´écran ou si
aucune chiffre n´apparaît, réitérez les étapes
3a-b.
4. Problèmes de fonctionnement
Si le pavé numérique ne fonctionne pas comme
prévu, vérifiez bien que les étapes suivantes
aient été éxécutées comme il faut :
- Les piles sont neuves et ont été installées
correctement
- Le récepteur est relié correctement au PC ou
à l´ordinateur portable
- Le récepteur et les appareils se trouvent à
l´intérieur de la portée radio (selon les lieux,
10 m maximum)
La déclaration de conformité à la directive R&TTE 99/5/EC
se trouve sur www.hama.com
touche de connexion
Fig.2
touche de connexion
+
+–
–
Fig.1
All manuals and user guides at all-guides.com

5
n
e La declaración de conformidad según la directiva R&TTE 99/5/CE la encontrará en
www.hama.com
oDe conformiteitsverklaring conform de R&TTE-richtlijn 99/5/EG vindt u onder
www.hama.com
iLa dichiarazione di conformità secondo la direttiva R&TTE 99/5/CE è disponibile sul
sito www.hama.com
k
Τη δήλωση συμμόρφωσης σύμφωνα με την οδηγία 99/5/EΚ περί R&TTE θα τη βρείτε στη
διεύθυνση www.hama.com
sKonformitetsförklaring enligt R&TTE riktlinje 99/5/EG finner du på www.hama.com
mRadio- ja telepäätelaitteita koskevan direktiivin 99/5/EY mukainen
vaatimustenmukaisuusvakuutus löytyy osoitteesta www.hama.com
q
Deklaracja zgodności według dyrektywy R&TTE 99/5/EG dostępna na stronie
internetowej www.hama.com
h
A megfelelőségi követelmények megegyeznek az R&TTE Irányelvek 99/5/EG
ajánlásaival www.hama.com
c
Prohlášení, o shodě podle směrnice R&TTE 99/5/EG, naleznete na www.hama.com
v
Prehlásenie o zhode podľa R&TTE smernice 99/5/EG nájdete na www.hama.com
pA declaração de conformidade segundo a directiva R&TTE 99/5/CE pode ser
consultada em www.hama.com
u
Заявление о соответствии товара нормам R&TTE 99/5/EG см. на веб-узле
www.hama.com
tR&TTEDirektifi 99/5/EG’ye göre uygunluk beyanı için www.hama.com adresine bakınız.
All manuals and user guides at all-guides.com
all-guides.com
Table of contents
Languages:
Other Hama Keypad manuals