Hama M3050 User manual

00052470/04.07
Wireless Laser Mouse
»M3050«
Laser-Funkmaus
Souris radio Laser
COMPUTER
All listed brands are trademarks of the corresponding companies. Errors and omissions excepted,
and subject to technical changes. Our general terms of delivery and payment are applied.
PO Box 80 · 86651 Monheim/Germany
Phone: +49 9091 502-0
Fax: +49 9091 502-458
http://www.hama.com
00052470
00052470bda.indd Abs1:2-Abs2:100052470bda.indd Abs1:2-Abs2:1 05.05.2008 12:41:49 Uhr05.05.2008 12:41:49 Uhr

23
1. Hardware Installation
1.1 Einlegen der Batterien
a) Entfernen Sie die Batteriefach-Abdeckung
und legen die Batterien polrichtig in das
Batteriefach (abb. 1).
b) Bringen Sie die Batteriefach-Abdeckung
wieder so an, dass sie fest verschlossen ist.
c) Stellen Sie den ON-OFF Schalter auf der
Unterseite der Maus auf „ON“.
1.2 Anschließen des USB Empfängers
a) Verbinden Sie den USB Empfänger mit einem
freien USB Anschluss am PC.
b) Der USB-Empfänger wird von Windows erkannt
und in das Betriebssystem eingebunden.
c) Durch die Smart-Link Technologie ist die Maus
mit Standardfunktionen sofort einsatzbereit.
d) Um den seitlichen Zusatztasten eine bestimmte
Funktion zuordnen, ist es notwendig die
beigelegte Software zuinstallieren.
2. Batteriekontrollanzeige (abb. 2)
Bei zu geringer Batteriespannung beginnt die Kon-
trollleuchte zu blinken. Die Maus funktioniert zwar
noch einige Zeit, Sie sollten aber so bald wie möglich
die Batterien austauschen.
Hinweis: Neu eingelegte Batterien werden durch ein
10x-liges blinken der LED angezeigt.
3. DPI/Modus-Umschalter
Betätigen Sie den DPI/Modus-Umschalter (abb. 2) um
zwischen 800 - 1600 dpi umzuschalten. (< 3 sec.)
Zum Umschalten in den Media-Modus siehe Punkt 4.2.
4. Funktionszuweisung der seitlichen Zusatztasten
4.1 Voreingestellte Funktionen (abb. 3)
dInstallationshinweise
4.2 Umschalten in den Media-Modus (abb. 4)
Betätigen Sie den DPI-Umschalter länger als
3 Sekunden. Sobald Sie erfolgreich in den
Media-Modus umgeschalten haben, leuchtet das
Batteriesymbol für ca. 3 Sekunden auf. Folgende
Funktionen stehen dann zur Verfügung.
5. 4-Wege-Scrollrad
Das 4-Wege-Scrollrad ist ideal zum Anzeigen großer
Bilder, Dokumente oder Tabellenkalkulationen. Dies
ist jedoch nur möglich, wenn die Bildlaufleisten in
horizontaler bzw. vertikaler Richtung vorhanden sind.
Um alle Funktionen der Maus, insbesondere des
4-Wege-Scrollrades zu nutzen, ist es notwendig die
Software zu installieren.
6. Softwareinstallation
• Die Software unterstützt Windows 2000/XP/Vista
• Deinstallieren Sie eventuell bereits installierte
Maussoftware.
a) Legen Sie die beigelegte CD in Ihr CD-ROM oder
DVD-ROM Laufwerk.
Warten Sie einen Moment, und die Installations-
maske wird automatisch gestartet. Sollte dies
nicht geschehen, klicken Sie auf Start =>
Ausführen, geben Sie „X:/autorun ein und
bestätigen Sie mit Enter.
b) Wählen Sie als Produkt Type „Wireless/Wired
Mouse“ aus und klicken anschließend auf
„Run Setup“.
c) Durch einen Doppelklick auf das Maus-Symbol
in der Taskleiste können Sie die
Tasteneinstellungen Ihren persönlichen
Bedürfnissen anpassen.
Hinweis:
Während der Installation unter Windows XP/
Vista erscheint eine Meldung bezüglich eines nicht
signierten Treibers bzw. Programms.
Die Funktion der Maus oder Software wird dadurch
nicht beeinträchtigt. Fahren Sie mit der Installation
fort.
7. Funktionsprobleme
Sollte die Maus nicht erwartungsgemäß funktionie-
ren, stellen Sie sicher, dass Sie folgenden Schritte
genau ausgeführt haben:
• Die Batterien sind neu und korrekt eingelegt
• Der Empfänger ist ordnungsgemäß an den
Computer angeschlossen
• Empfänger und Geräte befinden sich innerhalb
ihrer Funkreichweite
(je nach örtlichen Gegebenheiten max. 10m)
DPI/Modus-
Umschalter
Batteriekontrollanzeige
Ein/Ausschalter
+-
+-
Zoom -
Zoom +
Vorwärts
allgemein
Rückwärts
allgemein
4-Wege-
Scrollrad
abb. 3
Play/Pause
Media Player
starten
Vorheriger
Titel
Nächster
Titel
Stumm-
schaltung
(Scrollrad
drücken)
Lautstärke +
Lautstärke -
abb. 4
abb. 2
abb. 1
00052470bda.indd Abs2:2-Abs2:300052470bda.indd Abs2:2-Abs2:3 05.05.2008 12:41:52 Uhr05.05.2008 12:41:52 Uhr

45
1. Hardware Installation
1.1 Inserting the batteries
a) Remove the battery compartment cover and
insert the batteries in the correct direction in
the battery compartment (fig. 1).
b) Reattach the battery cover so that it is securely
closed.
c) Set the ON-OFF switch on the base of the
mouse to “ON”
1.2 Connecting the USB receiver
a) Connect the USB receiver to a free USB port
on the PC.
b) Windows detects the USB receiver and installs
it into the operating system.
c) Thanks to Smart-Link technology, the standard
functions of the mouse can be used
immediately.
d) The software supplied must be installed to
assign specific functions to the additional
buttons on the side.
2. Battery control indicator
The control light starts to flash when the battery
voltage is too low. Although the mouse will still
function for some time, you should change the
batteries as soon as possible.
Note: When you insert new batteries, the LED will
flash ten times.
3. DPI/mode switch
Press the DPI/mode switch (fig. 2) to toggle between
800 and 1600 DPI. (< 3 sec.). See point 4.2. if you want
to switch to media mode.
4. Assigning functions to the additional buttons on
the side
4.1 Preset function (fig. 3)
gInstallation hints
4.2 Switching to media mode (fig. 4)
Press the DPI switch for longer than 3 seconds.
As soon as you successfully switch to media mode,
the battery symbol will light up for approximately
3 seconds. The following functions can then be used.
5. 4-way scroll wheel
The 4-way scroll wheel is ideal for displaying large
images, documents or spreadsheets. However, you
can only do this if the horizontal or vertical scroll
bars are present. To use all functions of the mouse,
in particular the 4-way scroll wheel, you must install
the software.
6. Installing the software
• The software supports Windows 2000/XP/Vista
• Uninstall any mouse software already installed.
a) Insert the enclosed CD into your CD-ROM or
DVD-ROM drive.
Wait a moment, the installation windows opens
automatically. If this does not happen, click Start
=> Run, enter “X:\autorun” and press Enter to
confirm.
b) Select “Wireless/Wired Mouse” as the product
type and then click “Run Setup”.
c) Double-click the mouse icon in the task bar
to adjust the button settings to your personal
needs.
Note: When installing the software under
Windows XP/Vista,a message may appear
referring to an unsigned driver or program.
This does not affect mouse or software operation.
Simply ignore and continue with the installation.
7. Functionality problems
If the mouse does not function as expected, ensure
that you have carried out the following steps:
• The batteries are new and inserted correctly
• The receiver is correctly connected to the
computer.
• Receiver and devices are within their
communication range (depending on location,
max. 10 m)
DPI/mode switch
Battery control indicator
fig. 2
Zoom -
Zoom +
Universal
Forward
Universal
Back
4-way scroll
wheel
fig. 3
Play/Pause
Media Player
start
Previous
Titel
Next
Titel
Mute (push
scroll wheel)
Volume +
Volume -
fig. 4
on-off switch
+-
+-
fig. 1
00052470bda.indd Abs2:4-Abs2:500052470bda.indd Abs2:4-Abs2:5 05.05.2008 12:41:52 Uhr05.05.2008 12:41:52 Uhr

67
1. Installation du matériel
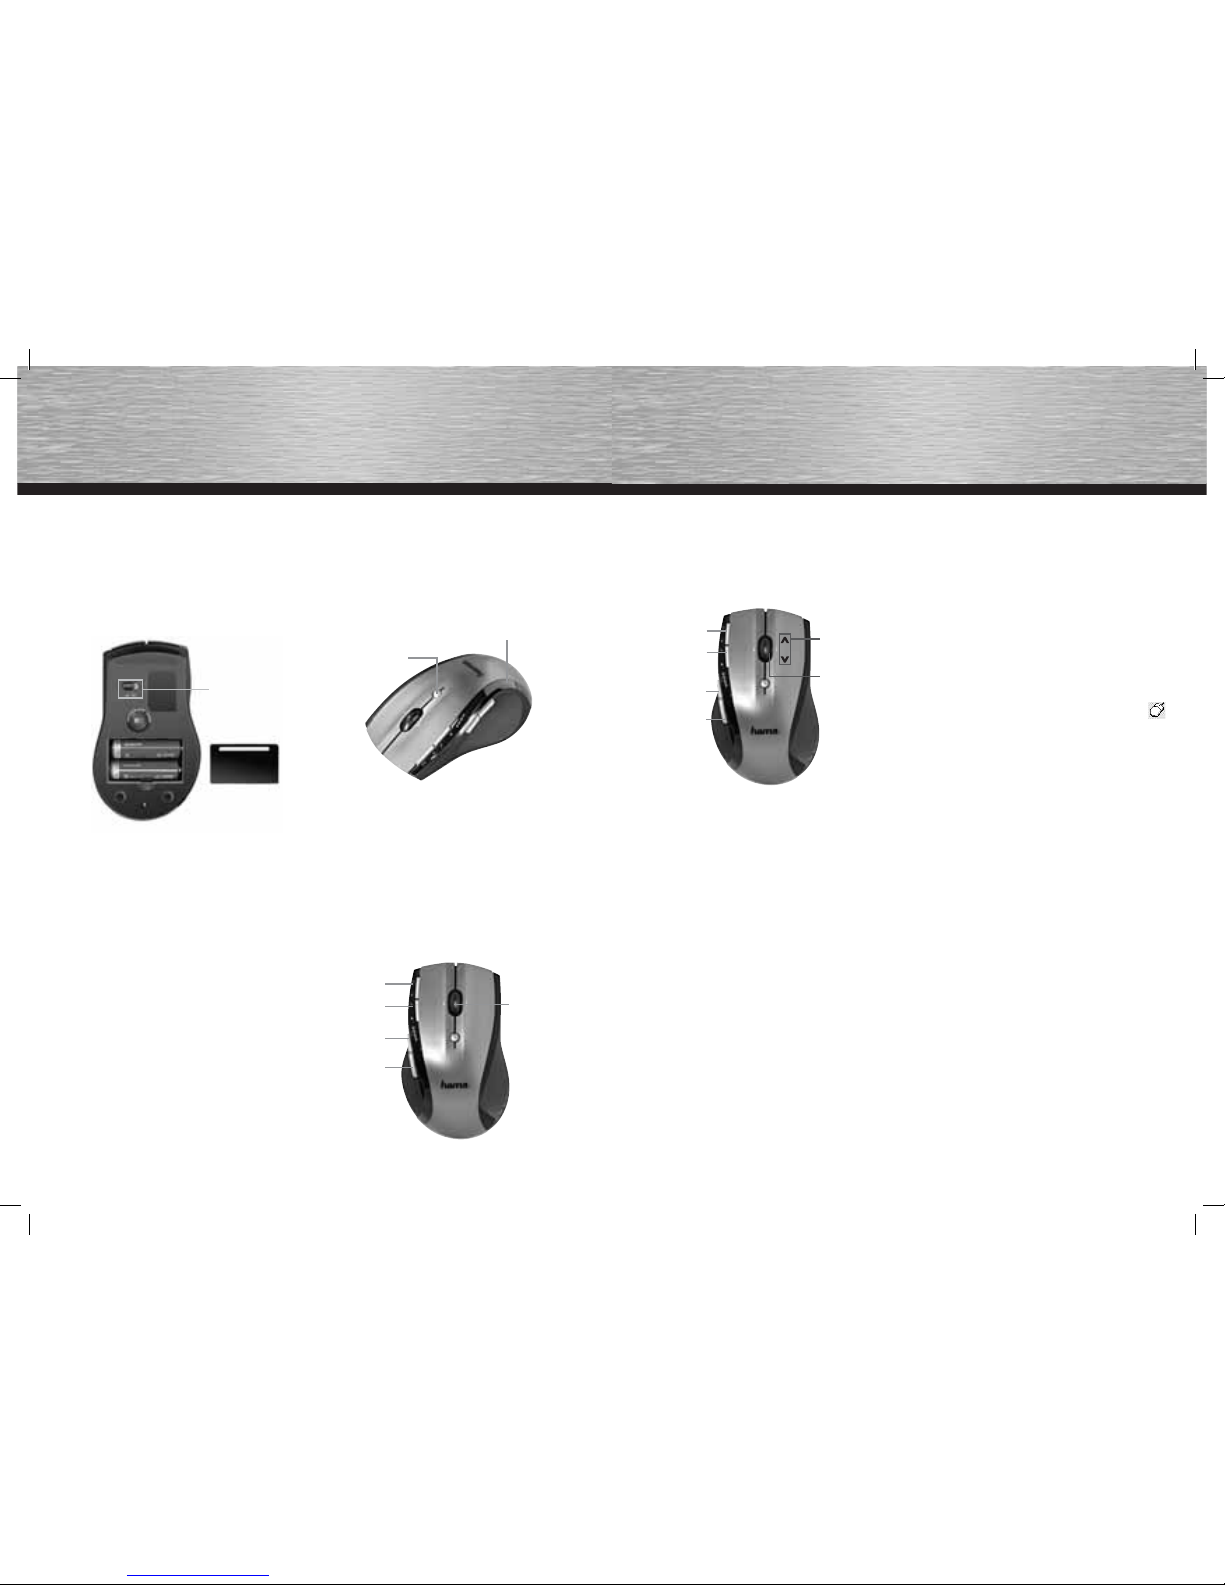
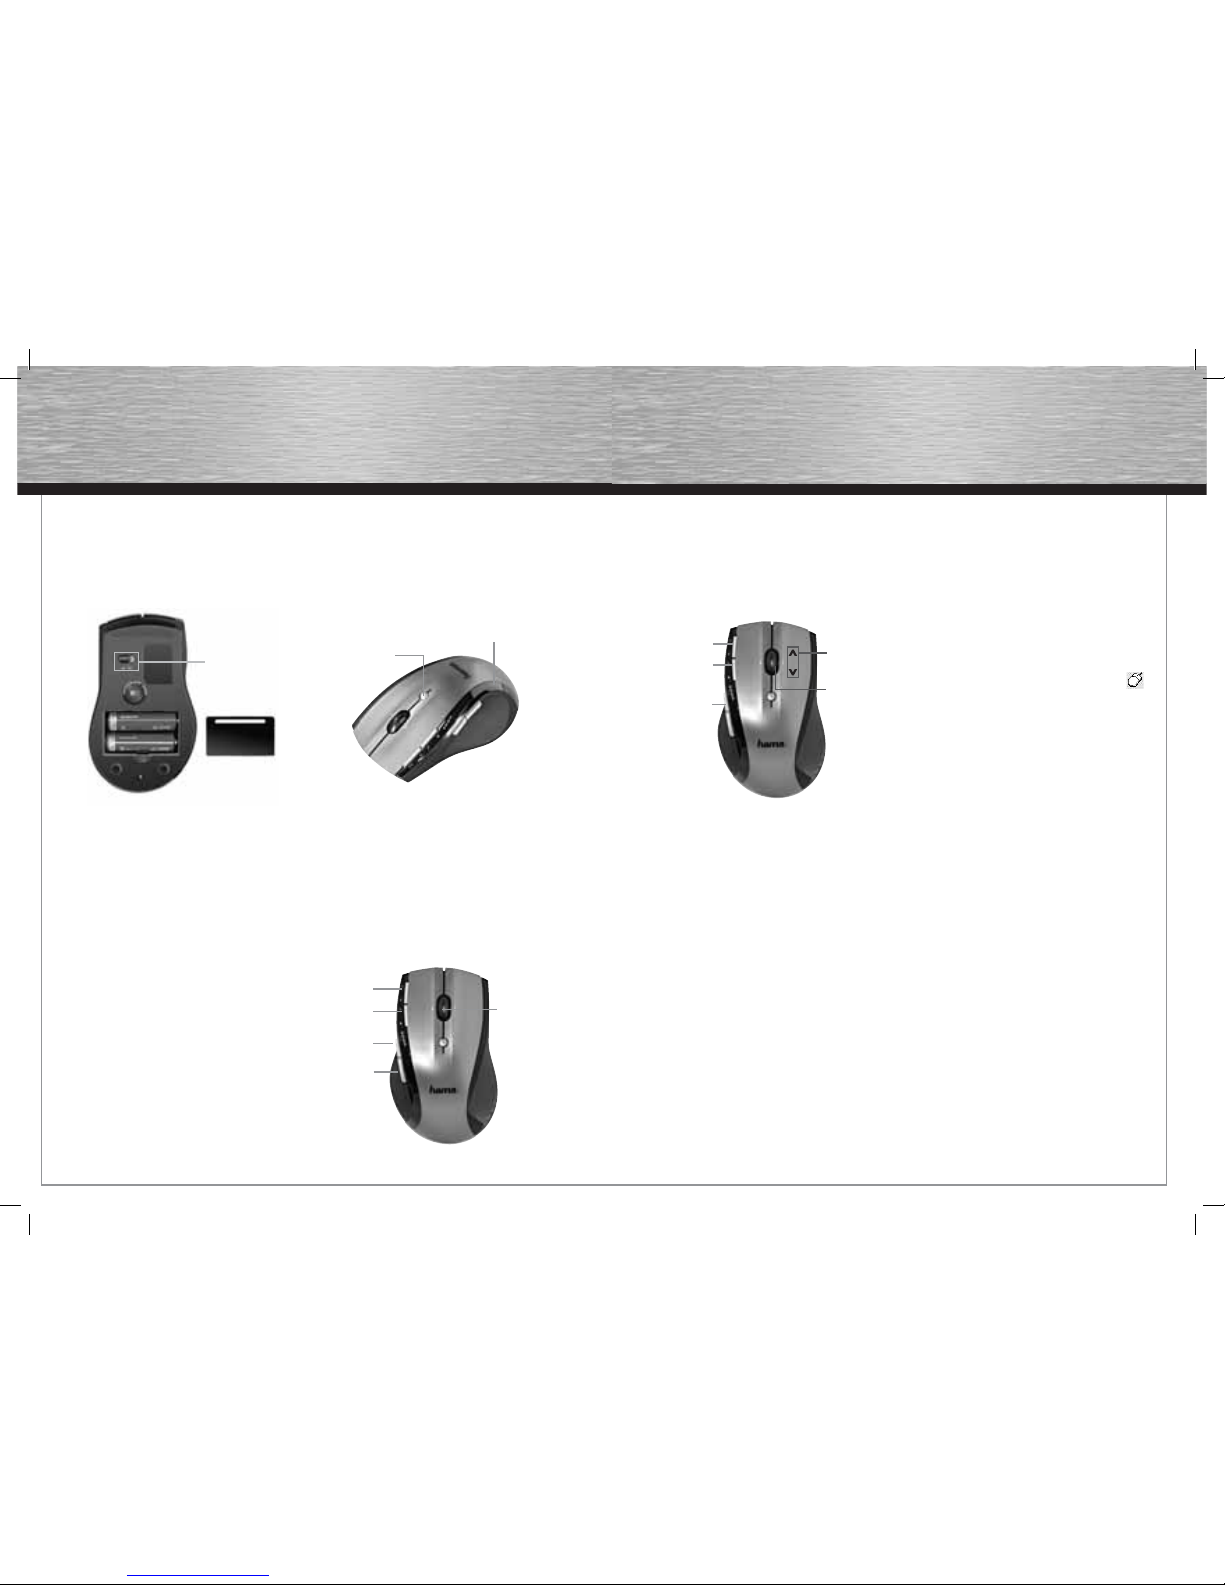
1.1 Mise en place des piles
a) Ouvrez le couvercle du compartiment et insérez
les piles en respectant la polarité (ill. 1).
b) Refermez le couvercle du compartiment à piles.
c) Réglez l’interrupteur ON-OFF de la face
inférieure de la souris sur « ON »
1.2 Branchement du récepteur USB
a) Raccordez le récepteur USB à un port USB
libre de votre ordinateur.
c) Le récepteur USB est alors reconnu par
Windows et intégré dans votre système
d’exploitation.
c) Grâce à la technologie Smart Link, votre souris
et ses fonctions standard sont utilisables
immédiatement.
d) Il est nécessaire d‘installer le logiciel fourni
afin d’attribuer une fonction spécifique aux
touches latérales supplémentaires.
2. Témoin de fonctionnement (ill. 2)
Le témoin lumineux clignote dès que le niveau des
piles est insuffisant. Votre souris continuera certes
à fonctionner pendant quelques temps, mais vous
devriez remplacer les piles dès que possible.
Remarque : La DEL clignote 10 fois afin de confirmer
l’insertion de piles neuves.
3. Commutateur DPI/mode
Actionnez le commutateur dpi/mode (ill. 2) afin de
commuter entre 800 et 1600 dpi (ppp). (< 3 sec.).
Voir point 4.2. si vous voulez commuter dans le
mode média.
4. Attribution de fonctions aux touches latérales
supplémentaires
4.1 Fonction préconfigurée (ill. 3)
fIndications d‘installation
4.2 Commutation en mode média (ill. 4)
Actionnez le commutateur dpi pendant plus de
3 secondes. Le symbole de la pile s’allume pendant
environ 3 secondes dès que la commutation vers le
mode média est effective. Les fonctions suivantes
peuvent alors être utilisées.
5. Molette à 4 directions
La molette à 4 directions convient parfaitement pour
l’affichage des grandes images, de documents ou
de tableurs. Les barres de défilement horizontale
ou verticale doivent toutefois être disponibles. Il est
nécessaire d’installer le logiciel (voir point 7) afin
de profiter pleinement de toutes les fonctions de la
souris, dont la molette à 4 directions.
6. Installation du logiciel
• Le logiciel supporte Windows 2000/XP/Vista
• Désinstallez d’autres logiciels de souris éventuels.
a) Insérez le CD fourni dans votre lecteur de
CD-ROM ou de DVD-ROM. Patientez jusqu’à ce
que le programme d’installation démarre
automatiquement. Si tel n’est pas le cas,
cliquez sur „Démarrer“ => „Exécuter“, saisissez
„X:/autorun“, puis confirmez avec la touche
d‘entrée.
b) Sélectionnez le type de produit „Wireless/Wired
Mouse“ et cliquez sur „Run Setup“.
c) En double-cliquant sur l‘icône de la souris
dans la barre des tâches, vous pouvez adapter
les réglages de la molette et des touches selon
vos besoins.
Remarque : Lors de l’installation du logiciel sous
Windows XP/Vista, il est possible qu’un messag
concernant un pilote ou un programme non signé
apparaisse. Le fonctionnement de la souris ou du
logiciel n’en seront toutefois pas affectés.
Continuez l’installation.
7. Problèmes de fonctionnement
Dans le cas où la souris ne fonctionne pas
correctement, assurez-vous que vous avez bien
effectué les étapes suivantes :
• Les piles sont neuves et correctement insérées
• Le récepteur est correctement connecté à votre
ordinateur
• Le récepteur et les appareils se trouvent à portée
radio l’un des autres (10 m au maximum en
fonction de la configuration des lieux)
Commutateur
DPI/mode
Témoin de contrôle de la
batterie
ill. 2
Zoom -
Zoom +
Avant
universel
Arrière
universel
Molette à 4
directions
ill. 3
Lecture/Pause
Lecteur Média
faire démarrer
Titre
précédent
Titre suivant
Mise en
position
muette
(appuyer sur
la molette de
défilement)
Volume +
Volume -
ill. 4
Interrupteur marche/
arrêt
+-
+-
ill. 1
00052470bda.indd Abs2:6-Abs2:700052470bda.indd Abs2:6-Abs2:7 05.05.2008 12:41:53 Uhr05.05.2008 12:41:53 Uhr

89
d
Die Konformitätserklärung nach der R&TTE Richtlinie 99/5/EG finden Sie unter www.hama.com
g
See www.hama.com for declaration of conformity according to R&TTE Directive 99/5/EC guidelines
f
La déclaration de conformité à la directive R&TTE 99/5/CE se trouve sur www.hama.com
e
La declaración de conformidad según la directiva R&TTE 99/5/CE la encontrará en www.hama.com
o
De conformiteitsverklaring conform de R&TTE-richtlijn 99/5/EG vindt u onder www.hama.com
i
La dichiarazione di conformità secondo la direttiva R&TTE 99/5/CE è disponibile sul sito www.hama.com
p
A declaração de conformidade segundo a directiva R&TTE 99/5/CE pode ser consultada em www.hama.com
s
Konformitetsförklaring enligt R&TTE riktlinje 99/5/EG finner du på www.hama.com
m
Radio- ja telepäätelaitteita koskevan direktiivin 99/5/EY mukainen vaatimustenmukaisuusvakuutus löytyy
osoitteesta www.hama.com
q
Deklaracja zgodności według dyrektywy R&TTE 99/5/EG dostępna na stronie internetowej www.hama.com
h
A megfelelőségi követelmények megegyeznek az R&TTE Irányelvek 99/5/EG ajánlásaival www.hama.com
c
Prohlášení, o shodě podle směrnice R&TTE 99/5/EG, naleznete na www.hama.com
v
Prehlásenie o zhode podľa R&TTE smernice 99/5/EG nájdete na www.hama.com
k
Τη δήλωση συμμόρφωσης σύμφωνα με την οδηγία 99/5/EΚ περί R&TTE θα τη βρείτε στη διεύθυνση
www.hama.com
u
Заявление о соответствии товара нормам R&TTE 99/5/EG см. на веб-узле www.hama.com
t
R&TTEDirektifi 99/5/EG’ye göre uygunluk beyanı için www.hama.com adresine bakınız.
j
Overensstemmelseserklæringen i henhold til R&TTE-retningslinierne finder du under HYPERLINK
„http://www.hama.com”
e
00052470bda.indd Abs2:8-Abs2:900052470bda.indd Abs2:8-Abs2:9 05.05.2008 12:41:53 Uhr05.05.2008 12:41:53 Uhr
Table of contents
Languages:
Other Hama Mouse manuals

Hama
Hama 3R182602 User manual

Hama
Hama M440 User manual

Hama
Hama 00011224 User manual

Hama
Hama M2060 User manual

Hama
Hama Wireless Optical Mouse User manual

Hama
Hama RM 200 User manual

Hama
Hama RM 100 User manual

Hama
Hama AM-5200 User manual

Hama
Hama M3040 Assembly instructions

Hama
Hama mySCAN 00052343 User manual