Hamilton Beach COT2000 Series User manual

COT2000 SERIES
PrimePourTM
Operation Manual
READ BEFORE USE.
For more visit www.commercial.hamiltonbeach.com
Good Thinking®
840247002
2/15
840247002_v03.indd 1 2/6/15 4:49 PM

2
1. Read the Operation Manual before using.
Keep Operation Manual handy.
2. Do not use for other than intended use.
3. Not intended for use by or near children.
4. Children should be supervised to ensure that
they do not play with this equipment.
5. This equipment is not intended for use by
persons (including children) with reduced
physical, sensory, or mental capabilities, or
lack of experience and knowledge, unless they
have been given supervision or instruction
concerning use of the appliance by a person
responsible for their safety.
6. The use of accessory attachments not
recommended by Hamilton Beach Commercial
may cause injuries.
IMPORTANT SAFETY INSTRUCTIONS
WARNING – When using appliances, basic safety precautions should be followed, including the
following:
– SAVE THESE INSTRUCTIONS –
Technical Services
For assistance or replacement parts, call our
Technical Services number:
844-657-1544 or + 910-693-4277
8 a.m. – 5 p.m. EST Monday – Friday
www.commercial.hamiltonbeach.com
7. Do not operate the device after it malfunctions,
or is dropped or damaged in any manner. Call
the Technical Services number, (844) 657-1544,
for instructions on examination, repair, or
adjustment.
8. CO2(Carbon Dioxide) Warning! CO2displaces
oxygen. Strict attention must be observed in
the prevention of CO2gas leaks in the entire
CO2system. If a CO2gas leak is suspected,
particularly in a small area, immediately ventilate
the contaminated area before attempting to
repair the leak. Personnel exposed to a high
concentration of CO2gas will experience
tremors which are followed rapidly by loss of
consciousness and suffocation.
840247002_v03.indd 2 2/6/15 4:49 PM

3
Parts and Features
Tap Handle
Tap Tower
Drip Tray
and Grate
Tower Base
Side Access
Panel
Front
Door
Pressure Gauge
Bag in Box (BIB)
Quick Connect/
Disconnect (QCD)
Bottle
Holders
Bottle
Nozzle
Spirit
Reservoir
Bag-in-Box (BIB)
Cleaning
Connector
Flow Control
Orifice
840247002_v03.indd 3 2/6/15 4:49 PM

4
3.75”
Maximum
1. The machine is calibrated to dispense at a ratio
of 3 parts drink mix to one part spirits. If you
are serving a 12-ounce drink, fill the glass with
6 ounces of ice and dispense about 6 ounces
until the glass is full.
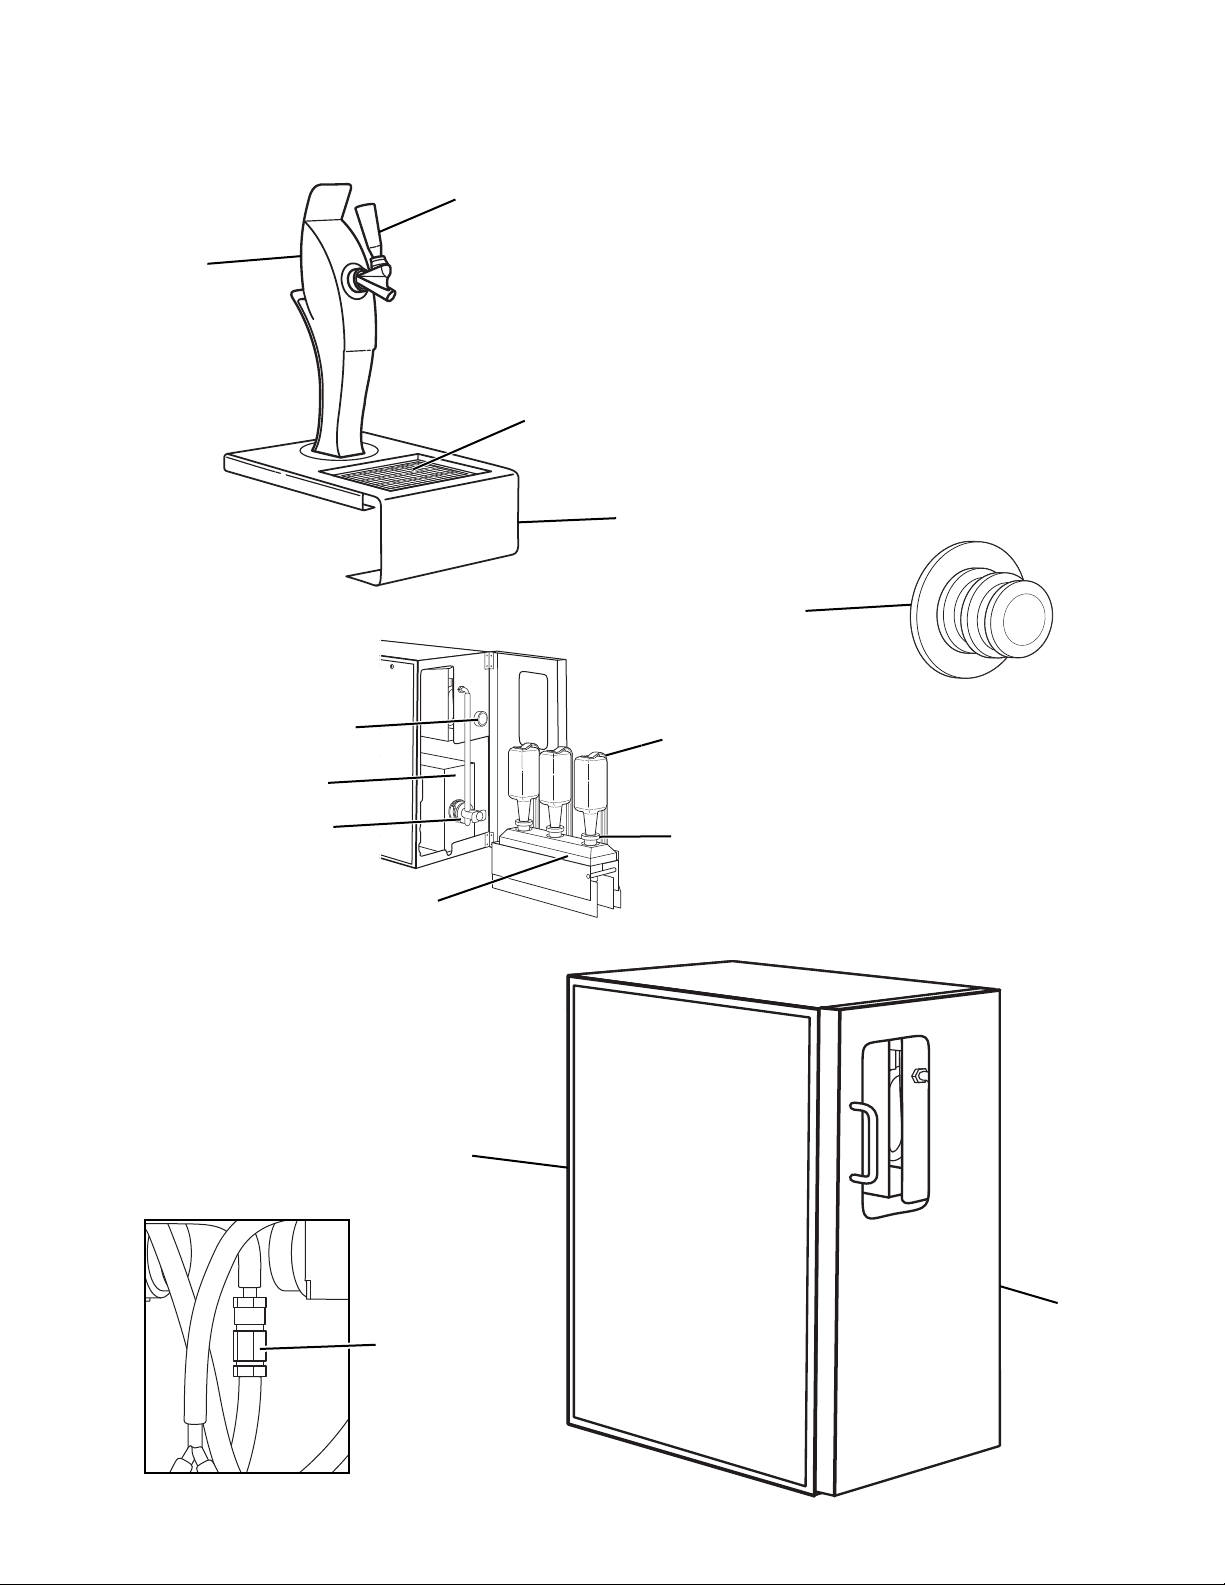
2. The machine holds three bottles
of spirits and a 3-gallon bag of
drink mix. It is recommended the
levels of each be checked before
service each day. The reservoir
holds 0.5 liters of spirits in
addition to the volume in each
bottle. The spirits reservoir is
designed so that the bottle in
the rear of the unit will empty
first and the bottle in the
front will empty last. If the
spirits reservoir runs empty,
air will enter the unit and
cause spitting and coughing
at the tap.
To replace a bottle of spirits,
remove the empty bottle,
remove the cap to the new
bottle, and slide the bottle nozzle over the
bottle. Fold the tip of the bottle nozzle over, and
insert the nozzle into the spirits reservoir, tilting
the bottle upside down. Lower the bottle holder
and secure by tightening the thumbscrew.
The bottle holders need to be centered on the
bottoms of the bottles. Slide the drawer into the
cabinet after the spirits bottles are installed. If
the bottle holders hit the cabinet when sliding
the drawer inside, then adjust the position of
the holders on the bottoms of the bottles.
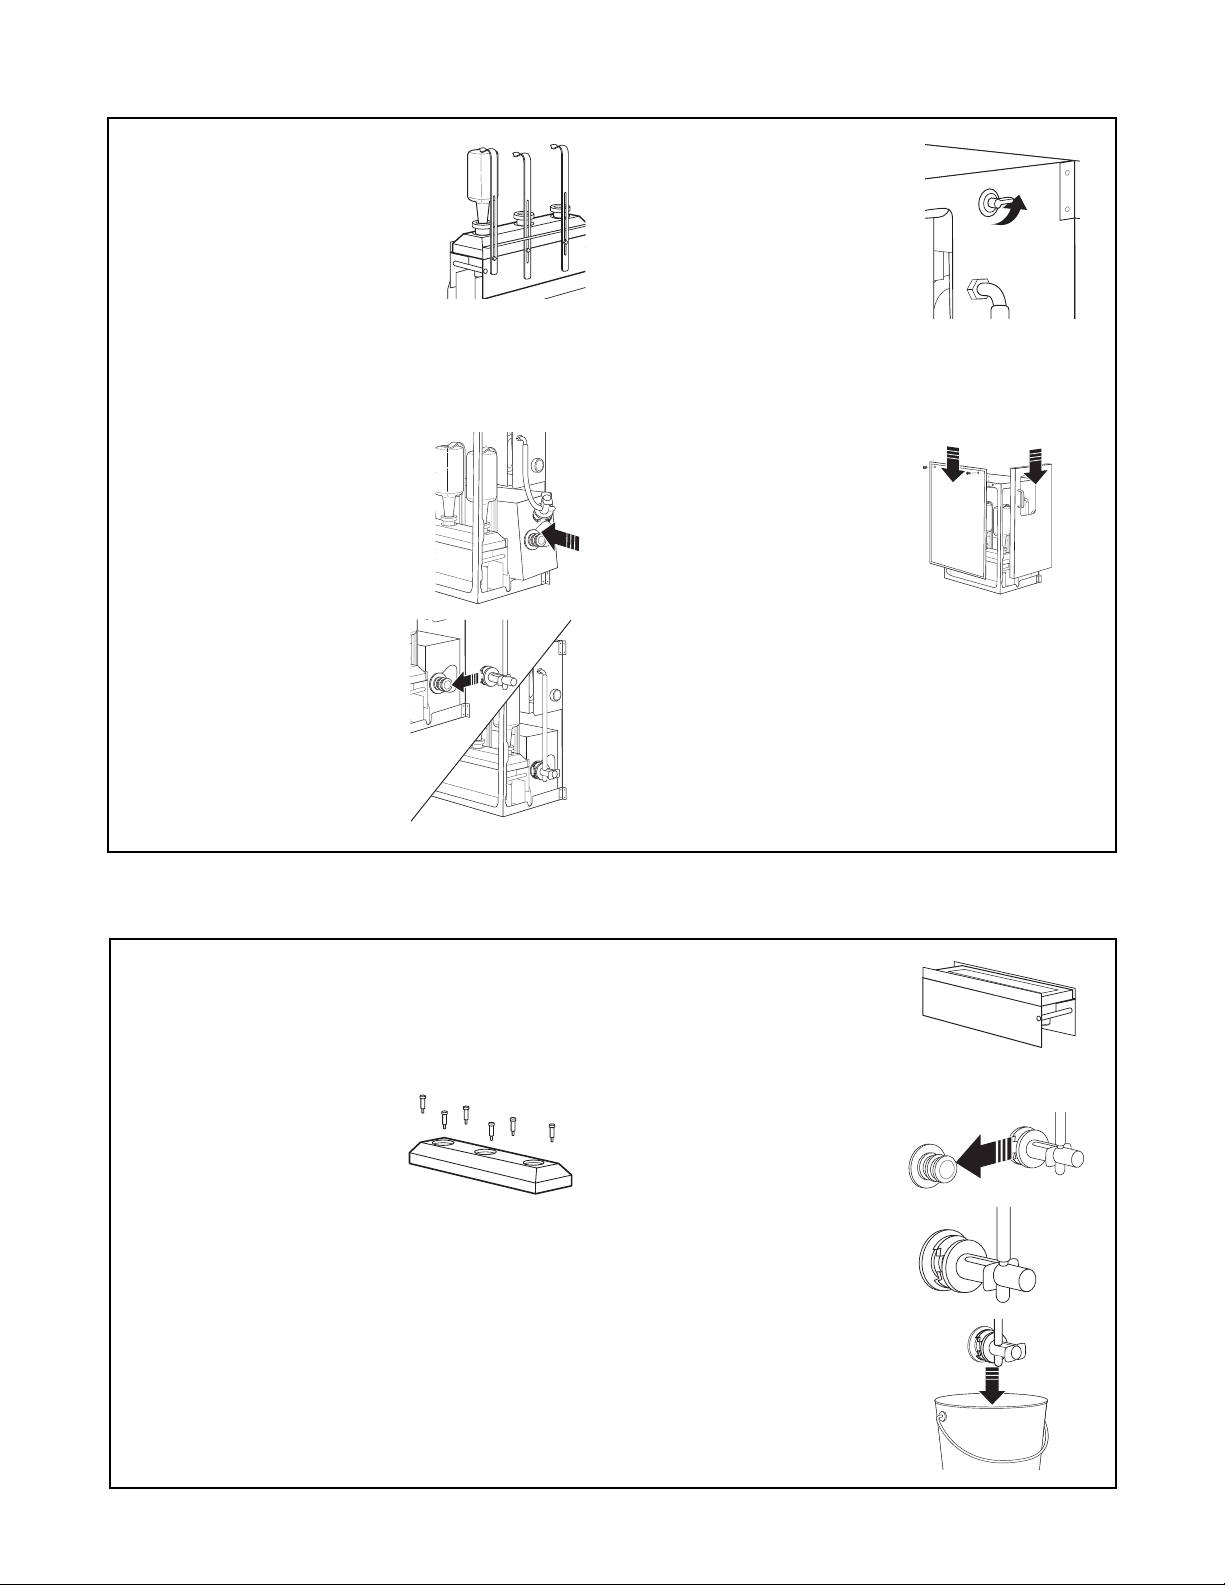
3. To replace the bag in box (BIB), pull out firmly
on the plunger, and slide the quick connect/
disconnect (QCD) to the side. Discard the empty
BIB.
Install the bag in box
(BIB) by opening the end
of the box and pulling
out the fitting. A cap is
installed over the fitting;
pull to remove. Slide the
fitting into the slot of the
cardboard box. Slide the
box into the unit.
Fully pull out the
plunger on the quick
connect/disconnect
(QCD). Attach the QCD
by sliding it over the
fitting. Firmly push in on
the plunger to engage the
fitting, and slide the BIB
into the cabinet as far as
it will go.
If the BIB runs empty, the
pumps will turn off. When a new BIB is installed,
the pumps will start automatically when the
faucet is opened.
4. Refer to the Troubleshooting Guide if additional
help is needed.
5. Follow the steps outlined in Maintenance to
keep your machine in top shape.
Operating Instructions
Installation
Site Preparation
The installation requires a CO2supply hose to be within reach of the base cabinet, and it must be long
enough such that the cabinet can be pulled out for installation, cleaning, and maintenance. The supply
line pressure must be regulated so that it delivers between 50 and 60 psi. The supply line can be
attached to the unit through a standard 1/4-inch female quick coupler, or the hose can be attached to a
1/4-inch barbed fitting and secured with a hose clamp.
The tap tower and base unit is designed to clamp-mount to a flat table or countertop. The countertop
thickness cannot exceed 3.75 inches. The unit includes 8 feet of hose to run from the faucet to the
base cabinet. The base cabinet needs to be located so that it is within reach of the hose, allowing the
cabinet to be pulled out for installation, cleaning, and maintenance.
840247002_v03.indd 4 2/6/15 4:49 PM

5
Installation
1. Remove the equipment
from the cabinet, which
includes the tap tower,
tower base, drip tray and
grate, spirit bottle holders
(quantity 3), and a bag of
hardware.
2. Install the thumbscrews to
the tower base. Snap the
pads to each end of the
thumbscrews.
3. Install the tap tower to the
tower base by threading
the drink hose through the
access hole and bolting
the large washer to the
underside of the base and
tower with #8 screws,
nuts, and lock washers
(quantity 4 each).
4. Route the hose along the
edge of the tower base,
which requires threading
the hose past the lateral
support on the underside
of the tower base.
5. Slide the rubber spacers over
the end of each thumbscrew.
6. Clamp the tap tower
and base to the table or
countertop. Verify the
hose is not pinched. The
rubber spacers can be
removed in order to
mount to a thicker
countertop.
7. Install the drip tray and
grate.
8. Close the tap faucet by
pushing the handle away
from you.
9. On the base cabinet, remove
the side access panel by
removing two screws and
lifting up and off. Remove
the front door by lifting up
and off.
10. Pull the spirits reservoir
drawer out by cutting the
cable tie securing it to the
cabinet. Remove the pump
cover by removing four red
thumbscrews.
11. Connect the drink hose from
the tap tower to the base
cabinet and secure with a
hose clamp.
12. For servicing and
maintenance, the CO2
should be able to be turned
off to the cabinet. When
running a CO2line to the
cabinet, include a shutoff
valve.
The unit comes assembled with a 1/4-inch male
quick coupler. The CO2supply line can use the
matching female coupler (such as McMaster-
Carr part #6536K38), or the male quick coupler
can be replaced with a 1/4-inch barbed fitting,
included in the bag of hardware, and the supply
line is attached with a hose clamp.
Do not hook up the CO2supply line until
instructed in the Sanitizing section.
13. Sanitize the unit as described in Sanitizing on
page 6.
14. Check for leaks in the hoses
and fittings and tighten
where needed. Verify hoses
are not pinched inside
the cabinet. Verify the
supply line CO2pressure
to the cabinet is between
50 and 60 psi. Adjust the
unit regulator to 30 psi by
pulling out the knob and
rotating until the needle indicates 30 psi. Push
the regulator knob in until it “clicks” to prevent
tampering, and install the pump cover.
15. Install the bottle holders to
the spirits reservoir with
thumbscrews, and tighten with
the bottle holders in the tallest
position.
16. Remove the cap to the spirit
bottle and slide a bottle nozzle
over the bottle.
840247002_v03.indd 5 2/6/15 4:49 PM

6
1. Prepare the sanitizing solution by mixing
1.24 ounces (1.5 teaspoons or 7.5 ml) 5%
liquid chlorine (liquid bleach–unscented,
nondetergent, non-drip-free, fresh new product)
in one gallon of water, resulting in a 100 ppm
concentration.
2. Remove the cover to
the spirits reservoir by
loosening and removing
the six screws. Remove
the bottle nozzles. If
the reservoir cover
has plugs in each of
the holes, remove and discard the blue plugs.
Immerse the bottle nozzles in the sanitizing
solution. With a soft brush, brush the inside and
outside of the cover with sanitizing solution,
and rinse with clear water. Remove the bottle
nozzles from the sanitizing solution and rinse
with clear water.
3. Fill the spirits reservoir
with about 25 oz.
(739 ml) of sanitizing
solution. Using a soft
brush, brush the top
portion of the inside of the spirits reservoir.
4. Attach the bag-in-box
(BIB) cleaning connector
to the quick connect/
disconnect (QCD) by
sliding it into position
and depressing the
plunger. Immerse the
QCD in a bucket of
sanitizing solution.
Sanitizing
Installation (cont.)
17. Fold the tip of the bottle nozzle
over, and insert the nozzle into
the spirits reservoir, tilting the
bottle upside down. Lower the
bottle holder and secure by
tightening the thumbscrew.
Slide the drawer into the
cabinet after the spirits bottles
are installed. The bottle holders need to be centered
on the bottoms of the bottles. If the bottle holders
hit the cabinet when sliding the drawer inside, then
adjust the position of the holders on the bottoms of
the bottles.
18. Install the bag in box (BIB) by
opening the end of the box
and pulling out the fitting.
A cap is installed over the
fitting; pull to remove. Slide
the fitting into the slot of the
cardboard box. Slide the box
into the unit.
19. Fully pull out the
plunger on the quick
connect/disconnect
(QCD). Attach the QCD
by sliding it over the
fitting. Firmly push in on
the plunger to engage the
fitting, and slide the BIB
into the cabinet as far as
it will go.
20. On the control panel,
verify the spirits valve is
rotated to DISPENSE.
21. There may be sanitizer or
water in the hoses if it was
just sanitized. Dispense
about 12 ounces (355 ml)
or until air is no longer
trapped in the lines.
22. Check fittings and hoses for signs of pinching
and leaking. Adjust and tighten where needed.
Check the pressure gauge again to confirm it
indicates 30 psi.
23. Install the side access
panel and front door.
24. Push the cabinet into
position, verifying the
hoses do not get pinched.
25. Open and close the
front door to verify it
travels freely.
26. Pull and push in the spirits reservoir drawer to
verify it travels freely.
27. Sample a drink to ensure the integrity of
the product. The unit is calibrated at the factory
to dispense at a ratio of 3 parts drink mix to 1
part spirits.
840247002_v03.indd 6 2/6/15 4:49 PM

7
Troubleshooting Guide
Problem . . . Solution . . .
Nothing comes out
when the tap faucet is
opened.
• Empty drink mix bag in box. The pumps will shut off when the drink mix bag in
box is empty. Connect a new bag in box. Be sure to fully engage the plunger on
the quick connect/disconnect (QCD).
• Low CO2pressure. Open the cabinet door and identify the CO2pressure from the
gauge. The unit is designed to operate at 30 psi, and the pressure gauge was set
to 30 psi at the time of the installation. If the pressure gauge is reading less than
30 psi, the CO2tank is likely low or empty. Check the pressure at the CO2tank.
Replace or recharge if needed. The CO2supply line leading to the cabinet should
be between 50 and 60 psi.
The flow is very slow
when the tap faucet is
opened.
• The drink mix bag in box is almost empty. The pumps will shut off when the drink
mix bag in box is empty. Connect a new bag in box. Be sure to fully engage the
plunger on the quick connect/disconnect (QCD).
• Low gas pressure. Open the cabinet door and identify the CO2pressure from the
gauge. The unit is designed to operate at 30 psi, and the pressure gauge was set
to 30 psi at the time of the installation. If the pressure gauge is reading less than
30 psi, the CO2tank is likely low or empty. Check the pressure at the CO2tank.
Replace or recharge if needed. The CO2supply line leading to the cabinet should
be between 50 and 60 psi.
• The quick connect/disconnect (QCD) to the drink mix bag in box is not tight.
Reconnect the QCD to the bag in box. The plunger must be fully depressed.
• Pinched hose. Check for a pinched hose between the cabinet and tap tower.
The flow is sputtering
when the tap faucet is
opened.
• Low spirits level. Air in the lines will cause coughing and sputtering at the tap.
Check that there are spirits in the reservoir.
• The drink mix bag in box is almost empty. Check that there is drink mix
remaining in the box. Connect a new box if needed.
• The quick connect/disconnect (QCD) to the drink mix bag in box is not tight.
Reconnect the QCD to the bag in box. The plunger must be fully depressed.
The flow is only drink
mix when the tap
faucet is opened; no
spirits are dispensed.
• The spirits shutoff valve is turned OFF. Open
the cabinet door and rotate the handle to
DISPENSE.
• The filter in the spirits reservoir is clogged.
Clean filter. (The mesh filter is located in the
bottom of the spirits reservoir.)
• The flow control orifice is clogged. Remove
and clean the flow control orifice. The flow
control orifice is located between the pumps
and secured to the side wall of the cabinet.
The flow is only spirits
when the tap faucet is
opened; no drink mix
is dispensed.
• The drink mix BIB is almost empty. Connect a new bag in box.
• The quick connect/disconnect (QCD) to the drink mix BIB is not tight. Reconnect
the QCD to the bag in box. The plunger must be fully depressed.
Sanitizing (cont.)
5. On the control panel,
verify the spirits valve is
rotated to DISPENSE.
6. Verify the CO2supply
line pressure is between
50 and 60 psi. Connect
the air hose to the
cabinet.
7. Pump the sanitizing solution through the
system by opening the tap handle. When
sanitizer is flowing freely at the tap, close the
tap and allow the solution to work for
5 minutes.
8. Flush with clean water and pump until the
spirits reservoir is empty.
9. Install the cover to the spirits reservoir.
Mesh Filter
840247002_v03.indd 7 2/6/15 4:49 PM

4421 Waterfront Drive
Glen Allen, VA 23060
840247002
2/15
www.commercial.hamiltonbeach.com
Maintenance
Daily 1. Clean faucet. Wash your hands with soap and water, and prepare a chlorine-based
sanitizer solution. Clean the inside of the faucet with a brush and sanitizer solution.
2. Clean the drip tray. Pour chlorine-based sanitizer solution over the tray. Remove grate.
Wipe down inside/outside of the drip pan with a clean cloth towel and chlorine-based
sanitizer solution.
3. Wipe down tap tower and base.
Weekly 1. Clean BIB connector. Wash your hands with soap and water, and prepare a sanitizer
solution. Disconnect drink mix line from BIB. Soak connector in a dedicated bucket of
sanitizer solution for 1 minute.
Monthly 1. Remove the front door by lifting it up and off, and wipe down the door.
2. Disconnect and remove the drink mix BIB, and wipe down the bottom of the cabinet.
3. Pull the cabinet out as needed, using the handhold, to clean behind and underneath
the unit. Verify the hose to the tap tower does not get pinched when returning the unit
to its home position.
4. Attach the bag-in-box (BIB) cleaning connector to the quick connect/disconnect (QCD),
and immerse the QCD in a bucket of sanitizing solution [1.5 teaspoons or 7.5 ml of
5% liquid chlorine (liquid bleach–unscented, nondetergent, non-drip-free, fresh new
product) in one gallon of water].
5. Rotate the spirits shutoff valve to CLEAN.
6. Open the tap and let the sanitizer circulate through the hoses. When the fluid is
running clear, turn off the tap. Allow the solution to work for 5 minutes, and then flush
with clean water.
7. Reconnect the drink mix BIB.
8. Dispense about 12 ounces (355 ml) or until drink mix flows continuously from the
faucet.
9. Rotate the spirits shutoff valve to DISPENSE.
10. Dispense about 3 ounces (89 ml) or until air is no longer trapped in the lines.
11. Sample a drink to ensure the integrity of the product.
12. Check fittings and hoses for signs of leakage and tighten where needed.
13. Install front door.
It is essential that the entire liquid system is sanitized after extended shutdown periods. Purge all products
from the system, rinse with clear water, and then follow the steps identified in Sanitizing.
Problem . . . Solution . . .
The pumps fail to stop
cycling even when the
tap faucet is closed.
• There is a leak in the hoses. Check for leaks inside the cabinet and the hose
running from the cabinet to the tap.
• Faulty pump or pump auto shutoff. Turn off the CO2to the unit and call for
service.
The quick connect/
disconnect (QCD)
does not attach to the
bag in box (BIB).
• The QCD is not fully retracted. Pull the
plunger out as far as it will go. Slide the
QCD over the BIB fitting. Fully depress the
plunger.
Troubleshooting Guide (cont.)
840247002_v03.indd 8 2/6/15 4:49 PM
Other manuals for COT2000 Series
1
Table of contents
Popular Dispenser manuals by other brands

Georgia Pacific
Georgia Pacific GP PRO Dixie Ultra SmartStock Tri-Tower Mounting instructions

Bennett
Bennett 3000 Series Service manual

Bartscher
Bartscher 500379 manual

Yaesu
Yaesu FD-160 III instruction manual

OK International
OK International DX-350 / 355 user guide

lancer
lancer LEV FILL STATION Installation and service manual