Hamilton Single Stacker Quick start guide

Document#101-0008 1 11/11/05
Single Stacker
Operational Manual

Document#101-0008 2 11/11/05
TABLE OF CONTENTS
I. INTRODUCTION...................................................................................................4
Compatibility .................................................................................................................................. 4
Validator..................................................................................................................................... 4
Operation ....................................................................................................................................... 4
II. INSTALLATION...................................................................................................5
FrontLoadCabinet........................................................................................................................ 5
RearLoad Cabinet ........................................................................................................................ 5
III. STACKER REMOVAL .......................................................................................6
FrontLoadCabinet........................................................................................................................ 6
RearLoad Cabinet ........................................................................................................................ 6
IV. BILL REMOVAL...................................................................................................7
FrontLoadCabinet........................................................................................................................ 7
RearLoad Cabinet ........................................................................................................................ 7
V. MAINTENANCE ...................................................................................................8
Monthly Maintenance ................................................................................................................... 8
AnnualMaintenance ..................................................................................................................... 8
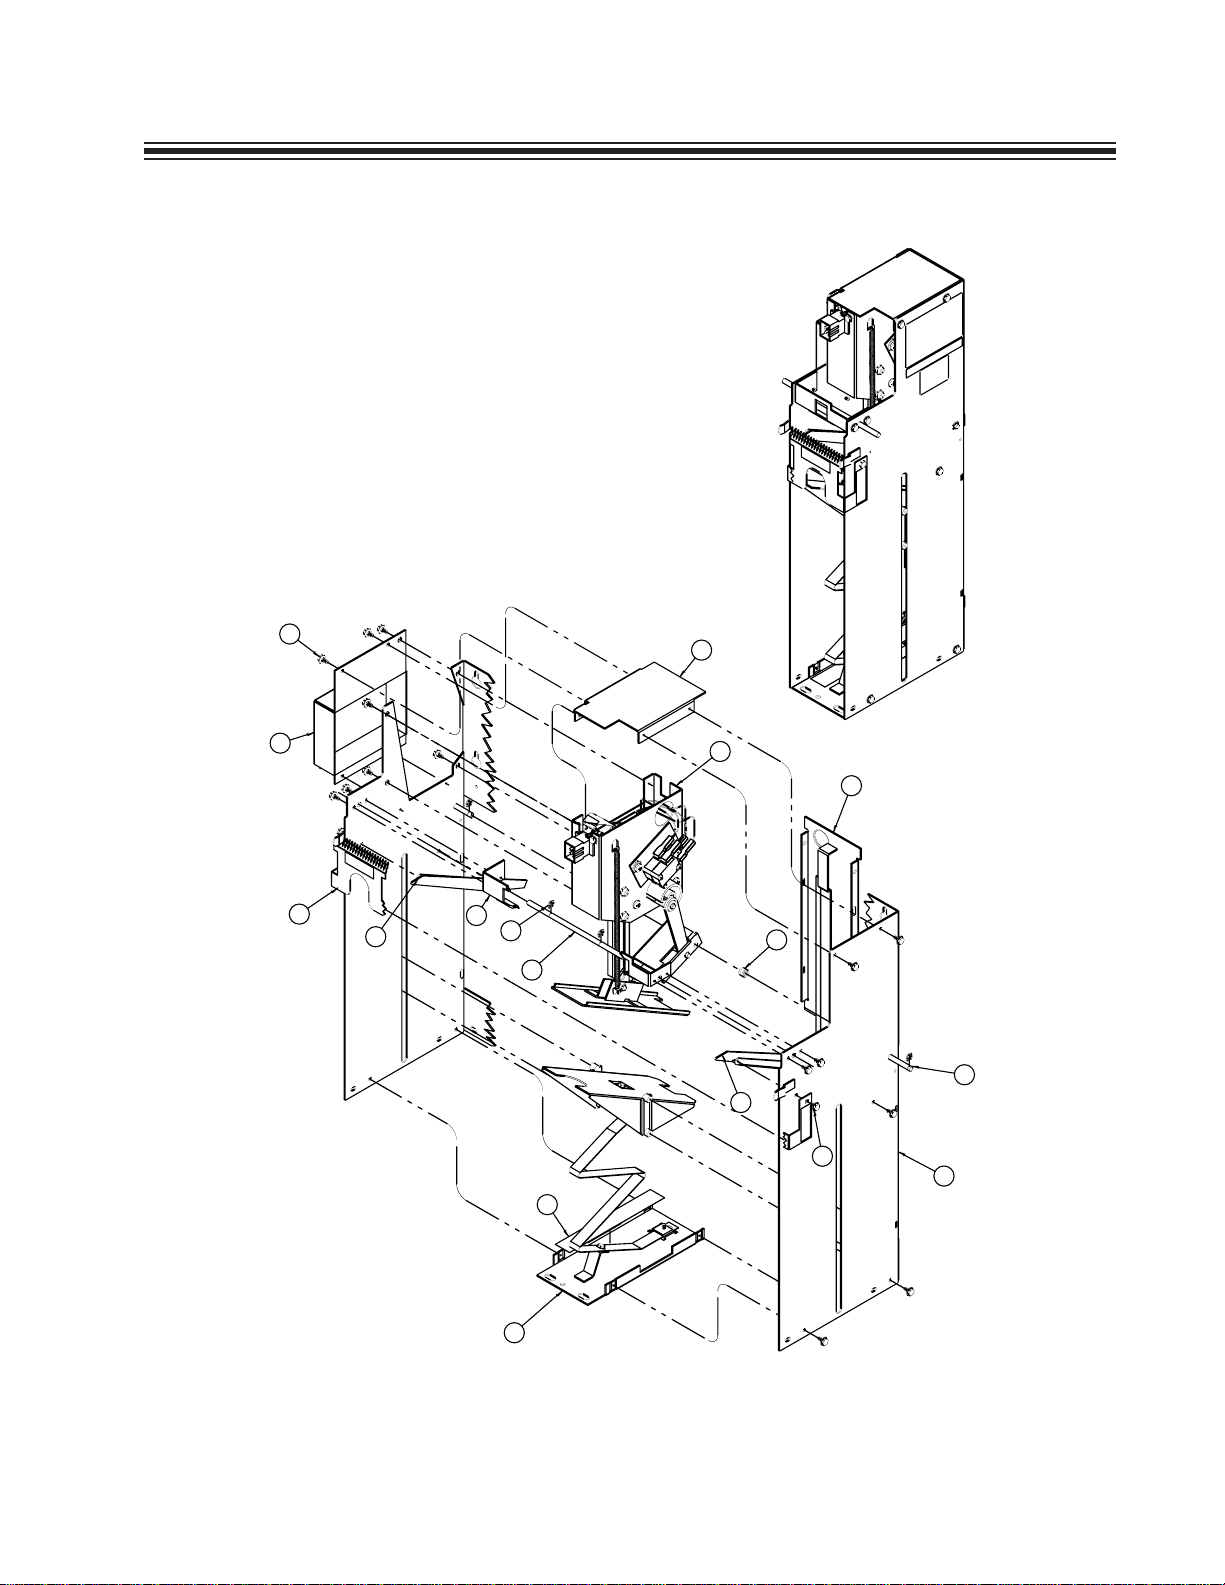
VI. PARTS....................................................................................................................9
Single Stacker ........................................................................................................... 9
SingleStackerBillOfMaterials .............................................................................. 10
Motor Assembly ..................................................................................................... 11
MotorAssembly Bill Of Materials .......................................................................... 12
Bottom PlateAssmebly........................................................................................... 13
APPENDIXA ......................................................................................................... 14
APPENDIX B......................................................................................................... 15

Document#101-0008 3 11/11/05
ABOUT THIS MANUAL
Thismanualwill providetheoperatorwithinformationabouttheoperationandthemaintenanceoftheHamil-
tonSingle Stacker.Schematic andelectricalconnection diagramsarealso provided toassistthe operator.
Further assistance canbe obtained bycalling (800)837-5561 or (419)867-4858.
When calling for assistance, it is important to have the serial number readily available. Please record this
numberinthe spaceprovided.
STACKER SERIAL#______________________________________

Document#101-0008 4 11/11/05
I. INTRODUCTION
Compatibility
Validator
TheStackermaybe connected in a systemusingtheXEValidatorandacurrentversionoftheC2000Control-
ler(C230v1.9orhigher).TheC2000Controllerwillcontrolthestackingoperations.ConfigurationSwitch#2
onthe C2000Controllerand Switch#4on theXEValidatormust be inthe OFFpositionin orderforthe XE
Validatorto functionwiththe Single Stacker.
The Hamilton Single Stacker must have the letters “NR” at the end
of the serial number. If these letters are missing, then the Stacker
maynotcompatiblewithotherHamiltonequipment.
Operation
Afterabillisaccepted,itpassesoutoftheValidatorandfallsintotheStacker,ontopoftherails.TheValidator
thensendsacreditpulseto theController.Thecontrollerregistersa credit andsends anactivation pulseto the
stacker which energizes the relay and starts motor. Then a cam on the motor shaft activates a switch that
unlatchesthe relay andtakes overrunningthe motor.The camalsooperates thepusher, whichtravelsdown
and pushes the bill below the rails.As the cam completes one revolution, it comes back to the switch and
deactivatesthemotor.
Thereisan additionalswitchoperatedby thecam.Thisswitch isconnectedtothe Stackerbusycircuit of the
Controller.Itsimplyopens when thecamisturningandcloses againwhenonerevolutioniscomplete.While
theswitchisopen,theControllerknowsthattheStackeris“busy”.Iftheswitchremainsopenfortoolong,the
Controllerassumesthe Stackeris jammedandshutsthe machinedown.ASTACKERBUSYorSTACKER
MALFUNCTIONerror message isthen displayedonthe Controller.

Document#101-0008 5 11/11/05
II. INSTALLATION
Front Load Cabinet
TheStacker isattachedto therear of thecabinet bythreescrews, oron aStackerHanging Bracket,depend-
ingonthecabinetmodel.IfusingaStacker Hanging Bracket,position the uppertwo holes inthe Stacker over
thetoptwoscrews andinstallthelowerscrew.HooktheValidatorMountingBracketonto the mountingpins
oftheStacker.AttachtheValidatorSupport BrackettotheValidatorMounting Bracketandto the sideofthe
cabinet.Connect theValidatorand Stackerwiring harnesses. PlacetheValidator in theValidator Mounting
Bracket.
Rear Load Cabinet
PlacetheValidatorWiring Harness overthetopoftheValidatorto protectit duringinstallationoftheStacker.
ConnecttheStacker wiringandplace thewiringabove theStackerto protect itduringinstallation. Placethe
Stackerjust behind theValidator withthehousingsupport pinsslightlyabove theValidatorSupportBracket
andmovetheStackerforwardto contacttheValidatorbracket. MovetheStackerforwardanddownuntil the
Stackerhousing supportpinsrest inthe slots oftheValidator SupportBracket.
Properoperation of theStackerrequiresit to behangingvertically
atthis point.
ThemountingsystemforRearLoadChangersequippedwithaStackerconsistsofamain bracket that boltsto
the front of the changer cabinet and two side plates that are fastened to either side of the Validator. The
Validatorandplatesslide intothe mainbracketandaresecured.The Stackeristhenhung on tabsprovidedon
thesideplates.

Document#101-0008 6 11/11/05
III. STACKER REMOVAL
Front Load Cabinet
First,disconnecttheMainValidator Harness. Next,disconnecttheStackerWiringHarnessbygently pulling
theconnectorapart. RemovetheValidatorandtheValidatorSupport Bracket.Thenremove the lowerscrew
holdingtheStackertotherearofthecabinet.LifttheStackerapproximately1/2"andpullforward.Tocontinue
operating the changer without the Stacker, attach the Stacker By-pass Plug. (Refer toAPPENDIX B for
instructions.)
Rear Load Cabinet
Liftthe Stackerslightly toallow theStackerpins toclear theValidator SupportBracket. Bring the Stacker
straightoutofthecabinetuntil there isroom todisconnect thewiring harnessthat runsfrom theStacker tothe
Controller.To continueoperatingthechanger withouttheStacker, attach theStackerBy-passPlug. (Referto
APPENDIXBforinstructions.)

Document#101-0008 7 11/11/05
IV. BILL REMOVAL
Front Load Cabinet
To removethe billsfromthe lowersectionof theStacker,press the PressurePlate downwardwithone hand
whileremovingthestackofbillswiththeotherhand.
Rear Load Cabinet
To removethe billsfrom thelower sectionof theStacker,remove therear gateand press thePressure Plate
downwardwithonehandwhile removing thestackofbillswiththe other hand.
Ineitherthe frontorrearload application,theStackerdoes not need
toberemoved from itsmountedposition toremovestacked bills.

Document#101-0008 8 11/11/05
V. MAINTENANCE
Monthly Maintenance
1. Keep theStacker clean.
2. Check operation;theStackershouldcycle smoothly.
3. With the Stackerempty,check thepressure plate.Push theplate downand let itgo.
Itshould snapfreelyto thetop.
Annual Maintenance
1. All pivotpointsmust becleanedand re-greased.
2. Check for bent, loose, worn, rusted or corroded parts.
3. Check themotorfor coasting.
4. Use asmallamountof DrySlick™(aliquid solventcleanerandprotectant) onthe
slides. Do not use grease or WD-40™ on the slides.

Document#101-0008 9 11/11/05
VI. PARTS Single Stacker
9
16
14
711
15
3
6
12
13
20
1
10
8
5
2
4

Document#101-0008 10 11/11/05
SCREW, #6-32 x 1/4 LG. PAN HEAD PHILLIPS
SINGLE STACKER36-0036
1
KIT, SINGLE STACKER COMB
100-0099
90-0132
36-0002A2 MOTOR ASSEMBLY 1
36-00033 MOTOR COVER 1
36-00044 TOP COVER 1
36-00065 REAR GATE
36-00126 VALIDATOR BRACKET 1
7 36-0013
8
LEFT MOUNTING RAIL 1
36-0014
9
RIGHT MOUNTING RAIL 1
36-0005A
10
BOTTOM PLATE ASSEMBLY 1
36-0043
11
PUSHER PIN 1
36-0034
12
SPACER, PIVOT 1
90-0507
13
3/16" RETAINING RING 5
90-0547
14
STACKER MTG ROD 1
90-0601
15
SCREW, #6-32 x SELF-TAPPING HEX 4
16
18
1
1
HOUSING AND CLIP
1 36-0031
QTY.
DESCRIPTIONPART#
ITEM#
Single Stacker Bill Of Materials

Document#101-0008 11 11/11/05
6
5
4
3
2
1
MOTOR
47 OHM
1 WATT
.1 UF
400V
GROUND ( GREEN) 20 AWG
COMMON ( BROWN) 20 AWG
STACKER( WHITE) 20 AWG
BUSY ( YELLOW) 20 AWG
L1 HOT ( RED) 20 AWG
L2 NEUTRAL( BLUE) 20 AWG
6 PIN MOLEX
14
17
16
15
19
19
25
5
26
24
23
21
22
27
20
13
18
1
8
9
7
4
6
10
11
2
12
3
Motor Assembly

Document#101-0008 12 11/11/05
SCREW, #6-32 x 1/4 LG. PAN HEAD PHILLIPS
MOTOR ASSEMBLY36-0002A
90-0132
1
MOTOR BRACKET
1 36-0002
QTY.
DESCRIPTIONPART#
ITEM#
36-0011A2 CAM LINK ASSEMBLY 1
36-0015A3 SWITCH ASSEMBLY 1
36-00184 PUSHER 1
36-00205 PUSHER LEVER 1
36-00216 PUSHER GUIDE 1
36-00347 PIVOT PIN SPACER 1
36-00418 PUSHER GUIDE STUD 2
36-00429 PUSHER GUIDE SPACER 2
36-004410 LINK PIN 1
36-004511 PIVOT PIN 1
36-0050A12 CAM ASSEMBLY 1
36-007013 SINGLE STACKER, MOTOR 1
36-0079A14 SNUBBER KIT, STACKER 1
47-001115 TERMINAL, MALE 3
47-022016 SHRINK TUBE 1/16" 1.5
47-000017 WIRE, 20 GA 1
48-311618 HARNESS, SINGLE STACKER MAIN 1
19 49-9371
20
SPADE CONNECTOR BLUE 3/16" 2
50-0028
21
SPRING, SLIDE 1
90-0144
22
SCREW, #8-32 x1/2 PH 4
90-0308
23
NUT, #6-32 NYLON LOCK 2
90-0411
24
WASHER,#8 INTERNAL LOCK 5
90-0417
25
WASHER, #10 BRASS 2
90-0425
26
SHIM, VENDING VALIDATOR 1
4
RETAINING RING 1/8
27
90-0506
1
Motor Assembly Bill Of Materials

Document#101-0008 13 11/11/05
1
2
3
4
BOTTOM PLATE ASSEMBLY
SCREW, #6-32 x 1/4 LG. PAN HEAD PHILLIPS
36-0005A
1
PLATE BOTTOM
1 36-0005
36-00742 SPRING, STACKER PRESSURE 1
36-0007B3 PRESSURE PLATE WITH SLIDES 1
90-01324 3
QTY.
DESCRIPTIONPART#
ITEM#
Bottom Plate Assmebly

Document#101-0008 14 11/11/05
APPENDIX AAPPENDIX A
APPENDIX A
SingSing
SingSing
Single Stacle Stac
le Stacle Stac
le Stackk
kk
kerer
erer
er
SchematicSchematic
SchematicSchematic
Schematic
6
5
4
3
2
1
MOTOR
47 OHM
1 WATT
.1 UF
400V
GROUND ( GREEN) 20 AWG
COMMON ( BROWN) 20 AWG
STACKER( WHITE) 20 AWG
BUSY ( YELLOW) 20 AWG
L1 HOT ( RED) 20 AWG
L2 NEUTRAL( BLUE) 20 AWG
6 PIN MOLEX

Document#101-0008 15 11/11/05
APPENDIX BAPPENDIX B
APPENDIX B
StacStac
StacStac
Stackk
kk
ker By-Per By-P
er By-Per By-P
er By-Pass Plugass Plug
ass Plugass Plug
ass Plug
To operate themachinewithout astacker, follow thestepsbelow:
1. Turnoffpowertothe machine.
2. Disconnect theStackerPlug(A).
3. Locatethe By-PassPlug(B). The By-PassPlugis approximately3-4inches away
fromthe StackerPlug,and isconnectedto theharness with apurple wire.
4. Plug theStackerPlug (A)intothe By-PassPlug(B).
STACKER PLUG ( A )
STACKER BY-PASS PLUG ( B)
HARNESS
STACKER PLUG ( A )
STACKER BY-PASS PLUG ( B)
HARNESS

Document#101-0008 16 11/11/05
LIMITED WARRANTY AGREEMENT
OF HAMILTON MANUFACTURING CORP.
HamiltonManufacturing Corp.,anOhio Corporation,(“Seller”) warrantstoPurchaser thatall new
equipmentshallbefree fromdefectsinmaterialandfactoryworkmanshipforaperiodofone(1)yearfromthe
originalshippingdate. HamiltonManufacturingCorp. furtherwarrantsifany partofsaid newequipmentin
Seller’ssoleopinion,requiresreplacementorrepairduetoadefectinmaterialorfactoryworkmanshipduring
said period, Seller will repair or replace said new equipment. Purchaser’s remedies and the liabilities and
obligationsofSellerhereinshallbelimitedtorepairorreplacementoftheequipmentasSellermaychoose,and
Seller’s obligationtoremedy suchdefects shallnot exceedthePurchaser’soriginalcost forthe equipment.
PurchaserEXPRESSLYAGREESthisistheEXCLUSIVEREMEDYunderthiswarranty.Therearenoother
express or implied warranties which extend beyond the face hereof.All warranty repair service must be
performed by either a Factory Trained Service Representative or HAMILTON MANUFACTURING
CORP.,1026HamiltonDrive,Holland,Ohio43528PHONE(419)867-4858or(800) 837-5561,FAX
(419)867-4867.
Thelimitedwarrantyfornewequipmentisconditioneduponthefollowing:
1. The subjectequipmenthasnot, intheSeller’s soleopinion,beensubjected
to:accident,abuse,misuse,vandalism, civil disobedience,riots,actsof
God,natural disaster,acts ofwaror terrorism.
2. The Sellershallnotbe liableforanyexpense incurred byPurchaserinci-
dentaltothe repairorreplacementof equipment andPurchasershall
assumefullresponsibilityforanyfreightorshippingcharges.
3. The coverageofthis warranty shallnotextend toexpendableparts.
4. Purchaser shallhaveawarranty registration cardonfilewith Seller priorto
anyclaimin order forwarrantyprotectionto apply.
5. No warrantycoverageisapplicable toanyequipment used forcurrency
otherthanthat specifiedatthe time ofthepurchase.
6. Sellerexpresslydisclaimsanywarrantythatcounterfeitcurrencywillnot
activatesaidequipment.
7. Sellerexpresslydisclaimsanywarrantyforanylossesduetobillmanipula-
tionortheft orlossofcash underanycircumstances.
8. Use oftheequipmentforanythingother thanits intendedanddesigneduse
willvoidtheLimitedWarrantyAgreement.Useofequipmentforanything
otherthanitsintended anddesigned useincludes,butisnot limitedto,
downloadingsoftware/applicationsnotcertifiedbySellersuchase-mail,
spyware,screen savers,viruses,worms, thirdparty software, websearch
engines,cookies,spam, desktopapplications,games,web surfing,etc.
Seller further warrants all repair or service work performed by a factory trained representative or
HamiltonManufacturing Corp. fora period ofninety (90) daysfrom the datethe repair orservice work was
performed.Purchaser’sremediesandtheliabilitiesandobligationsofSellerhereinshallbelimitedtorepairor
replacement of equipment as Seller may choose, and Seller’s obligation to remedy such defects shall not
exceed the Purchaser’s depreciated value of the equipment. Purchaser EXPRESSLYAGREES this is an
EXCLUSIVEREMEDYunder this warranty.Thereare noother express orimplied warrantiesonrepair or
serviceworkperformed byafactory trainedrepresentativeor Hamilton ManufacturingCorp.which extend
beyondtheface hereof.

Document#101-0008 17 11/11/05
Thelimitedwarrantyforrepairandserviceworkisconditioneduponthefollowing:
1. The subjectequipmenthas not,inthe Seller’ssoleopinion, been subjected
to:accident,abuse,misuse,vandalism, civil disobedience,riots,actsof
God,natural disaster,acts ofwaror terrorism.
2. The Sellershallnotbeliable foranyexpenseincurredby Purchaser inciden-
taltotherepair or replacementofequipmentandPurchaser shall assumefull
responsibilityforanyfreightorshippingcharges.
3. The coverageofthis warranty shallnotextend toexpendableparts.
4. Purchaser shallhaveawarrantyregistration card onfilewithSellerprior to
anyclaimin order forwarrantyprotectionto apply.
5. No warrantycoverageisapplicable toanyequipment used forcurrency
otherthanthat specifiedatthe time ofthepurchase.
6. Sellerexpresslydisclaimsanywarrantythatcounterfeitcurrencywillnot
activatesaidequipment.
7. Sellerexpresslydisclaimsanywarrantyforanylossesduetobillmanipula-
tionortheft orlossofcash underanycircumstances.
8. No personorentity other thanafactory trainedrepresentativeor Hamilton
ManufacturingCorp.has performedorattempted toperformthe subject
repairorservice.
9. Usingequipmentwhichhasbeenservicedor repaired foranything other
thanitsintendedor designed usesuchasdownloadingsoftwareapplications
notcertifiedbySellerwillvoidtheLimitedWarrantyAgreement.This
includessoftware/applicationssuchas e-mail, spyware,screensavers,
viruses,worms,third partysoftware,web searchengines,cookies, spam,
desktopapplications,games, web surfing,etc.
THISAGREEMENTISMADEWITHTHEEXPRESSUNDERSTANDINGTHATTHEREARE
NO IMPLIED WARRANTIESTHAT THE EQUIPMENTSHALLBE MERCHANTABLE, ORTHAT
THE GOODS SHALL BE FIT FOR ANY PARTICULAR PURPOSE. PURCHASER HEREBYAC-
KNOWLEDGES THATIT IS NOT RELYING ON THE SELLER’S SKILLOR JUDGMENTTO SE-
LECT OR FURNISH EQUIPMENT SUITABLE FOR ANY PARTICULAR PURPOSE AND THAT
THEREARENOWARRANTIESWHICHEXTENDBEYONDTHATWHICHISDESCRIBEDHEREIN.
ThePurchaser agrees thatin no eventwill theSeller be liablefor direct, indirect, or consequential
damagesorforinjury resultingfromanydefectiveornon-conformingnew,repairedor serviced equipment,or
foranyloss, damageorexpense of anykind,including lossofprofits, business interruption,lossof business
informationorotherpecuniarylossarisinginconnectionwiththisLimitedWarrantyAgreement,orwiththeuse
of,orinabilityto usethe subjectequipmentregardlessofSellers knowledgeof thepossibilityofthesame.

Document#101-0008 18 11/11/05
1026HamiltonDrive
Holland,OH 43528
Sales Phone: (888) 723-4858 Sales Fax: (419) 867-4850
Customer Service Phone: (800) 837-5561 Customer Service Fax: (419) 867-4857
Parts Phone: (866) 835-1721 Parts Fax: (419) 867-4867
Website:http://www.hamiltonmfg.com
EmailAddresses:
HamiltonManufacturingCorporation
Table of contents