manuals.online logo
Brands
  1. Home
  2. •
  3. Brands
  4. •
  5. Hammerhead
  6. •
  7. Scrubber
  8. •
  9. Hammerhead 500 Series User manual

Hammerhead 500 Series User manual

500 SERIES
HAMMERHEAD
CLEANING EQUIPMENT COMPANY
R
HammerheadClean.com
Easy to Use
Efficient
Economical
ENGINEERED SIMPLICITYTM
Adjustment & Testing Guide
ADJUSTMENTS
AND
TESTING
ANTEA 50 BT – BTS - BTO
Doc. 10059284
Issued 12/201
Ver. AC
Page 1 of 25
READ THE USE AND MAINTENANCE MANUAL
Display function
The display allows to:
•setup and manage the main functionalities and commands of the machine during the
working mode;
•access separately to the following submenu:
•“user menu” including the base functions of the machine. This menu is intended
for the operator of the machine.
•”advanced menu” including the advanced features and settings of the machine.
This is addressed to experienced technicians. Access to “user menu” i
s open, while
“advanced menu” is password protected.
•read eventual alarm signal to manage a potential issue of the machine.
Key 1:
Function
Eco
Key 4:
Forward /
Bacward
speed
Key 2:
NOT
USED
Key 5:
Coupling /
Uncoupling
brushes
(only BT version)
Key 3:
Clean
water
Key 6:
Chemical
percentage
ADJUSTMENTS
AND
TESTING
ANTEA 50 BT – BTS - BTO
Doc. 10059284
Issued 12/201
Ver. AC
Page 2 of 25
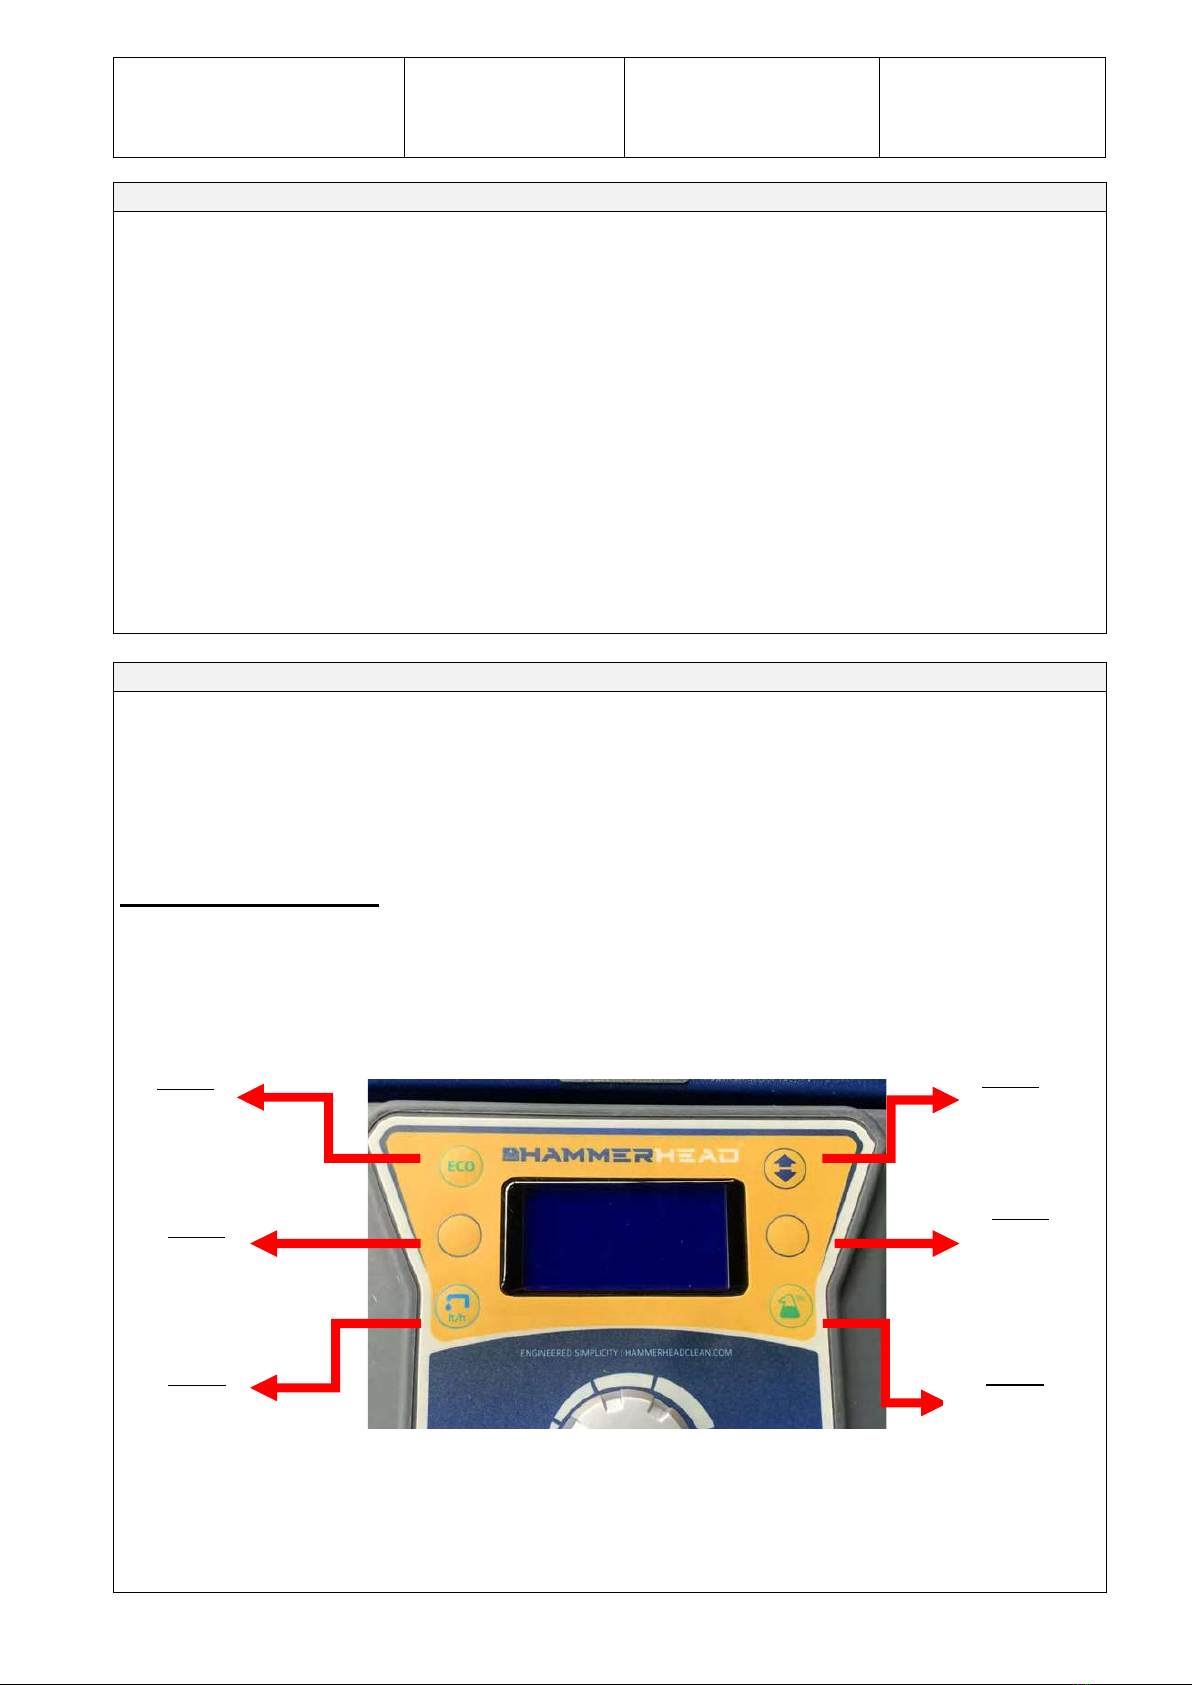
Display function – Alarm Ta le
The display shows the possible alarms of the machine.
Alarms are shown on the first line of the display and it alternates between the alarm id and a
short alarm description.
Here below the alarm table.
Allarm id. Alarm Description What to do
AL_1: Function Brushes Current
Protection
High current consumption detected. Check
the brush motor absorption and utilization.
Brushes Ammeter
AL_2: Function Vacuum Current
Protection
High current consumption detected. Check
the vacuum motor absorption and
utilization.
Vacuum Ammeter
AL_3: Function Damaged powerstage Brush or vacuum power stage damaged.
Replace the electronic card.
Powerstage Fail
AL_4: Function Brush or Vacuum
overcurrent
Short circuit on brush or vacuum motor
output. Check motor cables and conditions.
Overcurrent
AL_5: Function Thermal protection on
brush or vacuum
motor
Over temperature on brush or vacuum
stage. Wait 5 minutes and check the motor
absorption rate.
Overtemperature
AL_10: Function Batteries not
connected
Check the connections of the batteries
cables and the related connections
on the
electronic card.
Batt. Connection
AL_13: Traction Lever fault
Check connections and functionality of
potentiometer.
Lever Failure
AL_14: Traction Pressed lever during
turning on
Forward Micro Switch pressed at
turning on.
Release the lever.
Release lever
AL_15: Traction Thermal protection on
traction motor
Over temperature on traction stage. Wait 5
minutes and check the motor absorption.
Overtemperature
AL_1 : Traction Damaged powerstage Traction power stage damaged. Replace
the electronic card.
Powerstage fail
AL_17: Traction Traction overcurrent Short circuit on traction motor output.
Check motor cables and conditions.
Overcurrent
ADJUSTMENTS
AND
TESTING
ANTEA 50 BT – BTS - BTO
Doc. 10059284
Issued 12/201
Ver. AC
Page 3 of 25
Steering wheel function – Alarm Ta le (following)
Allarm id. Alarm Description What to do
AL_18: Traction Traction Current
Protection
High current consumption detected. Check
the traction motor absorption
and
utilization.
Tract. Ammeter
AL_19: Traction -------- Power st
age read as damaged : if persist
replace the card.
Motor lecture
AL_21: General Fault in turning on/off
sequence
Check connections of the connector
of the
key. Swicth off and switch on again.
Key-off failure
AL_22: General Main Relay Failure
Check the connections of the motors. If it is
ok, the main Relay is
damaged. Replace the
electronic card.
Main Relay Fail
AL_23: General Overvoltage. Over
voltage on electronic card. Check
batteries status and connections.
Overvoltage.
AL_24: Traction Batteries not
connected to
electronic card.
Check batteries status and connections to
electronic card.
Batt. Connection
AL_25: General No communication
between electr. card
and command bridge.
Check connections between the command
bridge and the electronic card.
Keyboard failure
ADJUSTMENTS
AND
TESTING
ANTEA 50 BT – BTS - BTO
Doc. 10059284
Issued 12/201
Ver. AC
Page 4 of 25
Display function – Working Mode – Battery Status
During the working mode the display shows battery charge status (as percentage of the total
available charge).
Verify that the battery check card disables the brush motor (traction and vacuum motors still
on) when the remaining battery charge is at 20% (alarm limit 1).
From the limit 1, the charger level will blink.
Verify that the battery check card disables the vacuum motor (traction motor still on) when the
remaining battery charge is at 10% (alarm limit 2).
Display function – “user menu” and “advanced menu”
The display acts as a programming console.
Using a specific key sequence it is possible to access the two main menu:
“user menu” including the base functions of the machine. This is intended for the operator
of the machine.
“advanced menu” addressed to experienced technicians (“advanced menu” is password
protected).
Enter the “user menu”.
To enter the “user menu” proceed as follow:
•Press at the same time, with machine off, the “key 4” and “key ”.
•Keeping pressed the mentioned buttons, rotate the machine key in ON position.
•Wait for the loading of “user menu” text interface.
Use the “key 1” and the “key 3” to move and scroll into the “user menu”.
Use the “key 4” and the “key ” to modify a setting.
Use the “key 2” to confirm a new parameter value.
Key 1:
Function
Eco
Key 4:
Forward /
Bacward
speed
Key 2:
NOT
USED
Key 5:
Coupling /
Uncoupling
brushes
Key 3:
Clean
water
Key 6:
Chemical
percentage
ADJUSTMENTS
AND
TESTING
ANTEA 50 BT – BTS - BTO
Doc. 10059284
Issued 12/201
Ver. AC
Page 5 of 25
Display function – “user menu” and “advanced menu” (following)
Available sections of “user menu” are:
MENU DEFAULT
AVAILABLE
VALUES DESCRIPTION
General Sets:
Language: ### IT IT – EN – DE – FR -
SP Language setup.
General Sets:
Model: ### ANTEA B-BT-B DS-BT DS-
VERSA-VERSA DS Machine model setup.
General Sets:
Battery: ### GEL WET – GEL – XFC
Installed batteries type.
General Sets:
Reset main count-meter: ### NO RESET
Y/N Reset for partial hour
meter.
General Sets:
Display count-meter: ### Traction Traction / Key
Hourmeter mode:
key – connected to
ON/OFF key.
Traction – connected to
traction motor.
General Sets:
Display tune: ### 15 5 - 50 Display tune
General Sets:
Display brightness: ### 0 0 – 10 Display brightness
General Sets:
Exit: ### N Y/N Exit from ”user menu”
General Sets:
Key-on ctn: ###h:###m - - General hour meter for
turning on status.
General Sets:
Traction motor_h: ###h:###m
- - General hour meter for
traction motor use.
General Sets:
Brush motor_h: ###h:###m
- - General hour meter for
brush motor use.
General Sets:
Vacuum motor_h: ###h:###m - - General hour meter for
vacuum motor use.
General Sets:
-ID CHECK- Password: ### - -
Password to get access to
“advanced menu”, only
for experienced
tec
hnicians. Default
password is 0.
ADJUSTMENTS
AND
TESTING
ANTEA 50 BT – BTS - BTO
Doc. 10059284
Issued 12/201
Ver. AC
Page of 25
Steering wheel function – “user menu” and “advanced menu” (next)
To modify a parameter value, act as follow:
•Scroll and move inside the submenu, using the “key 1” and the “key 3”, until finding the
parameter to modify.
•Use the “key 4” and the “key ” display the admissible values related to the parameter to
change.
•Use the “key 2” to setup the new parameter value.
•To confirm the new parameter value it is needed to go back to working mode. Select the
submenu “exit” to go out from the “user menu”.
Ex. Modify the language setting from IT to EN.
1. Switch off the machine by switching the key in OFF position.
2. Enter the “user menu”. Press at the same time, with machine off, “key 4” and the “key
” .
3. Keeping pressed the mentioned buttons, rotate the key in ON position. Wait for the
loading of “user menu” text interface.
4. Once loaded the “user menu”, use the “key 1” and the “key 3” to find out the submenu
“language”.
5. Use the “key 4” and the “key ” to visualize the admissible values for the language
parameter and find out the value EN.
. Use the “key 2” to setup the new parameter value as EN.
7. To confirm the new parameter value (EN) it is needed to go back to working mode. Select
the submenu “exit” to go out from the “user menu”. Press the “key 2” to confirm the
action.
ADJUSTMENTS
AND
TESTING
ANTEA 50 BT – BTS - BTO
Doc. 10059284
Issued 12/201
Ver. AC
Page 7 of 25
Display function – “user menu” and “advanced menu” (next)
“Advanced menu”.
To get access to the “advanced menu” enter as first the “user menu” and then the submenu
“password”. Type in the value 60. The available submenu are:
Settings:
Access to general settings (language,battery type…)
>General sets.
Settings:
Access to parameters related to brush motor.
>Brushes sets.
Settings: Access to parameters related to dosing system as
water pump (if included).
>Water Pumps sets.
Settings: Access to parameters related to dosing system as
detergent pump (if included).
>Chemical sets.
Settings:
Access to parameters related to vacuum motor.
>Vacuum sets.
Settings:
Access to parameters related to traction motor.
>Traction sets.
Settings:
Monitor of machine working parameters.
>Monitor mode.
Settings: Factory default settings. Do not modify anything
Contact Fimap Service
>Engineer pars.
Settings:
Back to the main page.
>Exit…..
Use the “key 1” and the “key 3” to move into the submenu of the “advanced menu”
Use the “key 2” to enter a submenu and to confirm a new parameter value.
Use the “key 4” and the “key ” to modify a setting.
Use the “key 2” to leave the “advanced menu” and get back to the working mode.
ADJUSTMENTS
AND
TESTING
ANTEA 50 BT – BTS - BTO
Doc. 10059284
Issued 12/201
Ver. AC
Page 8 of 25
Display function – “advanced menu” - su menu “General Sets”
The “General sets” submenu allows to enter the machine general parameters. “General sets” is
very similar to “user menu”.
General Sets: default Language setup for the text
interface of the machine.
Language: ### IT
General Sets: default Machine model setup (with or
without dosing system).
Model: ### ANTEA
General Sets: default Setup for installed battery types.
Battery: ### GEL
General Sets: default Reset for partial hour meter (as in
the “user menu”).
Rst.Cnthr: ### N
General Sets: default Reset for general hour meter
(key, brush, vacuum, traction).
Rst.Main Cnthr: ### N
General Sets: default Hourmeter mode:
key – connected to ON/OFF key.
Traction – connected to traction
motor.
Display Cnt: ### TRACTION
General Sets: default Display tune
Display tune: ### 15
General Sets: default Display brightness
Display brightness: ### 0
ADJUSTMENTS
AND
TESTING
ANTEA 50 BT – BTS - BTO
Doc. 10059284
Issued 12/201
Ver. AC
Page 9 of 25
Display function – “advanced menu” - su menu “Brushes Sets”
The “Brushes sets” submenu allows to enter the parameters and settings related to brush motor.
Brushes Sets: default Maximum current provided from the
electronic card to the brush motor.
Max motor current: ##[Amp]
40
Brushes Sets: default Nominal current, joined with T_Nom define
the condition of Brush Current Protection.
(alarm + cut off motor). Nom motor current:##[Amp]
25
Brushes Sets: default Nominal timer, joined with I_Nom define the
condition of Brush Current Protection
. (alarm
+ cut off motor).Nominal motor time: ##[s] 30
Brushes Sets: default Delay in turning off the brush motor at the
release of the pedal.
Swicth off delay: #.#[s] 0,0
Brushes Sets: Default Not used.
Reset delay: ##[s] 10
Brushes Sets: default Delay in turning on the brush motor at the
pressing of the pedal.
Swicth on delay: #.#[s] 0,2
Brushes Sets: default Not used.
Ecomode voltage: ##[V] 17
Press the “key 2” to exit the submenu.
Press the “key 2” to go back to the working mode.
ADJUSTMENTS
AND
TESTING
ANTEA 50 BT – BTS - BTO
Doc. 10059284
Issued 12/201
Ver. AC
Page 10 of 25
Display function – “advanced menu” - su menu “Water Pumps Sets”
The “Water pumps sets” submenu allows to enter the parameters and settings of the water
pump and detergent pump (if installed).
Water flow Sets: default Water quantity (liter/hour) in the cleaning
solution. Step 1 of the water selector.
Flow1 sets: ##[V] 1.9
Water flow Sets: default Water quantity (liter/hour) in the cleaning
solution. Step 2 of the water selector.
Flow2 sets: ##[V] 2.1
Water flow Sets: default Water quantity (liter/hour) in the cleaning
solution. Step 3 of the water selector.
Flow3 sets: ##[V] 2.
Water flow Sets: default Water quantity (liter/hour) in the cleaning
solution. Step 4 of the water selector.
Flow4 sets: ##[V] 2.7
Water flow Sets: default Water quantity (liter/hour) in the cleaning
solution. Step 5 of the water selector.
Flow5 sets: ##[V] 2.8
Water flow Sets: default Water quantity (liter/hour) in the cleaning
solution. Step of the water selector.
Flow sets: ##[V] 3.2
Water flow Sets: default Water quantity (liter/hour) in the cleaning
solution. Step 7 of the water selector.
Flow7 sets: ##[V] 3.7
Press the “key 2” to exit the submenu.
Press the “key 2” to go back to the working mode.
ADJUSTMENTS
AND
TESTING
ANTEA 50 BT – BTS - BTO
Doc. 10059284
Issued 12/201
Ver. AC
Page 11 of 25
Display function – “advanced menu” - su menu “Chemical Pumps Sets” (next)
Chemical Pumps Sets: default Maximum number of pulsation per
minute of the chemical pump.
MaxPumpFreq:#.#[puls/min] 800
Chemical Pumps Sets: default Pulse duration of the chemical pump.
PumpPulseDuration: #.#[ms]
15
Chemical Pumps Sets: default Detergent quantity (as % of the water
amount lt/h) in the cleaning solution.
Step 1 of the detergent selector. Flow1 set: #.#[%] 14
Chemical Pumps Sets: default Detergent quantity (as % of the water
amount lt/h) in the cleaning solution.
Step 2 of the detergent selector. Flow2 set: #.#[%] 28
Chemical Pumps Sets: default Detergent quantity (as % of the water
amount lt/h) in the cleaning solution.
Step 3 of the detergent selector. Flow3 set: #.#[%] 42
Chemical Pumps Sets: default Detergent quantity (as % of the water
amount lt/h) in the cleaning solution.
Step 4 of the detergent selector. Flow4 set: #.#[%] 5
Chemical Pumps Sets: default Detergent quantity (as % of the water
amount lt/h) in the cleaning solution.
Step 5 of the detergent selector. Flow5 set: #.#[%] 70
Chemical Pumps Sets: default Detergent quantity (as % of the water
amount lt/h) in the cleaning solution.
Step of the detergent selector. Flow set: #.#[%] 84
Press the “key 2” to exit the submenu.
Press the “key 2” to go back to the working mode.
ADJUSTMENTS
AND
TESTING
ANTEA 50 BT – BTS - BTO
Doc. 10059284
Issued 12/201
Ver. AC
Page 12 of 25
Display function – “advanced menu” - su menu “Vacuum Sets”
The “Vacuum sets” submenu allows to enter the parameters and settings related to vacuum
motor.
Vacuum Sets: default Maximum current provided from the
electronic card to the vacuum motor.
Max motor current: ##[A] 40
Vacuum Sets: default Nominal current, joined with T_Nom
define the condition of Vacuum Current
Protection. (alarm + cut off of the
motor).
Nom. motor current: ##[A] 22
Vacuum Sets: default Nominal timer, joined with I_Nom define
the condition of Vacuum Current
Protection. (alarm + cut off of the
motor).
Nom. motor time: ##[s] 30
Vacuum Sets: default Delay in turning off the vacuum motor at
the lifting of squeegee body lever.
Switch off delay: ##[s] 5
Vacuum Sets: default Not used.
Reset delay: ##[s] 15
Vacuum Sets: default Voltage reduction for vacuum motor in
ECO mode.
Ecomode voltage: ###[V] 17
Press the “key 2” to exit the submenu.
Press the “key 2” to go back to the working mode.
ADJUSTMENTS
AND
TESTING
ANTEA 50 BT – BTS - BTO
Doc. 10059284
Issued 12/201
Ver. AC
Page 13 of 25
Display function – “advanced menu” - su menu “Traction Sets”
The “Traction sets” submenu allows to enter the parameters and settings related to traction
motor.
Traction Sets: default Acceleration ramp. Time needed to reach
the maximum speed.
Acc Ramp: #.#[s] 2.5
Traction Sets: default Deceleration ramp. Time needed to
completely stop the machine at the
release of the pedal.
Dec Ramp: #.#[s] 1.0
Traction Sets: default Reverse ramp. Time needed to move
from forward to backward, and vice
versa.
Rev Ramp: #.#[s] 1.0
Traction Sets: default
Maximum forward speed (as percentage
of the maximum reachable speed).
FW Speed: #[%] 100
Traction Sets: default Maximum backward speed (as
percentage of the Maximum forward
speed).
BW Speed: #[%] 0
Traction Sets: default
Speed at the minimum pressing of the
pedal.
Min Speed: #[%] 0
Traction Sets: default
Minimum potentiometer voltage in idle
condition.
Stop pos ref. value: ##[V] 0.5
Traction Sets: default
Maximum potentiometer voltage for
forward command.
FW pos ref. value: ##[V] 12.0
Traction Sets: default
Maximum potentiometer voltage for
backward command.
BW pos ref. value: ##[V] 12.0
ADJUSTMENTS
AND
TESTING
ANTEA 50 BT – BTS - BTO
Doc. 10059284
Issued 12/201
Ver. AC
Page 14 of 25
Display function – “advanced menu” - su menu “Traction Sets” (next)
Traction Sets: default
Dead band of the potentiometer.
Deadband ref value: ##[mV] 20
Traction Sets: default
Electronic brake delay at the switching
off of the machine / release of the pedal.
E-Brake Delay: ###[s] 0,5
Traction Sets: default
Not used.
Model motor voltage: ##[%] 50
Traction Sets: default
Not used.
Mode1 motor current: ##[A]
35
Traction Sets: default
Machine breaking when moving switched
on.
Runaway speed: ###[V] 20
Traction Sets: default
Maximum current provided from the
electronic card to the traction motor.
Max current: ##[A] 45
Traction Sets: default Nominal current, joined with T_Nom
define the condition of Traction Current
Protection. (alarm + cut off motor).
Nom current: ##[A] 10
Traction Sets: default Nominal timer, joined with I_Nom define
the condition of Traction Current
Protection. (alarm + cut off motor).
Nom time: ##[s] 10
Press the “key 2” to exit the submenu.
Press the “key 2” to go back to the working mode.
ADJUSTMENTS
AND
TESTING
ANTEA 50 BT – BTS - BTO
Doc. 10059284
Issued 12/201
Ver. AC
Page 15 of 25
Display function – “advanced menu” - su menu “Monitor mode”
The “Monitor mode” submenu shows the parameters and settings of the machine during the
working condition.
Monitor sets:
Batteries voltage.
Battery: ## [V]
Monitor sets:
Traction motor voltage.
Traction voltage: ## [V]
Monitor sets:
Traction motor current.
Traction current: ## [A]
Monitor sets:
Traction motor current.
Traction ammeter: ## [A]
Monitor sets:
Brush motor current.
Brushes current: ## [A]
Monitor sets:
Suction motor current.
Vacuum current: ## [A]
Monitor sets:
Traction motor temperature.
Traction temp: ## [°C]
Monitor sets:
Main card temperature.
Function temp.: ## [°C]
Monitor sets:
Main card inputs.
Function inputs:
ADJUSTMENTS
AND
TESTING
ANTEA 50 BT – BTS - BTO
Doc. 10059284
Issued 12/201
Ver. AC
Page 1 of 25
Display function – “advanced menu” - su menu “Monitor mode”
The mentioned parameters can be displayed also in working mode. Follow the procedure here
described:
1. Switch off the machine by switching the key in OFF position.
2. Enter the “user menu”. Press at the same time, with machine off, the “key 4” and the
“key ”.
3. Keeping pressed the mentioned buttons, rotate the key in ON position. Wait for the
loading of “user menu” text interface.
4. Once loaded the “user menu”, use the “key 1” and the “key 3” to find out the submenu
“password”.
5. Use the “key 4” and the “key ” to display the value 0 as the standard password to
enter the “advanced menu”.
. Use the “key 2” to confirm the new parameter value of the password. The “advanced
menu” is now accessible.
7. Use the “key 1” and the “key 3” to find out the submenu “Check/Monitor”.
8. Confirm the access to the submenu “Check/Monitor” by pressing the “key 2”.
9. Use the “key 1” and the “key 3” to visualize the parameter to be monitored in working
mode.
10. Confirm the parameter to be monitored by pressing the “key 2”.
11. Once confirmed the display will came back to “advanced menu”.
12. Press the “key 1” and the “key 3” to find out the submenu “Exitr”.
13. It is possible to use and works with the machine as usual and monitoring at the same
time the status of the parameter.
14. To exit the submenu “Check/Monitor” switch off and switch on the machine.
ADJUSTMENTS
AND
TESTING
ANTEA 50 BT – BTS - BTO
Doc. 10059284
Issued 12/201
Ver. AC
Page 17 of 25
Electric System Testing
1. Disconnect the battery connector.
2. Check cle
anliness and tightness of the battery connection
cables.
3. Check the connection and tightness of the power cables.
4. Check the functionality of
connectors and the wiring
system.
5. Reconnect the battery connector.
. Check the functionality:
•display and its functions;
•direction switch;
•emergency button;
•key contact;
•brush disconnection;
7.
Check forward movement, backward movement,
acceleration and braking
, lifting and lowering of the brush
base and the squeegee.
ADJUSTMENTS
AND
TESTING
ANTEA 50 BT – BTS - BTO
Doc. 10059284
Issued 12/201
Ver. AC
Page 18 of 25
Battery charger adjustment (NORDELETTRONICA)
1. Check that the set-
up of the battery charger corresponds to
the type of battery actually installed on the machine.
2. To adjust the battery charger, proceed as follows:
•Use a screwdriver to remove the small plastic cap,
•Set the dip switch in accordance with the following tables,
•Fix again the small plastic cap.
Use only the upper dip switch, check that the lower ones are
both OFF.
Set the upper dip switches as follows
S1 S2 SET UP FLASHES
OFF OFF Wet cell batteries 1
ON ON Gel TROJAN 2
OFF ON Generic GEL or AGM batteries 3
ON OFF Gel EXIDE SONNENSCHEIN 4
SW2 : S3 e S4: OFF for all batteries (not used)
Carefully read the attery charger operating
manual.
Battery charger alarm signals:
YELLOW LED
1 Flash: WRONG BATTERY - POLARITY REVERSAL -
SHORT CIRCUIT OUTPUT;
2 Flashes: ALARM TIME-OUT, DEFECTIVE BATTERY
3 Flashes: DEFECTIVE CHARGER
4 Flashes: OVERHEATING ALARM
Initial test of the charger:
When plugged in, the Red LED lit
once, than the Yellow LED lit
once, and then the green LED flashes to confirm which
charging algorithm was selected by the dip switches (see
table).
ADJUSTMENTS
AND
TESTING
ANTEA 50 BT – BTS - BTO
Doc. 10059284
Issued 12/201
Ver. AC
Page 19 of 25
Hydraulic installation
1. Check the cleanliness and functionality of the
solution
tank plug and fast water-detergent filling cap.
2. Check the cleanliness and sealing of the solution filter.
3. Fill up the solution tank.
4. Check hoses sealing, solenoid valve (on the brush base)
and water valve.
5. Verify that when the water valve is open, the solution
arrive continuously onto the floor.
. Check the detergent tank drain and level hose .

Other Hammerhead Scrubber manuals

Hammerhead 650RS User manual

Hammerhead

Hammerhead 650RS User manual

Hammerhead Hammerhead User manual

Hammerhead

Hammerhead Hammerhead User manual

Popular Scrubber manuals by other brands

SNOWJOE SUNJOE 24V-PWSCRB-CT Operator's manual

SNOWJOE

SNOWJOE SUNJOE 24V-PWSCRB-CT Operator's manual

Dadant M00432 Assembly, Operation, Maintenance, Replacement Parts

Dadant

Dadant M00432 Assembly, Operation, Maintenance, Replacement Parts

Comet CPS 45E manual

Comet

Comet CPS 45E manual

Miele DA 6890 Operating and installation instructions

Miele

Miele DA 6890 Operating and installation instructions

Kärcher BR 35/12 C BP Original instructions

Kärcher

Kärcher BR 35/12 C BP Original instructions

Chariot CS20 operating instructions

Chariot

Chariot CS20 operating instructions

HSS Hire 439 Operating & safety guide

HSS Hire

HSS Hire 439 Operating & safety guide

Cleaning Machines KF66B manual

Cleaning Machines

Cleaning Machines KF66B manual

Tennant T191 quick guide

Tennant

Tennant T191 quick guide

Bulldog Scrubbers BD20 user manual

Bulldog Scrubbers

Bulldog Scrubbers BD20 user manual

Powr-Flite PAS28032DX Operator's manual

Powr-Flite

Powr-Flite PAS28032DX Operator's manual

HAKO Scrubmaster B 120 R operating manual

HAKO

HAKO Scrubmaster B 120 R operating manual

Festool CTM 26 E AC Original operating manual/spare parts list

Festool

Festool CTM 26 E AC Original operating manual/spare parts list

Saber Compact Glide SG28 operating instructions

Saber Compact

Saber Compact Glide SG28 operating instructions

Clemas & Co GANSOW 41BF 57 Service and parts manual

Clemas & Co

Clemas & Co GANSOW 41BF 57 Service and parts manual

Parkside 291645 Translation of the original instructions

Parkside

Parkside 291645 Translation of the original instructions

Windsor Sensor SRXP12IA manual

Windsor

Windsor Sensor SRXP12IA manual

Minuteman ERide 21 Service manual

Minuteman

Minuteman ERide 21 Service manual

manuals.online logo
manuals.online logoBrands
  • About & Mission
  • Contact us
  • Privacy Policy
  • Terms and Conditions

Copyright 2025 Manuals.Online. All Rights Reserved.