Hanna HI 84502 User manual

1
Instruction Manual
HI 84502
TITRABLE TOTAL ACIDITY
MINITITRATOR
for wine analysis
www.hannainst.com

2
Dear Customer,
Thank you for choosing a Hanna product. This manual will provide you with the necessary
information for the correct use of the instrument. Please read it carefully before using the
instrument. If you need additional technical information, do not hesitate to e-mail us at

3
All rights are reserved. Reproduction in whole or in part is prohibited without the written consent
of the copyright owner, Hanna Instruments Inc., Woonsocket, Rhode Island, 02895, USA.
TABLE OF CONTENTS
PRELIMINARY EXAMINATION................................................................................................. 4
GENERAL DESCRIPTION ........................................................................................................ 5
SPECIFICATIONS ................................................................................................................... 7
PRINCIPLE OF OPERATION .................................................................................................... 8
FUNCTIONAL DESCRIPTION ................................................................................................... 9
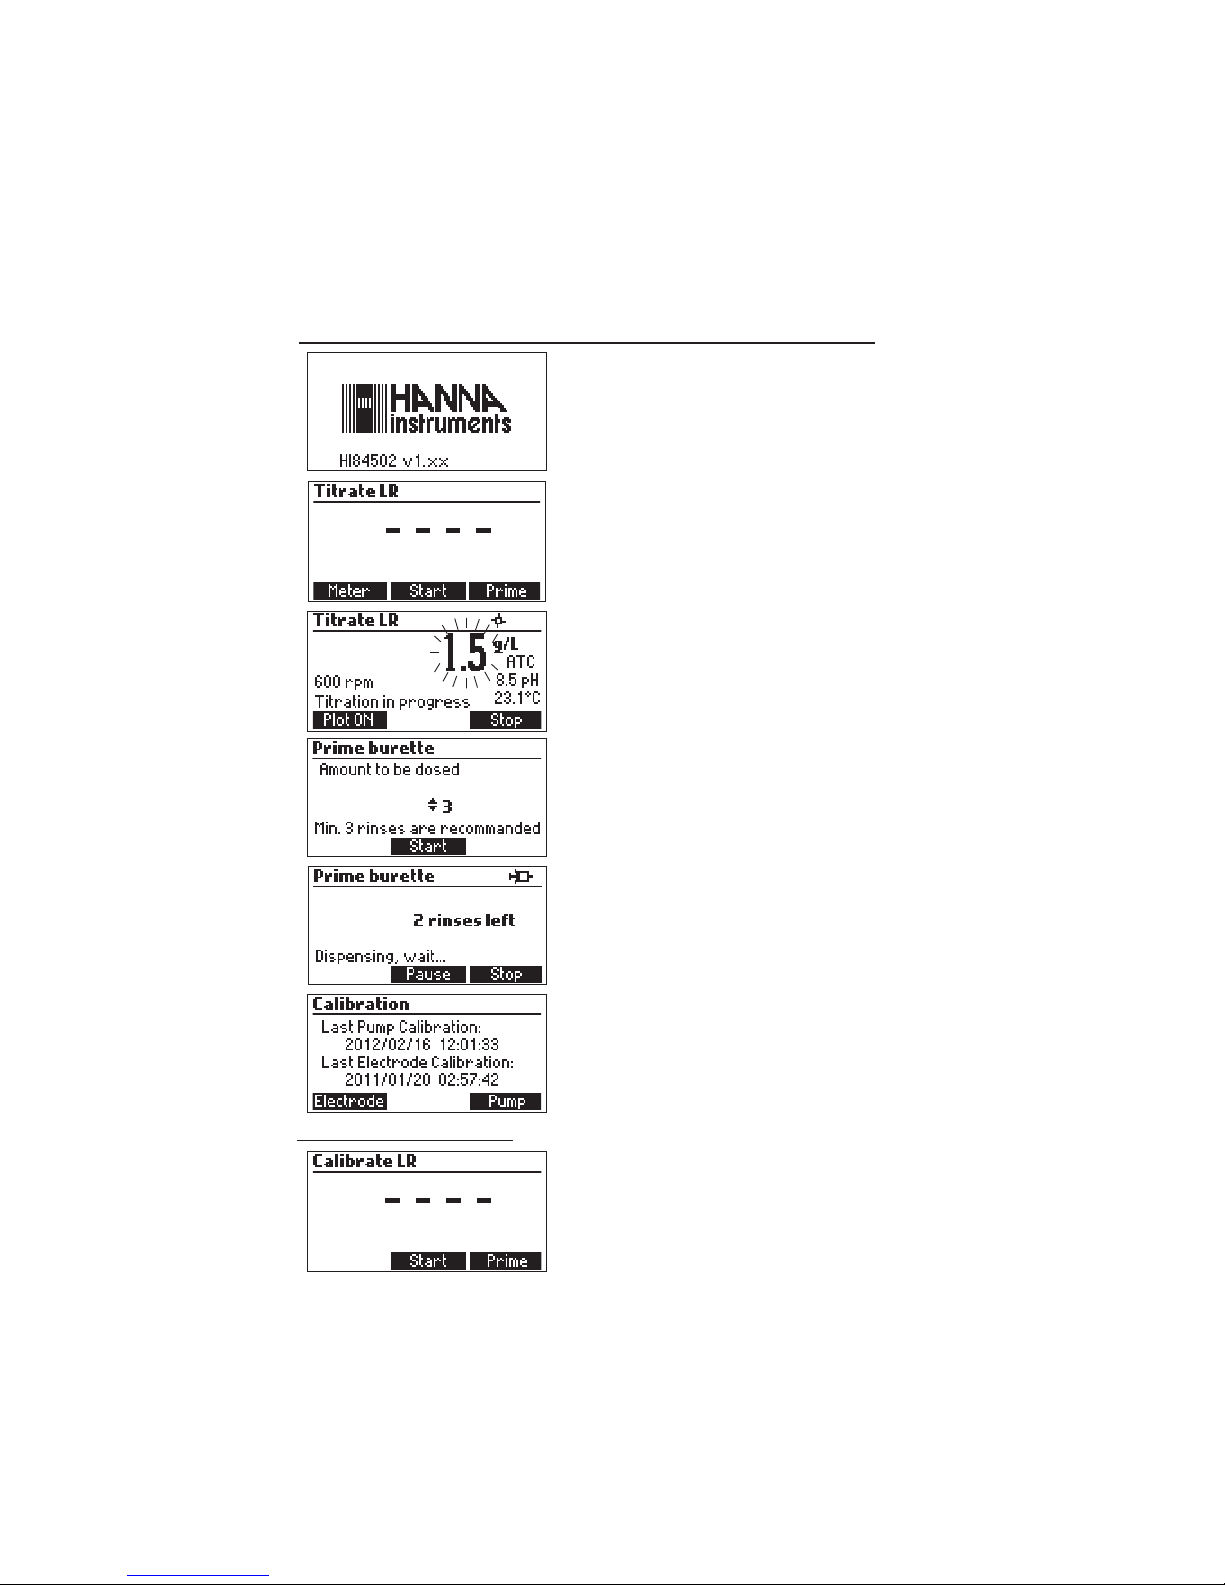
TITRATOR STARTUP ........................................................................................................... 11
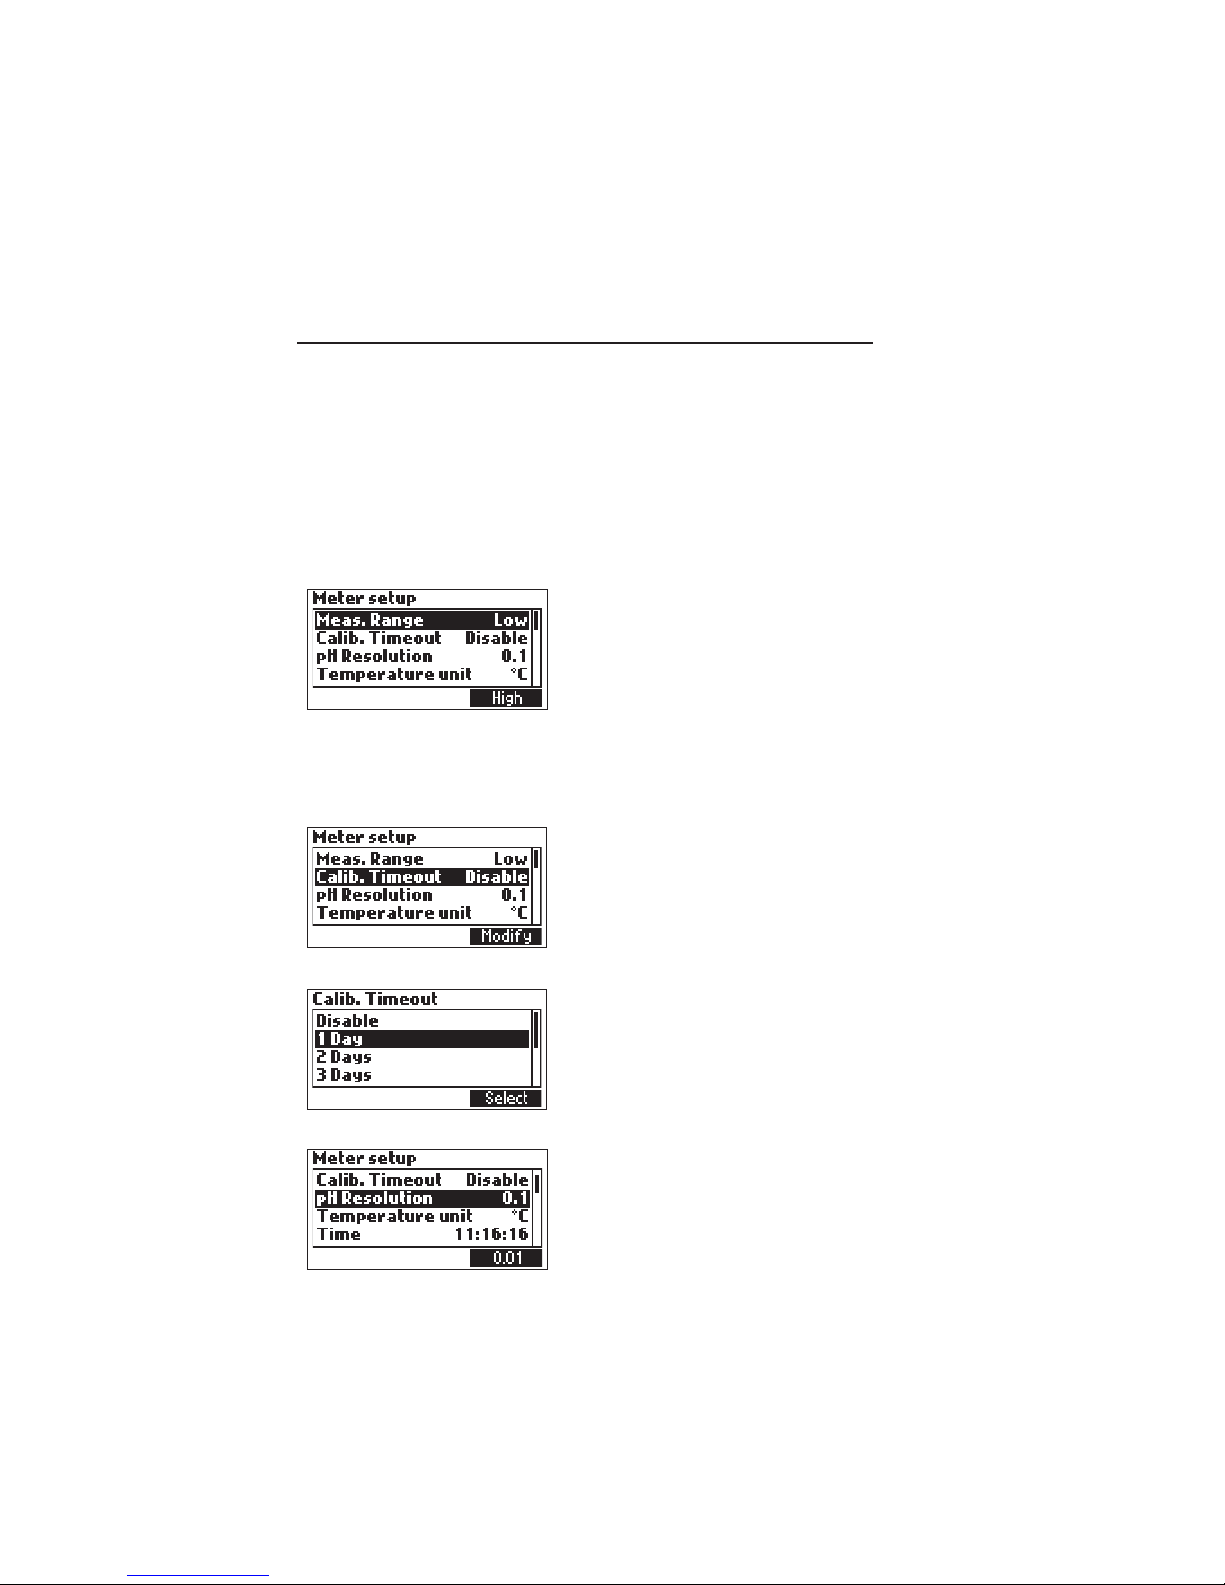
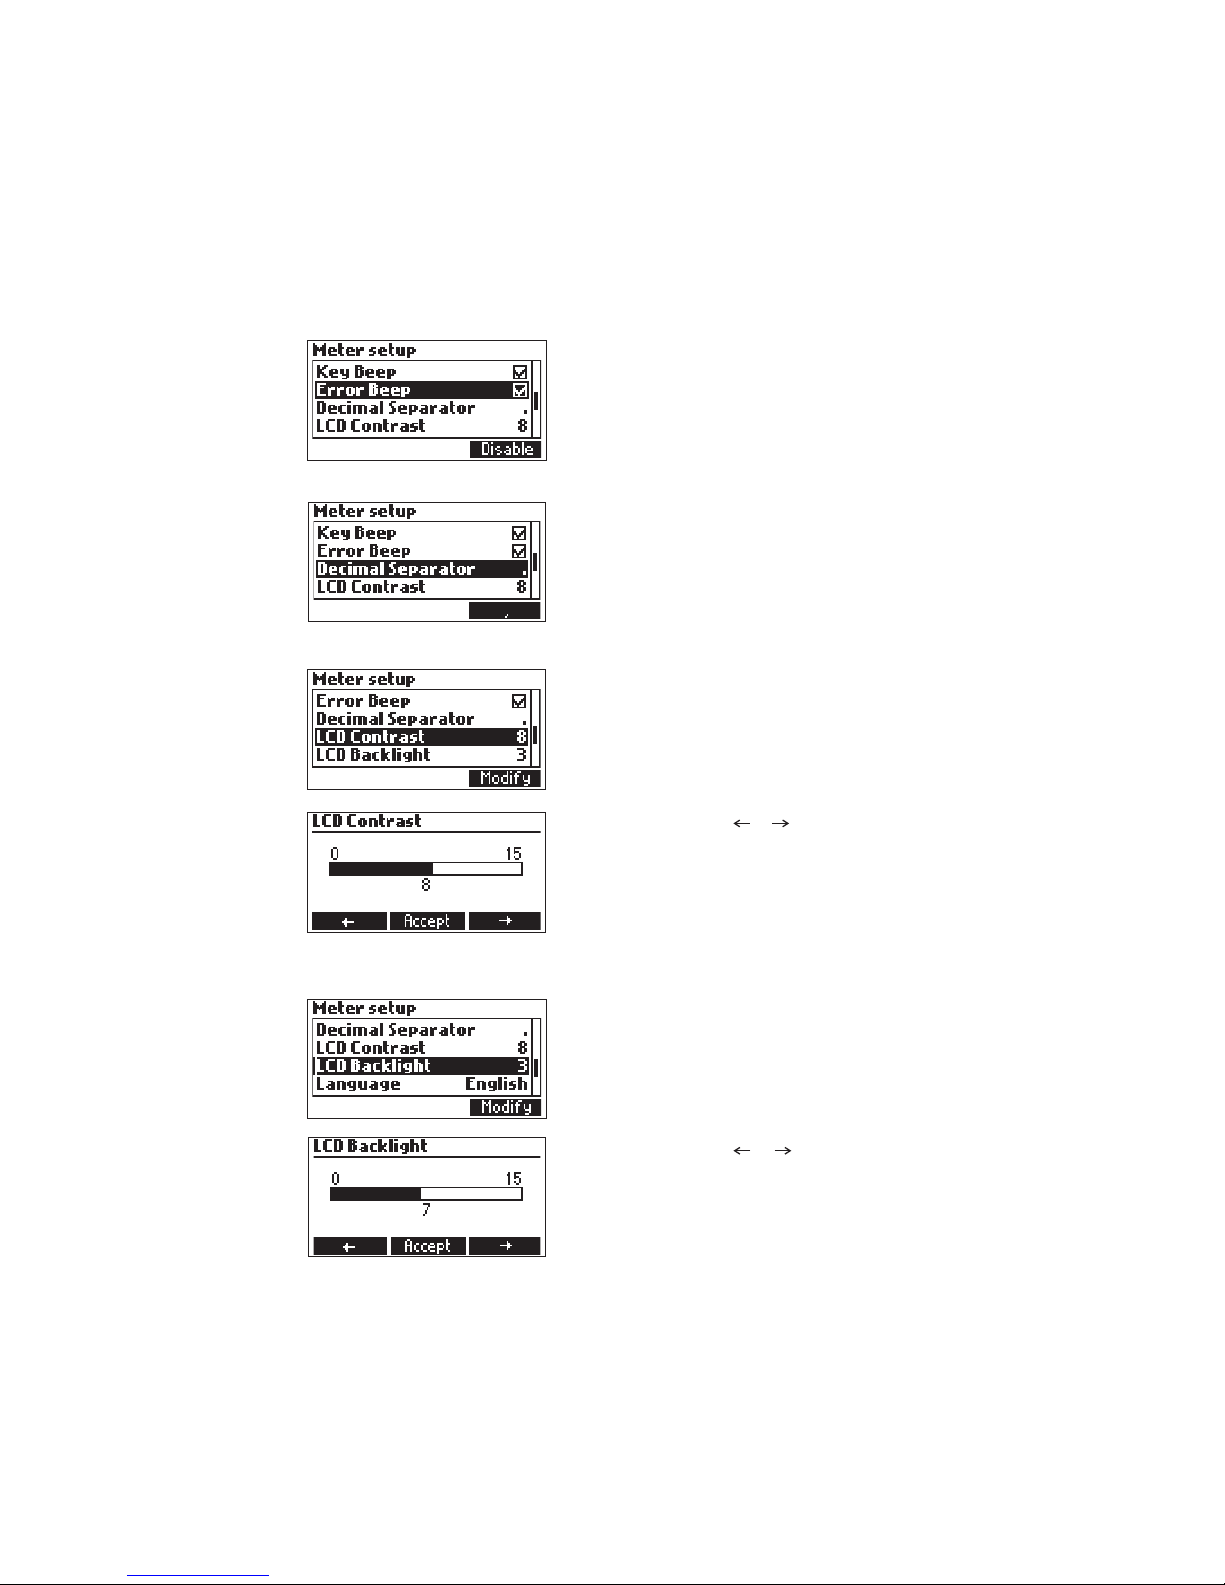
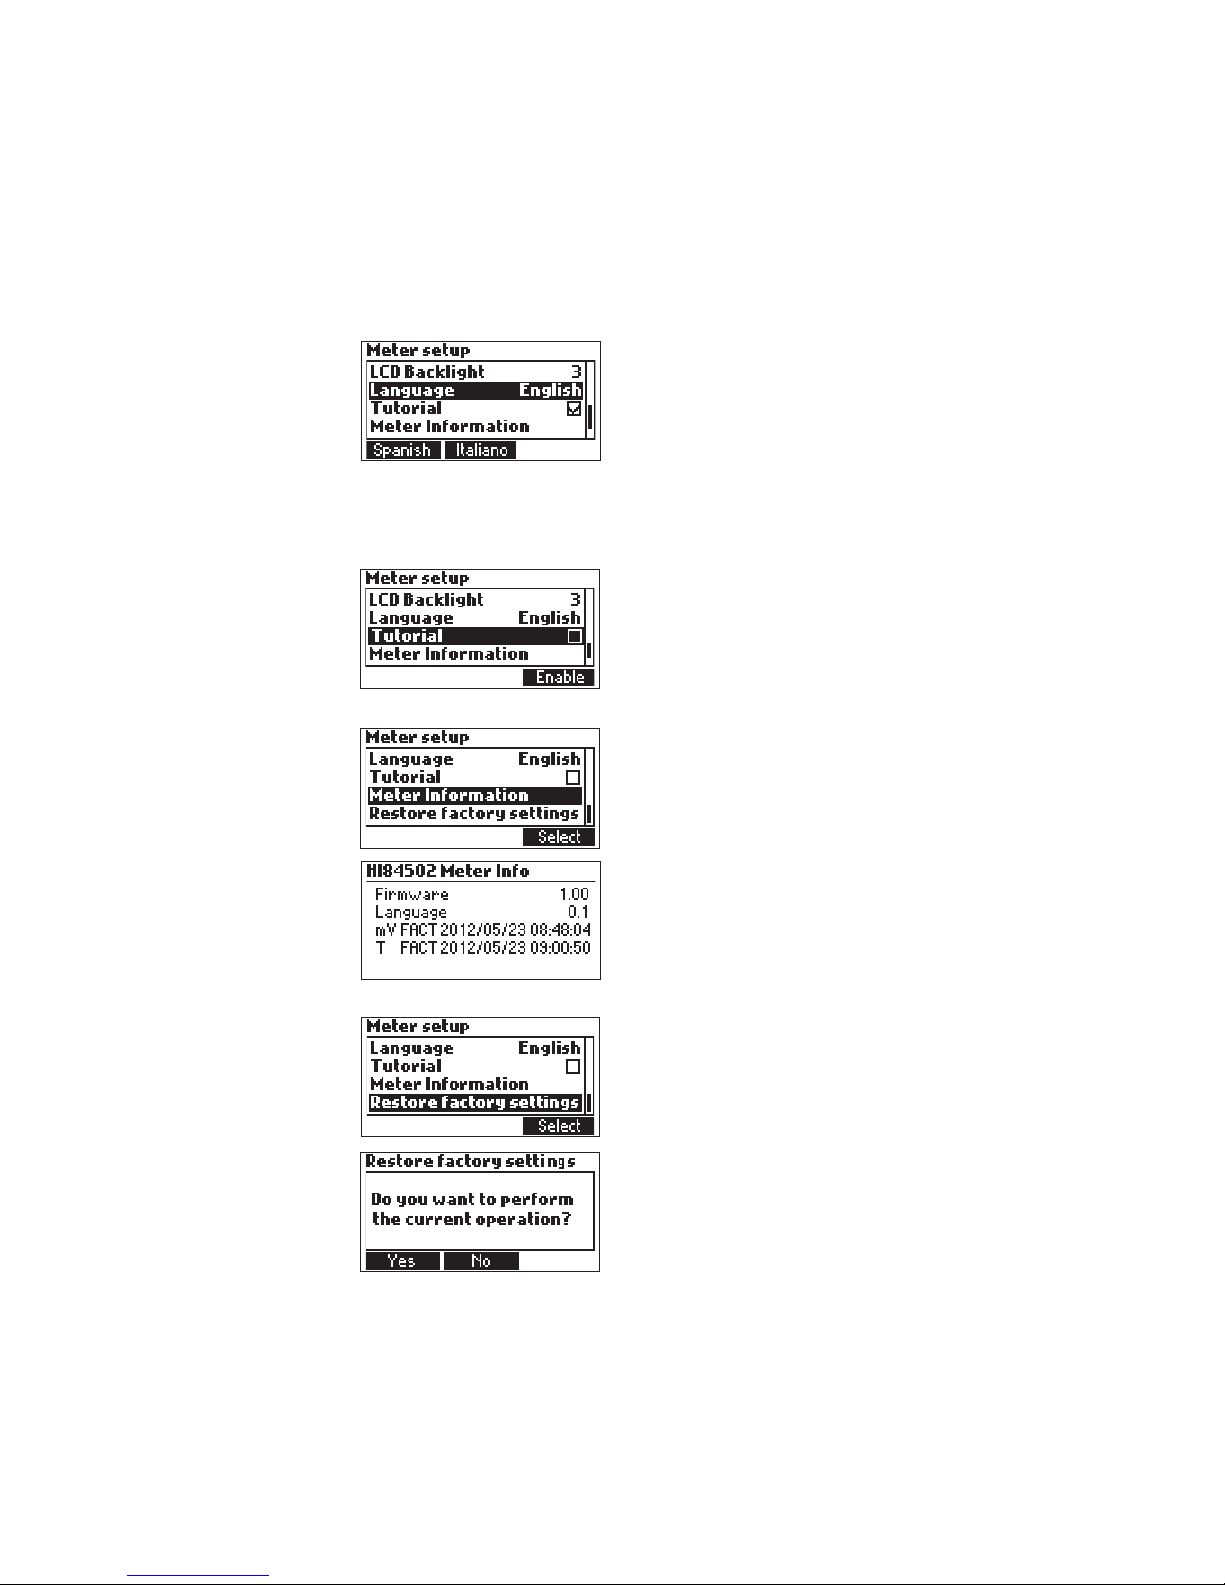
SETUP MENU .................................................................................................................... 12
GUIDE TO DISPLAY CODES ................................................................................................... 16
ELECTRODE PREPARATION .................................................................................................. 18
ELECTRODE CALIBRATION PROCEDURE................................................................................. 19
pH BUFFER TEMPERATURE DEPENDENCE ............................................................................ 23
DOSING PUMP INSTALLATION ............................................................................................. 24
DOSING PUMP PRIME PROCEDURE ..................................................................................... 24
PUMP CALIBRATION PROCEDURE ........................................................................................ 26
TITRATION PROCEDURE ..................................................................................................... 28
pH MEASUREMENT ............................................................................................................ 33
PC INTERFACE AND DATA TRANSFER ................................................................................... 37
TROUBLESHOOTING GUIDE ................................................................................................ 38
ELECTRODE CONDITIONING AND MAINTENANCE .................................................................. 40
ACCESSORIES ..................................................................................................................... 42
WARRANTY........................................................................................................................ 43

4
PRELIMINARY EXAMINATION
Please examine this product carefully. Make sure that the instrument is not damaged. If any
damage occurred during shipment, please notify your Dealer.
Each HI 84502 minititrator is supplied complete with:
•HI 84502-70 Reagent kit for Titrable Acidity in wine
• HI 1048B pH electrode
•HI 7662-T Temperature probe
•HI 7082 Electrode Fill Solution (30 mL)
•2000 µL automatic pipette with two plastic tips
•Two 100 mL beakers
•Tube set (aspiration tube with titrant bottle cap and dispensing tube with tip)
•Dosing Pump Valve
•5 mL Syringe
•1 mL Plastic Pipette
•Stir bar
•Power Adapter
•Two sachets of cleaning solution for wine deposits
•Two sachets of cleaning solution for wine stains
•Instruction manual
Note:Save all packing material until you are sure that the instrument works correctly.
Any defective item must be returned in its original packing.

5
GENERAL DESCRIPTION
The HI 84502 is a low-cost, easy to use, microprocessor-based automatic titrator that benefits from
Hanna’s years of experience as manufacturer of analytical instruments.
The instrument incorporates a simple and reliable dosing pump which ensures high dosing
reproducibility. Pump calibrations, performed with the provided Hanna reagents, assure the accuracy
of the instrument.
The instrument comes with a preprogrammed method for Total Titratable Acidity measurements in
wine.
The HI 84502 performs the analysis and all the necessary calculations, with a simple and effective
user interface.
By simply pressing the Start key in Titrator mode, the instrument will automatically titrate the
sample to the end point. The current pH and temperature are continuously displayed during titration
process. The result is immediately displayed in g/L, then the instrument is ready for another
titration by pressing the Restart key.
A dedicated HELP key aids in setup, calibration, status and troubleshooting.
Other features:
•pH meter / mV meter
•Stir speed control
•Graphic mode to display the titration data
•Data can be stored using the log feature and then exported to a USB stick or
transferred to a PC using the USB connection
•Log on demand for up to 400 samples (200 for mV/pH measurements; 200 for
titration results)
•GLP feature, to view calibration data for pH electrode and pump

6
SIGNIFICANCE OF USE
Acids occur naturally during the growing of grapes and as part of the fermentation process. Wines
show lower levels of acid when there are hot growing seasons or when the grapes come from hotter
regions. In the proper proportion, acids are a desirable trait and give the wine character.
The three predominant acids in wine are tartaric, malic and citric, all of which are intrinsic to the
grape. Tartaric acid is the principal acid in grapes and is a component that promotes a crisp flavor and
graceful aging in wine. A moderate amount of a wine’s acid comes from malic acid, which contributes
to fruitiness, and a small amount comes from citric acid. Wine also contains trace amounts of other
acids. The least desirable acid in wine is acetic acid, which, when present in more than a nominal
amount, gives wine a sour or vinegary aspect.
Total acidity, also called titratable acidity, is the sum of the fixed and volatile acids. In the United
States the total acidity is usually expressed in terms of tartaric acid, even though the other acids are
measured.
Total Acidity directly effects the color and flavor of wine and, depending on the style of the wine, is
sought in a perfect balance with the sweet and bitter sensations of other components. Too much
acidity makes wine tart and sharp; too little makes wines flat, flabby and uninteresting. Proper
acidity in wine is what makes it refreshing and an ideal accompaniment to food.
The proper acid level of a wine varies, with sweeter wines generally requiring somewhat higher
levels to retain the proper balance. For dry table wine the acceptable range is usually 6.0 to
7.5 g/L; for sweet wine it’s 7.0 to 8.5 g/L.

7
SPECIFICATIONS
Titrator Range Low Range
0.1 to 5.0 g/L of tartaric acid
High Range
4.0 to 25.0 g/L of tartaric acid
Resolution 0.1 g/L
Accuracy 3 % of reading or ± 0.1 g/L @ 25 °C whichever is greater
Sample volume 10 mL LR / 2 mL HR
Titration method Acid-base titration
Principle End point titration: 8.20 pH
Pump speed 10 mL/min
Stirring speed 600 rpm
Log data Up to 200 samples
pH meter pH meter -2.0 to 16.0 pH / -2.00 to 16.00 pH
pH Resolution 0.1 pH / 0.01 pH
pH Accuracy ± 0.01 pH
pH Calibration 1, 2 or 3 calibration points;
4 available buffers (4.01, 7.01, 8.20, 10.01)
Temperature Manual or automatic
Compensation
mV meter mV meter -2000.0 to 2000.0 mV
mV Resolution 0.1 mV
mV Accuracy ± 1.0 mV
Log data Up to 200 samples (pH or mV)
Temperature Range -20.0 to 120.0 °C (-4.0 to 248.0 °F)
Resolution 0.1 °C
Accuracy ±0.4 °C without probe error
Electrode HI 1048B
Temperature Probe HI 7662-T
Environment 0 to 50 °C (32 to 122 °F); max 95% RH non-condensing
Power supply 12 Vdc power adapter
Dimensions 235 x 200 x 150 mm (9.2 x 7.9 x 5.9”)
Weight 1.9 kg (67.0 oz.)

8
PRINCIPLE OF OPERATION
The determination of total acids in wine is made according to a neutralization reaction, that is the
reaction between the acids found in wine and a base.
Titratable acidity is measured on a degassed sample at the end-point of 8.20. The results are
expressed as g/L tartaric acid.
For precise results it is very important to know the sample volume, titrant volume and concentration.
The dosing pump reproducibility is independent of the titrant tubing, therefore it doesn’t need
frequent calibrations. The calibration of the pump is necessary in order to have high accuracy for the
titrations.
The calibration procedure is based on the analysis of a known solution. By doing this, the instrument
makes a differential analysis between the standard and the wine sample. The minititrator will
calculate the concentration of the titrant based on the amount needed to reach the end point.
REQUIRED REAGENTS
Code Description
HI 84502-50 Titrant
HI 84502-55 Calibration Standard

9
FRONT VIEW
REAR VIEW
6) Temperature probe
7) pH Electrode
8) Beaker
9) Dosing pump
10) Power switch
11) Power adapter
12) USB connector (PC interface)
13) USB connector (Storage interface)
14) Temperature connector
15) BNC electrode connector
16) Reference connector
17) Titrant bottle
18) Syringe
19) Aspiration tube
20) Dosing Pump Valve
FUNCTIONAL DESCRIPTION
OVERHEAD VIEW
1) Titrant bottle
2) Liquid Crystal Display (LCD)
3) Keypad
4) Electrode holder
5) Dispensing tube

10
ESC -used to leave the current screen and to return either to the previous screen or to the
main screen. In Setup menu, exits a parameter without changing the value.
/-used to modify the parameters’ values, to scroll the information displayed while
viewing a help screen or to move between the options from the instrument’s Setup menu
CAL -used to access the Electrode and Pump calibration options
HELP -used to access/exit the instrument’s contextual help
LOG -used to save the current mV/pH reading in pH meter mode and the titration result
MENU -used to enter Setup, Recall or GLP selection menu, while instrument is in pH or
Titration mode
STIR -used to start/stop the stirrer
Note: The stirrer starts automatically during pump calibration and titration, it cannot
be stopped by pressing STIR key.
GUIDE TO INDICATORS
During the instrument’s operation information is displayed on the LCD.
Displayed icons:
Unstable reading.
Stirrer on.
Pump running.
Parameter can be modified.
KEYPAD FUNCTION
1) Current time and instrument mode information (pH meter or Titrator)
2) pH electrode condition
3) Stirrer speed
4) Instrument status

11
DOSING PUMP
The dosing pump is based on a valve that automatically moves the titrant between the titrant
bottle and syringe when filling the syringe and between the syringe and sample when
dispensing. A replaceable 5 mL plastic syringe is used to limit the amount of titrant used per test
to ensure the highest possible accuracy. Before a set of titrations it is necessary to prime the
dosing system.
Note:Once titrations have been completed the dosing system should be cleaned with deionized
water using the prime feature.
TITRATOR STARTUP
This is a general outline of the steps required to perform a titration. The following topics are
expanded upon each section that follows.
•Place the instrument on a flat table. Do not place the instrument in direct sun light.
•Connect the power adapter to the instrument.
•Turn the instrument ON using the power switch from the rear panel of the instrument.
•Set up the instrument. See the “Setup Menu” section for details.
•Connect the pH electrode to the instrument.
•Connect the temperature sensor to the instrument.
•Calibrate the pH electrode.
•Connect the tubes and the valve. See the “Dosing Pump Installation” section for the
procedure.
•Remove the titrant bottle cap and replace it with the bottle cap with tubes. Place the titrant
bottle in the appropriate place on the titrator top.
•Prime the syringe. To assure high accuracy, verify there are no air bubbles in the syringe or
tubing.
•Calibrate the pump.
•Prepare the sample.
Note:Different volumes of wine are required based on the concentration. See “Titration
Procedure” for details.
•Run a titration and log sample results.
5) Virtual option keys
6) Stirrer and reading status
7) Main reading information
8) pH temperature compensation mode (Manual or Automatic)
9) Temperature reading

12
SETUP MENU
The titrator’s setup menu may be accessed from the main screen (meter or titrator) by pressing
the MENU key, then Setup.
A list of setup parameters will be displayed with currently configured setting.
While in the setup menu it is possible to modify the instrument’s operation parameters. The
ARROW keys permit the user to scroll the setup parameters.
Press HELP to view the contextual help.
Press ESC to return to the main screen.
Range Setup
Use Low measurement range for 0.1 - 5.0 g/L.
Use High measurement range for 4.0 - 25.0 g/L.
To ensure a high accuracy, it is recommended to
recalibrate the pump after the valve, titrant or
electrode has been changed.
Use the ARROW keys to select the value.
Press Select to confirm or ESC to return to the setup
menu without saving the changes.
Calibration Timeout
Disabled or 1 to 7 days.
This option is used to set the number of days before
the pH calibration expired warning message is
displayed.
Press Modify to access the calibration timeout screen.
pH Resolution
0.1 or 0.01.
Press the displayed virtual option key to change the
option.

13
°C, °F or K.
Press the virtual option key to change the option.
Temperature Unit
Time
Press the Modify key to change the time and time
format.
Press Format to switch between 12 hour (am/pm)
and 24 hour mode.
Press to highlight the value to be modified (digit
by digit). Use the ARROW keys to change the value.
Press Accept to confirm the new value or ESC to
return to the setup.
Date
Press the Modify key to change the date and date
format.
Press Format to cycle between the available date
formats.
Press to highlight the value to be modified (digit
by digit). Use the ARROW keys to change the value.
Press Accept to confirm the new value or ESC to
return to the setup.
Key Beep
Select Enable to activate or Disable to deactivate
the Key Beep function.
If enabled a short beep will be heard every time a
key is pressed.

14
Error Beep
LCD Contrast
Select Enable to activate or Disable to deactivate
the Error Beep function.
If enabled a beep will be heard when an error
condition occurs.
Decimal Separator
This option allows the user to select the symbol
used for a decimal separator.
This option is used to set the display’s contrast.
Press Modify to change the display’s contrast.
The default value is 8.
Use the ARROW keys or / to increase/
decrease the value.
Press Accept to confirm the value or ESC to return to
the setup menu.
LCD Backlight
Use the ARROW keys or / to increase/
decrease the backlight level.
Press Accept to confirm or ESC to return to the
setup menu.
Press Modify to change the backlight level.
The default value is 3.

15
Press the corresponding virtual option key to change
the language.
If the selected language cannot be loaded, the
previously selected language will be reloaded.
If no language can be loaded at startup the instrument
will work in the “safe mode”. In “safe mode” all
the messages are displayed in English and tutorial
and help information are not available.
Language
Press Select to view the firmware version, language
version, mV factory calibration date and time and
temperature factory calibration date and time.
Meter Information
Tutorial
Restore Factory Settings
Enable or Disable the Tutorial. This helpful tool
offers additional information during calibration and
titration.
Press ESC to return to the setup menu.
Press Select to restore the factory settings.
Press Yes to confirm the restore process or No to
return without restoring.
Press ESC to return to the setup menu.

16
This screen appears when the titrator is in calibration
mode.
Press Pump to calibrate Pump.
Press Electrode to calibrate pH electrode.
GUIDE TO DISPLAY CODES
Titration screen when a titration is in progress.
Titration screen display.
This screen appears when the instrument is turned
on during the initialization process.
Prime burette screen.
Prime burette screen when the dosing system is
running.
PUMP CALIBRATION MESSAGES
Pump calibration is initiated by pressing the Start
key.

17
This error message appears during pump calibration
when the end point can not be reached and the
maximum amount of titrant is exceeded. Check
standard, electrode and/or dosing system and try
again.
The calibration was outside the acceptable limits.
Prepare a new standard and try again.
This error message appears when the pH reading
exceeds the acceptable input limits (-2.00 < pH
< 16.00).
pH CALIBRATION MESSAGES
pH calibration mode.
When the reading has stabilized press Confirm to
accept the calibration or Clear to restore the default
calibration.
The “Wrong Buffer”message is displayed when the
pH value is outside of the acceptable range. Clean the
electrode by following the Cleaning Procedure and/or
check the buffer concentration before continuing the
pH calibration.
Press the ESC key to exit pH calibration mode.
This screen appears while pump calibration is in
progress. Pressing ESC or Stop key, to return to the
Pump Calibration screen.

18
ELECTRODE PREPARATION
PREPARATION PROCEDURE
Remove the electrode protective cap.
DO NOT BE ALARMED IF ANY SALT DEPOSITS ARE PRESENT. This is normal with electrodes and
they will disappear when rinsed with distilled/deionized water.
During transport tiny bubbles of air may have formed inside the glass bulb. The electrode cannot
function properly under these conditions. These bubbles can be removed by "shaking down" the
electrode as you would do with a glass thermometer.
If the bulb is dry, soak the electrode in HI 70300 Storage Solution for at least one hour.
TITRATION MESSAGES
This screen is displayed when the instrument is in
titration mode. Press Start to begin a titration, Meter
to enter pH meter mode or Prime to enter into the
prime function.
The titration result, expressed as concentration of
tartaric acid in g/L (ppt), is displayed automatically
at the end of the titration. Press the Restart to start
another titration or ESC to return to the main screen.
This error message appears when the input reading
(pH or temperature) exceeds the input limits. If the
pH or temperature values are blinking they are out
of range.
This screen appears when the sample concentration
is out of range.

19
ELECTRODE CALIBRATION PROCEDURE
It is recommended to calibrate the instrument frequently, especially if high accuracy is required.
The pH electrode should be recalibrated:
a) Whenever the pH electrode is replaced
b) At least once a week, but daily is advised
c) After testing aggressive chemicals and after electrode is cleaned
d) When high accuracy is required
e) If the pH calibration expired warning is displayed during measurement.
Every time you calibrate the instrument use fresh buffers and clean the electrode (see page 40).
PROCEDURE
A single one, two or three-point calibration can be performed, using four predefined buffers
4.01, 7.01, 8.20 and 10.01 pH. For a single point calibration any of the four buffers may be
used, 8.20 pH is recommended.
Note: The HI 84502 will not accept other pH buffers for calibration.
•Pour small quantities of selected buffer solutions into clean beakers. For accurate calibration
use two beakers for each buffer solution, the first one for rinsing the electrode and the second
one for calibration.
•Put a magnetic stir bar in the beaker that will be used for calibration.
•Remove the protective cap and rinse the electrode with some of the buffer solution to be used
for the first calibration point.
•Put the first beaker with calibration buffer in the beaker holder.
•Place the electrode holder on the top of the beaker and secure it by turning clockwise and
press STIR.
•Immerse the pH and the temperature probe approximately 2 cm (0.8”) into the buffer paying
attention not to touch the stir bar.
To enter Electrode Calibration follow the next steps:
•Press CAL key then Electrode.
•The electrode calibration screen will be displayed.
•Pressing Clear to delete the previous calibration, the meter exits calibration.

20
Point 1 calibration
•The 8.20 buffer will be selected by default. If necessary press the ARROW keys in order to
select a different buffer value.
•The (unstable measurement) symbol will be shown on the display until the reading
becomes stable.
•When the reading is stable and close to the selected buffer, the (unstable measurement)
symbol will disappear and the Confirm key will become active.
•Press Confirm to confirm the calibration or ESC to exit calibration.
•After the first calibration point has been confirmed, press ESC to exit without performing the
second calibration point.
Point 2 calibration
•The calibrated value will be shown on the display and the second expected buffer value will
be displayed.
•Remove the electrode holder with electrodes from the top of the beaker.
•Place the second beaker with calibration buffer in the beaker holder. Rinse the electrodes in
a beaker containing the second buffer rinsing solution.
•Place the electrode holder (with electrodes) on the top of the beaker and secure it by turning
clockwise and press STIR.
•If necessary press the ARROW keys in order to select a different buffer value.
Table of contents
Other Hanna Measuring Instrument manuals

Hanna
Hanna HI 83203 User manual

Hanna
Hanna SALINTEST HI98203 User manual

Hanna
Hanna HI 5221 User manual

Hanna
Hanna HI981033 User manual

Hanna
Hanna HALO2 User manual

Hanna
Hanna HI 9811 User manual

Hanna
Hanna HI 96736 User manual

Hanna
Hanna HI 5522 User manual

Hanna
Hanna HI 96724 User manual

Hanna
Hanna HI 991300 User manual

Hanna
Hanna HI981032 User manual

Hanna
Hanna HI 991300 User manual

Hanna
Hanna HI 720 User manual

Hanna
Hanna HI 96734 User manual

Hanna
Hanna HI 9835 User manual

Hanna
Hanna HI 110 User manual

Hanna
Hanna Foodcare HI99192 User manual

Hanna
Hanna HI 9142 User manual

Hanna
Hanna HI 96785C User manual

Hanna
Hanna HI759 User manual