HanRongDa HRD-787 Instruction Manual

High Performance Multi Band Radio
Bluetooth TF Card Player · APP Intelligent Remote Control
Flashlight ·SOS Alarm
Operational Guideline
(Model: HRD-787)
Thank you for your purchasing our product. Please read this operation guide carefully and keep it properly before using it.
1: An Overview of the Product
Our products which are constantly innovated can meet various demands of the majority of users. This has been our company’s
tenet for researching and developing new products.
HRD-787 is a product carefully made by our company. It is a DSP digital display full band radio that can support APP intelligent
remote control.
It can receive FM, medium wave, short wave, VHF VHF (VHF-NFM&VHF-WFM), North America national weather band
multi-band broadcast and can support Bluetooth, TF card multimedia music playback with high fidelity sound quality.
It supports flashlight lighting and SOS alarm emergency functions and is an emergency product that can be used both at home and
outdoors.
2: A Brief Description of Product Functions:
Different from the traditional radio, this product has a radio with APP intelligent remote control (it can support Android and
Hongmeng mobile phone software).
Within a range of less than 20 meters, the band switching and mode switching of the intelligent near-distance remote control radio
can be realized. With such functions as digital key point frequency, sound control, frequency selection, radio recording, locking, the
product can give users new use experience.
Our product designs six kinds of backlight colors which can provide users with different visual experience:

FM&VHF mode backlight: green
AM mode backlight: purple
SW mode backlight:yellow
WB mode backlight:red
Backlight for Bluetooth receiving mode: gentle blue
TF card playing backlight: light blue
Our product uses software programming to realize such functions as reception of FM, medium wave, short wave, VHF
(VHF-NFM, VHF-WFM) and all-band radio broadcast in North American weather bands. It has strong reception sensitivity.
Our product, with the aid of high-tech audio technology, can connect Bluetooth wirelessly for music transmission and play. It can
play 256G mp3/wma/wav TF format to the maximum.
Our product TYPE-C jack is a dual jack: it can be charged and the data line is used to connect our product with the computer. Then,
the product is used a as a sound source input speaker.
Under radio mode, our product supports automatic search & automatic radio as well as manual station saving.
10 meter waves are designed which can quickly search for the desired frequency point.
FM/ medium wave settings have five options. There is no national boundary and all world countries can use that.
1): FM: 87.5-108MHZ/ AM: 522-1710KHZ (step value: 9KHZ)
2): FM: 87-108MHZ/ AM: 520-1710KHZ (step value: 10KHZ)
3): FM: 76-108MHZ/ AM: 522-1710KHZ (step value: 9KHZ)
4): FM: 64-108MHZ/ AM: 522-1710KHZ (step value: 9KHZ)
Under music playing mode, our product is equipped with the music spectrum “ ”, which can bring you
beautiful music melody.
Our product has both BASS low sound quality and headphones. Therefore, it can meet demands of the majority of users.
Under TF card playing mode, our product can provide four types of playing:
rA (repeat all), rO: (repeat one), rF (repeat file), rr: (random)
Our product uses the polymer lithium battery which has a long battery life.
Our product can be locked,can be mute
Our product adopts 1.26-inch super-large display screen which can display a variety of contents: including the time, the power
indicator, the signal indicator, the sleep time and the alarm clock symbol.
24-hour system/12-hour system can be selected.
The sleep shutdown time, can set to be 90-80-70-60-50-40-30-20-10 minutes.
Timing startup and timing alarm clock can be set.
After selecting timing startup, users can set the shutdown time after timing startup to be 10-20-30-40-50-60-70-80-90 minutes
&FULL (it will automatically power off after startup is canceled)
Our product is equipped with backlight display. Therefore, users can use it in the dark.
Our product can remember 396 stations in radio mode (FM/VHF/medium wave/short wave: 99 each).
Under Bluetooth and TF card music playback mode, our product can play six kinds of EQ sounds:
E1: NORMAL, E2: POP, E3: ROCK, E4: JAZZ,
E5: CLASSIC, E6: COUNTRY
Our product uses type-c charging jack so that users can use it safely.
3: Items inside package

Name of items
Quantity
HRD-787 high performance all band radio
1
Straps
1
polymer lithium battery (Built-in machine)
1
USB TYPE-C Data & charging cable
1
Operational guideline
1
Storage bag
1
Packing box
1
4: Schematic diagram for downloading mobile APP (see APP installation instructions in the
attachment):
Step 1: turn on the radio Step 2: Install the APP. Step 3: successful installation on the mobile desktop Step 4. Click it to enter APP
mode
“RADIO-C” Click it for connection
5: Schematic diagram of appearance button functions
Front view of product Rear view

Left view Right view
Top view
5.1 Functions of all buttons:

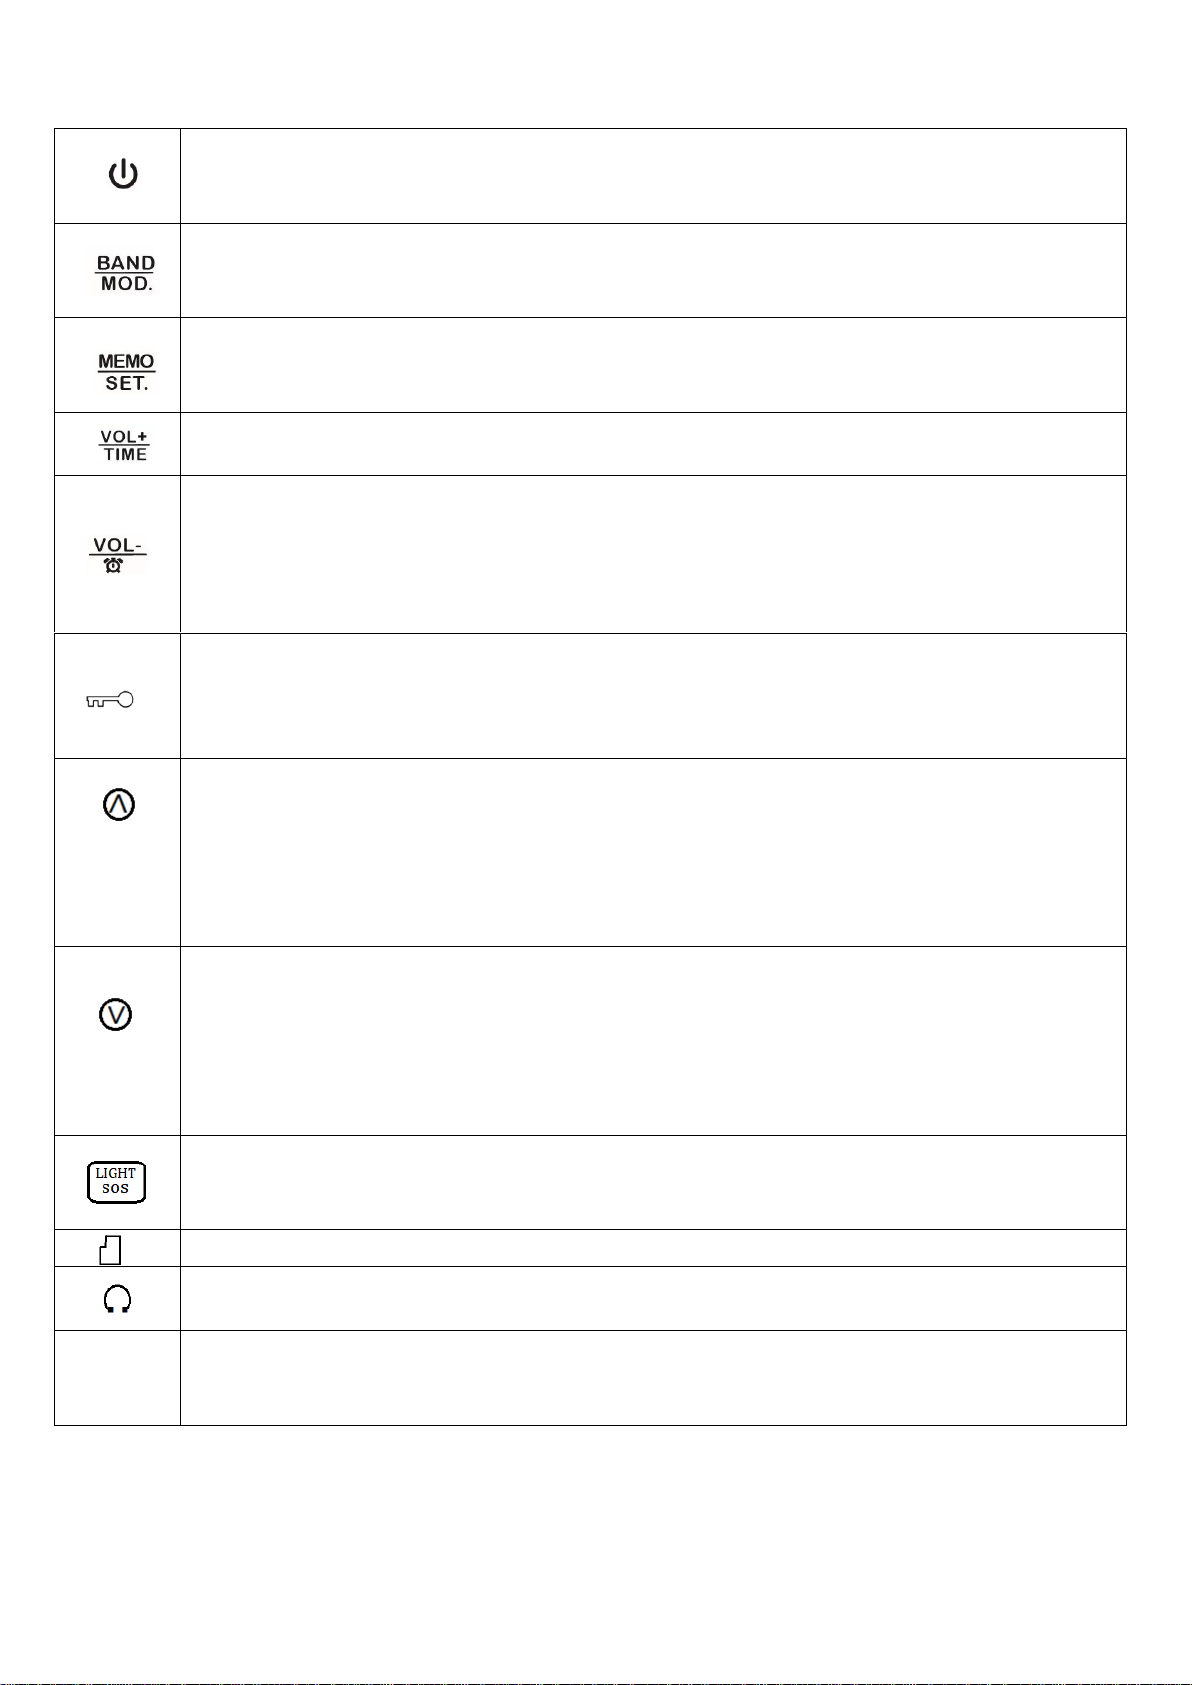
1: Power on/off the machine [Refer to 7.1.1 for details].
2: Set 90 minutes’ sleep mode [Refer to 7.1.2 for details]
3: Working Mode: light press it to switch pause/play.
1: Under clock display state: Set receiving frequency range [Refer to 7.4 for details].
2: Under starting-up status: Select working mode switch [Refer to 7.2 for details]
3: Fully automatic station search and storage [Refer to 7.4.1.3 for details]
1: radio mode: light press it to enter fetch mode & long press it for 2 seconds to manually save stations.
2: Music playback working mode: light press it to select EQ sound.
3: Turn on and off VHF; switch NFM/WFM mode and select WFM [refer to 7:6 for details]
1: power-on status: volume adjustment+
2: Clock status: long press it to enable runtime setting/12-hour system&24-hour system
1: power-on status: volume adjustment-
2: Clock status: long press it to set the timed alarm clock/timed startup & timed shutdown will be set after it
is started.
3: Alarm clock state: light press it to close the alarm clock; Clock status: light press it to cancel the alarm
clock.
1: Power-on/Power-off state: lock & Unlock
2: Open or close “SOS” alarm functions [refer to 13.4/13.5 for details]
3: Short wave working mode: Enable the fast meter wave to select stations.
4: Select TF card play mode [refer to 9 points for details ]
1: clock/alarm clock is set: adjust the time +;
2: Radio mode: light press it to increase frequency;
long press it for two seconds to automatically search for stations
enter the station fetch/storage mode: light press it to get the station fetch/storage address number +
3: TF card playing mode: light press it to play the next song; long press it to play quickly;
4:Bluetooth mode: light press it to go to the next song.
1: Clock/ alarm clock setting: adjust the time -;
2: Radio mode: light press it to decrease frequency;
long press it for two seconds to automatically search for stations
enter the station fetch/storage mode: light press it to get the station fetch/storage address number-.
3: TF card playing mode: light press it to return to the previous song; long press it to rewind playback;
4: Bluetooth mode: light press it to return to the previous song.
1: Double click it (press it twice continuously) to start the flashlight; light press it to turn off the light.
2: When the SOS alarm lock is on, long press it for two seconds to start "SOS" alarm + flashing light.
Light press it to turn off the light and alarm.
TF card jack socket
3.5MM headphone audio output jack.
TYPE-C
USB jack
1: Charging hole;
2: Computer audio input jack.

6: Description of LCD Symbols
Radio playing: signal indication; music playback mode: music
spectrum display symbol
Station storage address number& station fetch address number &EQ
display symbol
VOLUME
Volume
Automatic search and storage of stations & manual station storage &
station fetch display symbol
Power & Charging
Charging
Unit
Unit
Start auto start-up & alarm clock
Sleep time
Lock symbol
Bluetooth playback
TF card play
North American national weather band has activated the warning
indication.
FM: Frequency modulation receiving mode;
VHF: VHF receiving mode
AM: medium wave receiving mode;
SW: short wave mode;
WB: National weather band of NorthAmerican
Bluetooth&TF card Play mode: Enable pause/play

AM
Ante meridiem of 12-hour system
PM
post meridiem of 12-hour system
Standby time: Display the time.
Bluetooth mode: Display Bluetooth status
TF card working status: Display the total number of songs & display
the playing time
7: Introduction to functions:
7.1.1: Power on/off: light press and the clock will be displayed; light press [ ] within 10 seconds and the machine will be
turned on.
When the machine is on, long press [ ] for two seconds to close the machine. Clock status will be displayed when the
machine is turn off.
[Note: After power-off, the radio will enter power saving mode (backlight will be off after 5 seconds and the display will be off after 10
seconds). If you need to check the time, press [ ].
7.1.2 Set sleep time: light press [ ] to start clock; long press [ ] for two seconds to set sleeping mode;
90.80.70.60.50.40.30.20.10 minute 。When sleep time is displayed, light press [ ] to choose automatic sleep
shutdown minutes as 90.80.70.60.50.40.30.20.10 minutes.
After select auto sleep shutdown mode, LCD displays .
7.2: BAND: selection of working mode
The product supports eight working modes which are shown below:
Working state, light press 【BAND】key to switch the above several working modes.
7.3: Volume adjustment: (Volume can be adjusted between 00 and 30)
In the working state, light press [VOL+&VOL-] to adjusts the volume, which can be adjusted between "00-30" volume level as
required.
7.4: Receive RADIO:
The machine can receive FM/VHF/AM/SW/WB and the specific receiving range is as follows:
Different countries have different requirements for FM reception and medium wave reception. The following options are specially
designed.
The factory default value is the first one
FM Mode
VHF Mode
AM Mode
SW Mode
WB Mode

1
87.5-108MHZ
30.00-199.975MHZ
522-1710KHZ (9KHZ)
4.750-21.850MHZ
162.400-162.550MHZ
2
87-108MHZ
30.00-199.975MHZ
520-1710KHZ (10KHZ)
4.750-21.850MHZ
162.400-162.550MHZ
3
76-108MHZ
30.00-199.975MHZ
522-1710KHZ (9KHZ)
4.750-21.850MHZ
162.400-162.550MHZ
4
:64-108MHZ
30.00-199.975MHZ
522-1710KHZ (9KHZ)
4.750-21.850MHZ
162.400-162.550MHZ
Users can adjust the above reception modes according to demands and the operation procedures are as follows:
Under time display mode, long press "BAND" for 2 seconds to display FM low frequency point of the current mode (87.5MHZ); light
press [ ] to select the frequency range you want. Stop the operation to exit the setting and the machine will automatically default
to the last selected frequency setting value.
(LCD’ displaying 87 means that the second receiving mode is used; LCD’s displaying 76 means that the third receiving mode is used;
LCD’s displaying 64 means that the fourth receiving mode is used.)
7.4.1: Station searching mode: Manual station adjustment; semi-automatic station search; full-automatic station search and storage
7.4.1.1: Manual station adjustment: light press[ ]and the station will increase and decrease according to the minimum
wave band.
Minimum FM&VHF step value: 0.1MHZ
Minimum step value of AM medium wave: 9KHZ / 10KHZ
Minimum step value of SW short wave: 0.005MHZ
7.4.1.2: Semi-automatic station search: long press for 2 seconds and each band quickly searches radio by the minimum
step value. It will then stop and play as long as stations with signals are found.
7.4.1.3: Full-automatic station search and storage: Under radio mode, long press [BAND] for two seconds to enter the
full-automatic station search and storage. Stations will be automatically stored. It will be searched from the lowest frequency
point of the current received band to the highest frequency point.
During the automatic scanning and search process, the symbol "PRESET 01-PRESET **" on the right corner of the LCD will
be displayed (the number stands for the preset address number).
After a round of search is finished, it automatically stops and plays the first frequency point program saved.
Number of stations stored for each band: 99; total number of storage stations: 396 (except WB North America National
Weather Band)
Warm tip: The number of stations stored depends on the local signal strength.
7.5: Metre wave of short wave:
Short wave reception range: 4.750-21.850MHZ.
In order to select the short wave station more quickly, 10 meter waves are set under SW working mode of short wave. Light
press [ ]and LCD will display
4.750MHZ, 5.600MHZ, 7.350MHZ, 9.900MHZ, 12.100MHZ, 13.870MHZ, 15.800MHZ,
17.900MHZ, 19.100MHZ and 21.850MHZ.

7:6: About VHF
Civil VHF band (civil VHF band). This machine can receive VHF (NFM/WFM dual demodulation mode)
7.6.1:About VHF band:
VHF-NFM (The delivered bandwidth value of our product is 5KHZ):
This band can receive train channel/racing channel /VHF intercom receiver /VHF(HAM) and can be used by some people in need.
(The above data are for reference only. Different countries have different situations. They shall be based on radio frequency
division of local areas.)
7.6.2: VHF-WFM: Four bandwidth settings are available: 50KHZ/100KHZ/150KHZ/200KHZ
They improve the playability and usability of the product.
7.6.3: The default VHF receiving mode of our product is VHF-NFM.
7.6.4: VHF band users can choose to turn it off or on according to their needs. The operations are shown as below:
7.7: Manual station storage method:
In the radio receiving mode, you can find target frequency points by the three methods mentioned above 7.4.1. Long press [MODE]
for two seconds to enter the station saving mode and the LCD will display that “PRESET **” flashes. At this time, light press
[ ] to select the station storage address number. Press [MODE] to confirm it again. The station storage storage number will
stop flashing and finally be off to complete the manual station storage operation.
Note: If the target frequency points are selected, please long press [MODE] for two seconds to start storing the station. Light press
[MODE] to confirm that the station has been saved. Store stations upwards directly in the order of station deposit number in this way,
7.8: Fetch stations
Store the stations according to [7.4.1.3 automatic station search or storage] or [7.7 manual station storage].

Light press [MODE] to pick up the station. When [PRESET **] is displayed, light press [ ] to select the station number.
Each time you press [ ], a station will be changed and the following content “PRESET00-PRESET **”(01-** is the station
pickup number) will be displayed.
Note: “PRESET -- ”indicates that there is no stored station
7.9: North American WB Weather Band:
Light press “BAND” to switch to WB weather band. Light press or long press to select the received weather frequency
points.
Frequency points received are as follows:
1-162.400MHZ, 2-162.425MHZ, 3-162.450MHZ: 4-162.475MHZ,
5-162.500MHZ, 6-162.525MHZ, 7-162.550MHZ,
Long press “BAND” for 2 seconds to enter the automatic warning "ALERT". In the automatic warning "ALERT" state, long press
"BAND" for 2 seconds to exit the automatic warning "ALERT" function. (Note: Under the automatic warning mode, no effect will
appear when you press buttons. You need to long press “BAND” to disable the automatic warning mode before other radio functions
can be used).
8: Bluetooth mode:
Bluetooth name of our product: “HRD-787”
Under the startup working state, light press “BAND” to switch to “BT" mode and Bluetooth“ ” will flash, indicating that it is
waiting to be connected to Bluetooth. After it is successfully connected, Bluetooth“ ” will always be displayed.
You can control related operations, such as volume, last song, next song and so on, by operating your mobile phone or this device.
Light press “ ” to switch Bluetooth music playback/pause.
9: TF card playing:
Power-on state, light press [BAND] to switches to TF card mode to play songs
Please insert TF card correctly according to the direction indicated by the icon: gently press into the card and gently press out
again.
Light press [ ] to play the next song. Light press [ ] to go back to the previous song.
Long press [ ]for fast forward and long press [ ] for fast backward.
Light press [ ] switch music playback/pause.
Under TF card playing mode, you can select playing mode according to the following operations:
Light press [ ] and the upper right corner of LCD will display rA, rO, rF or rr, which represents the following
functions:
rA (repeat all), rO: (repeat one), rF (repeat file), rr: (random)
TF card supports a maximum capacity of 256 GB.

TF card supports MP3, WMA, and WAV formats.
Maximum number of files supported by TF card: 65535
Warm Prompt:
a. When playing TF card music, please adjust the volume if the sound has vibrato in consideration of song sources
downloaded .
b. In the radio &Bluetooth mode, if TF card can not play or the screen displays Err, please replace the normal TF
card because of song sources downloaded or broken TF card.
10: Set the operating time:
Under clock display status:
Long press [VOL+] for 2 seconds and “hour” flashes; light press or long press [ ] to adjust the current hour.
Light press [VOL+] again and “minute” flashes; light press or long press [ ] to adjust the current minute.
Light press [VOL+] again to display [24Hr] or [12Hr] time system. Light press [ ] to select [12Hr] or [24Hr]
system.
Finally, light press [VOL+] to confirm the adjusted running time & time system.
※In the "12Hr" time system, "AM" on the LCD indicates the morning time and "PM" on the LCD indicates the
afternoon time.
11: Method to set timed power-on or timed alarm
11.1: Our product can set timed radio start-up& alarm functions.
Set current time according to the above [10: Set the operating time ].

Stop operation when “ ” and “ ” flash and automatically confirm the current settings adjusted 5 seconds later; light press "
V0L- " to confirm it.
Warm Prompt:
——"" timed startup: After the running time reaches the timed boot time, it will automatically play the working mode before
shutdown (if it is under Bluetooth mode, you should click on the Bluetooth device to play it).
——“ ” timed alarm clock:After the running time reaches the set alarm clock time, alarm clock “ ” flashes and the machine will
give up “dudu......”. The ring will last for three minutes and will ring every 5 minutes. Light press “VOL-”to close the alarm clock
and “ ” will stop flashing. Light press “VOL-”again to cancel alarm clock and “ ” will disappear. When the alarm clock makes
“dudu......”, light press any other button to pause the alarm.
11.2: Select automatic power-on and then the automatic shutdown time (the unit of the selected time is: minutes).
Operations are shown as follows:
Warm prompt: If you have selected the timed start time and timed shutdown time" ", the machine will be started when
the timed start-up is up. At that time, the screen will also display the sleep symbol [ ] when the timed shutdown time is
due. The system will be automatically shut down and the sleep symbol [ ] will disappear.
11.3: Cancel the timed start/timed alarm function
Cancel the timed start/timed alarm function: under clock status, light press [VOL-] and “ ” disappears to disable the
alarm.
12: Select EQ sound settings in music playback mode:
In music playback mode, light press [MODE] for cyclical selection of EQ sound quality:
E1: NORMAL E2: POP; E3: ROCK E 4: JAZZ),
E5: CLASSIC E6: COUNTRY

No operation within 3 seconds will be defaulted as EQ Sound quality after the adjustment.
13: SOS alarm& lighting emergency:
13.1: Power of emergency functions: maximum output of SOS alarm > 3W; flash power: 1W; flashlight power: >1W.
13.2: Enable SOS alarm: long press [LIGHT SOS] for 2 seconds to start SOS alarm. Light press [LIGHT SOS] to turn off SOS
alarm.
13.3: Enable lighting: Double click [LIGHT SOS] and LED will light up; light press [LIGHT SOS] to turn off lighting.
SOS alarm: It is open by default, but can be adjusted to be off as required. After it is closed, [LIGHT SOS] will not issue an alarm.
13.4: Operations to disable the SOS alarm function:
Under clock display status [MAKE SURE THE RADIO IS NOT LOCKED], double click [ ] and will be
displayed.
Long press [LIGHT SOS] and LCD will display and give out the sound “du“. At this time, SOS alarm has been turned off.
13.5: Operations to enable SOS alarm function:
Under clock display status [MAKE SURE THE RADIO IS NOT LOCKED], double click [ ]and will be
displayed.
Long press [LIGHT SOS] and LCD will display and give out the sound “du“. At this time, SOS alarm has been turned on
and can be used normally.
14: TYPE-C USB: Charging & ComputerAUX-IN function:
14.1: Charging: It is recommended to use a charging device whose output voltage is DC5V/1A-DC3A to charge the battery.
Otherwise, lithium battery or the device may be damaged.
If the lithium battery is not used for a long time, please ensure that it is charged once a month.
Insert the USB charging cable and “ ” on the screen will flash, indicating that it is in the charging state. When it is fully
charged, the “”displays the full grid and stops flashing. Generally speaking, the charging time is about 4-5 hours.
14.2: USB external audio input: In the working state of the machine, connect our product with the computer using data line and the
USB will be used as the audio input.
LCD display.
15: How to use antenna:
When receiving FM, VHF, SW and WB bands, please pull out antenna and change the antenna length and search direction. You
can find the best reception position.
*Hint: If there is a strong radio interference which leads to cross station, you can shorten the antenna.
Receive AM broadcast. This machine uses built-in magnetic antenna to receive medium wave. Magnetic antenna has certain
directionality when it receives the signal. Therefore, when receiving medium wave, you should rotate the direction of the machine
body appropriately to find the best reception effect.

16. Main technical parameters:
Scope of receiving
FM: 64-108MHZ
VHF: 30.000-199.975MHZ
AM: 520-1710KHZ
SW:4.750-21.850MHZ
WB:162.400-162.550MHZ
Sensitivity of reception
FM≤8dB
VHF≤8dB
AM:86dB
SW:40dB
Static current
≤70uA
Maximum current
≤820MA
Speaker
Ф40mm/4Ω/3W
SNR(Signal to Noise Ratio)
FM/VHF:≥40dB
MW:≥30dB
SW:≥40dB
Number of stored stations in the radio
mode
396 stations
Bluetooth version
VER 5.0
Bluetooth receiving range
≤20 meters
Minimum operating voltage
3.4V
External input voltage
DC.5v
Lithium battery
3.7v 1000mAh
TF card playback format
Support MP3 & WAV & WMA formats
Maximum capacity supported by TF
card
256G
Product size
92X53.2X26MM
Net weight of the products
105g
17. Matters needing attention:
Before using our product, please ensure that you follow the following basic safety tips and that the product is used in a safe and
reliable way:
♦Read and understand all safety instructions and usage information.
♦If the battery“ ” is displayed or the external frame of“ ”flashes, the battery has low power. Please charge it to ensure its
normal operation.

♦Charging devices with output voltage of DC5V/1A-DC3A are recommended. Otherwise, lithium batteries or devices may be
damaged.
♦If the machine is not used for a long time, please make sure to charge it once a month.
♦Do not expose our product to rain, damp or any liquid.
♦Do not make our product close to high temperature and heat source; do not barbecue or blow it.
♦Do not put in direct sunlight for a long time.
♦Do not let our product fall or be hit and do not apply heavy pressure on it.

FCC Warnning:
This equipment has been tested and found to comply with the limits for a Class B digital device,
pursuant to part 15 of the FCC Rules. These limits are designed to provide
reasonable
protection againstharmful interference in a residential installation. This equipment generates,
uses and can radiateradio
frequency
energy
and,
if
not
installed
and
used
in
accordance
with
the
instructions,
maycause
harmful
interference
to
radio
communications.
However,
there
is
no
guarantee
thatinterference
will
not
occur
in
a
particular
installation.
If
this
equipment
does
cause
harmfulinterference to radio or television reception, which can be
determined by turning the equipmentoff
and
on,
the
user
is
encouraged
to
try
to
correct
the
interference
by
one
or
more
of
thefollowing measures:
•
Reorient or relocate the receiving antenna.
•
Increase the separation between the equipment and receiver.
•
Connect the equipment into an outlet on a circuit different from that to which the receiver is
connected.
• Consult the dealer or an experienced radio/TV technician for help.
Caution:
Any
changes
or
modifications
to
this
device
not
explicitly
approved
by
manufacturer
could void your authority to operate this equipment.
This
device
complies
with
part
15
of
the
FCC
Rules.
Operation
is
subject
to
the
following
two
conditions:
(1)This
device
may
not
cause
harmful
interference,
and
(2)
this
device
must
accept
any
interference received, including interference that may cause undesired operation.
This
equipment
complies
with
FCC
radiation
exposure
limits
set
forth
for
an
uncontrolled
environment.
This
equipment
should
be
installed
and
operated
with
minimum
distance
0cm
between the radiator and your body.
Table of contents
Other HanRongDa Radio manuals