HAOLIYUAN ELECTRONIC CO., LTD PA1002T User manual

HAOLIYUAN (SHENZHEN) ELECTRONIC CO., LTD
Smart Plug
PA1002T
User Manual

2
Content
CHAPTER 1. Introduction.......................................................................... 4
1.1 Product Features .........................................................................................4
1.2 Package contents ........................................................................................4
1.3 Indicator and button Description...................................................................4
CHAPTER 2. Quick Installation Guide ...................................................... 5
2.1 Prepare installation ......................................................................................5
2.2 Connecting your Smart Plug to WiFi ............................................................5
CHAPTER 3. Control with Smart Life app................................................. 6
3.1 Switch, Left time, Timer................................................................................6
3.2 Modify device name.....................................................................................6
3.3 Device Sharing.............................................................................................7
3.4 Remove device............................................................................................8
3.5 Create Group...............................................................................................8
3.6 Smart Scenes settings .................................................................................9
CHAPTER 4. Control with amazon echo or Google home....................... 9
4.1 How to connect your device to Amazon Alex..............................................10
4.2 How to control your device via Google Home.............................................11
CHAPTER 5. FAQ....................................................................................13
5.1 For connecting your device to WiFi............................................................13
5.2 About App ..................................................................................................15
5.3 Compatible with third-party platforms.........................................................17

3
Safety Precautions
●Only use the ednet smart home devices within the specified
temperature range for: 0 ~ 40°C
●When not in use, store the product in a clean and dry place in temperatures
between 0°C and 40°C
●Do not let the indoor devices come into contact with liquids.
●ednet Smart Home does not replace adult supervision. Safeguard the health of your
children, family members or pets by regularly looking after them
●Ensure that the indoor devices are only used inside. These devices are not intended
for outdoor use and can be damaged.
●Keep the devices outside the reach of children, since these components can be
dangerous
●Never try to repair ednet smart home system by yourself. Repair and maintenance
work must be carried out by specialists.
●In case of problems contact our customer service.
Personal Information
●Read and accept the privacy policy for using the ednet smart home systems in
Smart Life app(ProfileSettingsAboutPrivacy Policy)
●Select a password with a high degree of safety for your ednet smart home account
to protect it from unauthorized access.
●The password should contain at least 8 characters; we recommend case-sensitive
letters and alphanumeric characters.
Live stream, push notification and further services are available via a cloud
server. Despite backup solutions, system stability and bandwidth management the
uninterrupted availability of the system cannot be guaranteed.

4
CHAPTER 1. Introduction
Smart plug connects to the Internet through WiFi network and controls the power
of home appliances。Smart phone or other device can control the switch of smart plug
and track the status of smart plug at any place where network is available;smart plug
using SmartLink net technology you can easily access settings, besides, it has timing
function you can DIY for your favorite, let you have fun on local or remote control your
home appliances, enjoy with it.
1.1 Product Features
Support WiFi network.
Support Smart configure net technology, easy to access settings.
Support status tracking, home appliances status timely feedback to your device.
Support multiple smart plug controlled from one smart phone.
Android 4.4.2 and above are supported
IOS 8 and above are supported
Support amazon echo and google home voice control
Easy installation, easy handling and can be activated immediately and stably.
CE, ROHS approval.
1.2 Package contents
The package contains:
One Smart plug
One User Manual
Note: If any of the listed contents are damaged or missing, please contact the
retailer from whom you purchased the product for assistance.
1.3 Indicator and button Description
Green LED:
Quick Blinking: App-Config mode initiated
Off: No network connection
On: Connected to the network
Red LED:
On: The Smart Plug is switched on.
5
Off: The Smart Plug is switched off.
Button:Smart plug on/off switch, Press and hold (for 5 seconds) until the green LED
blinks to initiate theApp-Config process.
CHAPTER 2: Quick Installation Guide
This chapter describes how to install the smart plug.
2.1 Prepare installation
2.1.1 Scan below QR code or search Smart Life from APP Store or Google Play and
install the app, new user must register a account first.
2.1.2 Connect mobile device to your 2.4GHz Wi-Fi router(with internet) and plug in the
smart plug
Note: the smart plug only support connect to 2.4G WiFi router.
2.2 Connecting your Smart Plug to WiFi
Press the button for 5 seconds until the green LED fast blinks then run Smart Life
app add device(select AllElectrical outlet) and follow the in-app instructions to
connect the smart plug to your network

6
CHAPTER 3: Control with Smart Life app
3.1 Switch, Left time, Timer
Open the App and enter the device control page, click on “Switch” control
the plug on/off, Click on “Left time” to set the plug on/off at the countdown
timer, Click on “Timer” to set the plug on/off on specify time.
3.2 Modify device name
Open theApp and enter the device control page, click "..." button which is
on the top right corner, click on the button "Modify Device Name" and

7
input the new device name you want.
3.3 Device Sharing
Open theApp and enter the device control page, click "..." button which is
on the top right corner, click on the button "Device Sharing" and input the
member account you want to share.
8
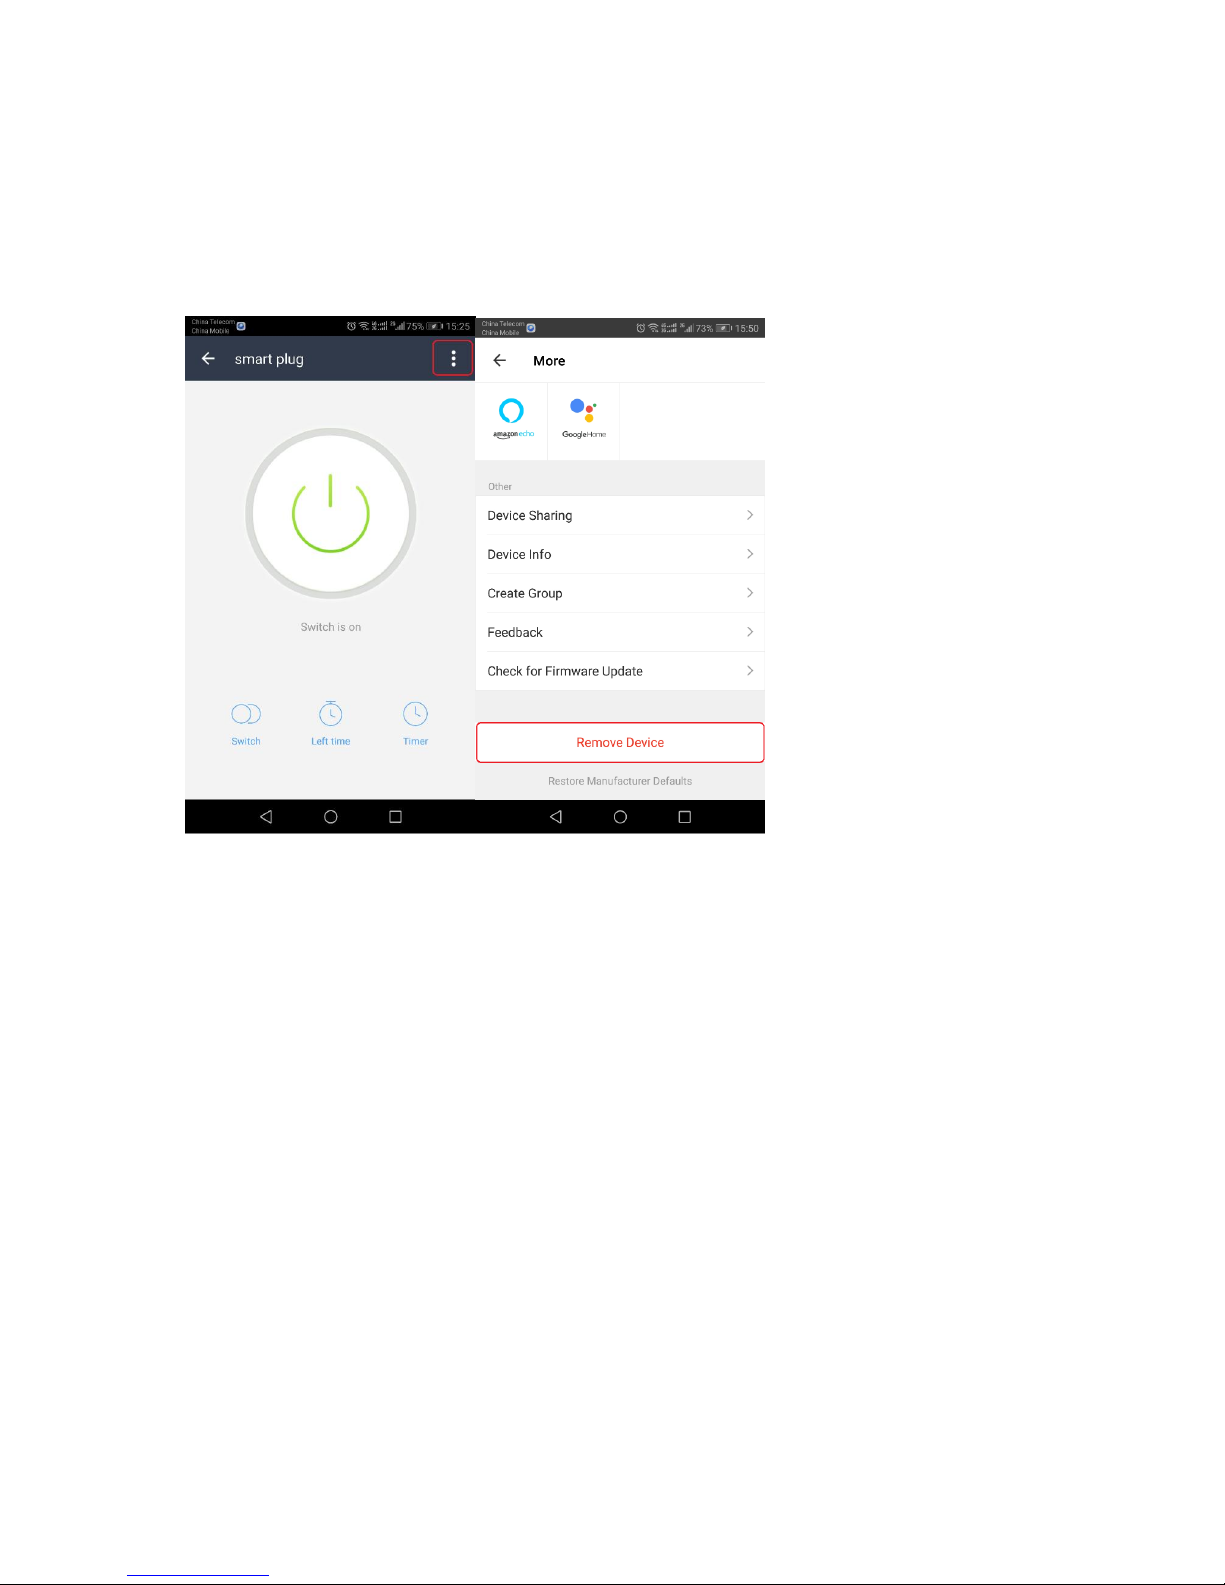
3.4 Remove device
Open theApp and enter the device control page, click "..." button which is
on the top right corner, click on the bottom of the page "remove device"
3.5 Create Group
Open theApp and enter the device control page, click "..." button which is
on the top right corner, click on the button "Create Group" and select the
device you want to create group.

9
Note: the group can’t be control by alexa and google home.
3.6 Smart Scenes settings
Open Smart Life app and click Smart ScenesAdd Scene,you can select
Scene or Autmation as below:
Note: for the Automation, because Temperature/Humidity/Weather/PM2.5/Air
Quality/Sunrise/Sunset get from internet, it will have some deviation with your place
where is the smart plug, please use them with care.
CHAPTER 4 Control with amazon echo or Google home
if you want to control the smart plug with amazon echo or Google home please
open Smart Life app and click ProfileSettingsIntegration enter the guide.
10
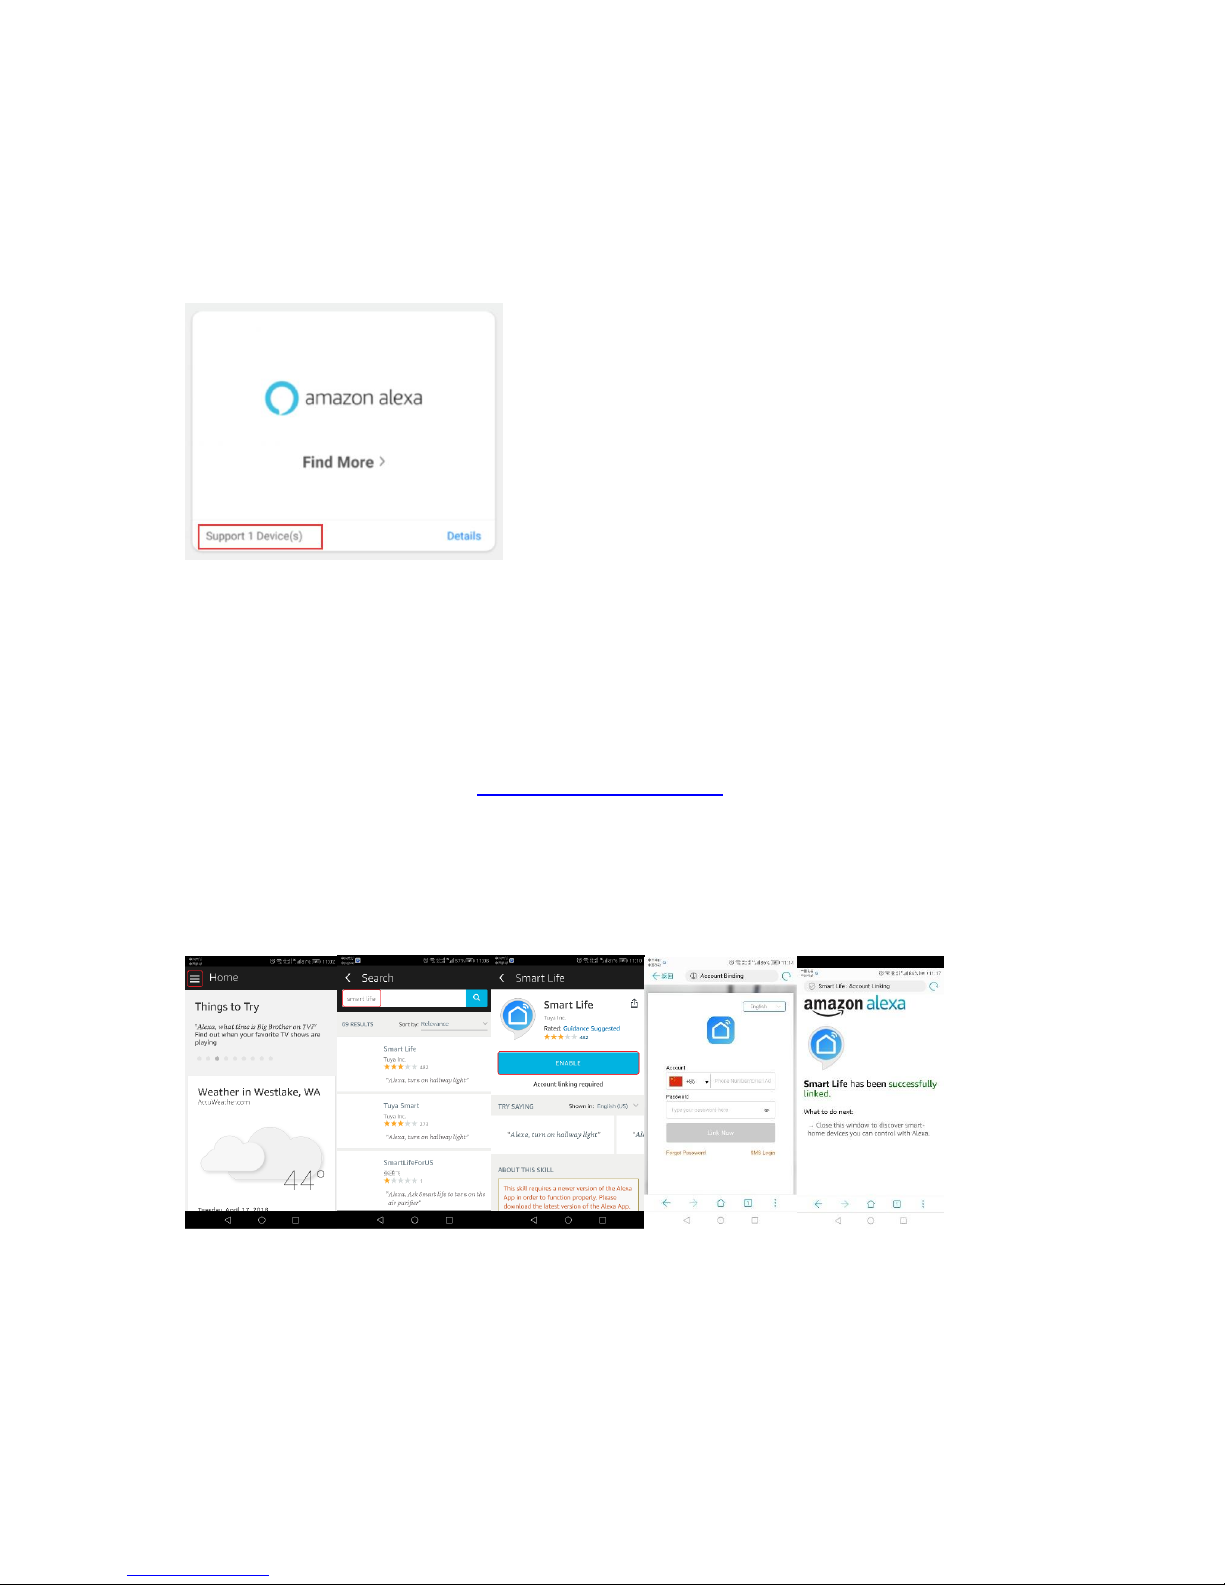
4.1 How to connect your device to Amazon Alex
4.1.1 Add Device
Make sure there is at least 1 device that is supported by Amazon Alexa. This is show
n on the Integration Screen.
4.1.2 Modify Device Name
Modify device name so your Amazon Alexa can easily recognize the name. For Exam
ple: Living Room Lamp, Bedroom Light.( please refer 3.2 Modify device name)
4.1.3 Set Up Alexa
Use Alexa App or Computer (http://alexa.amazon.com) to set up your Amazon Alexa.
4.1.4 Add Skill
In the menu bar, go to “Skills” and search for "Smart Life". Enable Skill, then type in y
our login info from your app account to finish the account linking.
4.1.5 Control Device
Ask Alexa to discover devices. After 20 seconds, devices will be discovered and Alex
a will tell you “I found x devices”. Then you can control your devices using voice thro
ugh your Amazon Alexa product.
The following voice commands are supported:
11
Alexa, turn on the plug.
Alexa, turn off the plug.
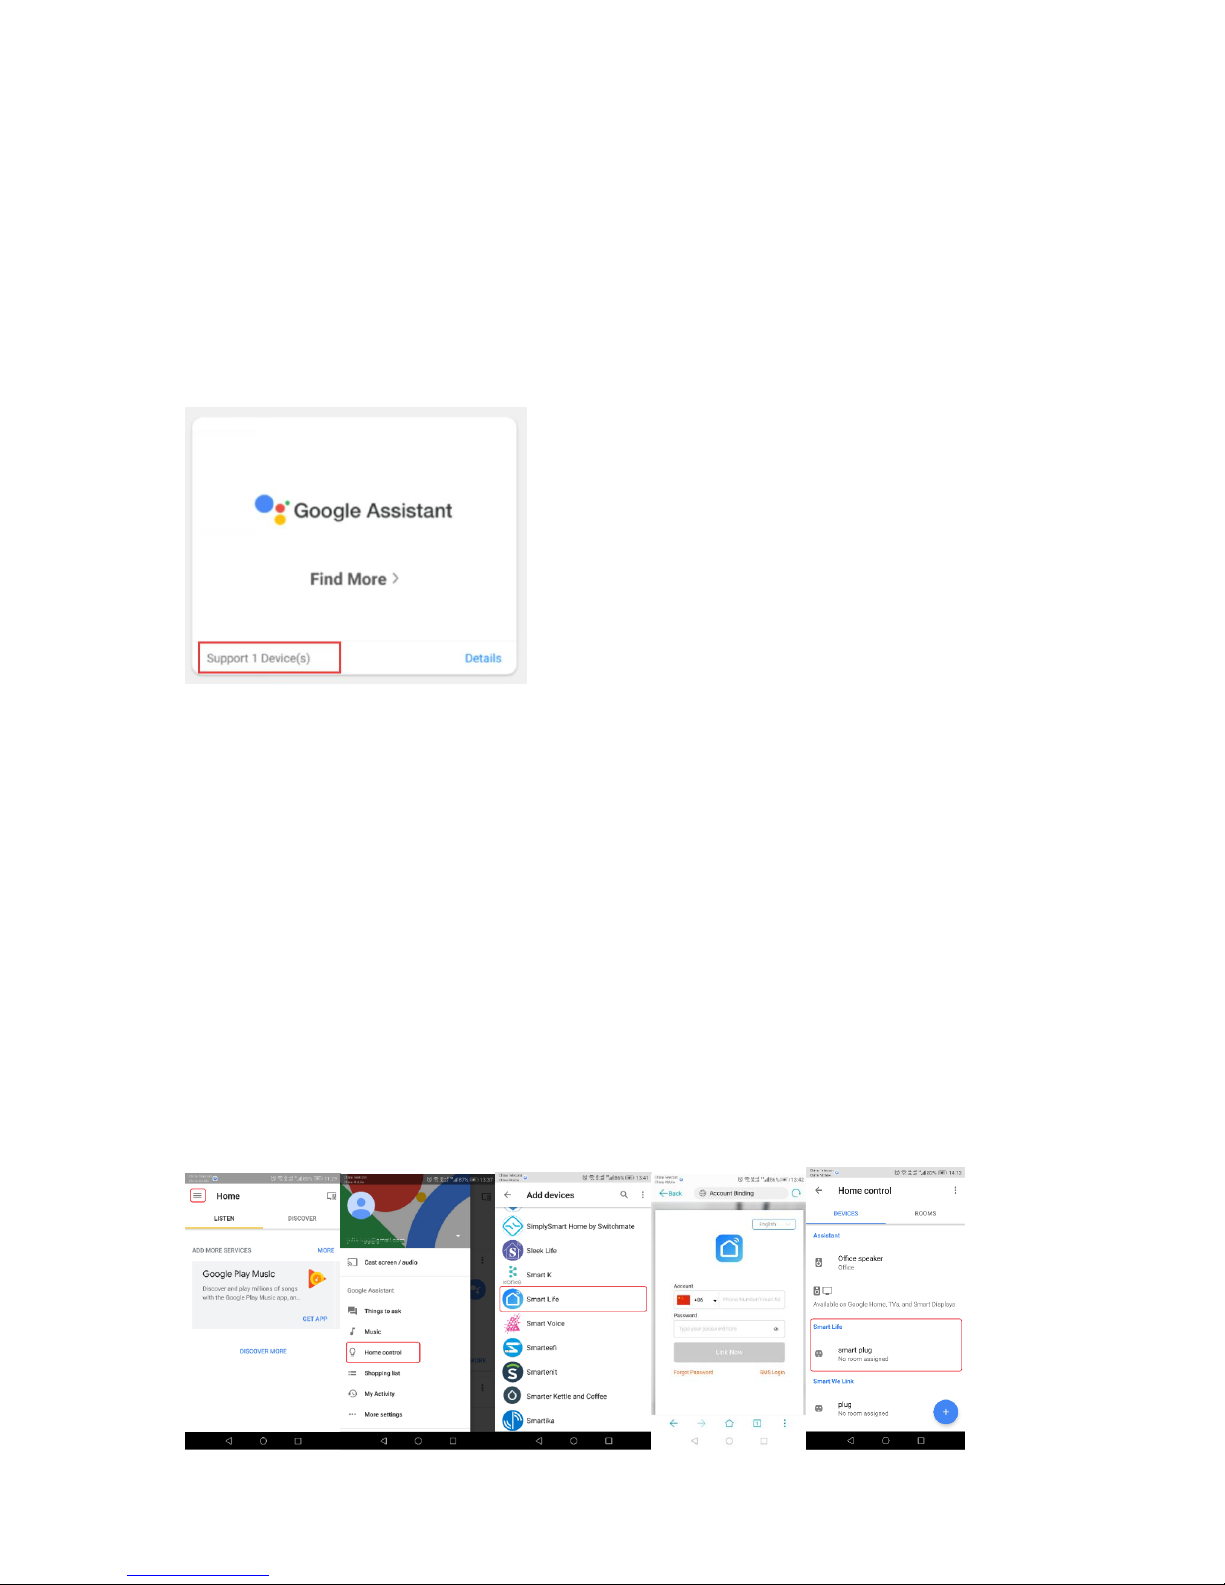
4.2 How to control your device via Google Home
4.2.1 Add Device
Make sure there is at least 1 device that is supported by Google Home. This is shown
on the Integration Screen.
4.2.2 Modify Device Name
Modify device name so your Google Home can easily recognize the name. For Exam
ple: Living Room Lamp, Bedroom Light. .( please refer 3.2 Modify device name)
4.2.3 Set up Google Home
Make sure phone system language is set to English. Then use the Google Home app
to set up your Google Home.
4.2.4 Add Home Control Action
In the menu bar, go to “Home Control” to add devices. Select "Smart Life", then type i
n your login info from your app account to finish the account linking. Your device shou
ld now be listed in the Home Control device list.

12
4.2.5 Control Device
You can now control your devices using voice through your Google Home product.
The following voice commands are supported:
Ok Google, turn on the plug.
Ok Google, turn off the plug.

13
CHAPTER 5: FAQ
5.1 For connecting your device to WiFi
5.1.1 How to connect your device?
1).Add device
a. Power on your device.
b. Log in your App, and select "+" on the top right of the App to add
device.
c. Ensure the indicator light blinking quickly (twice a second) the device is
in Config mode which allows you to connect.
- Please refer to the operation instructions at the top of the "Confirm
indicator blink rapidly" button about "How to make indicator blink rapidly"
- Please pressed power button for 5 seconds to reset the device
- It is recommended to check the operation manual in order to connect the
device to WiFi more quickly.
2). Enter Wi-Fi password
Enter the password of the WiFi Router you are connected to. Click
"Confirm" into the connecting process. Now we only support 2.4G Wi-Fi
channel, please check whether the Wi-Fi is 2.4G .
Finally, wait a few seconds till the success.

14
5.1.2 Failure at connecting Wi-Fi (add device failed)
Please note when adding device:
1). Confirm device is powered on.
2). Confirm device is waiting for network configuration.
3). Confirm that device, smartphone and router are close to each other.
4). Make sure the network function of the router and smartphone are
active.
5). Confirm the entered router password is correct.
6). Confirm adding device is under 2.4 WiFi channel. Enable the
broadcast and not allow to hide Wi-Fi
7). Confirm that router’s encryption method is WPA2-PSK and
authentication type is AES, or both are set up as automatic.
8). Confirm your Wi-Fi name only contains letters and numbers,
eg:abcd1234.
9). If router’s connected devices reach the amount limit. Please try to turn
off some device's Wi-Fi function and configure again.
10). If router enables MAC address filter, please try removing the device
from MAC filter list and make sure router is allowing device to be
connected

15
5.1.3 What if the device is offline
1). Ensure device is powered on.
2). Please check if the network is stable.(Check method: put the phone or
Ipad besides your device and make sure they are in the same network
environment, try to open a website to judge if the network can be used.)
3). Confirm whether the home Wi-Fi network is normal, or whether the
Wi-Fi name and password have been modified. If so, remove the device
and add it again. (Device Removal Method: Open the App and enter the
device control page, click "..." button which is on the top right corner, click
on the bottom of the page "remove device")
4). Please try to restart the router, wait 3 minutes and observe the status
of the device;
5.2 About App
5.2.1 Unable to control the device remotely, the function not
effective after control.
Couldn’t control device by app, it might be the reason of bad network
environment or device is offline.
1). Ensure device is powered on
2). It is recommended that you keep the APP open for about 3 minutes,
and observe whether the device is still online.
3). If it’s still online, please put the phone besides your device and make

16
sure they are in the same network environment, try to open a website to
see if it’s the problem of network
4). If device is online and network is good, but still can’t control device,
please go to the control page of the device, click on the "..." button in the
upper right corner, and then click on the "Send Feedback" to write the
problem you encountered, and provide you Router model, we will handle
it ASAP.
5.2.2 After the device is connected, it can be controlled at the same
location, but can't be remote controlled by the phone when change
to another location or other network environment.
If the device encounters such a situation, it may be the reason that the
device and cell phone are connected to the same LAN, but not connected
to the Internet.
1). Please put the phone besides your device and make sure they are in
the same network environment, try to open a website to see if it’s the
problem of network
2). If you cannot access the network, it is recommended to restart the
router.
3). If above problem occurs when device is connected to the network,
please go to the control page of the device, click on the "..." button in the
upper right corner, and then click on the "Send Feedback" to write the
problem you encountered, and provide you Router model, we will handle

17
it ASAP.
5.2.3 Device status cannot be synchronized with the status
displayed on the APP
1. If the device is controlled by a manual switch, the device may not be
synchronized at the same time.
2. It is recommended that you can open theApp and the device status will
be updated after operating.
5.2.4 How to cancel the countdown?
Please set the countdown timer at 0 hours and 0 minutes to cancel the
countdown.
5.2.5 How do I switch between Celsius and Fahrenheit ?
Please enter the APP –"Profile ", click personal icon into the basic
information page, at the "temperature unit" choose what unit you need,
after changing, the scene and so on will perform and show the
temperature of the unit that you chose for.
5.2.6 AP Mode Can not connect to your devices?
if you can not connect your devices to SmartLife-xxxx; please try
undefined-xxxx
5.3 Compatible with third-party platforms
5.3.1 How to check if my device compatible with third party ?
Please add your device and enter into the control page, select the "..."

18
button on the top right, you will see "Supported Third-party Control", click
the icon to find the quick guide using of the third party control.
5.3.2 The third party can’t recognize the voice control though it’s
been connected with device.
Please check the user manual of the third party and see if this voice
command is recognized accurately.

19
This equipment has been tested and found to comply with the limits for a Class
B digital device, pursuant to part 15 of the FCC Rules. These limits are
designed to provide reasonable protection against harmful interference in a
residential installation. This equipment generates, uses and can radiate radio
frequency energy and, if not installed and used in accordance with the
instructions, may cause harmful interference to radio communications.
However, there is no guarantee that interference will not occur in a particular
installation. If this equipment does cause harmful interference to radio or
television reception, which can be determined by turning the equipment off and
on, the user is encouraged to try to correct the interference by one or more of
the following measures:
•Reorient or relocate the receiving antenna.
•Increase the separation between the equipment and receiver.
•Connect the equipment into an outlet on a circuit different from that to which
the receiver is connected.
•Consult the dealer or an experienced radio/TV technician for help.
Caution: Any changes or modifications to this device not explicitly approved by
manufacturer could void your authority to operate this equipment.
This device complies with part 15 of the FCC Rules. Operation is subject to the
following two conditions: (1) This device may not cause harmful interference,
and (2) this device must accept any interference received, including
interference that may cause undesired operation.
This equipment complies with FCC radiation exposure limits set forth for an
uncontrolled environment.
This equipment should be installed and operated with minimum distance 20cm
between the radiator & your body.
Table of contents


