Happy HCS2-1201 Troubleshooting guide

Training Workbook: HAPPY HCS2-1201 Voyager Operation and Maintenance
Education Department
Chapter 1: Introduction and Basics 1
Training:
HAPPY HCS2-1201 Operations & Maintenance
For HCS Voyager2 with Touch Screen
Chapter 1: Introduction: The Machine, Needle, and Thread
–Introduction to your machine p.2
• Diagram of major parts p. 2
• Diagram of major systems: Pantograph, sewing machine, color change/cut p.3
• The Sewing Cycle p. 4
• Machine environment p.5
–Control Panel Introduction & Orientation p.6
• Power on/off / emergency stop
• Power-on & navigating to the main sewing screen
–Important Screens: A brief introduction p.7
• Drive screen 7
• Important Sub Screens 8
• Main menu, 9
–Additional Basics p.10
• About stitches, sewing quality, stitch file formats
–Embroidery Thread p. 11
• Installing thread p. 12
• Bobbin thread p. 14
–Embroidery Needles p. 15

Training Workbook: HAPPY HCS2-1201 Voyager Operation and Maintenance
Education Department
Chapter 1: Introduction and Basics 2
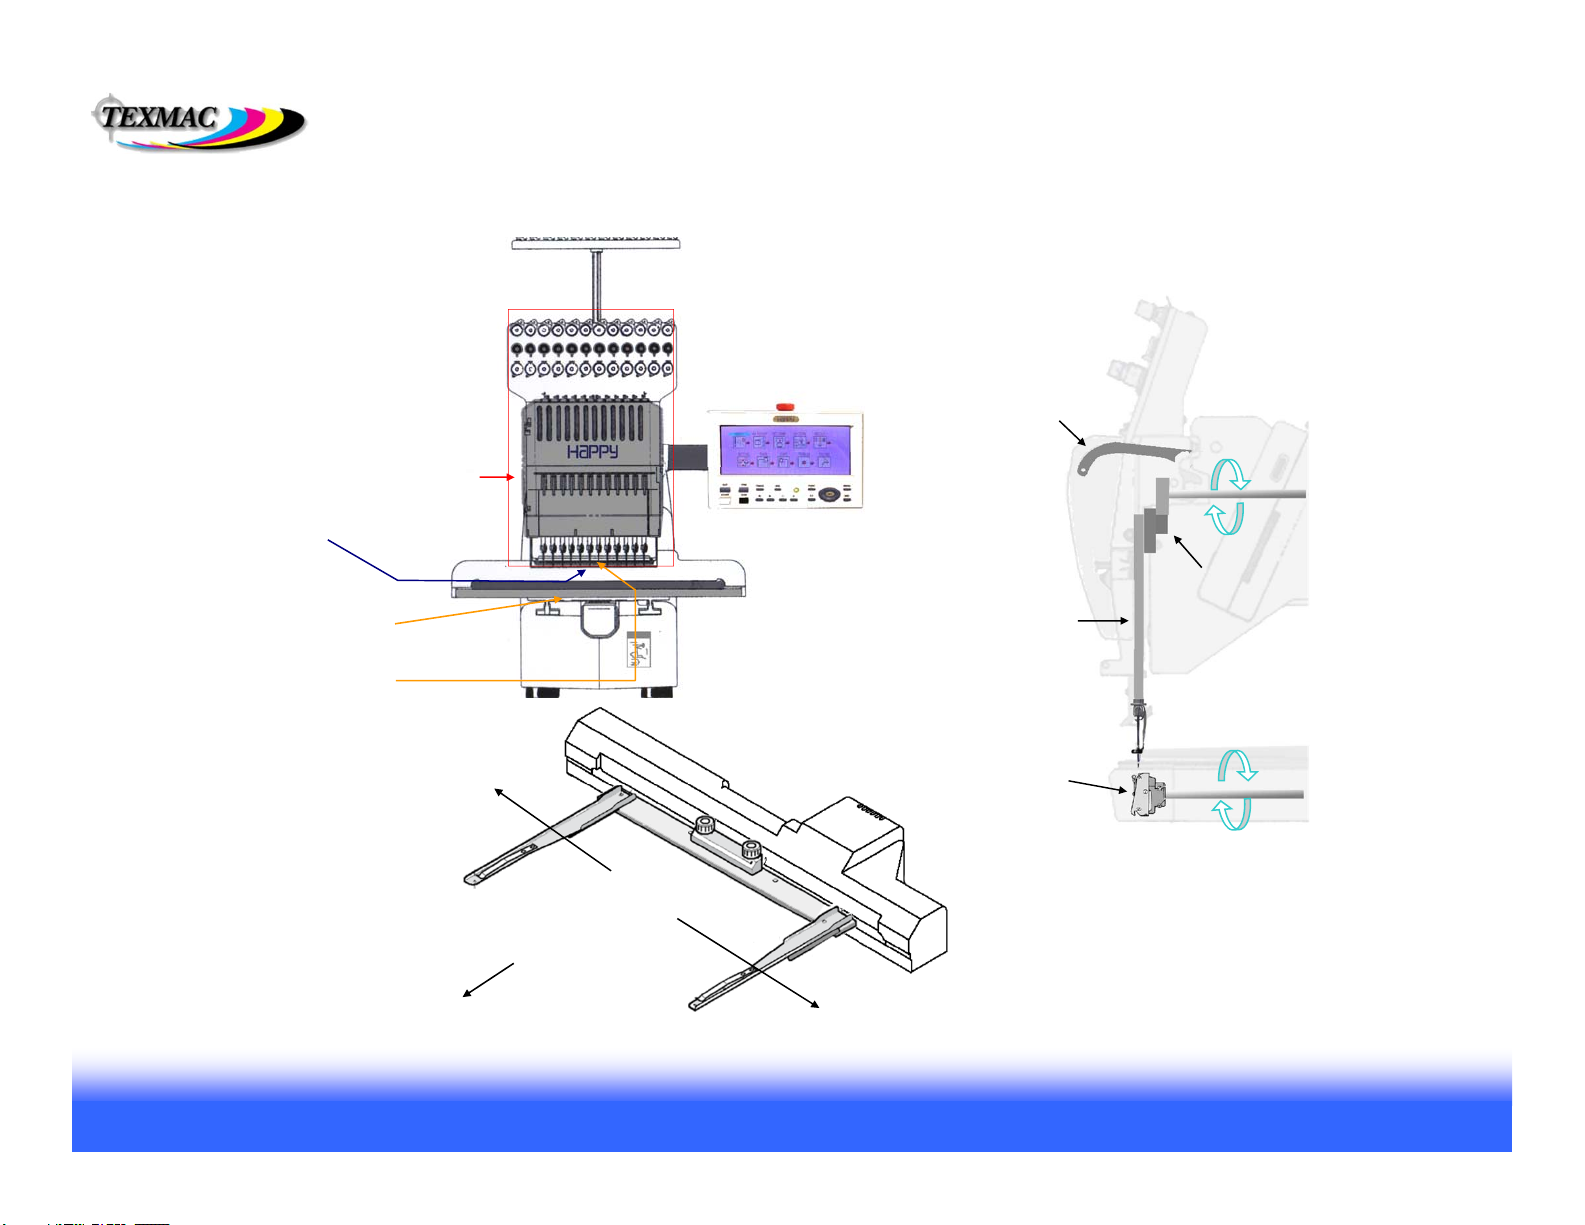
Introduction: A Quick Tour of the Machine
Fuses
power
base
tree
Emergency
Stop Switch
upper-tensioning knobs
thread break sensors
lower tensioning knobs
Main power switch: Press and
hold continuously for 1-2 sec. to
power on
cylinder arm
Rotary hook door /
bobbin cover
Oiling guide/
instructions
Manual needle
selector knob
Table area beneath cylinder arm:: for tubular goods, table or other object
under cylinder arm can provide support for the garment. However, the cap
driver requires that the surface under the arm be at least 4” below level of feet.
X-carriage
tubular arm
Thread posts
Take-up
lever
Safety
Cover
USB jump drive port
Training Workbook: HAPPY HCS2-1201 Voyager Operation and Maintenance
Education Department
Chapter 1: Introduction and Basics 3
Introduction: 3 key mechanical systems
x-carriage
X-direction
Y-direction
Moving head
Currently selected needle
is the one directly over
the presser foot.
During a thread trim:
(1) Needle descends, and thread is
cut below needle plate between a
fixed & moving knife.
(2) Then, when needle comes back
up, the “catcher” hook grabs the
cut end and “docks” it into the
thread holder.
Side view of machine:
head and sewing arm
take-up lever
rotary hook spins
on lower shaft
needle bar
lower shaft
“crank” cam converts
spinning motion to up-
and-down motion of
needle bar
bobbin sits in basket
of rotary hook
1. Color Change System
Moving head
Thread cut system
2. Sewing System
Take-Up Lever
Needle bar
Rotary hook / bobbin
3. X-Y Pantograph
Training Workbook: HAPPY HCS2-1201 Voyager Operation and Maintenance
Education Department
Chapter 1: Introduction and Basics 4
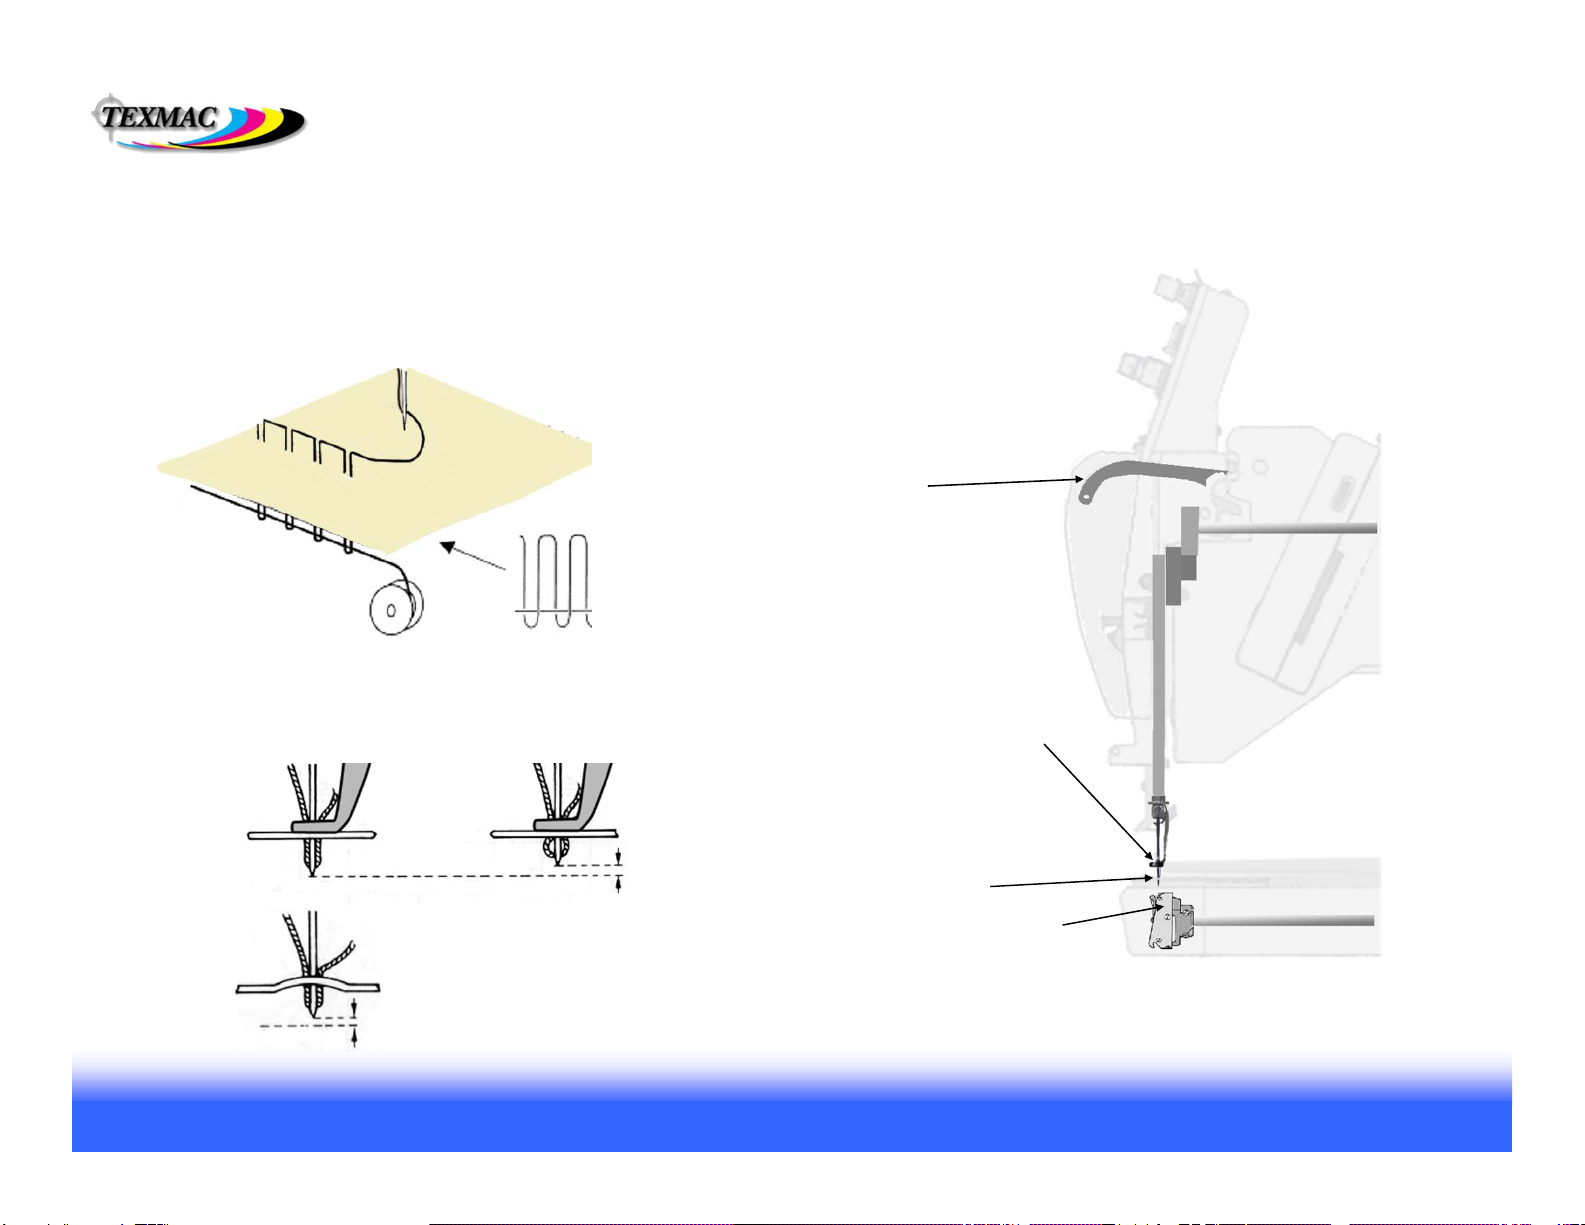
Basics: Lock Stitch Formation (sewing cycle)
bobbin thread
Take Up Lever:
At the start of the cycle, the take-up
lever lowers to allow enough slack
for the loop to form. After the hook
catches the colored thread and makes
the half-twist, it pulls back up to take
up the slack and close the loop to
finish the stitch.
Rotary Hook – spinning point reaches
behind the needle eye, hooks the colored
thread, spins/twists it around the bobbin
thread to form the loop.
Needle – Pushes a half-loop of thread
below the garment surface. Then, as it
starts back up, the slack causes the
loop to open, allowing the rotary hook
(below) to pass behind the needle and
grab the thread.
Presser Foot – presses down on the
garment surface to allow cleaner entry
of the needle. Also remains still as the
needle starts to lift to help the loop
form (see illustration at left.)
Lock Stitch Illustrated.
Notice how the top thread only half-loops with the bobbin
thread for every stitch
How Each Part of the
Cycle Works
The key parts of the sewing
cycle.
Role of the Presser Foot in Loop Formation
Note how the presser foot (shown in grey) helps the loop
open as the needle starts back up.
needle at
bottom needle
coming up
upper (colored)
thread
Without the presser foot, loop
may not form, as material and
thread rises with needle coming
back up.
Training Workbook: HAPPY HCS2-1201 Voyager Operation and Maintenance
Education Department
Chapter 1: Introduction and Basics 5
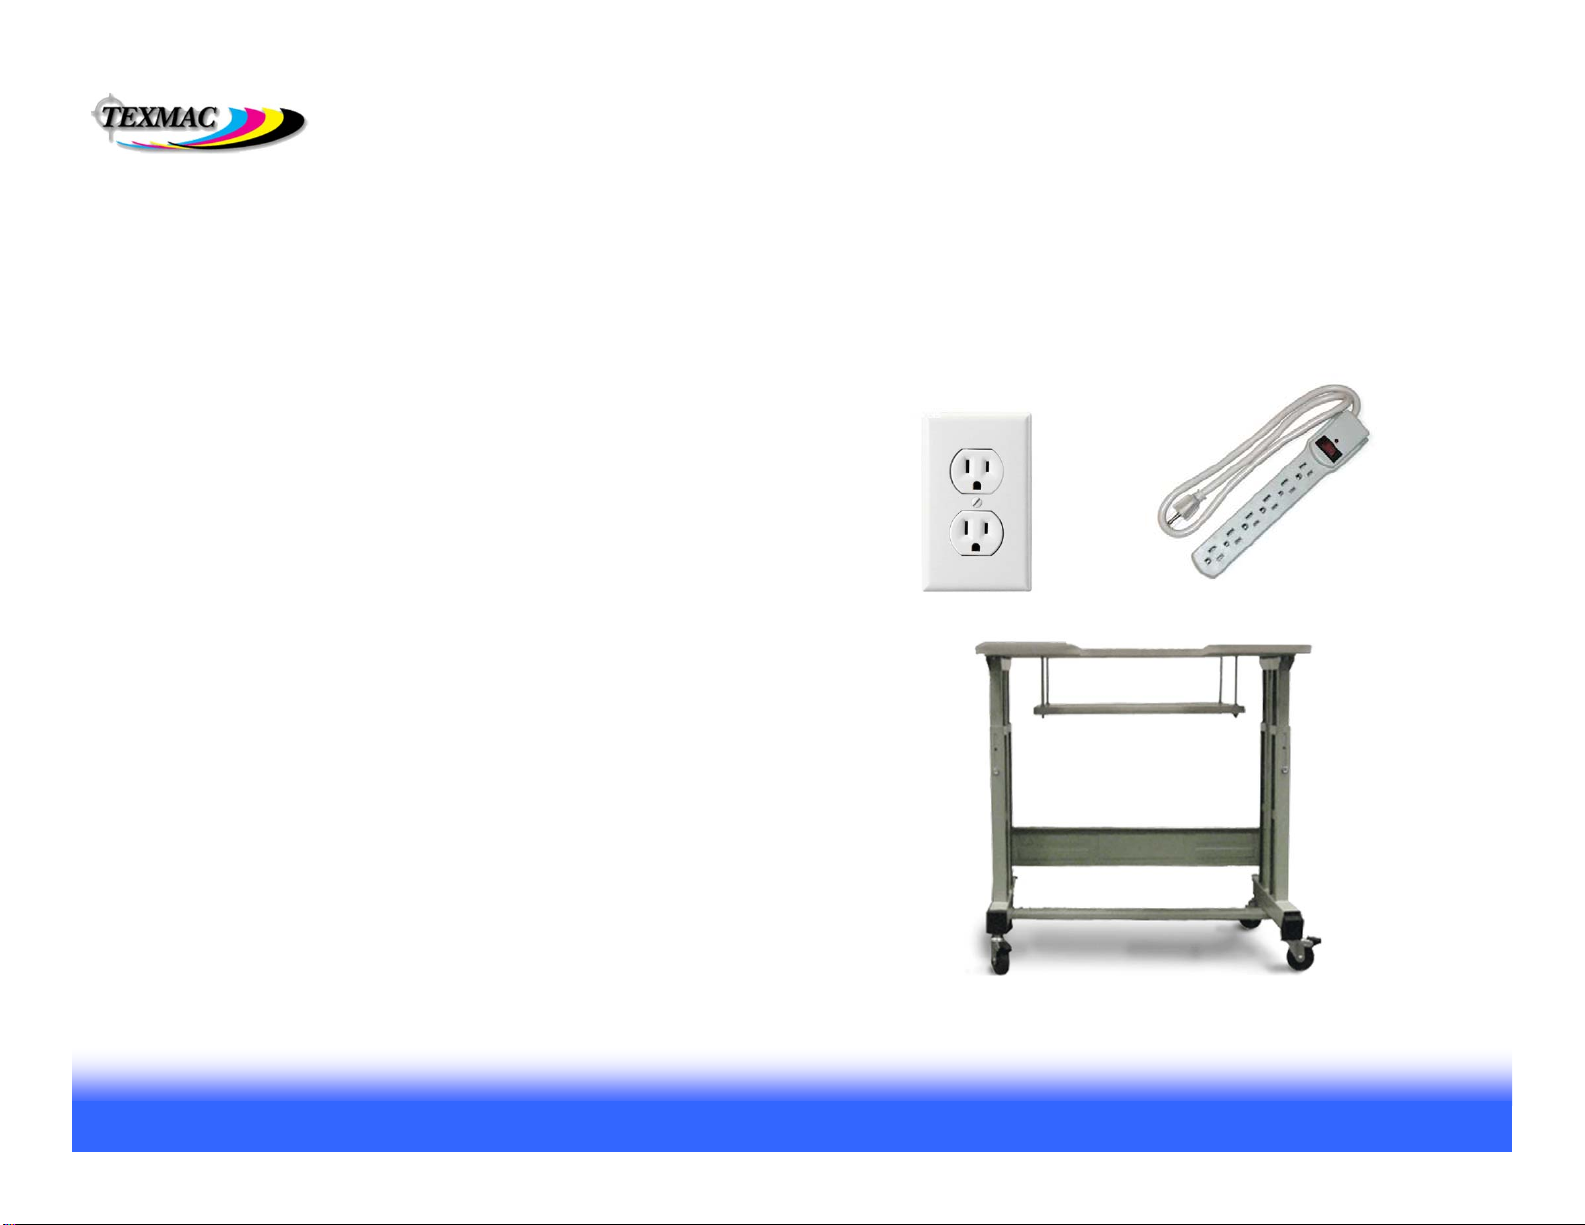
Proper Machine Environment
Temperature and Humidity-Controlled Environment
Set up/store your machine in a temperature and humidity-controlled environment to prevent
long-term corrosion and to protect the electronics. Don’t keep your machine anywhere you
wouldn’t keep a laptop or desktop computer !
Clean, Protected Electrical Power
grounded outlets: Your machine uses standard 110v household
current. Be sure you connect it to a grounded 3-prong outlet like
the one shown here. This is standard in most homes and
businesses today, but some older buildings may only have 2-
prong outlets.
Steady Table / Mounting Surface
Your machine will perform better (especially at higher speeds)
when operated on a strong, level and steady mounting surface.
Although on wheels, the optional stand provides plenty of
stability, and even more when the wheels are rotated to their
outermost positions and the brakes are applied at all 4 corners.
surge protection: Protect your machine against occasional power
spikes (from electrical storms or electrical wiring problems) with at
least a basic surge protector. The electronics on your machine
can be very expensive to replace. Higher-end surge protectors
and UPS units are able to protect against higher energy strikes,
and often come with a guarantee.
Basic surge
protector
Standard
3-prong
110v
outlet
Optional machine stand with accessory
shelf, casters and wheel brakes

Training Workbook: HAPPY HCS2-1201 Voyager Operation and Maintenance
Education Department
Chapter 1: Introduction and Basics 6
Control Panel Intro: Power On to the Main (Drive) Screen
Power On
Power on your machine with the black switch located on the side of the machine.
The screen below appears.
Press to continue
to the sewing
(drive) screen
Currently Selected
Hoop
Press if you wish to
select a different
hoop.

Training Workbook: HAPPY HCS2-1201 Voyager Operation and Maintenance
Education Department
Chapter 1: Introduction and Basics 7
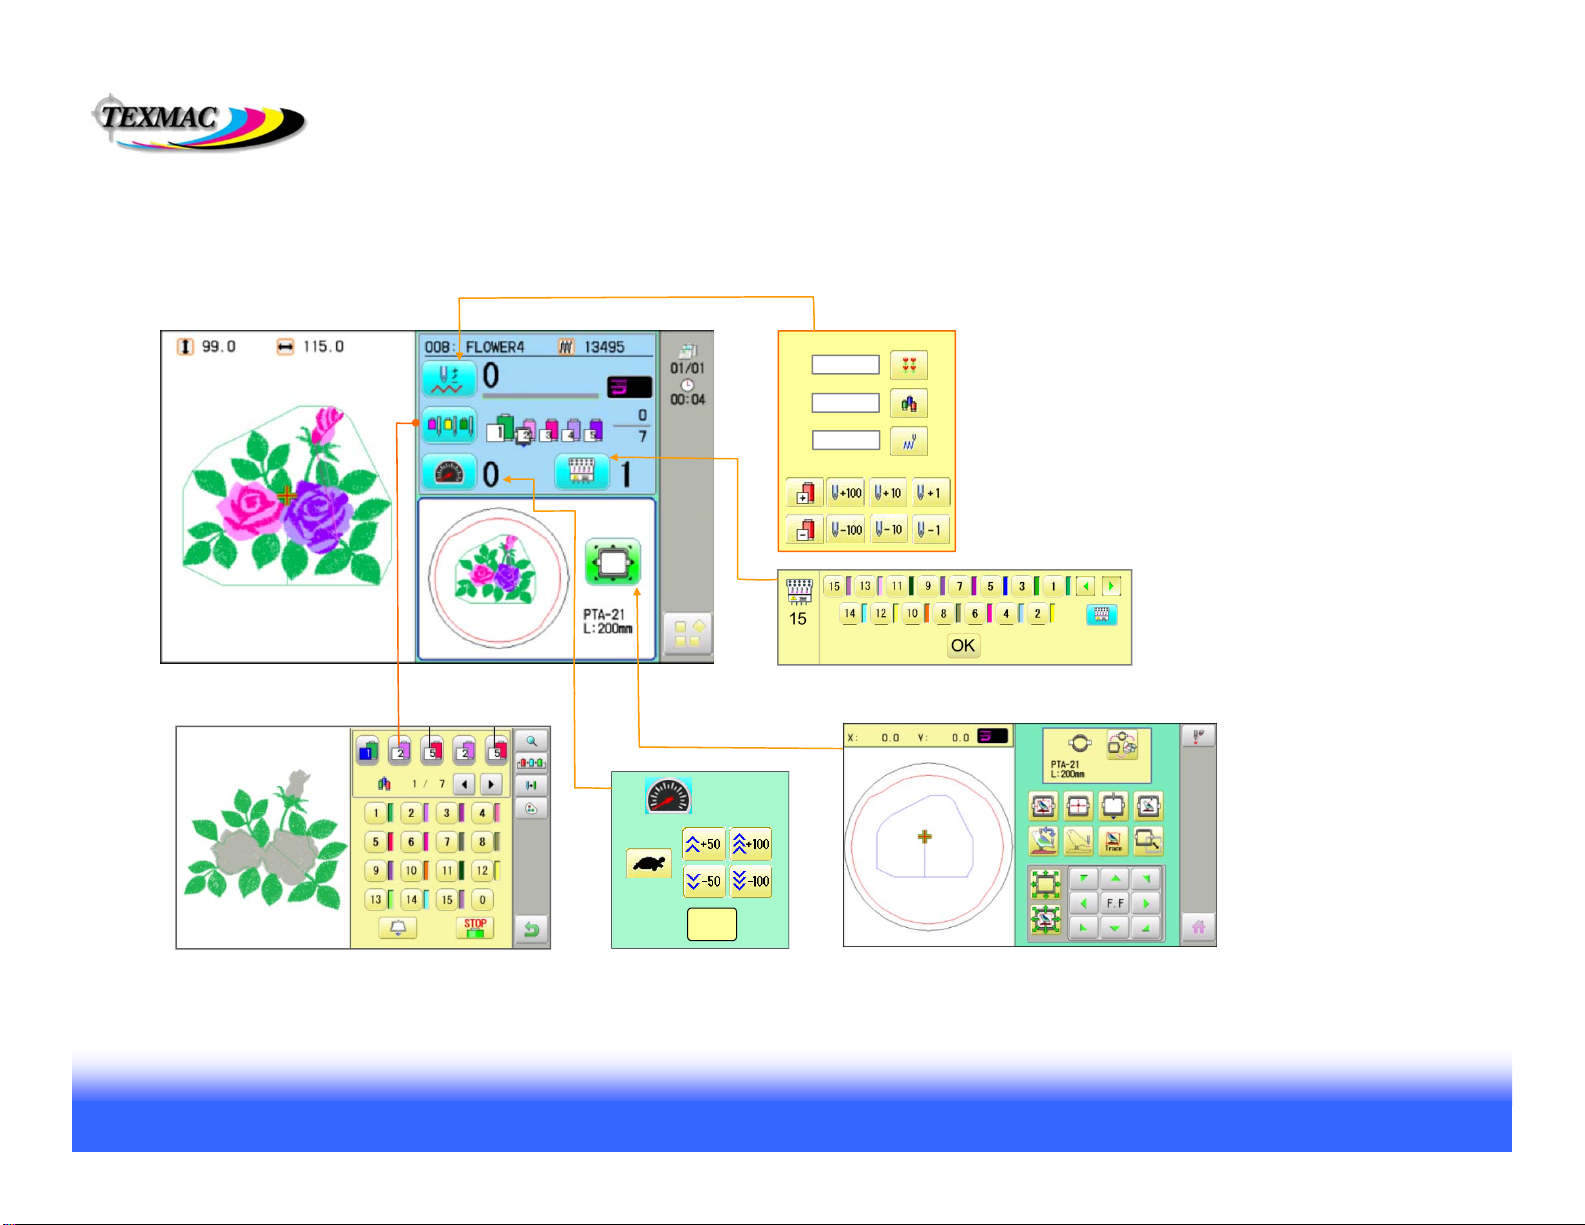
Control Panel Intro: Power On to the Main (Drive) Screen
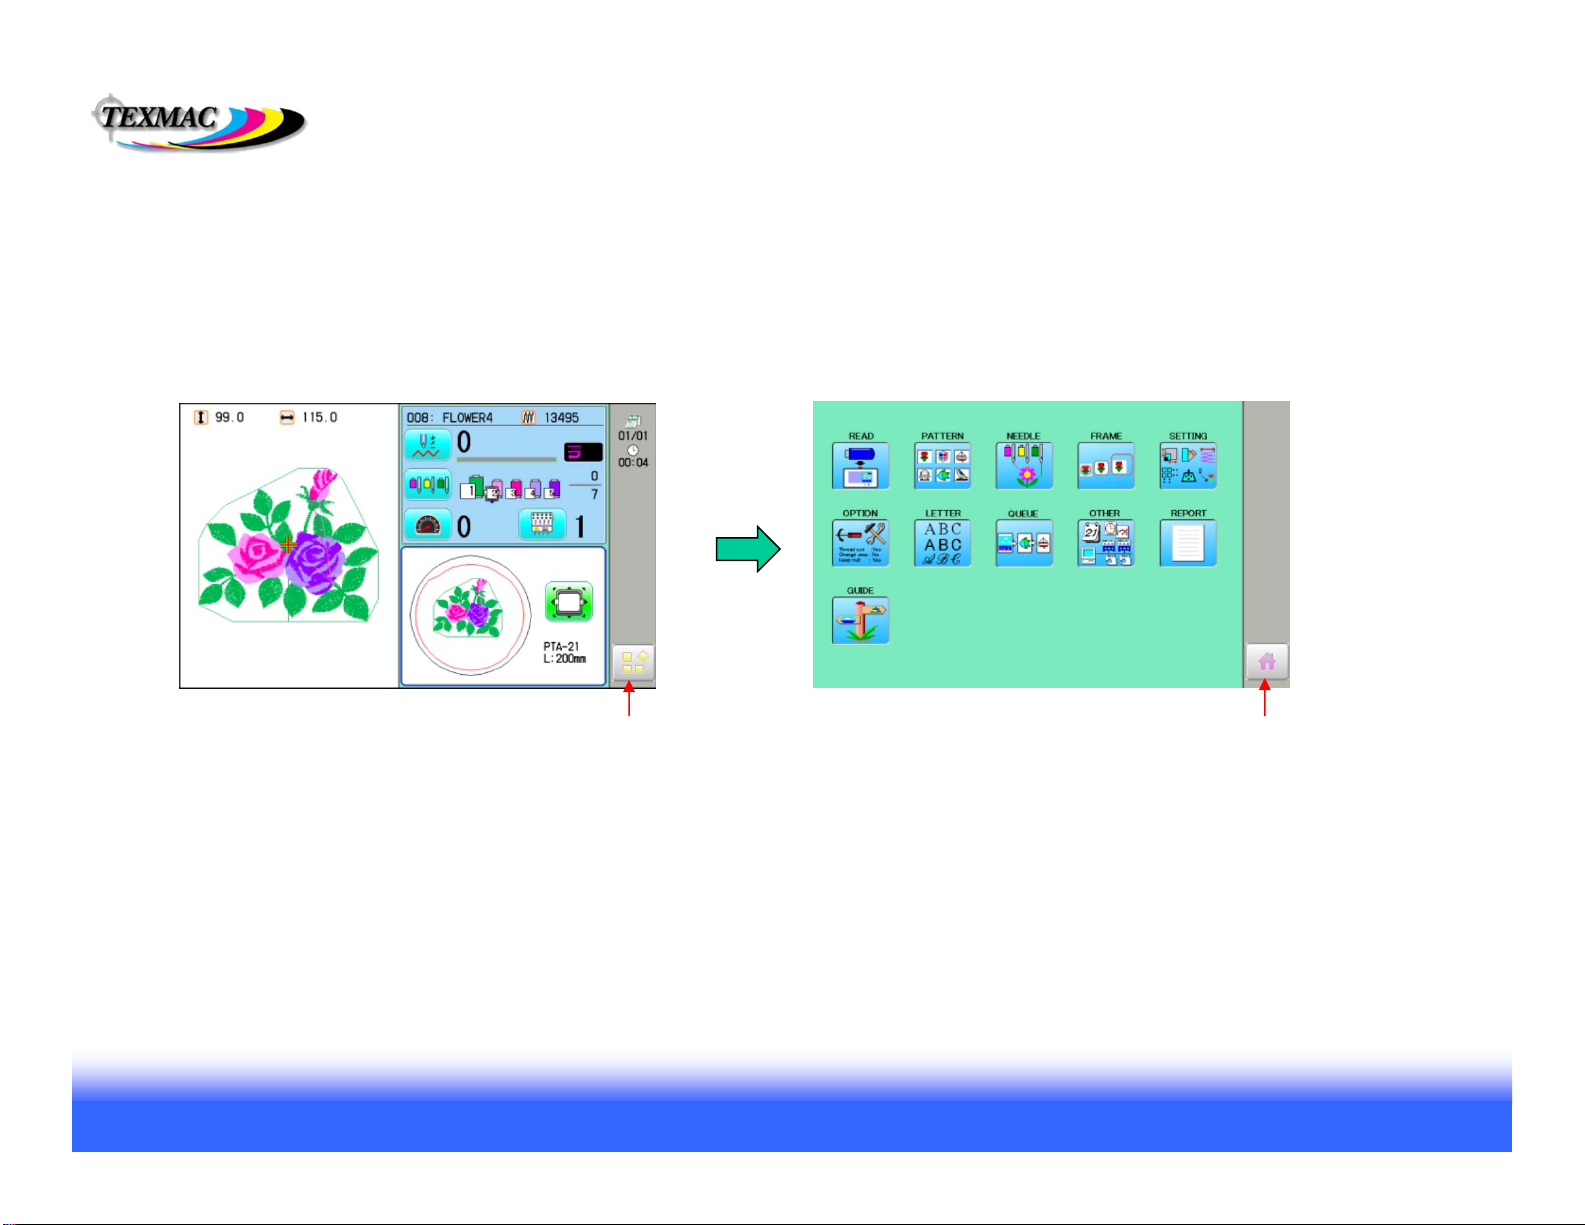
The Sewing/Drive Screen
This is the main “drive” screen. The machine needs to be in this mode to sew or to accept design transfers
by PC connection. Note the important information shown in the Drive screen here. This is the only screen
where this information is displayed.
-Current stitch position # is 0
-Current color block # is 1
-Current sewing speed is 0
Origin Symbol:
means the sewing
position is at the
origin (beginning).
Current Hoop:
shows what type of
hoop has been
selected.
Design position and fit in the hoop
Lights in green
when the machine
is ready to sew.
Training Workbook: HAPPY HCS2-1201 Voyager Operation and Maintenance
Education Department
Chapter 1: Introduction and Basics 8
Control Panel Intro: Other Important Screens
Shown below are the important subscreens directly accessible from the Drive screen by a single button:
OK
700
7
1
1
Sewing Position Screen
Jump to any position in the design
using this screen, by piece #, by
color block# or by stitch#.
Adjust Max Speed
During sewout or
while stopped.
Select hoop, Adjust Sewing Position
By selecting the hoop you’re being used, the
machine accurately displays the position in the
hoop.
Set Colors for Current Design
Assign needle (color) numbers, applique
stops, frame out commands in the design.
Needle Selector
Select a different
needle, toggle
jump/drive mode.
Training Workbook: HAPPY HCS2-1201 Voyager Operation and Maintenance
Education Department
Chapter 1: Introduction and Basics 9
Control Panel Intro: Other Important Screens
Summary of Main Menu Sub-screens:
READ – read in designs from thumb drive or from PC via network cable
PATTERN – view/select/delete/rename etc designs in memory
NEEDLE – set design colors (can be done from Drive screen as well)
FRAME – select hoop (can be done from Drive screen as well)
SETTING – perform basic edits/adjustments to the current design
OPTION – adjust settings for machine, designs and stitch data
LETTER – onboard lettering feature
QUEUE – queue a sequence of designs to be sewn.
OTHER – date/time, network, machine reset, version/update
REPORT – machine production report
GUIDE – onboard help
iCUSTOM – Customize drive screen icons (like a tablet or smart phone)
SCREEN – screensaver settings – select your own images, time, etc.
The Main Menu
The other - and most important - menu is the Main Menu, accessed from the main Drive screen by
pressing MENU as shown below.
Press this menu
button to get to
the main menu.
Press the Home
button to exit to the
main (drive) screen.

Training Workbook: HAPPY HCS2-1201 Voyager Operation and Maintenance
Education Department
Chapter 1: Introduction and Basics 10
Other Basics
•About Stitches :
–Max and minimum length: Must be between 1mm (.04 inch) and 12.7mm (1/2 inch). Too short causes thread
breaks. Too long, stitches are too loose.
•Major Factors Affecting Sewing Quality that you can control:
–Tension – once properly set, should rarely require re-adjustment. We will cover this in class.
–Hooping – proper hooping is a must. Not too tight, not too loose. We will cover this in class.
–Digitizing – hire a digitizing service and/or learn how to digitize in digitizing classes.
–Machine Adjustments – we will show (Chapter 4) how check key adjustments to maintain performance.
•Sewing file format used in commercial embroidery: DST
– All commercial machines read this format
– Does not have color information – must load the design into the machine AND tell it which colors to sew.
– Limited in editability. Not resized or adjusted easily for different types of garments without compromising
quality.
– Happy machines will also read HAPPY (.TAP) and Melco (.EXP) format.

Training Workbook: HAPPY HCS2-1201 Voyager Operation and Maintenance
Education Department
Chapter 1: Introduction and Basics 11
Embroidery Thread
•Upper (colored) thread
– Can be polyester or rayon, usually polyester. Standard is 40 weight
– Comes in several sizes: 5,000 meter cones to 1,000 meter cones.
– Handle carefully: physical contact, oil, dust, humidity, moisture can
prevent it from unspooling smoothly, and cause it to “hang up”
– Use thread cone stabilizers (plastic springs) to minimize cone movement
during sewing
•Bobbin thread
– L-type, approximately 350 yards per spool. Bobbin thread will have to
be changed more frequently than upper thread.
– Lasts approximately 25,000 to 60,000 stitches, depending on fabric
thickness, thread tension and other factors.
These stabilizers
help prevent thread
from unraveling or
catching.
Typical 5000
meter “king”
cone of thread
Training Workbook: HAPPY HCS2-1201 Voyager Operation and Maintenance
Education Department
Chapter 1: Introduction and Basics 12
Embroidery Thread
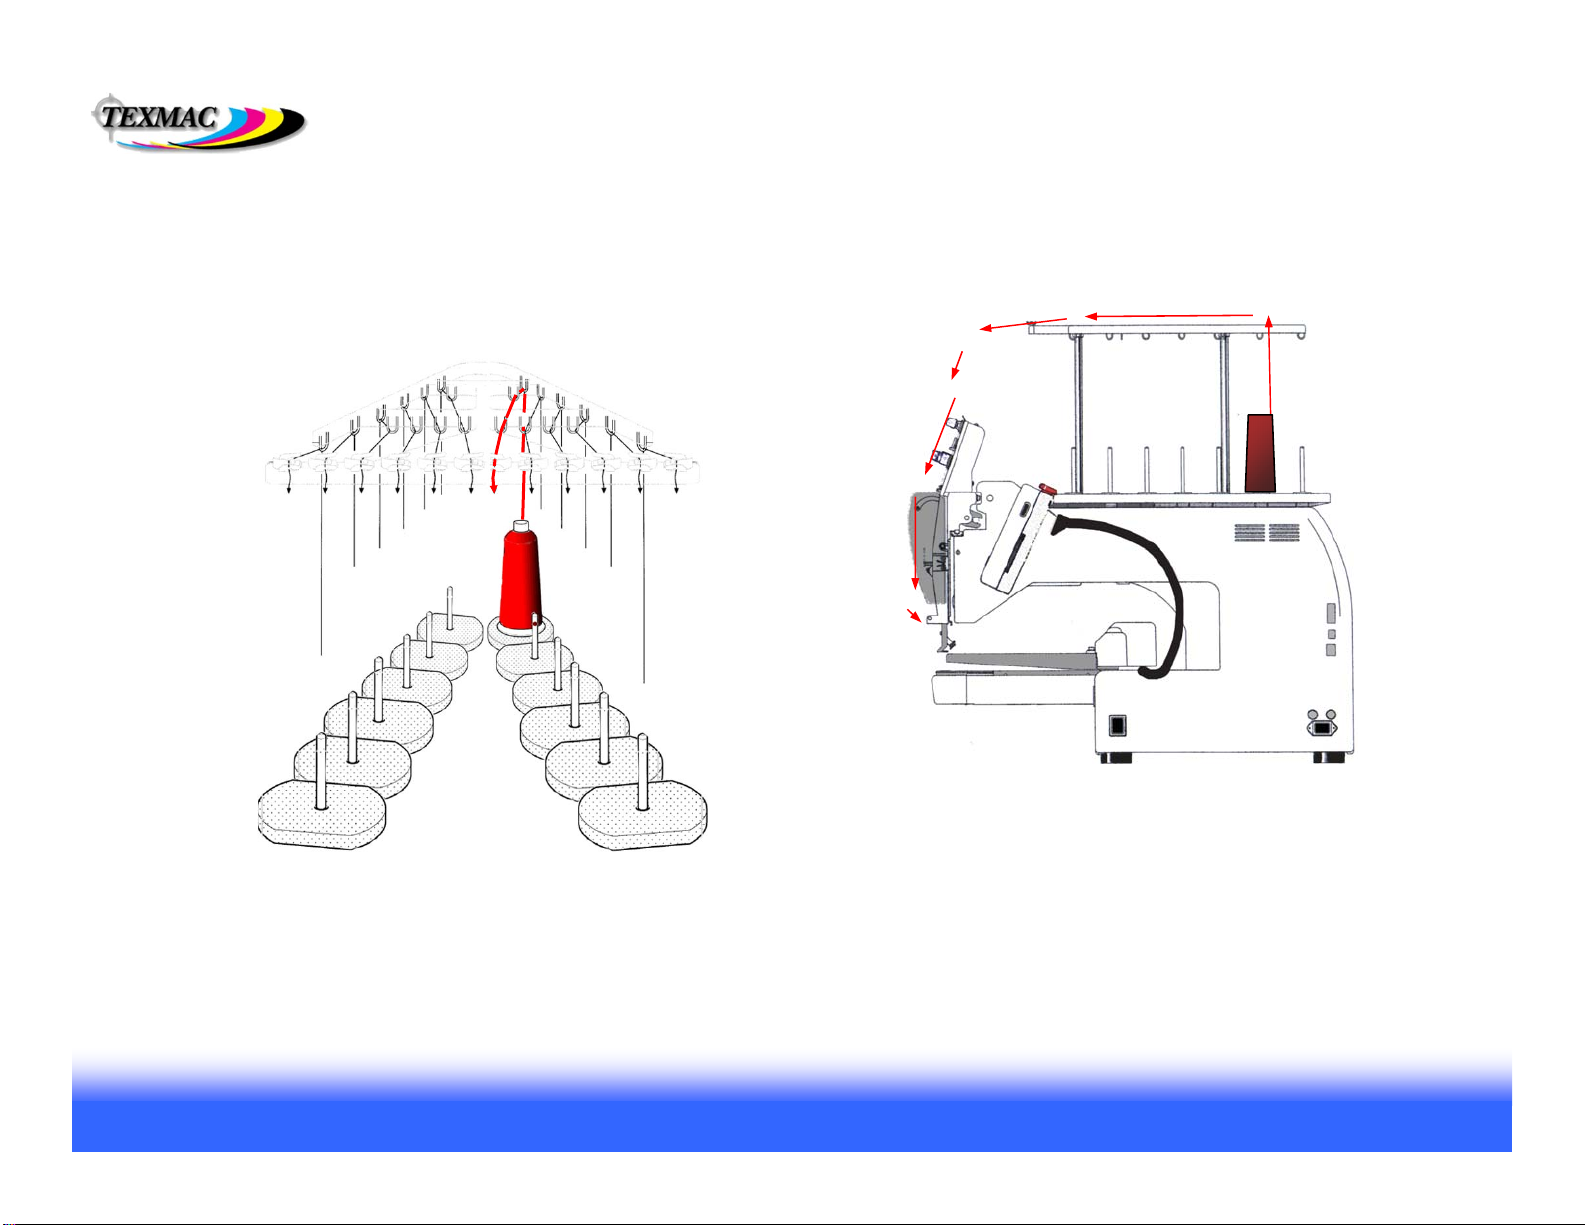
General Thread Path
Thread should be properly, perfectly routed from cone to
needle or it will not feed properly and stop the machine.
Installation of upper thread on your machine
Layout of Cone/Needle Sequence
Needle numbers are arranged right to left, lowest number to highest.
needle 1
needle 2
needle 3
needle 4
needle 5
needle 6
needle 12
needle 11
needle 10
needle 9
needle 8
needle 7
Thread
must not be
allowed to
slack here
or catch.
Thread must
be docked
in the spring
here, not
hanging
loose.
Replacement cones can be tied in here and pulled
through so the thread doesn’t have to be run manually
through the thread path. (See next page)

Training Workbook: HAPPY HCS2-1201 Voyager Operation and Maintenance
Education Department
Chapter 1: Introduction and Basics 13
Embroidery Thread
Thread Path through the moving head
-Proper Thread Routing: All threads must be routed
correctly at all points along the path through the sewing
head.
-Practice good thread “Discipline”: After threading all
needles, ensure there is no slack anywhere along the
thread path. Make sure to:
-Pull all threads – to ensure thread feeds smoothly
and turns the break sensor, and all slack is removed
from around thread cones
-“Dock” all thread ends from each needle onto the
thread-holding spring. Prevents thread from coming
loose and catching where not desired.
Upper Tensioner
Thread only makes
½ turn – make sure
it passes to the left
between the 2 metal
discs.
Lower Tensioner
Thread makes 1 full turn
clockwise around the base of the
knob – make sure it runs in the
V-shaped groove of the spoked
wheel.
Thread Break Sensor
Thread this like the upper
tensioner – ½ turn to the left.
Make sure the thread falls in
the groove as shown.
Thread “docked”
in thread
holding spring

Training Workbook: HAPPY HCS2-1201 Voyager Operation and Maintenance
Education Department
Chapter 1: Introduction and Basics 14
Embroidery Thread
Bobbin Loading and Tension Check/Adjustment
RE-LOADING THE BOBBIN CORRECTLY
The bobbin will need to be replaced frequently, allowing only 30,000 to 60,000 stitches per
spool. This has to be done correctly every time.
1.Ensure bobbin turns
clockwise. Pull thread
through this slit.
2. Feed thread through
eye at the end of the
tension flap.
4. Pass thread through the
wire loop at the top front of
the bobbin case. Do this
after you’re satisfied with
tension, and before
inserting into the machine.
1. Hold the bobbin case as shown in step 3, after feeding the thread through
the eye at the end of the tension flap.
2. “Cast” the bobbin case downward gently, very much like throwing a yo-yo.
3. Good tension: Upon stopping your hand, the slight downward momentum of
the bobbin case should cause it to unspool and continue downwards slightly
and stop. (If downward motion of your hand causes the bobbin to jump out of
the case, try again but more gently).
4. Wrong tension: If the bobbin doesn’t unspool at all, tension is too tight. If the
bobbin unspools on its own when held like in step 3, tension is too loose.
Make adjustments if needed as shown on the right.
With a working bobbin case and a properly loaded bobbin, this test reliably
tests to 25g on a bobbin tension gauge, precise within 1g. Perform this quick
check each time you re-load the bobbin until you are comfortable with tension. 5. TAKE CARE TO RE-INSERT THE RELOADED
BOBBIN CASE FULLY after re-loading or the machine
will not function correctly.
CHECKING TENSION WITH THE “DROP” TEST.
Make small adjustments if
you find it necessary. – no
more than a ¼ or ½ turn in
either direction before re-
checking tension.
3. Check tension with the
“drop” test (explained
lower left).
Training Workbook: HAPPY HCS2-1201 Voyager Operation and Maintenance
Education Department
Chapter 1: Introduction and Basics 15
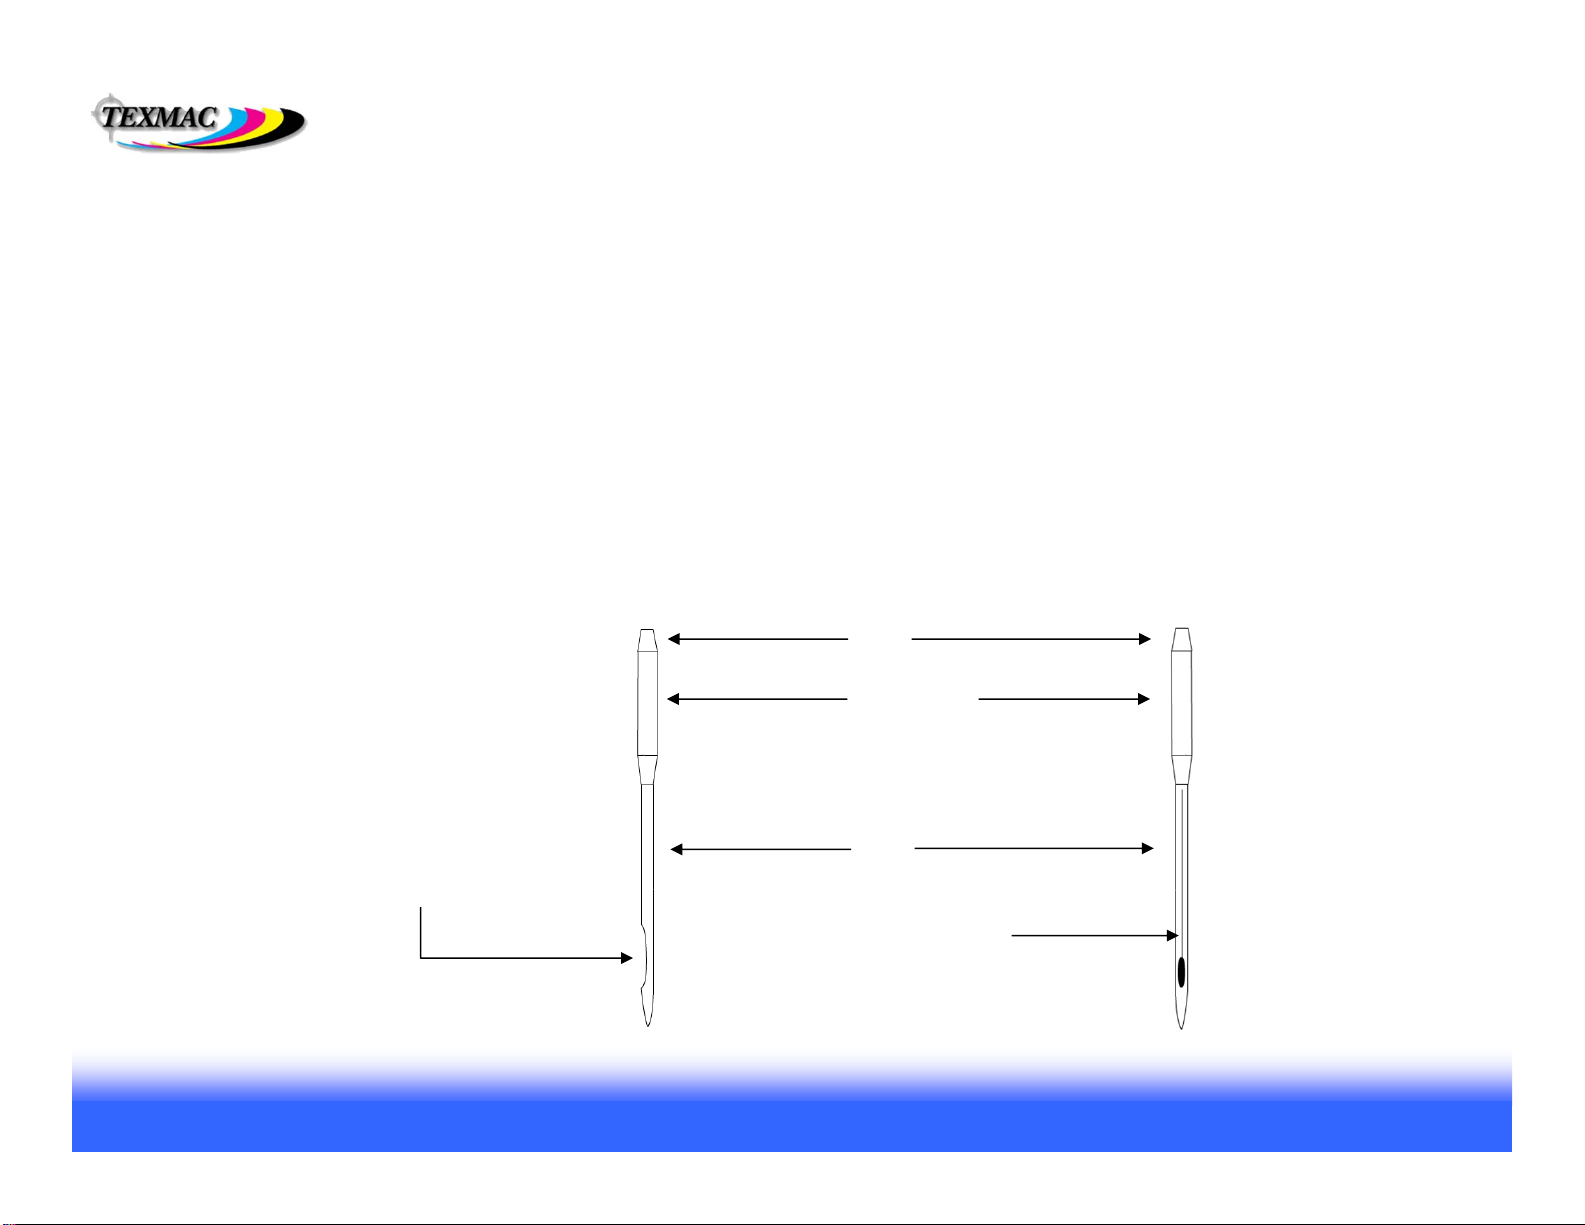
Embroidery Needles
Shank –
rounded. Does
not have a flat
spot
butt
blade or
shaft
Groove – allows you to find the
front of the needle by feel.
Scarf – faces towards the back
of the machine
–Type DB-K5, standard size is 75/11 ballpoint for most applications. Alternate needle for
sewing caps and other tightly-woven goods (heavy canvas) is 80/12 sharp point for better
penetration
–The width of the shaft of an embroidery needle limits the the finest possible detail (the
smallest possible stitch). Standard size (75/11) needles are .75 mm across, so stitches must be
at least a little wider than the hole that the needle punches in the fabric (minimum distance
1mm)
–Needles are subject to wear! Over time, burred surfaces and other wear can cause problems.
Be prepared to change needles frequently especially with heavy use.
Side
view
Front
view
Table of contents
Other Happy Sewing Machine manuals

Happy
Happy HCD Instruction sheet

Happy
Happy HCH User manual

Happy
Happy HCH Series User manual

Happy
Happy HCH-701 User manual

Happy
Happy HCS2-1201-30 User manual

Happy
Happy HCH User manual

Happy
Happy HCS User manual

Happy
Happy HK634020XB User manual

Happy
Happy HCG Series User manual

Happy
Happy HCD-1501 Installation guide

Popular Sewing Machine manuals by other brands


Pfaff Industrial
Pfaff Industrial POWERLINE 2231 Adjustment manual

Leather Machine
Leather Machine COBRA CLASS 3 MAINTENANCE AND TIPS

Janome
Janome MC 200E - brochure

Duerkopp Adler
Duerkopp Adler 510 operating instructions

Singer
Singer 4843116 instruction manual

Baby Lock
Baby Lock Katherine BL210A Getting to know


