manuals.online logo
Brands
  1. Home
  2. •
  3. Brands
  4. •
  5. Harbor Freight Tools
  6. •
  7. Outdoor Cart
  8. •
  9. Harbor Freight Tools 90662 Quick reference guide

Harbor Freight Tools 90662 Quick reference guide

ASSEMBLY & OPERATING INSTRUCTIONS
90662
3491 Mission Oaks Blvd., Camarillo, CA 93011
Visit our Web Site at www.harborfreight.com
Copyright©2003 by Harbor Freight Tools®. All rights reserved. No portion of this manual or
any artwork contained herein may be reproduced in any shape or form without the
express written consent of Harbor Freight Tools.
For technical questions and replacement parts please call 1-800-444-3353.
®
TRAILER CART
600 LBS., 10 CUBIC FEET
90662-Trailer Cart.p65 10/28/03, 1:38 PM1
THANK YOU for choosing a HARBOR FREIGHT TOOLS product. For future reference, please
complete the owner’s record below:
Model______________ Serial No._____________ Purchase Date_______________
SAVE THE RECEIPT, WARRANTY AND THESE INSTRUCTIONS. It is important that you read the
entire manual to become familiar with the unit BEFORE you begin assembly.
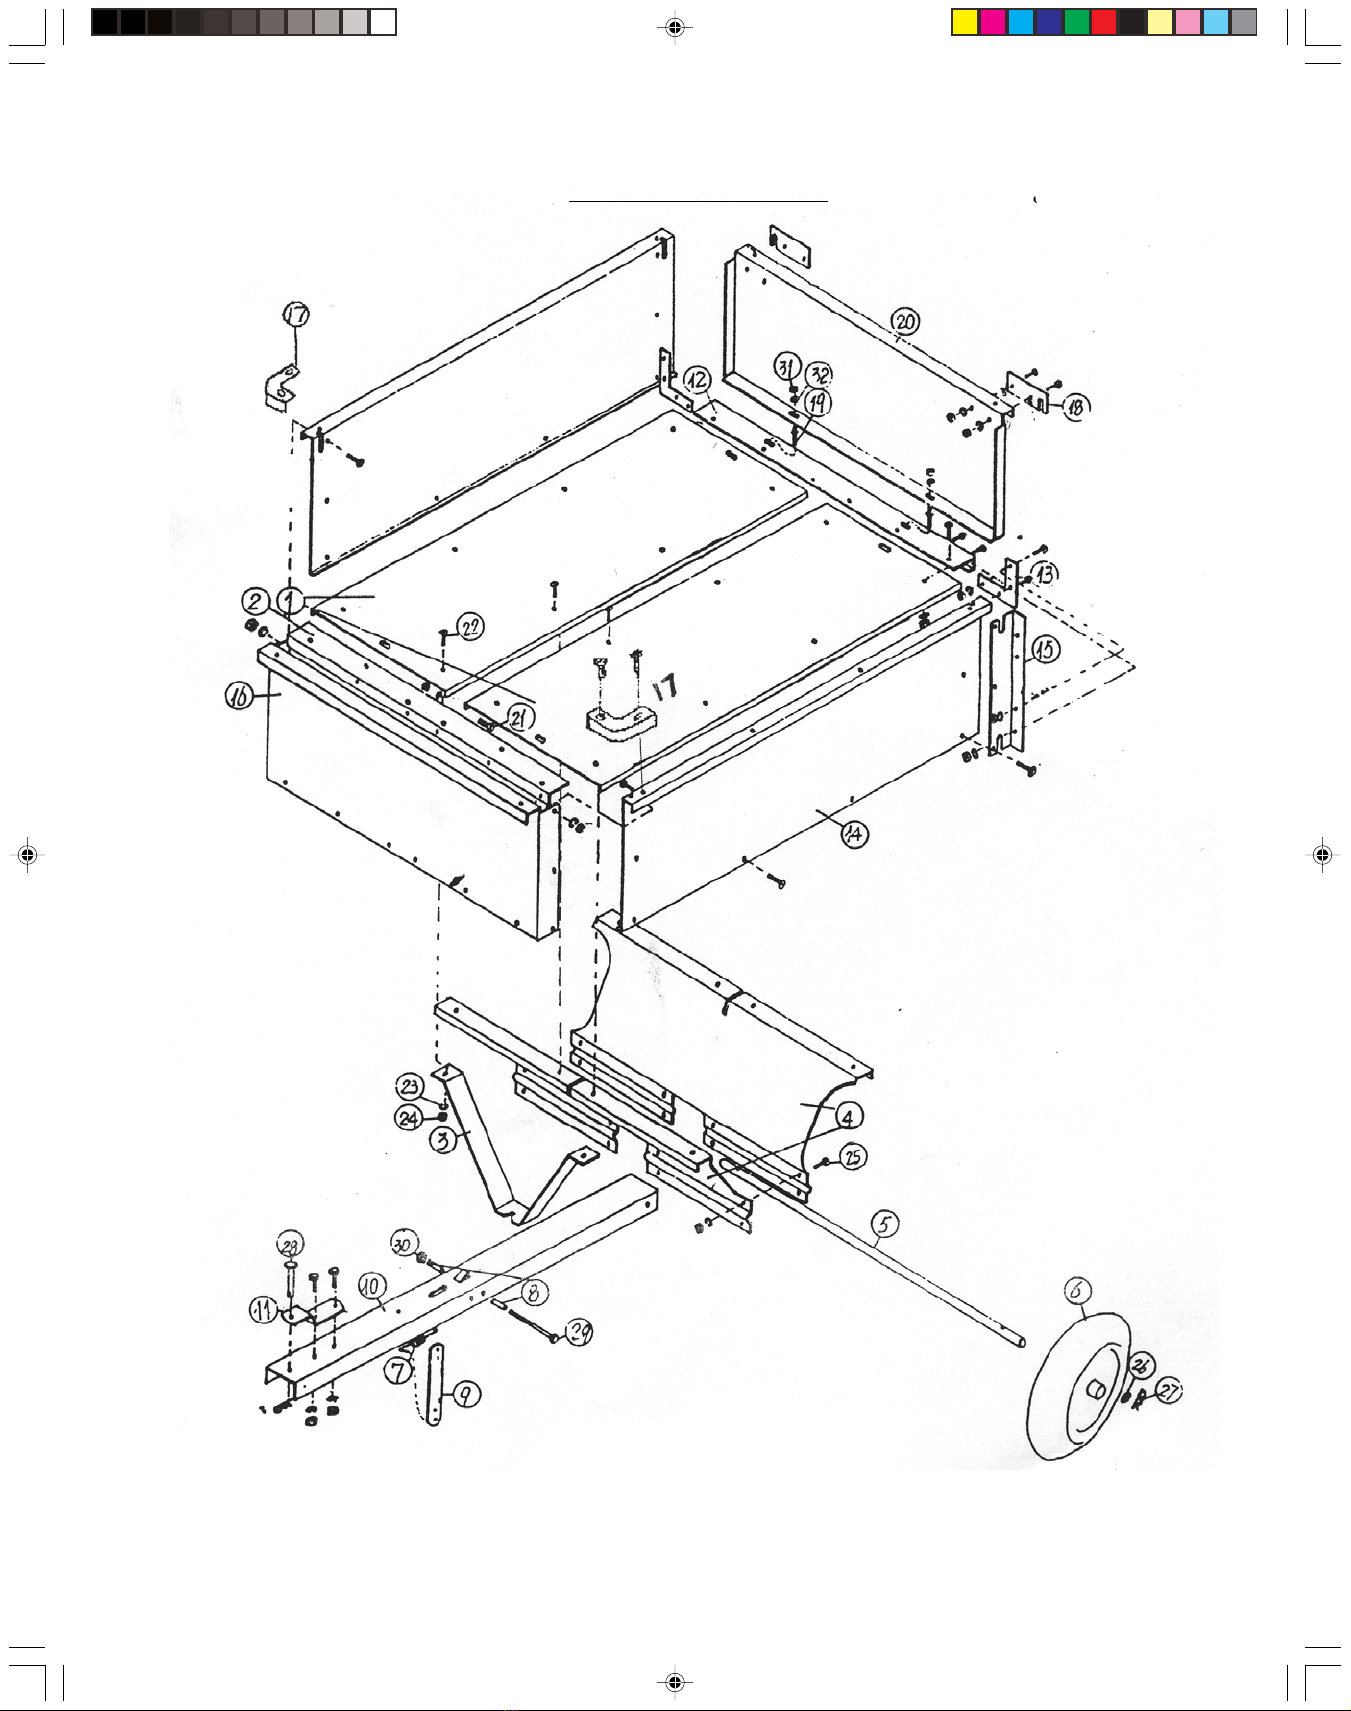
Technical Specifications
Cart Dimensions: 58" L x 32-3/4" W x 30-1/2" H
Outer Box Dimensions: 42-1/2” L x 18-7/8” W x 7-1/2” H
Wheels: 16" Pneumatic Wheel x 4" Wide
Maximum Load Capacity: 600 LBS.
Storage Area: 10 Cubic Feet
Safety Warnings and Precautions
WARNING: When using product, basic safety precautions should always be followed to
reduce the risk of personal injury and damage to equipment.
Read all instructions before using this product!
1. Keep work area clean. Cluttered areas invite injuries.
2. Observe work area conditions. Keep work area well lighted.
3. Store idle equipment. When not in use, products must be stored in a dry location to inhibit
rust. Always lock up products and keep out of reach of children.
4. Use the right product for the job. There are certain applications for which this product was
designed. It will do the job better and more safely at the rate for which it was intended. Do not
modify this product and do not use this product for a purpose for which it was not intended.
5. Check for damaged parts. Before using any product, any part that appears damaged should
be carefully checked to determine that it will operate properly and perform its intended function.
Check for any broken or damaged parts and any other conditions that may affect its operation.
Replace or repair damaged or worn parts immediately.
6. Replacement parts and accessories. When servicing, use only identical replacement parts.
Use of any other parts will void the warranty.
7. Do not operate product if under the influence of alcohol or drugs. Read warning labels on
prescriptions to determine if your judgment or reflexes are impaired while taking drugs. If there
is any doubt, do not operate the product.
8. Use eye protection. Always wear ANSI approved impact safety goggles.
9. Do not exceed the maximum load capacity.
10. Use caution if towing the cart on an incline or uneven surface. Be aware that the center
of gravity can shift on a slope, possible upsetting the cart. This Trailer Cart is not
designed for use on public highways. Always operate at speeds below 5 MPH when
performing off-road hauling.
11. Wear gloves and avoid sharp edges when assembling.
12. Do not allow children to play on, stand upon or climb into the Cart. The Cart is not for
carrying people or animals.
90662 Page 2
90662-Trailer Cart.p65 10/28/03, 1:38 PM2
13. Always check hardware and assembled parts after assembling. All connections should be
tight and hardware tightened.
14. When unloading and loading the Cart, be careful of the balance of the Cart. Always
engage the Tongue Latch to the towing vehicle before loading the Trailer Cart. The Cart will ride
best with the load centered over and in front of the axle.
Warning: The warnings, cautions, and instructions discussed in this instruction manual cannot
cover all possible conditions and situations that may occur. It must be understood by
the operator that common sense and caution are factors which cannot be built into
this product, but must be supplied by the operator.
Assembly/ Operation
Your Trailer Cart will require complete assembly prior to use. It is important that you read the entire
manual to become familiar with the product BEFORE you assemble and use the Trailer Cart.
Before assembling and operating the Trailer Cart be sure that you have all parts described in the
Parts List and Assembly Diagram located on the last pages of this manual.
1. Attaching the Front Cross Brace (2) to the Bottom Panels (1). Place both of the Bottom
Panels (1) next to each other on your work surface. Place the inside ridges so that they fully
line up with one another. Place the Front Cross Brace (2) with the long edge underneath
both Bottom Panels (1) so that the four holes in the Front Cross Brace (2) line up with
the two holes in each Bottom Panel (1) (four holes total). Attach the Front Cross Brace (2) to
the Bottom Panels with four Bolts (21), four Washers (23) and four Nuts (24)-see Figure 1.
2. Connect the Bottom Panels (1) by inserting a Bolt (21) through each of the outside holes.
Leave the two middle holes empty until Step 5 when attaching the Wheel Axle Supports (4).
Slide a Washer (23) onto each Bolt (21) and thread on a Nut (24)-see Figure 2.
3. Place the Tongue Support (3) so it rests over the top-center hole on each Bottom
Panel (1)-see Figure 3. From the outside of the Bottom Panel (1), slide a Bolt (22) up
through the Bottom Panel (1). Slide a Washer (23) onto each Bolt (22) and thread on
Nut (24)-see Figure 3.
Bottom Panels (1)
Front Cross
Brace (2)
Figure 1
Bottom Panels (1)
Bolt (21)
Figure 2
Bolt (21)
Washer (23)
Washer (23)
Nut (24)
Nut (24)
Bottom view
Tongue Support (3)
Bottom Panel (1)
Figure 3
90662 Page 3
90662-Trailer Cart.p65 10/28/03, 1:38 PM3
4. Locate both Wheel Axle Supports (4). Place them facing each other so that the eight holes
on the top line up. Insert a Bolt (25) through each hole, slide on a Washer (23) and lightly
tighten on Nuts (24). Do not fully tighten-see Figure 4.
Wheel Axle Supports (4)
Figure 4
Bolt (25)
Nut (24)
Washer (23)
5. Set the Wheel Axle Supports down on the inside Bottom Panels (1). Each of the eight holes
in the Wheel Axle Supports (4) should line up with the holes in the Bottom Panels (1). From
the outside of the Bottom Panels (1), slide up a Bolt (21) through each hole. Slide on
Washers (23) and thread on Nuts (24)-see Figure 5.
Wheel Axle Support (4)
Bottom Panel (1)
Bolt (21)
Washer
(23)
Nut (24) Figure 5
6. Now, insert a Bolt through each of the middle holes connecting the Bottom Panels from
Step 2. Slide on Washers (23) and thread on Nuts (24).
7. With the edges facing upward (see underside view on Figure 6), lay the Hitch Tongue (10)
on the Tongue Support (3). Insert the Tongue Latch (#9) up through the opening in the
Hitch Tongue (10). Place one Latch Spacer (8) on each side of the Tongue Latch (9), then
insert a Bolt (29) into the Hitch Tongue (10), through a Latch Spacer (8), through Tongue
Latch (9), Latch Spacer (8) and out second hole in Hitch Tongue (10). Hand tighten Bolt (29)
to Nut (30)-see Figure 6.
Attach one end of the Latch Spring (7) to the Hitch Tongue (10). Attach the other end of the
latch Spring (7) to the top hole in the Tongue Latch (9). Fully tighten the Bolt (29) and
Nut (30) holding the Hitch Tongue (10) in place-see Figure 6.
8. Attach the Wheel Axle and Tires by inserting the Wheel Axle (5) through the Wheel Axle
Support (4) and through the holes in the Hitch Tongue (10). Make certain that the axle is
centered in the Wheel Axle Support (4) with equal amounts of axle on each end-see
Figure 7.
90662 Page 4
90662-Trailer Cart.p65 10/28/03, 1:38 PM4
9. Slide the Tire Assembly (6) onto the Wheel Axle (5) with the tire’s valve stem facing outward,
slide on a Washer (26) and insert Cotter Pin (27)-see Figure 7.
10. Set the Hitch Pin Bracket (11) on the top of the Hitch Tongue (10). Line up two inside holes
in the Hitch Pin Bracket (11) with the back two holes in the Hitch Tongue (10). Insert a
Bolt (25) down through the Hitch Pin Bracket (11) and Hitch Tongue (10), slide on
Washers (23) and thread on Nuts (24)-see Figure 8. Repeat for second bolt. Slide the Hitch
Pin (28) down through the front hole in the Hitch Pin Bracket and through the front hole in the
Hitch Tongue (10). sert a Cotter Pin (27) into the Hitch Pin (28) to secure it in place-
see Figure 8.
Note: To release the Trailer Cart and any load it is carrying, pull back on the Tongue Latch (9).
Reset the Trailer Cart in place with the Tongue Support (3) resting on the Hitch Tongue (10)
and secured by the Tongue Latch (9).
Latch Spacer (8)
Latch Spring (7)
Latch Spring (7)
top view
Hitch
Tongue (10)
Hitch Tongue (10)
Tongue Latch (9)
Tongue Latch (9)
Figure 6
Wheel Axle (5)
Wheel/Tire Assembly (6)
Wheel/Axle Support (4)
Figure 7
Cotter Pin (27)
11. Turn the Trailer Cart over so that it is right-side up. Attach the Rear Corner Brackets (13) to
the Rear Cross Brace (12). Set the Rear Corner Brackets (13) into each corner of the Rear
Cross Brace (12) facing inward. Line up the two bottom holes in each Rear Corner
Bracket (13) with holes in the Rear Cross Brace (12). Insert a Bolt (21) into each of the
corner holes in the Rear Cross Brace (12), into the Rear Corner Bracket (13) through a
Washer (23) and secure with Nut (24)-see Figure 9.
90662 Page 5
underside view
Tongue
Support (3)
Hitch Tongue (10)
Make certain all persons and animals are clear of the Trailer Cart when the Tongue Latch (9)
is pulled.
Tongue
Support (3)
Tongue
Support (3)
90662-Trailer Cart.p65 10/28/03, 1:38 PM5
Hitch Pin Bracket (11)
Hitch Pin (28)
Hitch Pin (28)
Cotter Pin (27) Nut (24)
Bolt (25)
Washer (23)
Figure 8
12. Set the Rear Cross Brace (12) over the back of the Bottom Panels (1). Insert six Bolts (21)
down through the Rear Cross Brace (12) and Side Panels (14). Slide on Washers (23) and
secure with Nuts (24)-see Figure 10.
Rear Cross Brace (12)
Rear Corner Bracket (13)
Bottom Panel (1)
Figure 9
Rear Cross
Brace (12)
Bottom
Panel (1)
Rear
Corner
Bracket (13)
Bolt (21)
Figure 10
13. Attach the Left Side Panel (14) to the Bottom Panel (1). Set the Left Side Panel (14) against
the Bottom Panel (1) with the lip of the Left Side Panel (14) facing up. Insert a Bolt (21) into
each of the two (2) inside holes in the Side Panel (14), slide on Washers (23) and thread on
Nuts (24). Repeat for Right Side Panel (14).
14. Attach Rear Corner Braces (15) to Side Panels (14). Set the Rear Corner Brace (15) on the
inside corner of the Right Side Panel (14) so that the three holes in the Rear Corner
Brace (15) line up with the three holes in the Right Side Panel (14) and the two holes on the
Rear Corner Brace (15) line up with the two holes in the Rear Corner Bracket (13). Insert
two Bolts (21) through the Rear Corner Bracket (13) and Rear Corner Brace (15) and install
Washers (23) and Nuts (24). Insert three Bolts (21) through the Rear Corner Brace and
Right Side Panel (14) and install Washers (23) and Nuts (24). Repeat for Left Side Panel-
see Figure 11.
15. Set the Front Panel (16) on the Front Cross Brace (2) and between the Left Side Panel (14)
and Right Side Panel (14). Insert a Bolt (21) through each of the three holes on the Left
Side Panel (14) and Right Side Panel (14), and through the Front Panel (16) sides. Insert
Bolts through the six holes in the bottom of the Front Panel (16). Put on Washers (23) and
Nuts (24)-refer to Figure 12.
90662 Page 6
Hitch Tongue (10)
90662-Trailer Cart.p65 10/28/03, 1:39 PM6
Rear Corner Brace (15)
Bolt (21)
Nut (24)
Washer (23)
Figure 11
16. Set a Front Corner Brace (17) down onto each
corner where the Front Panel (16) and Side
Panels (14) intersect. Insert four Bolts (21)
through the Front Corner Brace (17) and lip of
Front Panel (16) and Right Side Panel (14) and
Left Side Panel (14). Secure with four Washers (23) and four Nuts (24)-see Figure 13.
Front
Panel (16)
Side Panel (14)
Bolt (21)
Figure 12
Front Corner Brace (17)
Front Panel (16)
Bolt (21) Front Corner Brace (17)
Figure 13
18. Put the Tailgate (20) into place on the Trailer Cart by lining up the two Tailgate Pins (19) with
the two holes on the Rear Cross Brace (12) and dropping them into place. The Tailgate
Latches (18) should be set onto the slots on the
Side Panels (14) -see Figure 14.
Tailgate Pin (19)
Bolt (21)
17. Attach the two Tailgate Latches (18) to the inside of the Tailgate (20) with two Bolts (21), two
Washers (23) and two Nuts (24). Insert the Tailgate Pins (19) up into the holes on the
bottom lip of the Tailgate (20). Slide a Washer (32) and a Nut (31) onto the threads of the
Tailgate Pin (19)-see Figure 14.
Figure 14-View of Inside Tailgate (20)
20
90662 Page 7
Right Side
Panel (14)
Use caution if towing the cart on an incline or uneven
surface. Be aware that the center of gravity can shift on a
slope, possible upsetting the cart. This Trailer Cart is not
designed for use on public highways. Always operate at
speeds below 5 MPH when performing off-road hauling.
Note: To release the Trailer Cart and any load it is
carrying, pull back on the Tongue Latch (9). Reset the Trailer Cart in place with the Tongue Support
(3) resting on the Hitch Tongue (10) and secured by the Tongue Latch (9).
Note: Before each use, check the Tongue Latch connection to the towing vehicle to insure
safe operation. Before each use, check the condition of the pneumatic tires (recommended 30 PSI)
Tailgate Latch (18)
90662-Trailer Cart.p65 10/28/03, 1:39 PM7
Part # Description Quantity Part # Description Quantity
1 Bottom Panel 2 17 Front Corner Brace 2
2 Front Cross Brace 1 18 Tailgate Latch 2
3 Tongue Support 1 19 Tailgate Pin 2
4 Wheel Axle Support 2 20 Tailgate 1
5 Wheel Axle 1 21 Truss Head Bolt (m8 x 16) 60
Unpacking
When unpacking your Trailer Cart, check to make sure the following parts are included. If any parts
are missing or broken, please call HARBOR FREIGHT TOOLS at 1-800-444-3353.
6 Wheel/Tire Assembly 2 22 Truss Head Bolt (m8 x 20) 2
7 Latch Spring 1 23 Lock Washer (8 mm) 72
8 Latch Spacer 2 24 Hex Nut (8 mm) 72
9 Tongue Latch 1 25 Hex Head Bolt (M8x 20) 10
10 Hitch Tongue 1 26 Flat Washer 26
11 Hitch Pin Bracket 1 27 Cotter Pin (3mm) 3
12 Rear Cross Brace 1 28 Hitch Pin (12.5 x 64) 1
13 Rear Corner Bracket 2 29 Hex Head Bolt (M6 x 90) 1
14 Side Panel 2 30 Nylon Nut 1
15 Rear Corner Brace 2 31 Hex Nut (6mm) 2
16 Front Panel 1 32 Flat Washer (6-8 mm) 2
Note: Some parts are listed and shown for illustration purposes only and are not available
individually as replacement parts.
PLEASE READ THE FOLLOWING CAREFULLY
THE MANUFACTURER AND/OR DISTRIBUTOR HAS PROVIDED THE PARTS DIAGRAM IN THIS MANUAL AS A REFERENCE
TOOL ONLY. NEITHER THE MANUFACTURER NOR DISTRIBUTOR MAKES ANY REPRESENTATION OR WARRANTY OF ANY
KIND TO THE BUYER THAT HE OR SHE IS QUALIFIED TO MAKE ANY REPAIRS TO THE PRODUCT OR THAT HE OR SHE IS
QUALIFIED TO REPLACE ANY PARTS OF THE PRODUCT. IN FACT, THE MANUFACTURER AND/OR DISTRIBUTOR EXPRESSLY
STATES THAT ALL REPAIRS AND PARTS REPLACEMENTS SHOULD BE UNDERTAKEN BY CERTIFIED AND LICENSED
TECHNICIANS AND NOT BY THE BUYER. THE BUYER ASSUMES ALL RISK AND LIABILITY ARISING OUT OF HIS OR HER
REPAIRS TO THE ORIGINAL PRODUCT OR REPLACEMENT PARTS THERETO, OR ARISING OUT OF HIS OR HER
INSTALLATION OF REPLACEMENT PARTS THERETO.
90662 Page 8
Maintenance
1. Check the tire pressure often. Make certain that PSI is at 30. A low PSI will force the user
to exert greater energy to move the Trailer Cart. Damage to the tires and wheels will
occur if the Cart is used below the recommended PSI.
2. Hubs and Wheels should be greased periodically.
90662-Trailer Cart.p65 10/28/03, 1:39 PM8
90662 Page 9
Assembly/Parts Diagram
90662-Trailer Cart.p65 10/28/03, 1:39 PM9

Other Harbor Freight Tools Outdoor Cart manuals

Harbor Freight Tools 42295 User manual

Harbor Freight Tools

Harbor Freight Tools 42295 User manual

Harbor Freight Tools 60570 Assembly instructions

Harbor Freight Tools

Harbor Freight Tools 60570 Assembly instructions

Harbor Freight Tools 58473 Assembly instructions

Harbor Freight Tools

Harbor Freight Tools 58473 Assembly instructions

Harbor Freight Tools 90614 User manual

Harbor Freight Tools

Harbor Freight Tools 90614 User manual

Harbor Freight Tools BIGFOOT Assembly instructions

Harbor Freight Tools

Harbor Freight Tools BIGFOOT Assembly instructions

Harbor Freight Tools Pittsburgh 614405 Assembly instructions

Harbor Freight Tools

Harbor Freight Tools Pittsburgh 614405 Assembly instructions

Popular Outdoor Cart manuals by other brands

Makita DCU602 instruction manual

Makita

Makita DCU602 instruction manual

Black Stone 2193 owner's manual

Black Stone

Black Stone 2193 owner's manual

Jetson Crush JSCKRT-BLK manual

Jetson

Jetson Crush JSCKRT-BLK manual

Vivo STAND-TV02D instruction manual

Vivo

Vivo STAND-TV02D instruction manual

Seville Classics SHE16210 Assembly instructions

Seville Classics

Seville Classics SHE16210 Assembly instructions

Winsome 82027 R4 quick start guide

Winsome

Winsome 82027 R4 quick start guide

Mopec DB Series Reference manual

Mopec

Mopec DB Series Reference manual

Drive Oxygen cylinder cart quick start guide

Drive

Drive Oxygen cylinder cart quick start guide

Gardena 232 Assembly instructions

Gardena

Gardena 232 Assembly instructions

Storz UG 130U instruction manual

Storz

Storz UG 130U instruction manual

Balt 89819 Lap-JR Assembly instructions

Balt

Balt 89819 Lap-JR Assembly instructions

Viatek ADJCART01 instructions

Viatek

Viatek ADJCART01 instructions

italor Carrito Galaxy Assembly instructions

italor

italor Carrito Galaxy Assembly instructions

Songmics VASAGLE LRC78 manual

Songmics

Songmics VASAGLE LRC78 manual

Rubbermaid M38 user manual

Rubbermaid

Rubbermaid M38 user manual

Magliner 4-WHEEL ARISTOCART Assembly instructions

Magliner

Magliner 4-WHEEL ARISTOCART Assembly instructions

Gorilla Carts GOR2530-D owner's manual

Gorilla Carts

Gorilla Carts GOR2530-D owner's manual

Hupfer TTW/V operating instructions

Hupfer

Hupfer TTW/V operating instructions

manuals.online logo
manuals.online logoBrands
  • About & Mission
  • Contact us
  • Privacy Policy
  • Terms and Conditions

Copyright 2025 Manuals.Online. All Rights Reserved.